Luthier Dave Helmer shows you how to cure buzzy strings, bad intonation, gnarly frets, high action, and other common troubles with off-the-shelf axes.
Guitars are the best. We love them. It’s fun to fall in love with a guitar at a store, buy it, and proudly bring it home. But we’ve all been there … where after a month that new guitar is just not playing as good as it was before. As guitar players, we know what feels good and what feels bad when it comes to playability. Maybe you have setup preferences that you like on all your guitars, or maybe you want to experiment with changes to your setup?
With a few tools, you can perform a handful of tasks that will make your new axe play better and stay in tune. This article is for folks who already know how to tighten loose parts, raise and lower string saddles or bridges, and adjust their truss rods—though I’ll share a tip on how to check it with even more accuracy.
Is that big bulky stock nut uncomfortable on your hand? Let’s trim it down and reshape it. If the action feels high and the neck looks straight, I’ll show you how to lower the action. And haven’t we all swapped out pickups and wondered, “Do they really sound better, or do I think that just because they’re new?” Before you swap your pickups, I’ll share some pickup-height measurements that might make you change your mind.
But wait! There’s more. With everything feeling and playing great, does moving into the upper register start to sound out of tune? Intonation is very easy to check and adjust. When you go to vibrato or hold a note, do the frets feel “sandy”? Are the fret ends rubbing against your hand while you play? Let’s flush and polish those up.
To be clear, we’re not swapping out anything on your new guitar: We’re simply refining the setup. Be sure to go online to see eight videos I made showing various processes covered in this story.
Begin the Beguine
There is an order of operations for best results. Neck relief is the first item to dial in, followed by getting the nut slots cut to the proper depth. After that, setting your string and pickup heights is in order. The final step is setting intonation.
Fret polishing is its own event and can happen anytime between string changes. Getting the frets feeling comfortable and well-polished will take some time and attention. You’ll also need some specialized tools as well as some that can be found in most households. Check the box for my list.
Tools You’ll Need
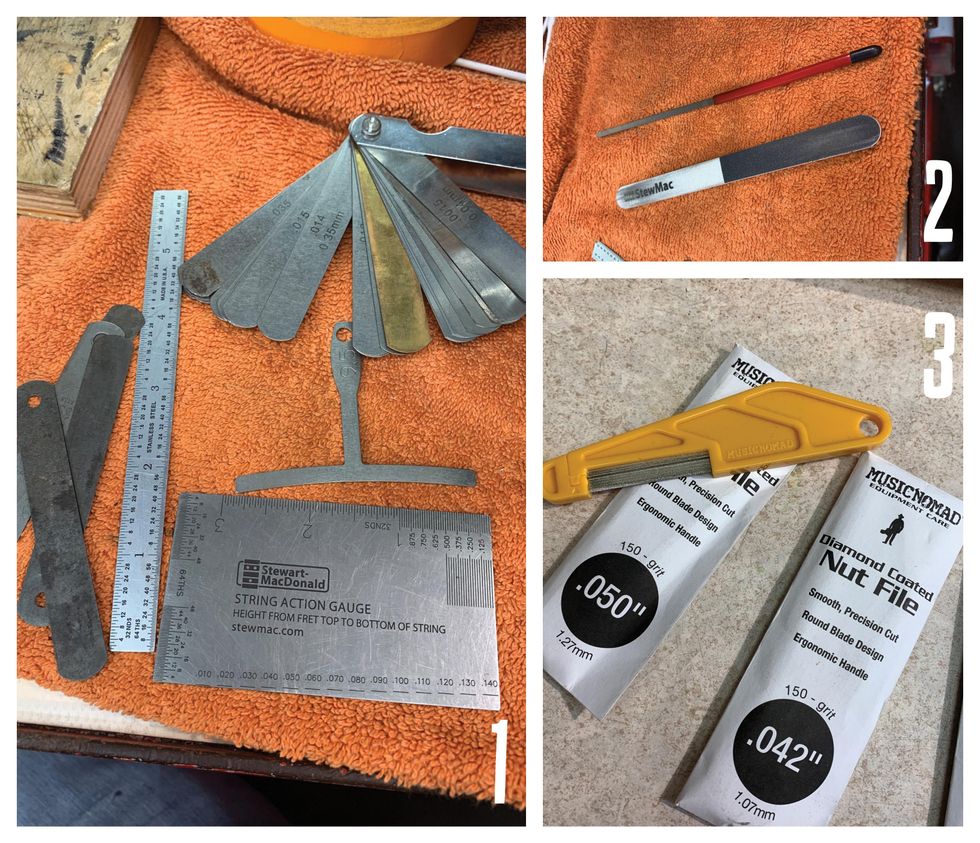
All of the specialized tools in this list are available through online suppliers, including StewMac and Amazon.
- 6" Ruler with measures in 64ths
- String action gauge [Photo 1]
- Miscellaneous screwdrivers
- Allen wrenches
- Radius blocks
- Understring radius gauges (with the radius on the bottom and the top)
- Fret-end dressing file
- Micro-Mesh sticks [Photo 2]
- Tape (low tack)
- Cotton swabs
- Paper towels (blue shop towels preferred)
- Clean cotton rags
- Nut files [Photo 3]
- Stikit sandpaper
- Tri-Flow lubricant
- Capo
- Feeler gauges
- Simichrome polish
Polishing the Frets
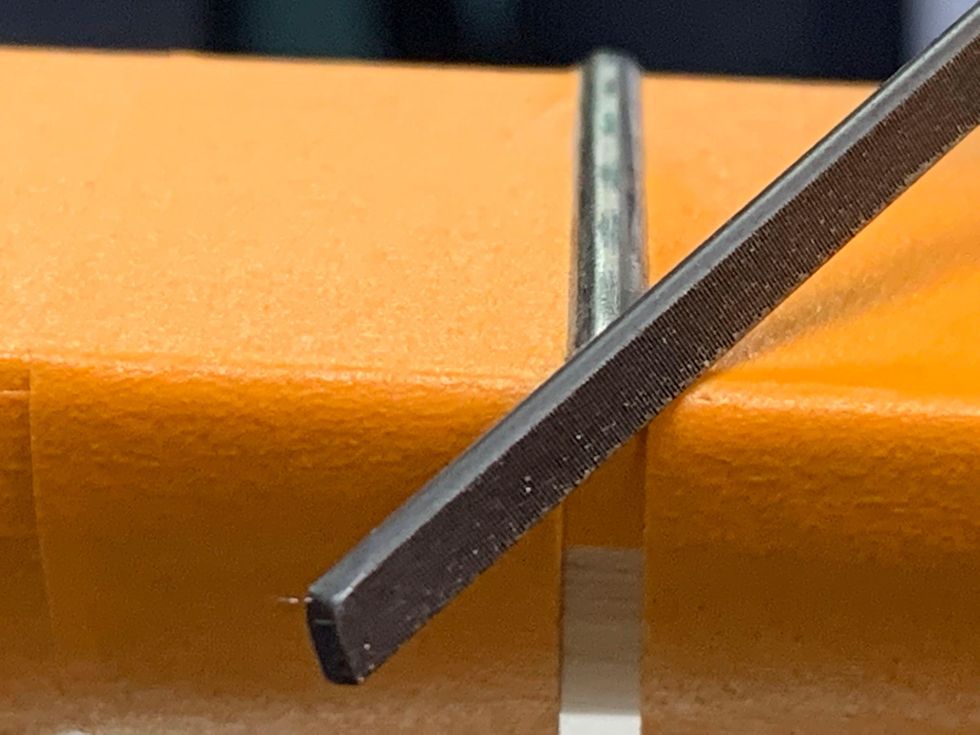
Photo 4
Let’s start with the most Zen of these tasks: fret polishing.
Tape off the fretboard using low-tack tape, exposing only the frets. De-tack each piece of tape on your clothing or maybe a rag—I use my jeans or my sweatshirt. Making it less sticky helps prevent pulling finish off a maple fretboard or the neck. Taping the fretboard also prevents putting any cross-grain scratches into it while you file and polish. You can choose to tape off the entire fretboard or work your way down one fret at a time. Dealer’s choice.
One thing to note about tape, any tape: Even when you de-tack it, you do not want to leave it on overnight. If that happens, rub the tape with your finger, which will break the surface tension. Then carefully pull the tape off from a corner, making sure you’re pulling it off at an angle and not at a straight line with the fretboard edge.
Every fret end has a small burr on the corner from the initial fret job. The fret-end dressing file has a non-marring smooth side for rounding the fret end, and a safe square edge for getting into the corner of the fret end. So, take the fret-end dressing file, use the squared off-side, and file both corners of the fret end [Photo 4].
How to Polish Frets
Here’s how easy it is to polish and smooth frets.
One or two strokes is all you’ll need. Then, using the non-marring side of the file, slightly round off the fret ends.
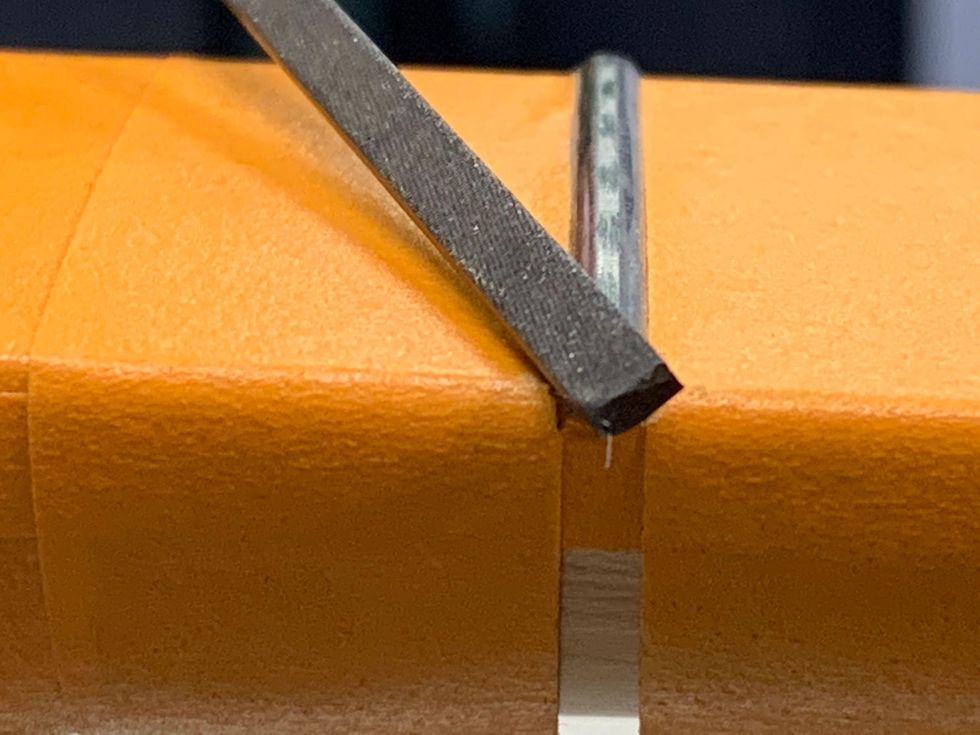
Photo 5
With the file positioned vertically, file downward to make the fret end flush with the edge of the fretboard.
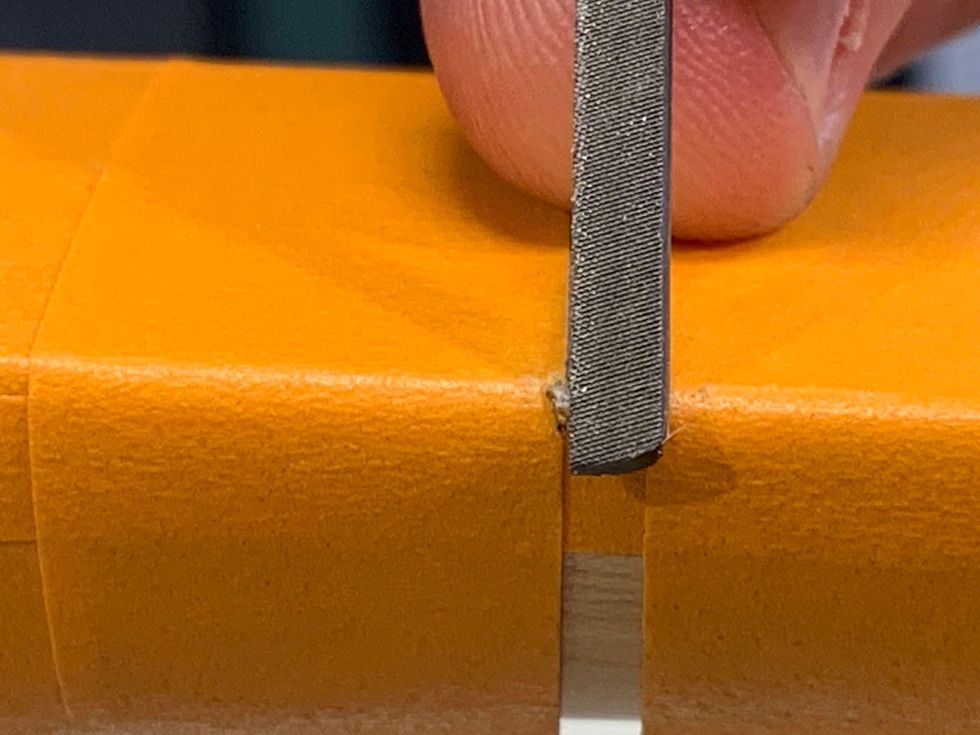
Photo 6
For a nice, rounded-off look, polish the frets using the same rounding motion from the previous step, working through all three grits of the Micro-Mesh stick.
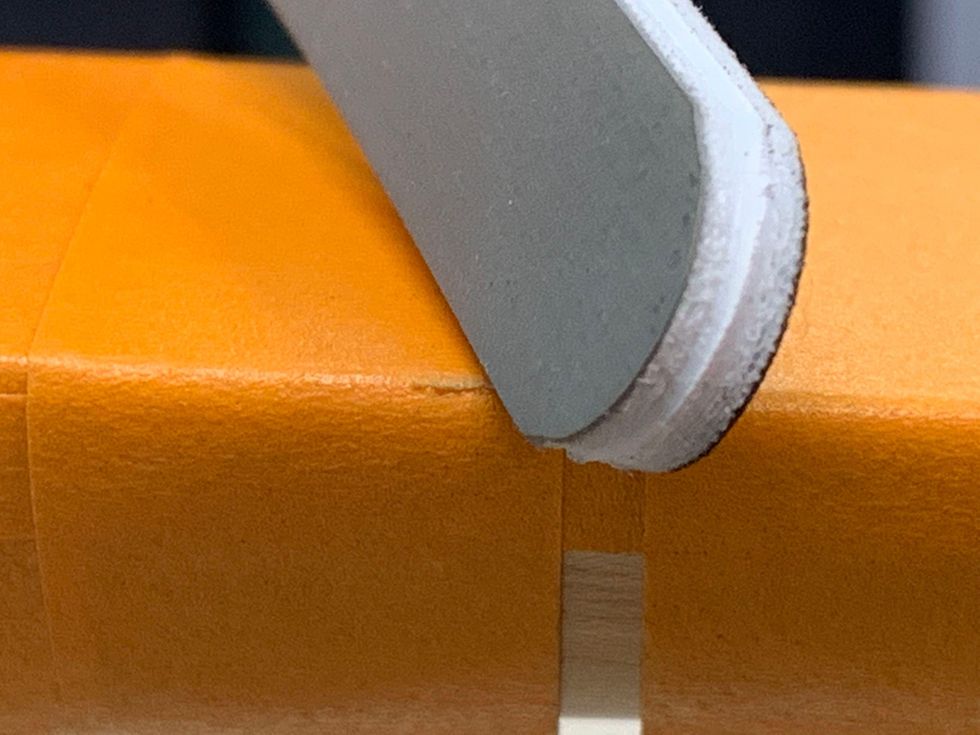
Photo 7
Then, polish both the sides and the top of the frets.
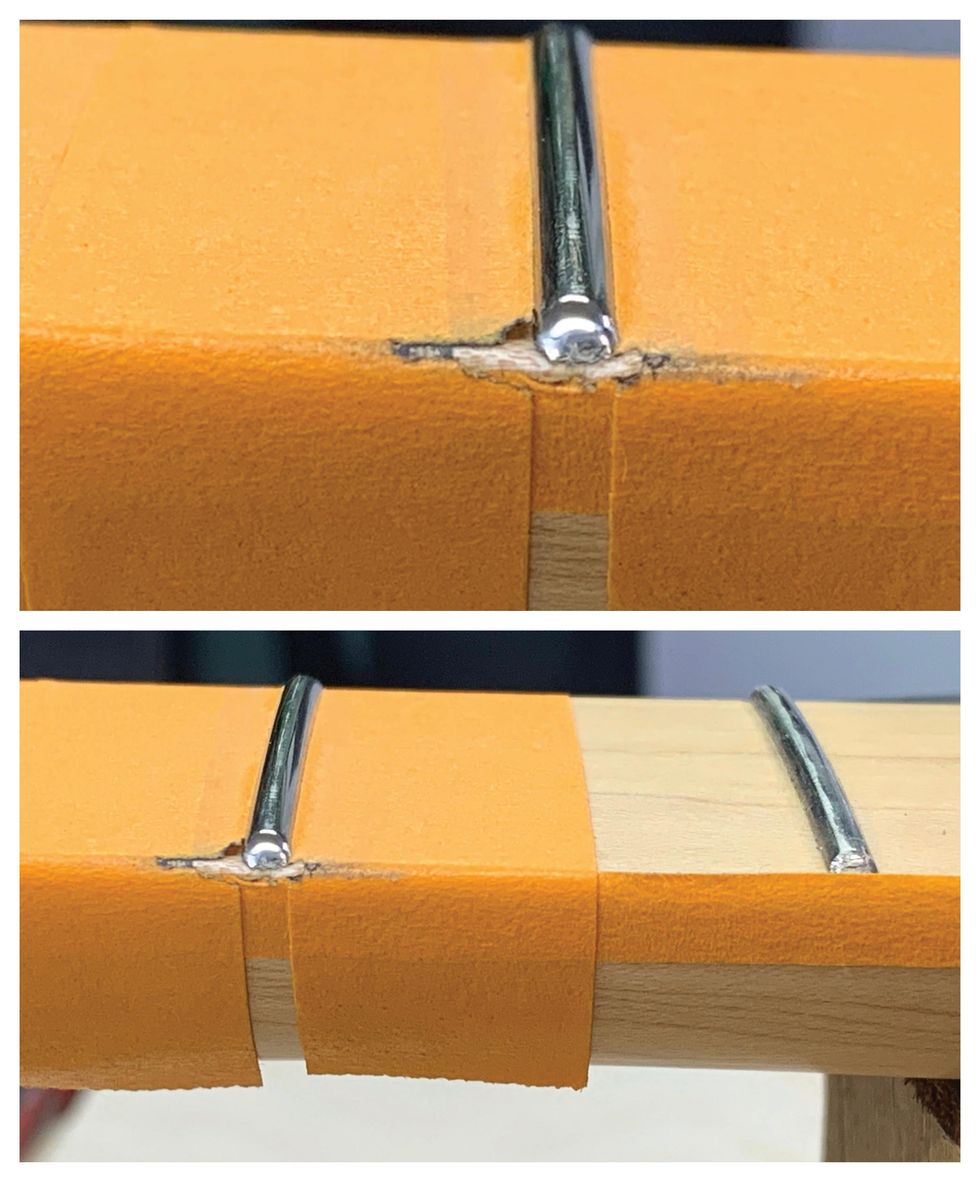
Photos 8 (top) & 9 (bottom)
Using a soft cloth and Simichrome, buff every fret. This will give you a great shine and help prevent oxidation. Now it’s time to remove the tape and condition the fingerboard if it needs it.
Note: Every fret has two fret ends to clean up and polish along with the fret itself. This is a fair amount of handwork. If you’ve never done it, you will get tired and need a break. Take that break. Take multiple breaks. Let the process take however long it requires without rushing. If you’re new, do all the fret polishing over a weekend or a few days. It should be fun, not painful. If it is difficult, call your local luthier and hire them to do it for you.
Adjusting Neck Relief
Photo 10
Neck relief refers to the slight amount of concave bowing intentionally created in the neck of a guitar or bass by adjusting the truss rod. For the safety of the guitar, be sure to slack the strings before doing any adjustments to the truss rod. Neither you nor your guitar needs to be tense during this process.
Before whipping out an Allen wrench for the truss rod, start by sight-checking the neck’s straightness. You can sight the neck with the guitar on its back, but I like to put it on edge and look at it that way. It’s easier to see how much curve there is when the guitar is on its side. I feel like gravity plays tricks on my eyes when I sight the neck with the guitar on its back. When I play the guitar, it’s on its side anyway, so looking at it from this vantage point is best.
Tune the guitar to pitch, put a capo on the first fret, and press fret 15 with your left hand.
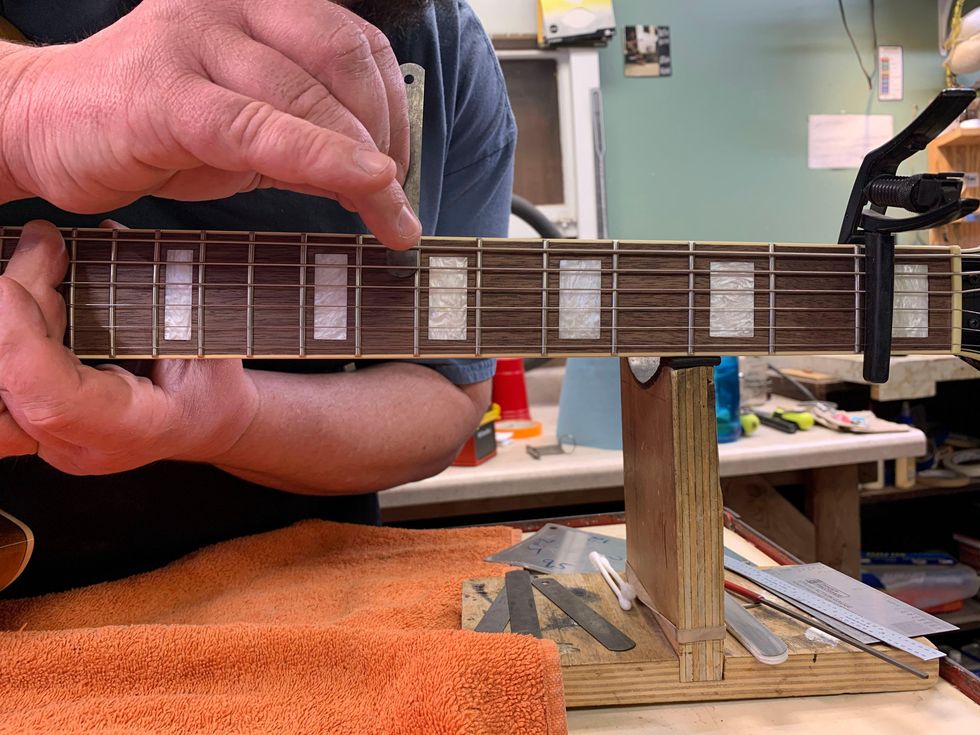
Photo 11
With your right hand, take a feeler gauge and check the gap at frets 7 through 9 (left-handed players, flip your hands around) [Photo 11].
From the top of the fret to the bottom of the string, the gap is usually anywhere from .003" to .012", depending on the feel you are going for. The feeler gauge should fit just between the top of the fret and the bottom of the string. The string shouldn’t move. This will tell you how much “relief” is in the neck. If you find this challenging, keep going—this will take some practice.
When dialing in the relief, I go back and forth between adjusting the truss rod and the string action. Getting the strings low and playing clean on a budget axe can be a challenge. Usually the fretwork isn’t that great, and in the upper register the frets can be unlevel, causing buzzes and clanks. If you need to raise the string action to get the notes to play clean, some fret leveling may be in order. (For more on fret leveling, go online to our article “About Fret Leveling,” from the December 2007 issue.) For good energy transfer, the neck should be as straight as possible. If the neck is straight and the frets are not level, the strings will buzz with low action.
In general, the flatter the radius on the fretboard, the straighter you can get the neck with the truss rod adjustment. On a fretboard with a 12" radius, you should be able to get .005" relief, and on a vintage 7.25" radius board you may need as much as .014" relief. The only way to get better at checking and setting relief is practice.
Refining the Nut
String buzzes, pinging noises when you tune, strings sticking in the slots, and too much string motion in the nut slots are all indicators of trouble. Before getting out the sandpaper and Micro-Mesh sticks, be sure you know if your guitar’s nut is TUSQ or bone. TUSQ is softer, so you should leave TUSQ nut slots a little higher. This leaves room for the TUSQ to wear without causing buzzing on the first fret. With bone, you can cut the slots lower, because it holds up to string wear.
How to Shape Your Guitar's Nut
Watch as Dave Helmer sands down the back half of a nut and creates a smooth finish.
The back side of the nut is usually very bulky and could often stand to lose some material to be more comfortable on your hand. So, let’s start there. Tape off the neck and headstock around the nut using a few layers of tape to protect the headstock face and fretboard. Then, slack the strings and pull them to either side of the nut.
Sand a bevel into the backside—the side closest to the headstock—of the nut using P320 and P400 grit Stikit sandpaper on a flat sanding stick.
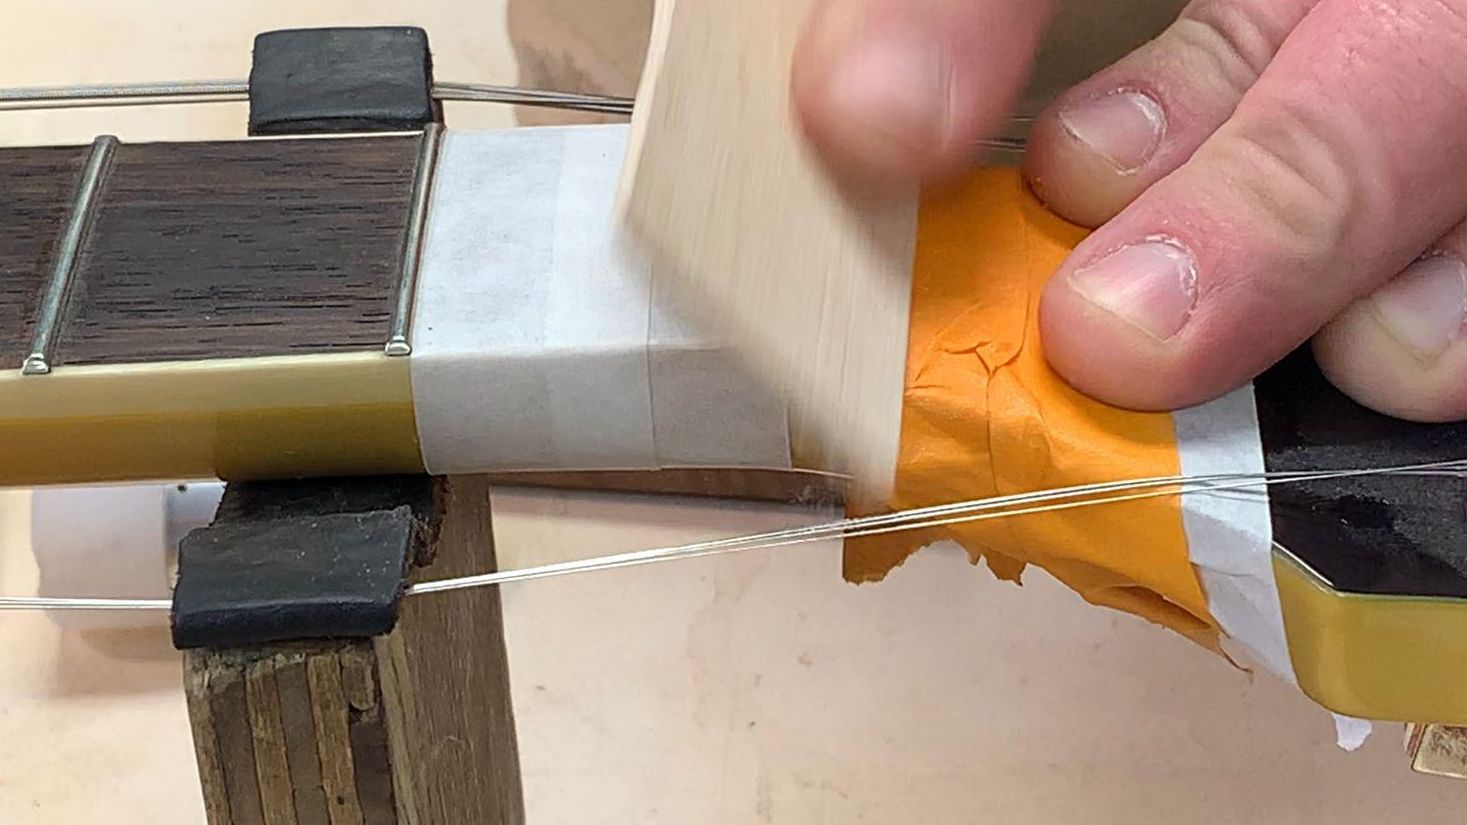
Photo 12
The bevel should start at the back of the nut and come forward about one-third to one-half the thickness of the nut [Photo 12]. Use P320 for most of the sanding and switch to P400 for the last 5 to 10 strokes.
Next, take a fresh Micro-Mesh stick and work through the various grits to buff/round over the bevel you’ve sanded into back of the nut, so it looks and feels good.
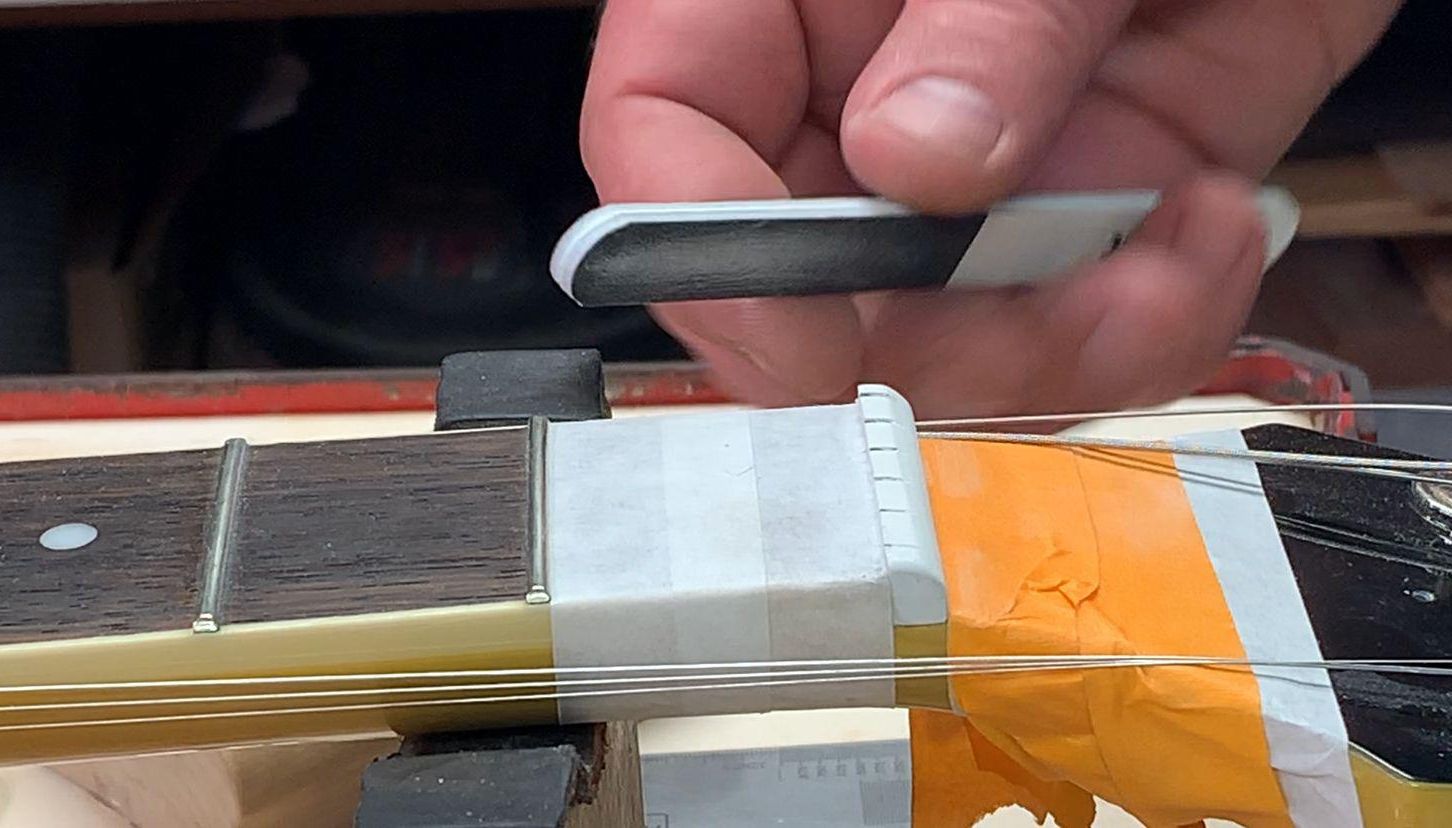
Photo 13
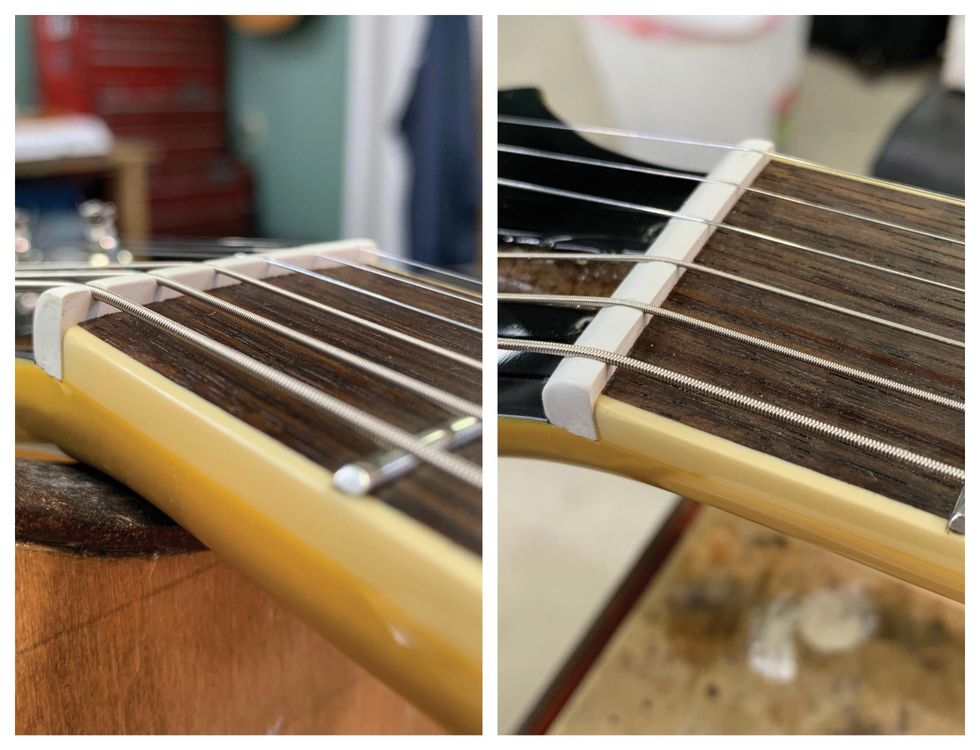
TUSQ nuts are often tall, and the strings sit deep in the slots.
Photos 14 (left) & 15 (right)
Wound strings require 50 percent of the diameter of the string to sit in the nut slot, with the other 50 percent above the top of the nut surface. The plain strings should be flush with the top of the nut. Take a look at the wrong appearance [Photo 14] and the correct look [Photo 15] for properly seated strings.
How to Sand Your Guitar's Nut
Our luthier shows you how to use a radius block and sand down a nut.
Use a radius block that matches the radius of your fretboard.
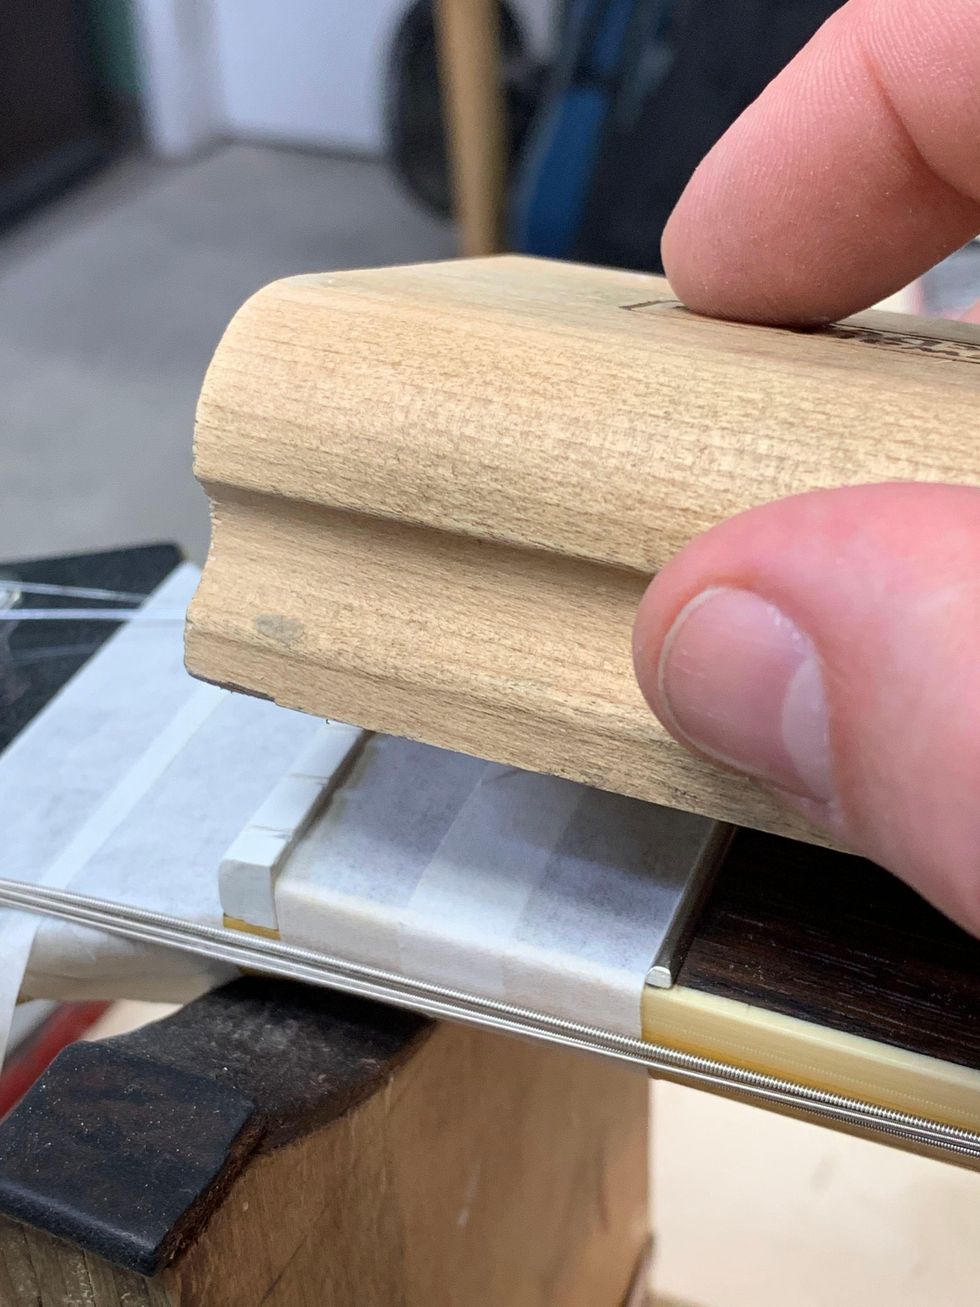
Photo 16
With P320 and P400 grit Stikit sandpapers, use mild pressure to sand down the top of the nut. Sand a bit and check your progress by setting the strings in the slots and putting a little tension on them. Tuning to pitch isn’t necessary. Use the P320 for most of the sanding, and switch to P400 when you are close to the 50/50 height for the wound strings. The radius block sanding will leave a flat, sharp edge on each side of the TUSQ nut [Photo 16]. To round over the sharp edge, use the sanding block and Micro-Mesh stick.
Use the coarse grit of a Micro-Mesh stick to round over and blend the bevel from the back into the top of the nut. Work through the grit gauges until it’s smooth. There is a fine balance between the bevel at the back of the nut and the top radius of the nut. Go back and forth between the two steps to get a nice, finished look and a nut that functions at optimal levels.
… And Refining the Nut Slots
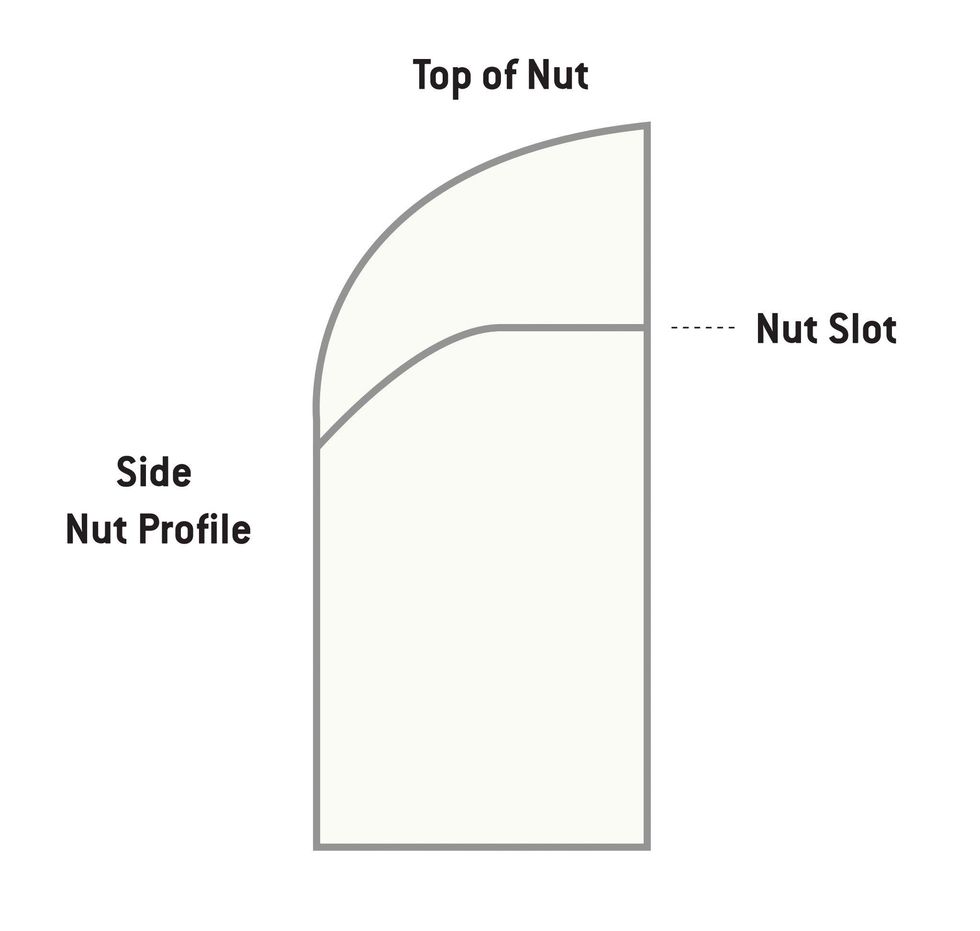
Photo 17
Nut height is the distance from the top of the first fret to the bottom of the string. A good height on the wound strings is about .020", and for the plain strings about .015". Measuring this gap with a feeler gauge can be tricky because of the fretboard radius. Many repair folks do this by eye and feel, based on experience. It takes some practice. A good check: At pitch, fret the third fret and check for a small gap between the string and the top of the first fret.
How to Widen Your Guitar's Nut Slots
A diamond file can make quick work of deepening and widening nut slots.
The bottom of the string should be sitting on the bottom of the front half of the nut slot [Photo 17]. File down each nut slot to its proper depth using the corresponding nut file. There are diamond nut files on the market in multiple sizes to accommodate many string gauges. Make sure to keep your strokes straight. The standard-toothed files have less sizes and usually require rolling them from side to side to get a well-fit string.
Next, using a proper-sized file, round over the bottom back half of the nut slots down, toward the face of the headstock and away from the strings. This will allow the strings to move freely during tuning or bending, while still having support from the front half of the slot.
How to File D and G String Slots on Guitar
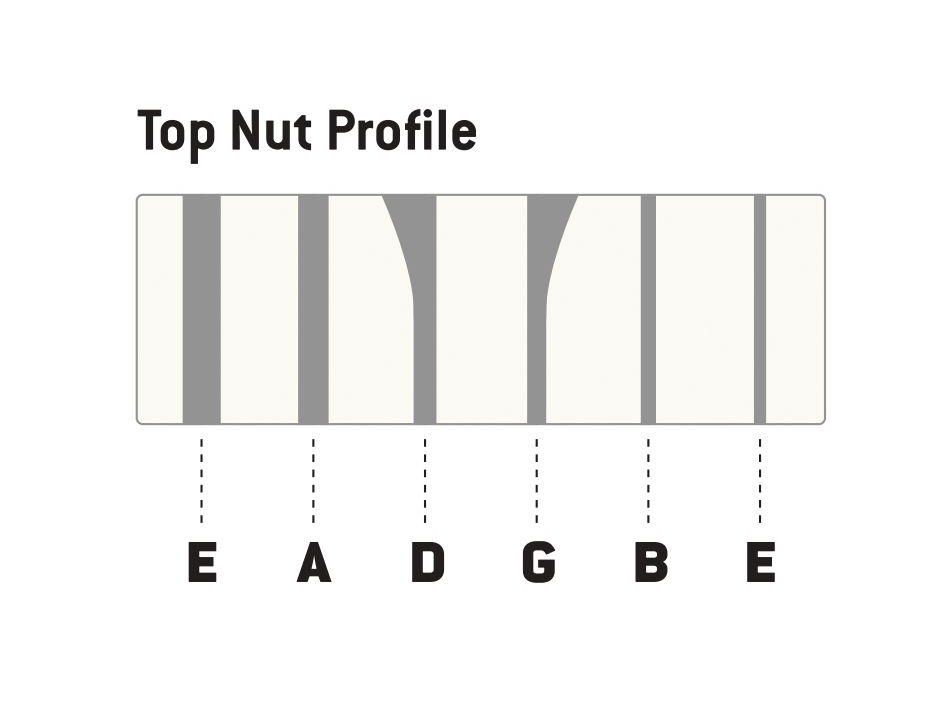
Photo 18
On guitars with 3x3 headstock configurations, the D and G strings need the back half of the slots feathered out away from the center, so the string has a direct path to the tuner post. Using a file that is one size bigger than the string and rolling it side to side on the back of the nut slot will give the string a straight path to the tuner post. Photo 18 is my illustration showing which slots need feathering.
Watch How to File D and G String Slots on Guitar
The D and G nut slots require special attention on 3x3-style headstock configurations.
Additionally, use pencil lead to lubricate the slots. Just get in there with the point of a pencil and mark the slot with its graphite. You might also put a drop of Tri-Flow on the front of the string tree. Tri-Flow will run down the string, so take a cotton swab or cloth to clean up any excess. Tri-Flow has Teflon in it, so you don’t need much.
Adjusting String Action
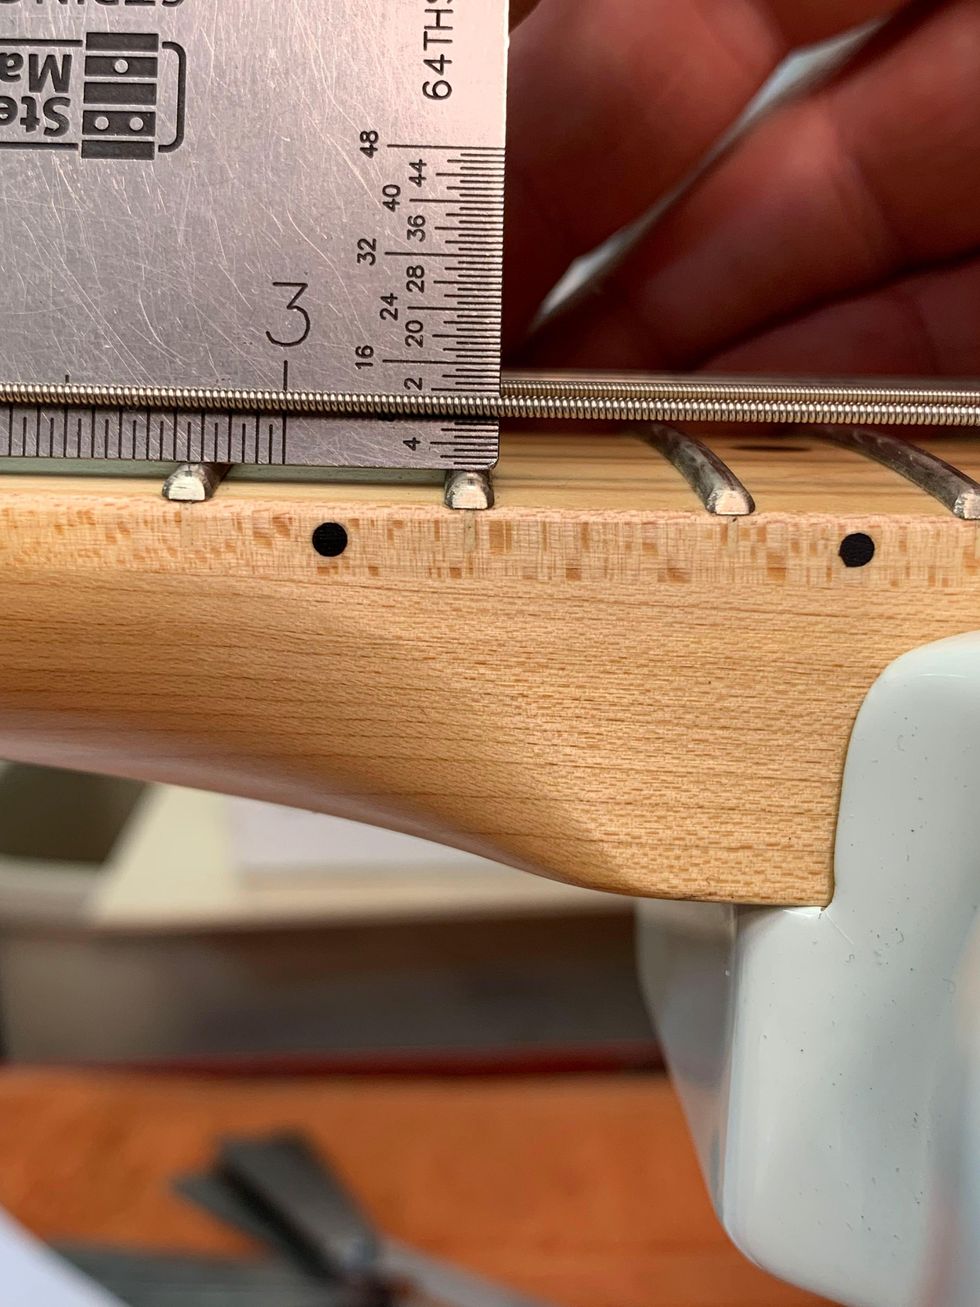
Photo 19
First, find your string height by measuring the string action at the 17th fret on a Fender-style guitar and at the 15th fret on a Gibson-style instrument.On electric guitars, action can range from 3/64" to 3/32", depending on the player’s comfort. My preferences are 1/16" on the treble side and 5/64"on the bass side on both Fender- and Gibson-style guitars measured at the appropriate fret.
How to Adjust Guitar Action
Here’s a look at how our author adjusts the action.
Always loosen the string tension before making action adjustments. This will save wear and tear on the small bridge components. Take either a 6" ruler or a string action gauge and set it on the frets. Measure from the top of the fret to the bottom of the string [Photo 19].
If the action is high, you will lower that string’s saddle or that side of the bridge. If it is low, you will raise it. Make sure the individual saddles are sitting square and upright to the face of the bridge. You do not want them sitting at an angle or leaning over. This will cause buzzing.
The bottom of the strings should match the radius of the fretboard when measured with an understring radius gauge.
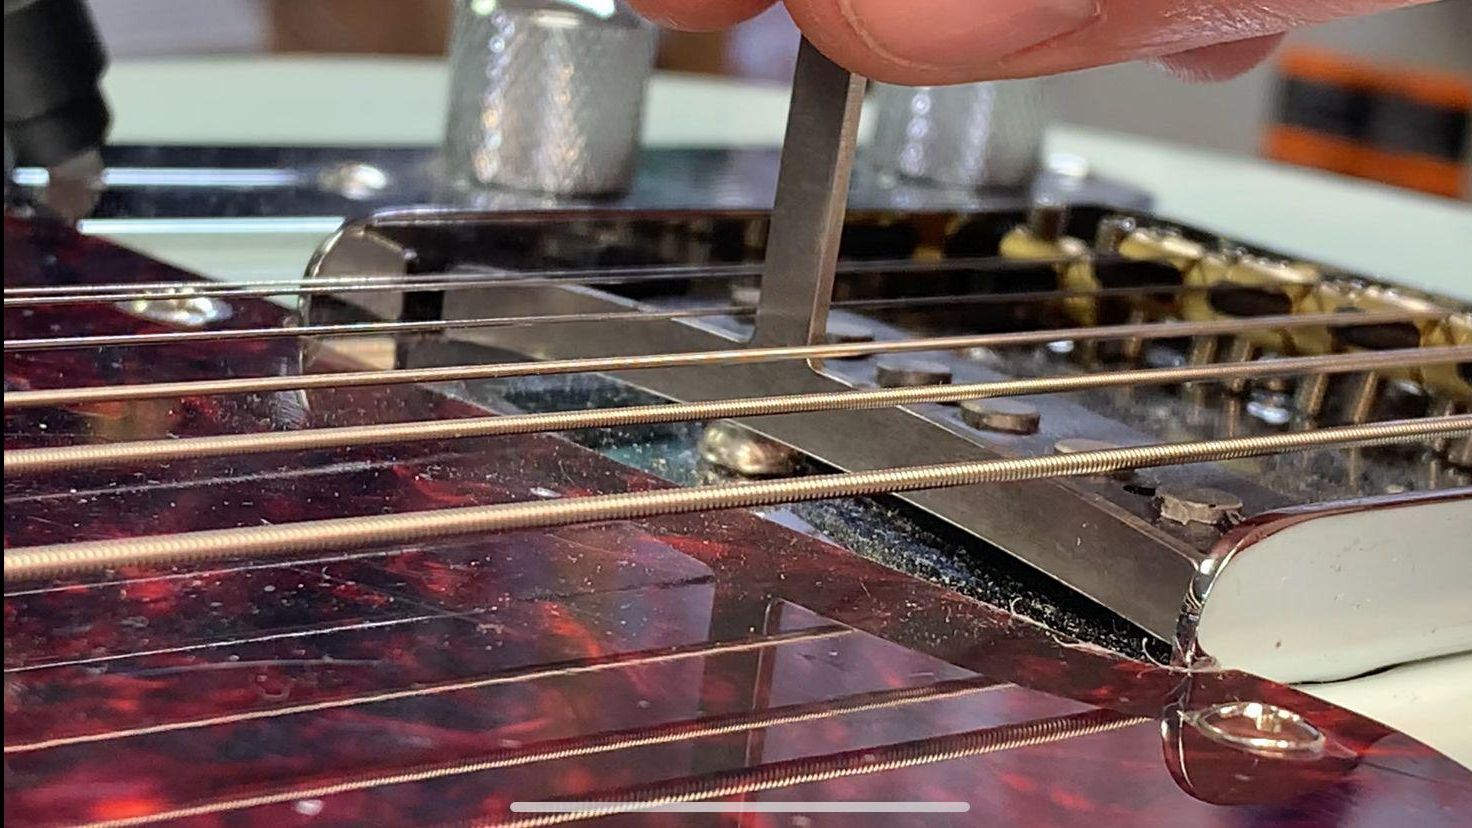
Photo 20
Start your adjustment with the outside strings, working toward the center. On Fender-style guitars, set the two outside strings to the height you want and have the middle four strings a bit higher than that. Bring the gauge up from underneath and just touch the two outside strings. Then, bring the strings down a little at a time until the radius matches.
On a Gibson-style Tune-o-matic, the saddles are not individually adjustable. So, if the radius doesn’t match, the saddles will need to be filed. To do this, I recommend using toothed nut files and a rolling side-to-side motion. Do a little work and check your progress. Remember to slack your strings when adjusting the saddle or bridge up or down.
Changing Pickup Height
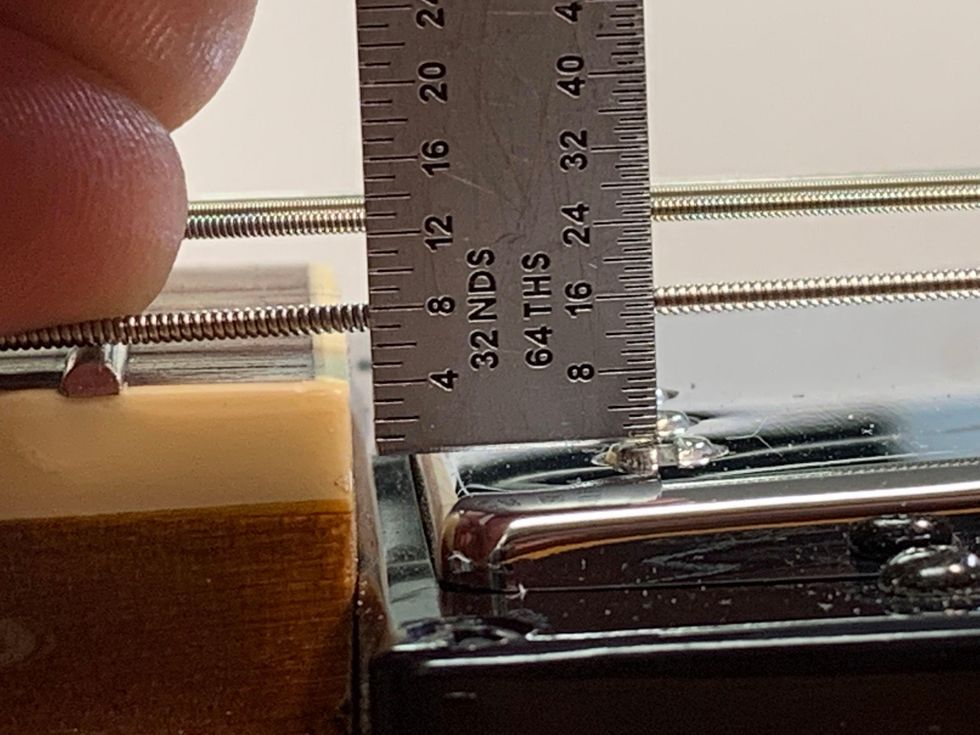
Photo 21
Finally, let’s take a look at pickup-height adjustment. First, to check pickup height, use the two outside strings again. Press the top wound string on the last fret and measure the distance from the top of the pole piece to the bottom of the string [Photo 21]. This distance can range from 3/64" to 1/8". My preferences are 1/16" on the treble side and 5/64" on the bass side.
Adjusting Guitar Pickup Height
Dave Helmer walks you through the process of adjusting the height of your guitar’s pickups.
On most styles of pickups, there are height adjustment screws on either side of the pickup to raise or lower it. The closer the pickup gets to the strings, the more present string frequencies become. If you get too close, the magnetic pull can affect the string’s vibration and you may hear some strange sounds as you go into the upper register.
On Strats, the neck pickup is regularly set too close, and at the 12th fret and above, the low E and A can sound choked, honky, and not clear. Lowering the neck pickup with a screwdriver usually solves this issue.
Setting Intonation
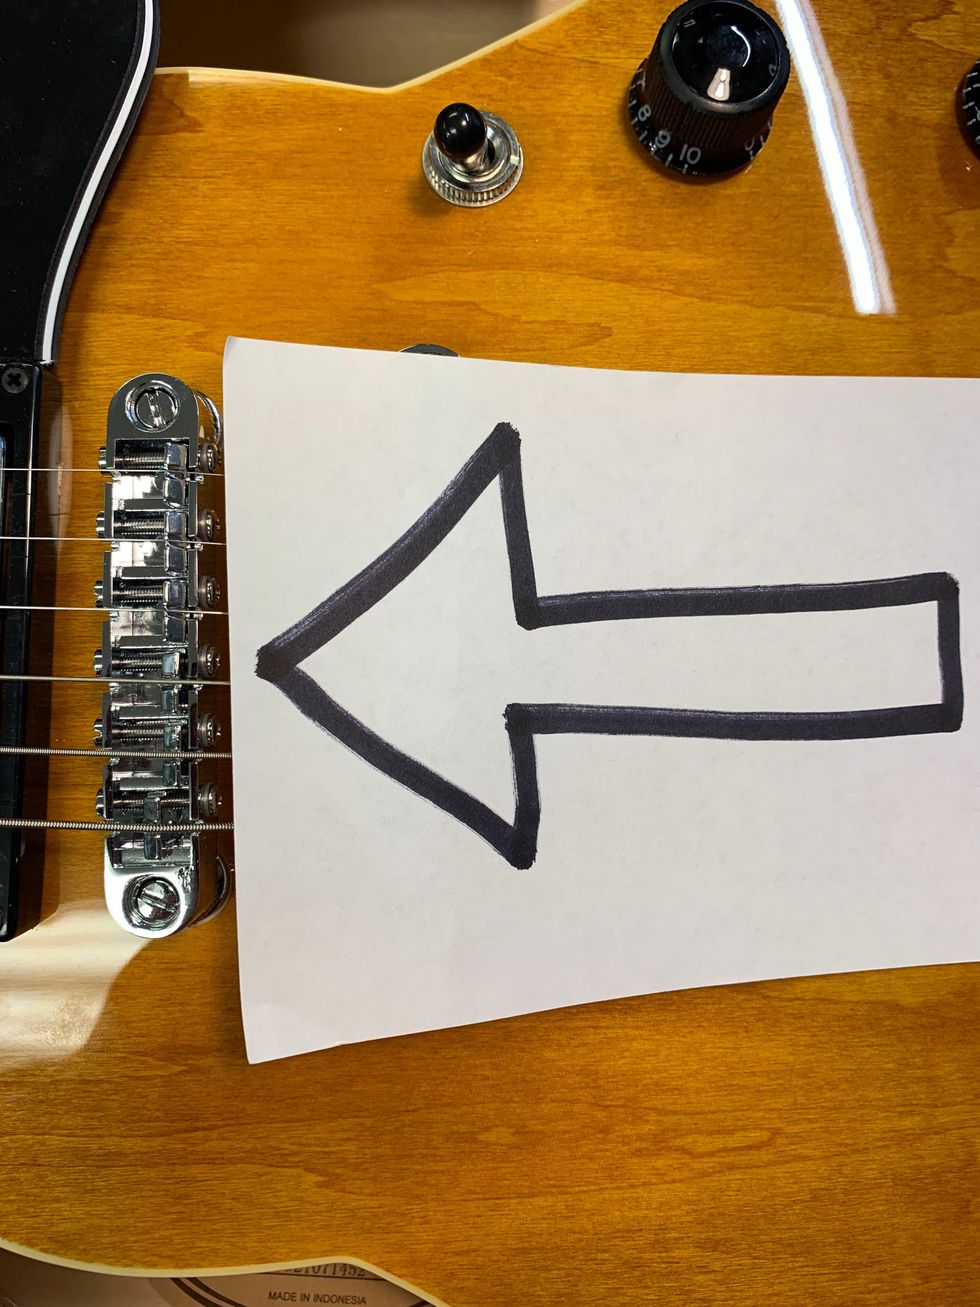
Photo 22
If you can’t get your guitar accurately in tune, you might need to check its intonation. Adjust all saddles as far back as possible so every string will play flat at the 12th fret. You will adjust the saddles forward, gradually making the octave play sharper until it’s in tune with the open string [Photo 22].
Adjust Your Guitar's Intonation
With a tuner and a screwdriver, Dave Helmer shows you how to adjust your guitar’s intonation.
Depending on your vibrato style, experiment with intonating the plain strings slightly flat. Use your ear and do what sounds good. Sometimes, the plain strings can have perfect intonation, but playing with vibrato can make them sound sharp.
To fine-tune intonation, the individual bridge saddles must be adjustable. Once the intonation is set, recheck the string radius using the understring radius gauge and adjust as needed. The radius can change as the saddles come forward during intonation.
Tri-Flow is great for lubricating saddle parts. Put a small drop on the saddle-height adjustment screws and capillary action will suck it in. Adjust the saddle up and down a few times to coat the threads. Clean up any excess with a cotton swab or cloth. Put a drop or two onto a cotton swab and apply the Tri-Flow to the top of each saddle where the string rests. This will help strings move freely during tuning and after any bends or vibrato.
And that’s it! For a relatively small investment in tools and time, you’re now ready to supercharge your new guitar—and maybe your long-treasured axes, too.
- DIY: How to Set Up a Fender Stratocaster - Premier Guitar ›
- 12-String Setup Secrets - Premier Guitar ›
- DIY: How to Set Up and Intonate an Acoustic Guitar - Premier Guitar ›
- Reader Guitar of the Month—Pickups and Finishes - Premier Guitar ›
- DIY Guitar: 7 Cool Reader Mods - Premier Guitar ›
Advanced
Intermediate
- Learn how to incorporate open strings all the way up the fretboard.
- Build velocity in your playing without practicing speed exercises.
- Discover an easy way to steal licks from the pros using YouTube.
It’s universally known in the guitar community that Brad Paisley isn’t just some guy that strums a guitar and sings country songs. He’s widely respected as one of the best players in the country music scene and takes an unusual approach to achieve the sonic insanity that spills out of his guitar. From Telecasters, G-benders, and cranked Dr. Z amps to instrumental records and wild guitar solos getting mainstream country radio airtime, Paisley has solidified his place in the discussion of all-time greats, and not just in the country world. In this lesson, we’ll dive into one of the cornerstones of Brad’s playing that makes him so unique: open strings.
A couple of prefaces:
Most of the licks in this lesson are exponentially easier when hybrid picked.
And in case you didn’t know, YouTube allows you to alter the speed of videos. This is a massive tool to take advantage of when learning licks, practicing them, and getting them up to speed. Simply click the Settings button in the bottom right corner of the video player and select Playback Speed. This will allow you to speed up or slow down the video to your liking without any changes to pitch. Transients will become an issue the farther away from the original speed you go, but not enough to keep you from slowing a solo down 50 percent to really learn and nail the nuances.
We’ll start by just dipping a toe in the water for Ex. 1, looking at a small part of the solo from Brad’s song “Ticks.” This section is found at the 3:06 mark of the video below. Brad really likes to use open strings to provide color to licks, usually with the note falling outside of the established scale. This little nugget is entirely in the E major scale (E–F#–G#–A–B–C#–D#) with exception of the open 3rd string. The use of the open string throws a b3 into the mix, while making it feel faster with little added effort. If you were to play this lick at half speed, the open G string does not sound great—but that’s the whole idea behind what Brad is able to do with open string licks. At tempo, the open string sounds like a natural inflection and the lick has more velocity than if it were omitted.
Ex. 1
Ticks
In Ex. 2 we’re still looking at the “Ticks” solo but focusing on the back half. This entire section of the solo is a smorgasbord of open strings. The first phrase uses sliding and open strings to create an almost bouncy and circus feel. The use of the open G string allows Brad to travel up the fretboard with some very interesting flair. Then he uses the open 1st string in measure 2 to create momentum again, but in this instance, the open-string pull-offs fall inside the E major scale rather than acting as color tones. It’s much easier to connect this section of the lick to the previous by using the third finger to execute the bend and the fourth finger to start the new descending phrase. Lastly, Brad takes the solo home with a simple descending three-note-per-string pull-off lick that combines inside and outside notes.
Ex. 2
If you’ve ever listened to Paisley’s “Time Warp,” you know that it’s a gold mine of licks to steal. In Ex. 3, I’m focusing on a lick Brad plays on the “Live on Letterman” version, which occurs after the piano solo at the 1:23 mark in the video below. It’s worth noting that this is not the same line featured on the album version from Time Well Wasted. This lick is a perfect example of how Brad uses open strings to create velocity and really get going downhill at breakneck speeds. The lick is not overly complicated, but it is extremely fast, especially if you are new to hybrid picking. I’m playing it at roughly 75 percent speed so that the notes are intelligible and not just a blur. The lick is mostly based in the A Aeolian mode (A–B–C–D–E–F–G), with flatted second being the exception.
Ex. 3
Brad Paisley - Time Warp (Live on Letterman)
In this example (Ex. 4), we tackle a fantastic phrase from the solo to “Water.” The lick I’m breaking down falls around the 1:43 mark in the YouTube video. What’s so interesting is that while the song is in F major, Brad utilizes the open A, D, and G strings to navigate the fretboard vertically and create energy. My favorite thing about the descending pull-off section of this lick is that it’s a tame bluegrass-style lick in G, but it’s the placement of the lick over the chord changes that makes it sound interesting.
Ex. 4
Brad Paisley - Water
Ex. 5 is where things get really exciting. It’s from a live performance of “Water” during the 2010 ACM awards. At the 3:40 mark Brad uses an open-string lick to build tension and work his way up the fretboard that caught my attention. As before, it sounds monstrous at tempo but really doesn’t make a ton of sense when slowed down. It’s a fairly simple pull-off lick that isn’t too difficult if you’re already used to hybrid picking, but it creates a ton of movement and excitement when sped up. I’m guilty of stealing both this lick and the idea behind it for “wow” moments in solos.
Ex. 5
Brad Paisley - Water (live ACM Awards 2010)
It’s undeniable how freakishly good of a guitar player Brad Paisley is (try grabbing some of the monster licks from the outro of “Water”). Because of how many tricks he has up his sleeve, he’s nearly impossible to replicate, but that doesn’t mean there isn’t something that everyone can take from Paisley’s bag of tricks. Use this concept of using open strings in unconventional places to add spice, speed, and mystique to your playing.
Unleash your inner metal icon with the Jackson Lee Malia LM-87, a high-performance shred-ready axe designed in collaboration with Bring Me The Horizon guitarist Lee Malia. Featuring custom Jackson signature pickups, a fast D-profile neck, and a TOM-style bridge for rock-solid stability, this signature model is a must-have for commanding metal tone and smooth playability.
British metal icon and Bring Me The Horizon guitarist Lee Malia has partnered with Jackson to create his signature LM-87, a shred-ready axe built for heavy riffing and alternative modern metal. As a founding member and lead guitarist of the Grammy-nominated band, Malia is renowned for his aggressive playing style and intricate solos. This high-performance guitar matches his demanding musicality.
With its offset Surfcaster™ body shape and vintage appeal, the LM-87 melds classic design with modern appointments. The thin open pore finish on the bound Okoume body and neck exudes organic style, while the unique 3-ply pickguard and chrome hardware add striking accents. The fast D-profile 3- piece okoume neck allows smooth riffing across the bound amaranth fingerboard.
Custom Jackson signature pickups, including a bridge humbucker with push-pull coil-split, equip the LM-87 with versatile tone-shaping options to fulfill Malia's sonic vision. The TOM-style bridge with anchored tailpiece and fine tuners provides rock-solid stability for low tunings and heavy picking.
Designed in close collaboration with the legendary guitarist, the Jackson Lee Malia LM-87 is built for shredding. Its blend of vintage vibe and high-performance features make this signature model a must-have for players who value commanding metal tone and smooth playability.
The Tune-o-matic bridge with an anchored tailpiece and fine tuners offers enhanced tuning stability and precise, incremental adjustments. This setup ensures consistent pitch control, improved sustain, and easier fine-tuning without affecting overall string tension.
The guitar’s three-piece set-neck guitar with graphite reinforcement offers exceptional strength, stability, and resistance to warping. The multi-piece construction enhances sustain and tonal clarity, while the graphite reinforcement adds extra durability and prevents neck shifting due to humidity or temperature changes. This design ensures a solid, reliable performance with improved resonance and longevity.
Features Include:
- Okoume body
- Three-piece okoume set neck construction with graphite reinforcement
- 12"-16" compound radius amaranth fingerboard
- 3-ply pickguard
- Chrome hardware
- Custom wound Jackson LM-87 pickups
- Volume with push-pull coil-split and tone control
- TOM-style bridge with anchored tailpiece and fine tuners
- Gig bag included
The Jackson LM-87 carries a street price of $899.99.
For more information, please visit jacksonguitars.com.
Unleashing the Pro Series Signature Lee Malia LM-87 | Jackson Guitars - YouTube
Jackson Pro Series Signature Lee Malia LM-87 Electric Guitar - Open Pore Black
Pro Series Lee Malia Signature LM-87 Open Pore BlackThe Tone King Imperial Preamp Pedal delivers legendary vintage American tube tone with modern control. Featuring two channels mirroring '50s tweed and '60s blackface tones, built-in zero watt poweramp, stereo convolution spring reverb and tremolo, and low-latency impulse response technology. MIDI programmable with up to 128 presets for instant recall.
The Imperial All-Tube Preamp pedal delivers Tone King’s legendary MKII amplifier's '50s tweed, '60s blackface, and vintage British rock tones in a compact, pedalboard-friendly format. It features the exact preamp section and phase inverter circuitry of the Imperial MKII amp, as well as Reverb, Tremolo and Attenuation, resulting in a pedal that sings with harmonic richness and blooming touch response. Powered by three 12AX7 preamp tubes running at high voltage, this preamp delivers the amp's sound, responsiveness, and exquisite interaction with your pickups and effects. The onboard, low-latency impulse response (IR) loader (per channel), Headphones, easy integration and expansion with your existing gear, and MIDI capabilities, takes these iconic tones into the new era of guitar playing.
Legendary Vintage Tube Amp Tones
The Imperial Preamp Pedal features two distinct channels, each mirroring the '50s and '60s flavors of the Imperial MKII.
- The Rhythm Channel evokes the essence of a classic '60s blackface combo's pristine cleans with a touch-sensitive response that transitions smoothly into overdrive.
- The Lead Channel is inspired by the iconic tweed amps of the '50s’ with the ability to glide between warm articulate cleans and aggressive midrange bark. This channel's Mid-Bite control adds a further layer of tone shaping, focusing the low-end, while adding high-end presence and gain for a British-flavored rock crunch.
Built-In Zero Watt Poweramp - Phase Inverter
The Imperial Pre-Amp Pedal includes the exact phase inverter circuitry of the actual Imperial MKII amp, utilizing one of its three 12AX7 tubes. This built-in “0 watt poweramp” authentically provides the harmonic and dynamic content of the Tone King poweramp section. This revolutionary design is the cornerstone that delivers the ENTIRE Imperial MKII experience right on your pedal board.
Stereo Convolution Spring Reverb & Stereo Tremolo
Like its namesake amp, the Imperial Preamp boasts foot-switchable spring reverb and tremolo (digital on the preamp pedal) which are assignable to each channel. A signature of the Tone King Imperial MKII tube amplifier, these era-correct effects add dimension and movement while transporting you to a golden age of electric guitar tone.
Impulse Response (IR) Cabinet & Power Amp Sim
The Imperial Preamp pedal's low latency IR and power amp simulation technology delivers its tube tones directly to the front of house or your interface. That’s especially evident in the 15 included OwnHammer-made IRs. Each channel has three of our favorites, preloaded, and selectable via dual 3-way toggle switches.
OH 112 Imperial TK1660: Tone King 1660 speaker in a Tone King Imperial 1x12 combo. Captured using a Shure SM57, a Neumann U87, and a Royer 121 through '70s API 312 preamps.
OH 212 Class A Blue: Celestion Blues from 1963 in a Vox AC30 2x12 combo. Captured using a Shure SM57, a Neumann U87, and a Royer 121 through '70s API 312 preamps.
OH 412 Basketweave M25: Celestion G12M-25 speakers from 1971 in a basket-weave 1960B 4x12 cabinet. Captured using a Shure SM57, Telefunken MD421, and Royer 121.
There are 12 additional IRs to choose from in the included Tone King Editor software (powered by Synergy) which are easy to swap in and out of the pedal's six available slots. You can also disengage the onboard IR loader entirely to use the preamp with an external IR loader or powered cabinet.
Tone King Editor Software
You can assign the Reverb, Tremolo and IR to each of the channels right on the pedal itself, making it a powerful and easy-to-use sonic tool. Tone King offers an Editor software, powered by Synergy, which takes the Pre-Amp's capabilities to another level, allowing you to fine-tune all of the preamp's digitally controlled parameters and save them in up to 128 MIDI presets
- Control the independent power amp simulation HF Comp and Low-Pass filters
- Access all 15 included OwnHammer IRs• Easily load your own IRs and manage your IR library
- Assign any of your IRs to the pedal's six available slots (three per channel)• Control your reverb, reverb tails, tremolo and effects loop bypass settings• Save these settings to up to 128 presets for instant recall via MIDI
The Tone King Editor software also unlocks all of the Imperial Preamp's modern control. Fully MIDI-capable, you can save your presets and access them instantly with a MIDI pedalboard controller or the laptop running your entire show. It is the perfect marriage of modern control and classic tube tone.
Expanding Your Rig's Capabilities
The Imperial Preamp Pedal is the perfect DI recording and performing solution. But that's just scratching the surface.
Add Channels to Your Current Guitar Amplifier
A standout feature of the Imperial preamp pedal is its ability to easily integrate with your existing amplifiers (must have a series effects loop). A straightforward 3-cable connection is all it takes, and you can instantly alternate between the Imperial Preamp as your amp's front end or your amp's preamp channels.
Networking with Other Effects-Loop-Equipped Preamp Pedals
Create the ultimate pedalboard-based rig with other preamp pedals (with effects loops). Using the same 3-cable method, you get both Imperial channels, your other preamp’s tones, the Imperial's stereo effects loop, and its onboard IRs. Additionally, you can assign the Imperial's spring reverb and tremolo effects to your other preamp channels.
Classic American Tube Tone for Every Stage & Studio
Whether you're a gigging musician, a recording artist, or simply a tone enthusiast, the Tone King Imperial Preamp pedal offers endless possibilities. Use it as a standalone preamp for recording or for silent stages and practice, add its two channels to your existing amplifier, pair it with a power amp and cabinet to move some air, or combine it with other preamp pedals for an even wider range of pedalboard-based tones.
Tone King Imperial Preamp Pedal is the ultimate marriage of legendary, vintage American tube tone and modern control.
For more information, please visit toneking.com
Features
- Two Channel High-Voltage preamp – DI
- 3 x 12AX7 preamp tubes running at proper high voltages
- Built-In zero watt poweramp - phase inverter circuit
- Two channels with independent Volume and Attenuation controls
- Rhythm Channel (top)
- '60s-era American blackface combo tone
- Bass and Treble controls
- Lead Channel (Bottom)
- '50s-era American tweed combo and British rock tones
- Tone and Mid-Bite controls
- Spring Reverb (convolution)
- Reverb and Dwell controls
- Independently assignable to each channel
- Tremolo (digital)
- Depth and Speed controls
- Independently assignable to each channel
- Stereo, Series FX loop (bypassable)
- MIDI programmable
- Save up to 128 presets for instant recall via an external MIDI switcher
- Presets save:
- Channel selection
- Master bypass settingo IR selection
- IR bypass setting
- Effects loop bypass setting
- Reverb bypass and tails settings
- Tremolo bypass settings
- Onboard Impulse Response (IR) Technology
- Low-latency Impulse Response cabinet simulation (bypassable)
- 3-position CAB/IR select switch per channel (programmable via software)
- Included OwnHammer IRs
- Poweramp simulation with software editable HF Comp and Low-Pass filters (per channel)
- Connections:
- Dual stereo balanced XLR outputs with Ground Lift Switch
- ¼" Headphone output
- Effects Send and Stereo Return Jacks
- MIDI 5-pin standard connector
- USB-C connector for use with the included Tone King Editor software editor
- To Amp In, From Amp Send and From Amp Return Jacks – for adding Imperial channels to your amp or preamp
- Included
- 6’ USB Cable
- Universal 12V Power Supply
- Dimensions: 7.2” (W) x 5.7” (D) x 2.75” (H)
- Weight: 1.9 lbs.
With a bit of downtime back in Nashville, co-shredders-in-chief Megan and Rebecca Lovell joined Shred With Shifty to deconstruct their face-melting leads on “Summertime Sunset,” off of their 2022 record Blood Harmony.
The Georgia-born, Nashville-based roots-rock outfit Larkin Poe have had a busy year. Last summer, they toured across the U.S. supporting Slash, and released their seventh studio album, Bloom, on January 22. With a bit of downtime back in Nashville, co-shredders-in-chief Megan and Rebecca Lovell joined Shred With Shifty to deconstruct their face-melting leads on “Summertime Sunset,” off of their 2022 record Blood Harmony.
The Lovells grew up reading sheet music and learning violin via the Suzuki method—there was little room for going off the beaten path until they fell in love with Jerry Douglas’ dobro playing on Alison Krauss records. Rebecca took up the mandolin, while Megan went for the dobro and the slide side of things. It took a while for them to get comfortable turning up from their bluegrass roots, but eventually they built Larkin Poe’s amplified, blues-rock sound.
First up, Rebecca, playing a pristine ’60s SG, shows how she put together her stinging, fuzzy solo by “hunting and pecking out” melodies in her mind, building up the chops to follow her intuition. Then Megan, playing a Rickenbacker-inspired lap steel of her own design through a Rodenberg TB Drive, details her dizzyingly fast slide acrobatics, and her particular “rake” technique that she copped from Jerry Douglas and Derek Trucks.
Tune in to hear them talk about how to sustain family relationships while going professional, keeping music community-minded, and whether or not they’ll go back to bluegrass.
If you’re able to help, here are some charities aimed at assisting musicians affected by the fires in L.A:
https://guitarcenterfoundation.org
https://www.cciarts.org/relief.html
https://www.musiciansfoundation.org
https://fireaidla.org
https://www.musicares.org
https://www.sweetrelief.org
Credits
Producer: Jason Shadrick
Executive Producers: Brady Sadler and Jake Brennan for Double Elvis
Engineering Support by Matt Tahaney and Matt Beaudion
Video Editor: Addison Sauvan
Graphic Design: Megan Pralle
Special thanks to Chris Peterson, Greg Nacron, and the entire Volume.com crew.