
Fig. 1 -Strap buttons come in an amazing array of shapes and sizes.
Everything you need to know to easily secure your acoustic or electric.
For most performers, it's essential that a guitar has strap buttons (Fig. 1). Though many guitars come with strap buttons already installed, some don't. If you have a guitar without strap buttons and want to install them, the good news is it's a straightforward job—if you know the correct procedures.
There are two critical considerations: The first is to find the right location. If strap buttons are installed incorrectly, your guitar won't balance well when you play standing up. The second consideration is to be very careful when installing a button on the neck heel—you can crack it. So, using both an acoustic and an electric guitar to illustrate the process, let's find out how to do this right and avoid those potential problems.
Our instruments.
Recently, a client brought in two guitars: a Larrivée OM-03 Vintage Sunburst and a 2002 Gibson SG Supreme. The Larrivée already had an endpin, but it lacked a strap button. The owner wanted me to install one so he could stand when playing onstage. For the SG Supreme, he wanted me to replace the stock buttons with a set of locking devices, so he could safely rock out with his band. For the Larrivée, we decided on a standard nickel-plated strap button and felt washer from Allparts; for the SG Supreme, we chose Schaller Security Locks.
One caveat.
My client wondered if adding a strap button would devalue his acoustic. On most modern flattops, a correctly installed strap button won't devalue the instrument (two exceptions are high-end vintage guitars or classical guitars). A strap button is useful for working musicians, and most guitar manufacturers will offer to install one before the guitar leaves the factory. Another reason to add a strap button to an acoustic is that tying a strap around the headstock (the old-school approach) can damage the finish, and in some cases, add unnecessary pressure to the neck joint. There's a lot of debate about this. Most collectors would never want anything installed on a guitar that was not considered original, so if you have a vintage axe keep this in mind.
Selecting the location.
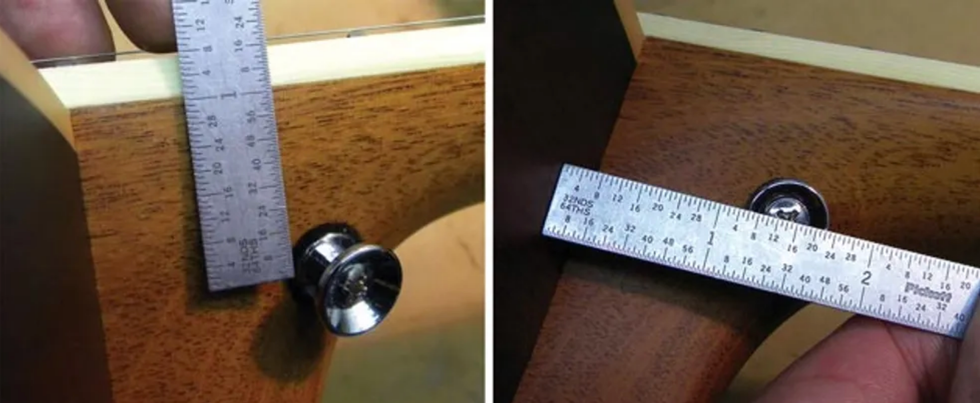
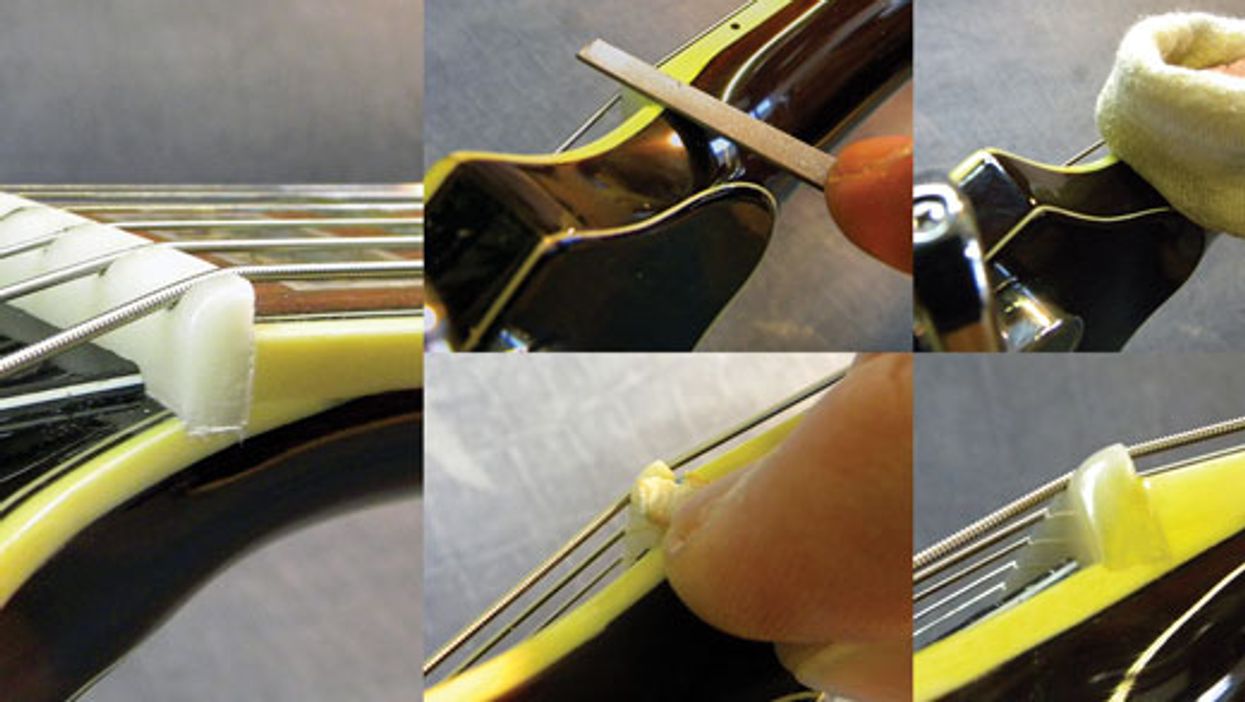
Fig. 2 (left) To install a strap button on the treble side of a flattop's neck heel, you need to take two measurements. One is the distance down from the fretboard. Fig. 3 (right) The second measurement is the distance away from the body.
Let's begin with the acoustic. The first step is to decide where to install the strap button. For the Larrivée, I determined that the best location was on the treble side of the neck heel about 1 1/4" below the top of the fretboard (Fig. 2) and about 1 1/2" out from the body (Fig. 3). I selected this spot for balance and structural integrity: This placement will keep the guitar from leaning away from you when you play, and this part of the neck heel is very stout, so you won't have to worry about cracking the heel—assuming the button is installed correctly, as we'll discuss in a moment.
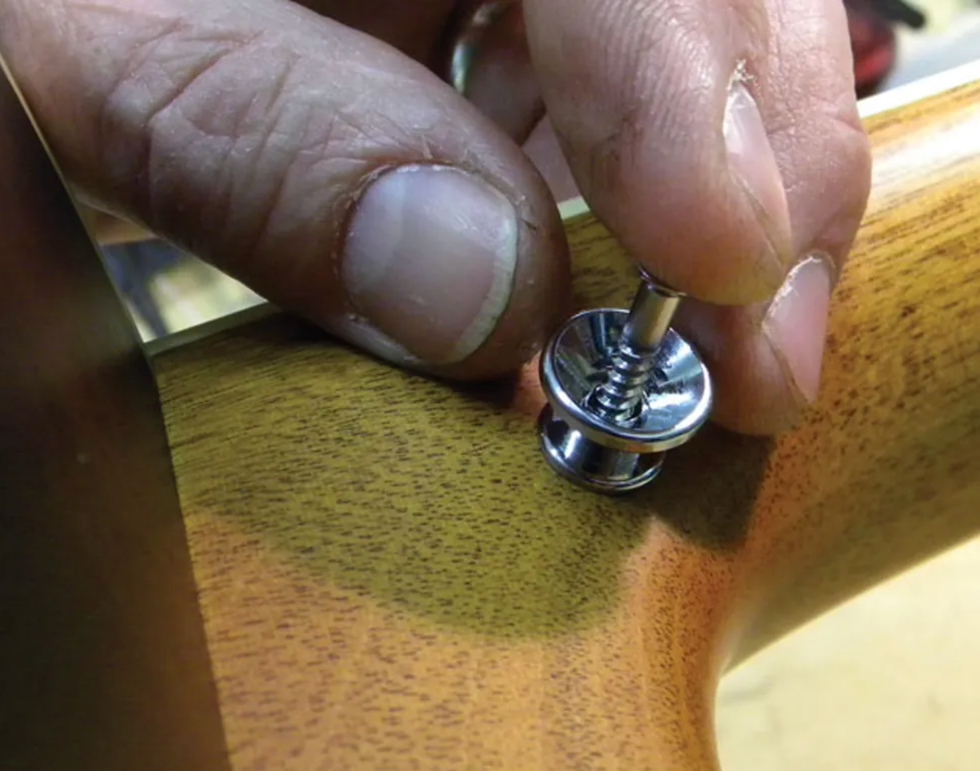
Fig. 4 - Mark the strap button's location by pressing the screw tip into the wood.
Once you've made these two measurements and located their intersection, mark it. You can mark the location using a pencil or gently press the strap button screw into the heel (Fig. 4).
Tip: If you use a screw to mark the drilling location, be careful not to slip—you could scratch the heel.
Selecting the drill bit.
The goal is to drill a hole that's slightly smaller than the outside diameter of the screw. If you use a drill bit that's too big, the screw will strip the wood and the button will not hold properly. Most strap button screws are relatively close in size, but they do vary depending on the manufacturer. Make sure you measure both the threads and the screw shaft so you know what size drill bit to use.
For example: The outside diameter (including threads) of my strap-button screw was 9/64", and the shaft (without threads) was about 7/64" in diameter. By choosing a 7/64" bit, I left enough wood for the screw to tap (or thread) itself into the heel without damaging it.
Gauging drill bit depth.
Fig. 5: Measure drill bit depth, then mark it with a red Sharpie.
With the screw inserted into the button, measure the depth needed for the screw and mark your selected drill bit with a red Sharpie (Fig. 5). This way, you'll know how deep to drill the hole. If you drill too far, you could hit the neck pocket. But if the hole is too shallow, you could crack the heel when you install the screw. Measure carefully and get it right.
Drilling the hole.
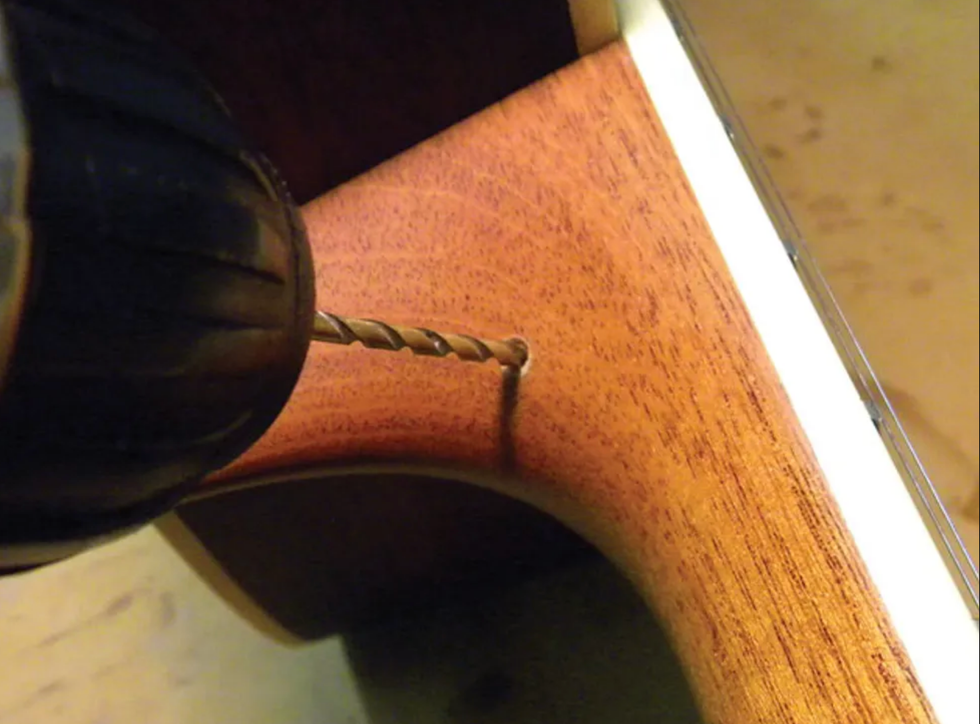
This is where all your measurements pay off. Remember, you don't have to push hard—let the drill and bit do the work. You simply control the process by keeping the bit aligned and watching the depth (Fig. 6).
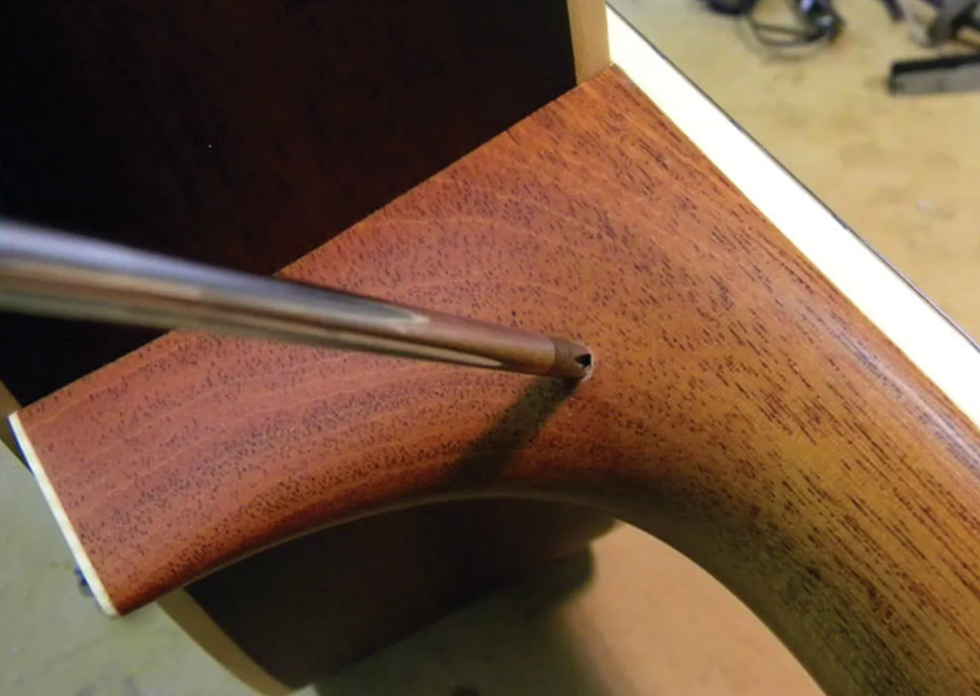
Fig. 7: Countersinking the hole with a Phillips screwdriver.
Before you insert the screw, use a medium-tip Phillips screwdriver to countersink the hole you just drilled (Fig. 7). This prevents the finish from chipping around the hole when you insert and tighten the strap-button screw. After countersinking the hole, install the strap button with a small felt washer between the wood and metal. The washer prevents the strap button from marring or denting the finish and wood, and it looks nice.
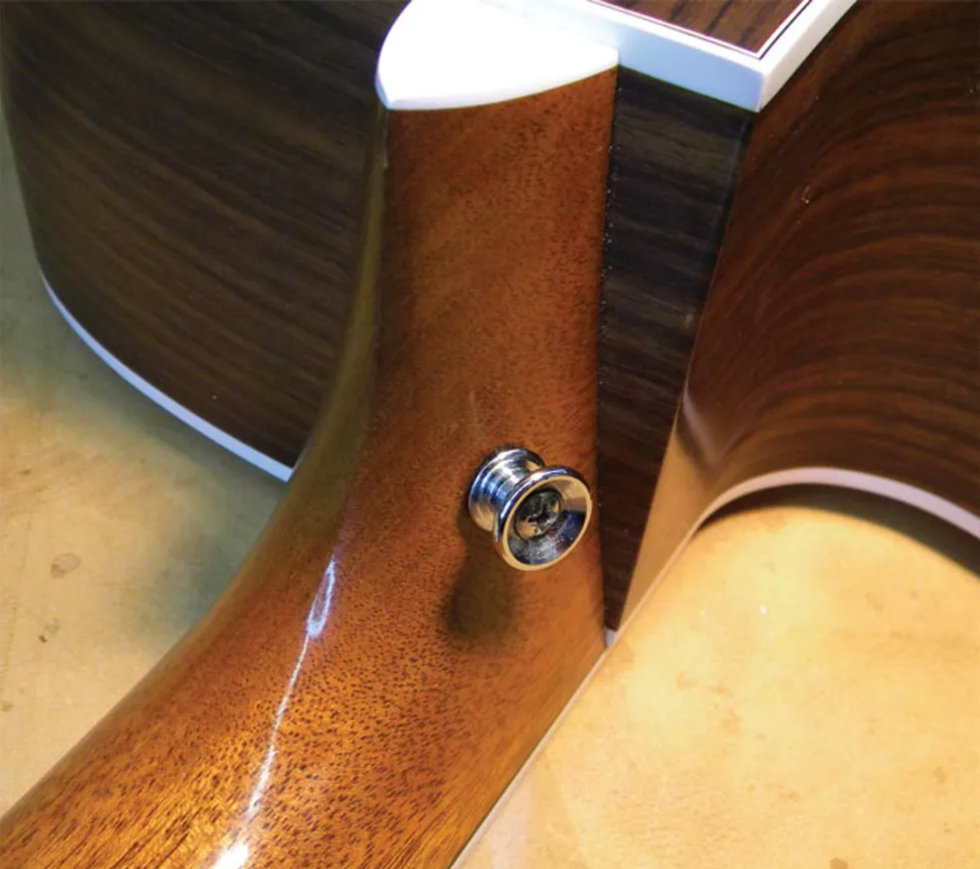
Fig. 8: Place a felt washer between the neck and button, then slowly tighten the screw until
the button is flush to the neck heel.
Voilà—a correctly installed strap button can add utility to a steel-string guitar (Fig. 8).
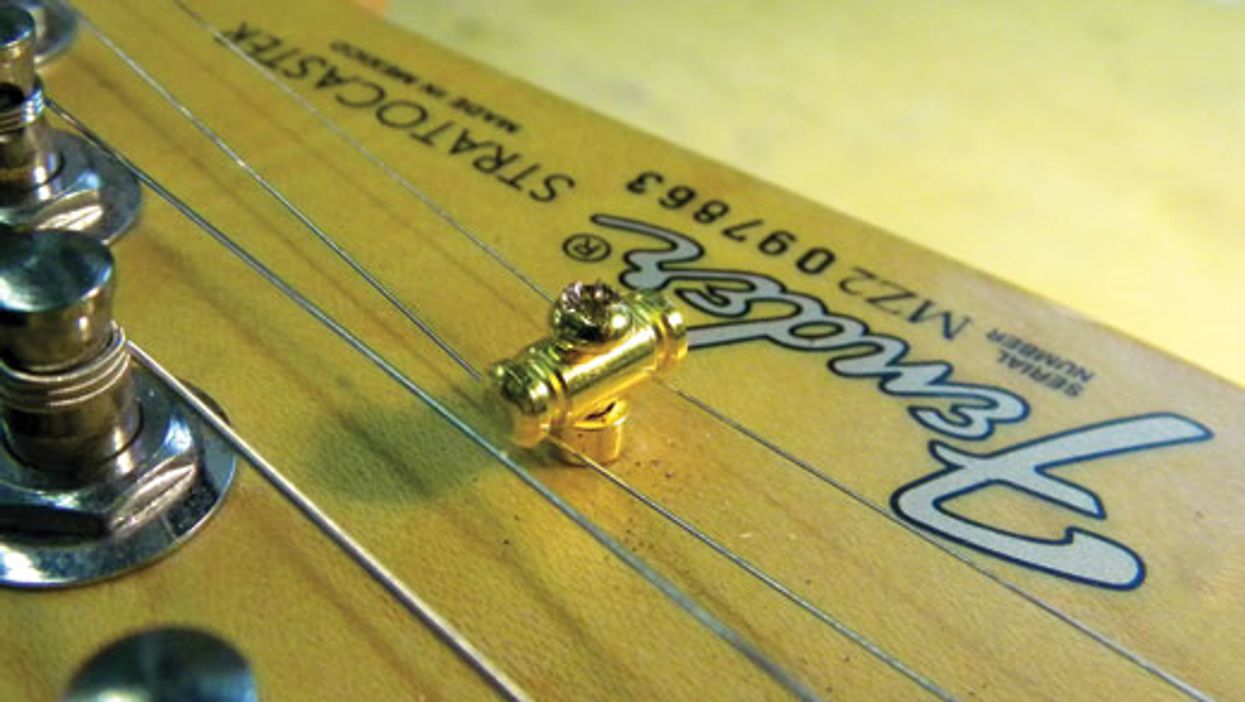
Strap-locking devices.
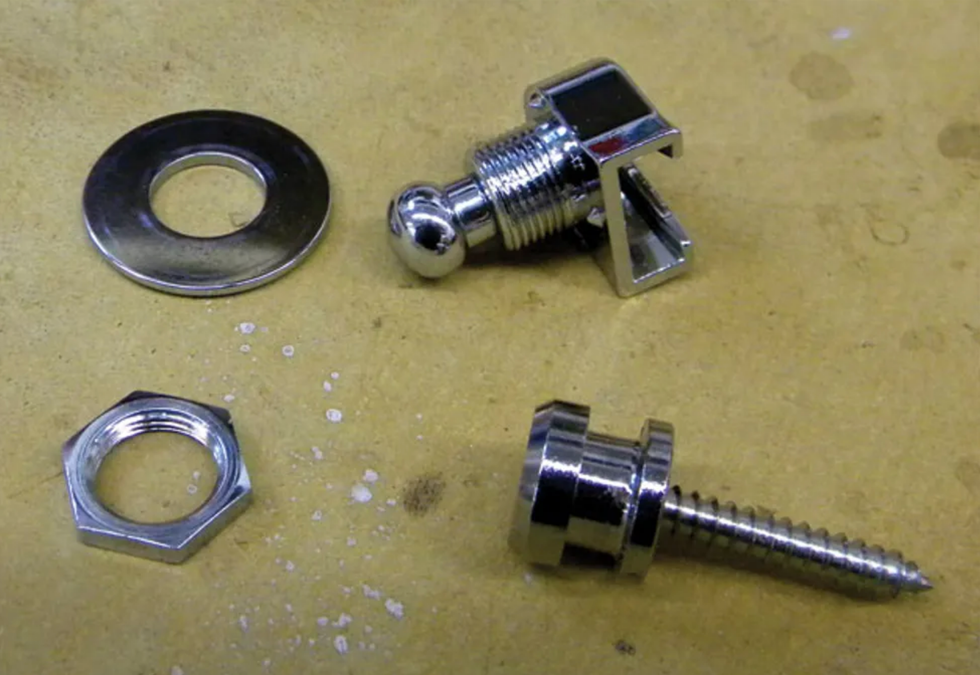
Fig. 9: Each Schaller Security Lock consists of an integrated screw and button, a locking mechanism that attaches to the guitar strap, and a washer and nut used to secure the locking device to the strap.
There are many different types and brands of locking devices on the market, but as I mentioned, my client wanted Schaller Security Locks (Fig. 9) for his SG. Once you've selected your locking hardware, it's crucial you measure the length of the included screws that go into the body and subsequently attach to the locking mechanism. In a moment, we'll see why.
The work begins.
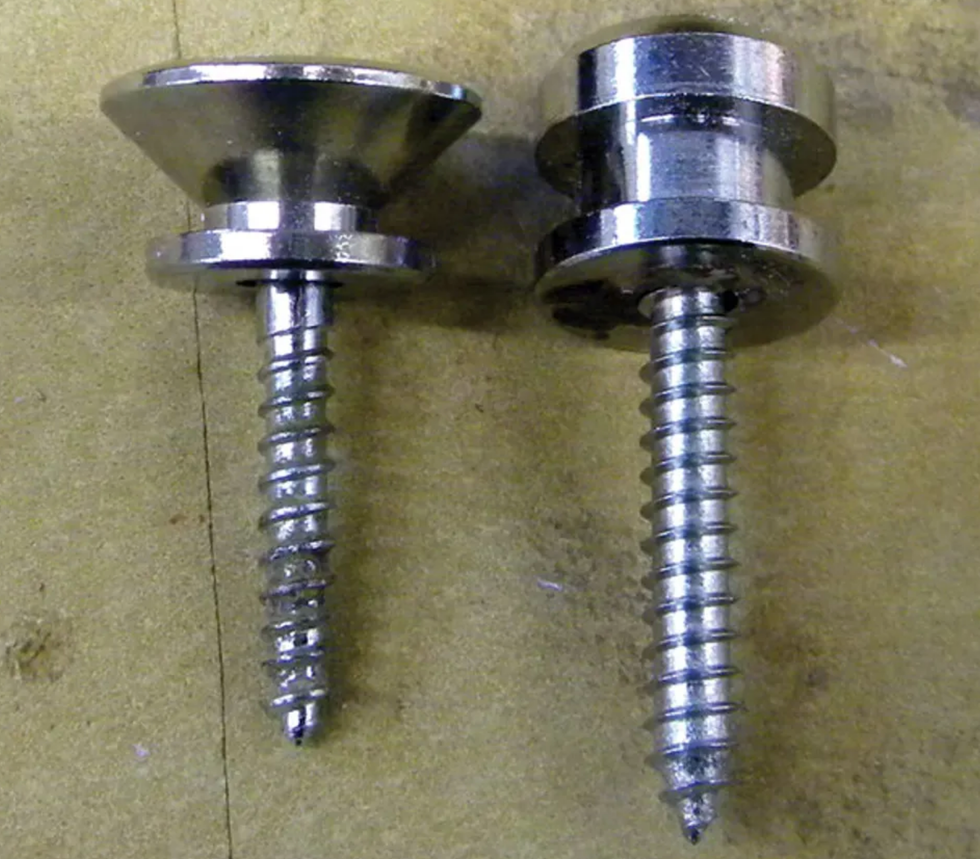
Fig. 10: Comparing the length of the stock SG screw and button (left) with the Schaller screw.
Installing the Schaller button on the SG's lower bout was easy because it was already pre-drilled for the original strap button I'd removed. Because the Schaller screws with their integrated buttons were longer than the original Gibson hardware (Fig. 10), I redrilled the hole to the proper depth using a 7/64" drill bit. So far, so good.
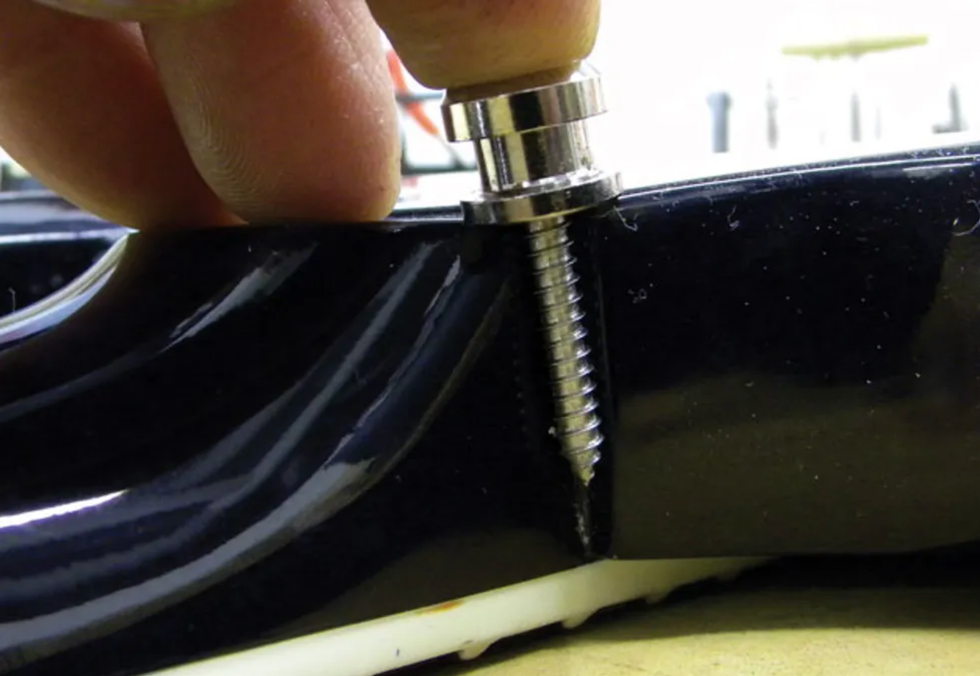
Fig. 11: The Schaller screw is too long for the SG's neck joint—it might hit the truss rod.
Ah, but the other strap button was a different story. On SGs, Gibson typically installs a strap button on the back of the guitar, right behind the neck joint. After I removed the stock button and measured the depth of the Schaller screw against the SG's neck joint (Fig. 11), I realized the screw would penetrate too far and possibly hit the truss rod. Yikes!
This left me with two choices: see if I could use the original hardware, or shorten the supplied Schaller screw and integrated button. Fortunately the Gibson button fit inside the Schaller locking mechanism, so I decided to reuse the original screw and button, rather than shorten and rethread the Schaller screw. Once again, I included a felt washer between the body and button.
Loading the strap.
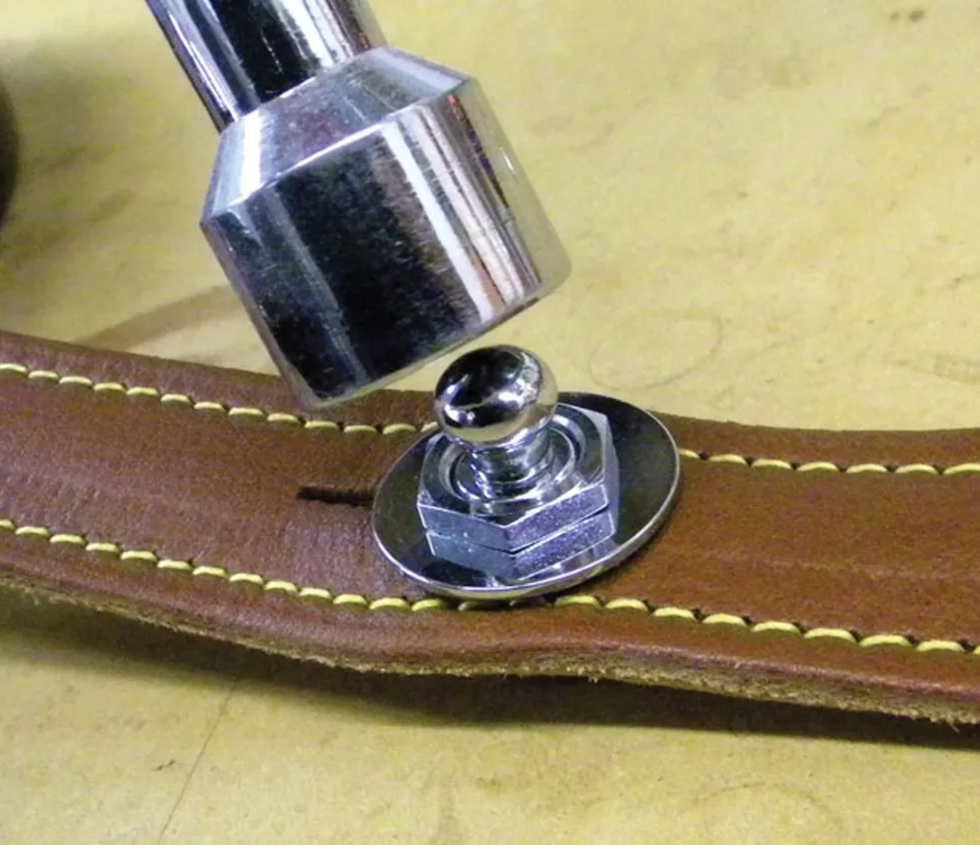
Fig. 12: Attaching the Schaller Security Lock to the strap.
One of the features that makes the Schaller system so secure is that the locking mechanisms attach to your strap. It's simple: Slip the strap-lock base into the strap's slit. Place the included washer over the device's shaft. Using a 9/16" deep-well nutdriver, tighten the nut over the washer (Fig. 12). This makes it nearly impossible for the locking mechanism to slip out of the strap. Rinse and repeat.
To mount the strap to the guitar, simply pull up on each lock's post, slip the lock onto its respective button, and release the post to lock it to the button.
[Updated 10/8/21]
- The ABCs of Output Jacks - Premier Guitar ›
- Guitar Shop 101: How to Install a Soundhole Pickup - Premier Guitar ›
- Tools for the Task: Strap Locks - Premier Guitar ›
- (Acoustic) Size Matters - Premier Guitar ›
- Guitar Shop 101: How to Install a Soundhole Pickup - Premier Guitar ›
At its core is GTRS’ upgraded G151 intelligent system, offering 128 onboard effects, MNRS amp and cab sims, and even 17 guitar emulations—exclusive to this model. Everything is controlled via the eye-catching Super Knob, which changes color to match your preset, as well as through the Bluetooth-connectible GTRS app.
GTRS’ W902 features select tonewoods and construction: an alder body, poplar burl top, and a sleek bolt-on 5-piece neck made from roasted flame maple and rosewood, with satin natural finish and a rosewood fingerboard. The fanned fret design features 24 white copper frets and a stainless zero fret. A pair of GTRS Alnico V pickups and an HL-II bridge deliver a resonant tone, made particularly versatile thanks to the 5-way tone switch and tone knob.
The W902 offers a truly innovative choice for tech-savvy guitarists. Its features include a wireless transmitter, OTG recording, an 80-second looper, metronomes, and a drum machine, the app-supported guitar boasts up to 12 hours of playtime on a single charge (9 hours with the wireless transmitter in use).
The W902 is an upgraded version of the original W900 Intelligent Guitar, and the W902 most notably features an upgraded GTRS Intelligent Processor System, the G151, which even offers upgrades over the GTRS SL810's recently announced G150 system. The G151 system comes with a staggering 128 effects pre-installed, along with 10 of both MOOER's in-house MNRS amp and cabinet simulation profiles. Exclusive to the W902, the G151 system even includes 17 guitar simulation effects, allowing guitarists to emulate the tonal resonance of some of their favorite guitars.
To activate and browse through presets within the G151 system, which can be connected via Bluetooth 5.0, guitarists can use the guitar's Super Knob, which lights up in different LED colors depending on which preset is activated. Of course, users are able to get stuck into and edit the effects chains of presets through the GTRS app, enabling them to craft their own favorites through their mobile device. The guitar still functions without the G151 system; the Super Knob just needs to be turned off, and the W902 is usable as a regular electric guitar.
Within the GTRS app, there is even an 80-second looper, 10 metronomes, and 40 drum machine grooves built in, providing users with an all-in-one suite for guitar practice and composition. This is especially the case when combined with the W902's OTG-recording support, enabling on-the-go recording without the need for a hardware recording setup.
The W902 comes bundled with a GTRS Deluxe gig bag, three guitar wrenches, a USB 3.0 cable for charging, and a user manual. The guitar even contains a wireless transmitter and an integrated 4000mAh Li-ion battery, providing up to 12 hours of continuous use (9 hours with the transmitter in use), allowing users to enjoy the G151 system through headphones or an amplifier.
Guitarists who want to experiment further with the W902’s technology can connect the intelligent system to the GTRS GWF4 wireless footswitch, which is ideal for switching between presets in live scenarios when control through a mobile device isn't practical.
GTRS W902 Guitar construction features:
- Alder Body, 5-Piece Selected Roasted Flame Maple and Rosewood Neck with Satin Natural Finish (C-Shape)
- Bolt-on neck, 25-1/2" scale length, with dual action steel truss rod
- Rosewood fingerboard, 12” radius, 24 white copper (0 fret stainless) fanned frets
- Built-in wireless transmitter
- Super Knob, Volume Control Knob, and Tone Knob, 3-way tone-selection switch
- GLB-P1 Li-ion Battery (4000mAh, up to 12 hours of continuous use, 9 hours with the wireless transmitter in use)
- USB port for charging and OTG recording
- GTRS Deluxe gig bag, 3 guitar wrenches
GTRS G151 Intelligent Guitar System features:
- GTRS G151 Intelligent Processing System (and GTRS App)
- 128 effects, 10 MNRS amp (GNR) and cabinet (GIR) simulation models
- 17 guitar simulations
- 80-second looper, 40 drum machine grooves, 10 metronomes
- Bluetooth 5.0 connectivity
- GTRS GWF4 wireless footswitch support (sold separately)
The GTRS W902 is now available worldwide. For more information visit www.gtrs.tech.
Ernie Ball, the world’s leading manufacturer of premium guitar strings and accessories, proudly announces the launch of the all-new Earthwood Bell Bronze acoustic guitar strings. Developed in close collaboration with Grammy Award-winning guitarist JohnMayer, Bell Bronze strings are engineered to meet Mayer’s exacting performance standards, offering players a bold new voice for their acoustic guitars.Crafted using a proprietary alloy inspired by the metals traditionally found in bells and cymbals, Earthwood Bell Bronze strings deliver a uniquely rich, full-bodied tone with enhanced clarity, harmonic content, and projection—making them the most sonically complex acoustic strings in the Ernie Ball lineup to date.
“Earthwood Bell Bronze strings are a giant leap forward in tone, playability, and durability. They’re great in any musical setting but really shine when played solo. There’s an orchestral quality to them.” -John Mayer
Product Features:
- Developed in collaboration with John Mayer
- Big, bold sound
- Inspired by alloys used for bells and cymbals
- Increased resonance with improved projection and sustain
- Patent-pending alloy unique to Ernie Ball stringsHow is Bell Bronze different?
- Richer and fuller sound than 80/20 and Phosphor Bronze without sounding dark
- Similar top end to 80/20 Bronze with richer low end than Phosphor Bronze
The Irish post-punk band’s three guitarists go for Fairlane, Fenders, and a fake on their spring American tour.
We caught up with guitarists Carlos O’Connell and Conor Curley from red-hot Dublin indie rock outfit Fontaines D.C. for a Rig Rundown in 2023, but we felt bad missing bassist Conor “Deego” Deegan III, so we’ve been waiting for the lads to make their way back.
This time, riding the success of their fourth LP, 2024’s Romance, we caught up with all three of them at Nashville’s Marathon Music Works ahead of their April 30 gig to see what they brought across the pond.
Brought to you by D’Addario
All’s Fairlane
Curley’s go-to is this Fairlane Zephyr, loaded with Monty’s P-90s and a Mastery bridge. It mostly stays in standard tuning and, like his other axes, has Ernie Ball Burly Slinky strings.
Blue Boy
Fender sent Curley this Jazzmaster a couple of years ago, and since then, he’s turned to it for heavier, more driven sounds. It’s tuned to E flat, but Curley also tunes it to a unique shoegaze-y tuning for their tune “Sundowner.”
You can also catch Curley playing a Fender Johnny Marr Jaguar.
Twin Win
Fender Twin Reverbs are where Conor Curley feels most comfortable, so they’re his go-to backline. The amps are EQ’d fairly flat to operate as pedal platforms.
Conor Curley’s Pedalboard
Curley’s pedalboard for this tour includes a TC Electronic PolyTune3 Noir, Strymon Timeline, Boss RV-6, Boss PN-2, Boss BF-3, Keeley Loomer, Death by Audio Echo Dream, Fairfield Circuitry Hors d'Ouevre?, Strymon Sunset, Strymon Deco, DigiTech Hardwire RV-7, Electro-Harmonix Nano POG, and Lehle Little Dual.
Fake Out
Connor Deegan didn’t own a bass when Fontaines D.C. began, and his first purchase was the black Fender Jazz bass (right)—or so he thought. He later discovered it was a total knock-off, with a China-made body, Mexico-made neck, and a serial number that belongs to a Jaguar. But he fell in love with it, and its sound—nasal on the high strings, with cheap high-output pickups—is all over the band’s first record, Dogrel. Deego plays with orange Dunlop .60 mm picks, and uses Rotosound Swing Bass 66 strings.
Deegan picked up the Squier Bass VI (left) for its “surfy vibes,” and upgraded the pickups and bridge.
Also in his arsenal is this 1972 Fender P-bass (middle). (He’s a bit nervous to check the serial number.)
V-4 You Go
Deego plays through an Ampeg V-4B head into a Fender 6x10 cabinet.
Conor Deegan’s Pedalboard
Deegan’s board includes a Boss TU-3, Electro-Harmonix Hum Debugger, Boss TR-2, modded Ibanez Analog Delay, Death by Audio Reverberation Machine, Boss CE-2w, Tech 21 SansAmp Bass Driver DI, Darkglass Electronics Alpha Omega Ultra, and Dunlop Volume (X) Mini pedal. A GigRig QuarterMaster helps him switch sounds.
Mustang Muscle
Carlos O’Connell favors this 1964 Fender Mustang, which has been upgraded with a Seymour Duncan Hot Rails pickup since Romance. It’s set up so that the single-coil pickup is always on, and he’ll add in the Hot Rails signal for particular moments.
Ghost of Gallagher
After getting to play a number of Rory Gallagher’s guitars thanks to a private invitation from the guitarist’s estate, O’Connell picked up this Fender Custom Shop Rory Gallagher Signature Stratocaster. The jangly, direct tone of this one is all over tunes like “Boys in the Better Land.”
More Fender Friends
O’Connell runs his guitars, including a vintage Martin acoustic which he picked up in Nashville, through a Fender Twin Reverb and Deluxe Reverb.
Carlos O’Connell’s Pedalboard
The gem of O’Connell’s board is this Soundgas 636p, an imitation of the infamous Grampian 636 mic preamp’s breakup. Alongside it are a TC Electronic PolyTune, Ceriatone Centura, Strymon Volante, Eventide H9, Orchid Electronics Audio 1:1 Isolator, Vein-Tap Murder One, MXR Micro Amp, Moog MF Flange, MXR Smart Gate, and Freqscene Koldwave Analog Chorus. A Radial BigShot ABY navigates between the Twin and Deluxe Reverb.
Brent Mason is, of course, on of the most recorded guitarists in history, who helped define the sound of most ’90s country superstars. So, whether you know it or not, you’ve likely heard Mason’s playing.
Professional transcriber Levi Clay has done the deepest of dives into Brent Mason’s hotshot licks. At one point, he undertook the massive project of transcribing and sharing one of Mason’s solos every day for 85 or so days. Mason is, of course, on of the most recorded guitarists in history, who helped define the sound of most ’90s country superstars. So, whether you know it or not, you’ve likely heard Mason’s playing. Levi shares the insight he gleaned from digging deep, and he tells us what it was like when they shared a stage last year. Plus, Levi plays us some great examples of Mason’s playing.