
Photo 1
Believe it or not, on eight out of 10 guitars with tuning problems, the culprit is usually bad strings or the exotic ways they were installed. Here are some ways to combat these issues.
Welcome back to Mod Garage. I’ve wanted to cover this topic for a long time, but to be honest, I didn’t dare because it seems so trivial. I’m sure a lot of you already have a natural routine to assess tuning, but I receive guitars daily for repairs, and enhancing tuning stability is something I hear about a lot—on electric as well as acoustic guitars. There are many reasons why a guitar has problems staying in tune, but today we’ll discuss the simplest one: the strings.
A column about strings? Now he’s crazy, you might say. Believe it or not, on eight out of 10 guitars with tuning problems, it turns out this is caused by the strings themselves and/or the way the strings were installed. For some guitars, the nut or the saddle/tremolo is causing problems; others have problems with the tuners or worn-out bridge pins on acoustic guitars, string trees, etc. But bad strings and exotic ways to install them are reason No. 1 for tuning problems. Let’s have a deeper look into what happens here and what can be done.
“The more windings you have on your posts, the greater the chance for tuning problems.”
Over the years I’ve seen the craziest things people do with their strings. Here are some simple guidelines for you to combat tuning problems, whether it’s an electric or acoustic guitar, or if it has steel or nylon strings.
Possible Problem No. 1: The Strings Themselves
You all know this “problem” when setting up new strings on a guitar: After getting them in tune and playing for a minute, you need to tune them again, and this will last for some time, depending on the material of the strings. This is normal when strings are getting stretched for the first time; they’ll stay in tune after they’ve settled. Here are some hints to get around this:
1. Stretching the strings several times after setting them up by simply pulling them upwards with your hands will speed up this process noticeably. There are also tools for this called string stretchers, but you can simply do it with your hands. This is called pre-stretching and is very simple to do. As a rule of thumb, steel strings will settle sooner than nylon strings.
2. A customer bought “pre-stretched strings” and brought them in so I could try a set of these in the shop. I could notice no difference other than the price, but I wanted to mention that such sets exist.
3. Cryogenic-treated string sets may stay in tune faster right from the start. This treatment is widely used to remove tension, especially out of metal parts—like on high-precision components for racing engines. This might work on steel strings, but I have my doubts that it will work on nylon strings. Funny enough, I’ve never read about tuning improvement on any cryogenic-treated string set, but a lot is mentioned about how good they sound, how long they will last, etc. It’s up to you if these strings sound any different from other string sets. Give it a try. In time, each string set should stay in tune without any problems, no matter what method you use to speed things up.
“Cryogenic-treated string sets may stay in tune faster right from the start.”
Some time ago, I had a British-made Burns guitar from the ’60s on the workbench that was still equipped with the original flatwound string set it came with from the factory. These strings were perfectly in tune after almost 60 years. If the strings aren’t damaged, there should be no problem. A problem I regularly see is that completely new string sets have a rotten egg under the hood, caused by problems during manufacturing. From my experience, it’s mostly steel strings of certain brands and very often the G string, but I’ve also had bad D and B strings out of the box. With such strings, no matter what you try, you can’t get them in tune, and you’ll see they have an unnatural pattern of movement. I have no idea what causes this problem during manufacturing, but just keep this in mind if you run into tuning issues with a new set of strings. The solution is simple: Replace the bad string or the whole set with a new one.
Possible Problem No. 2: The More, the Merrier
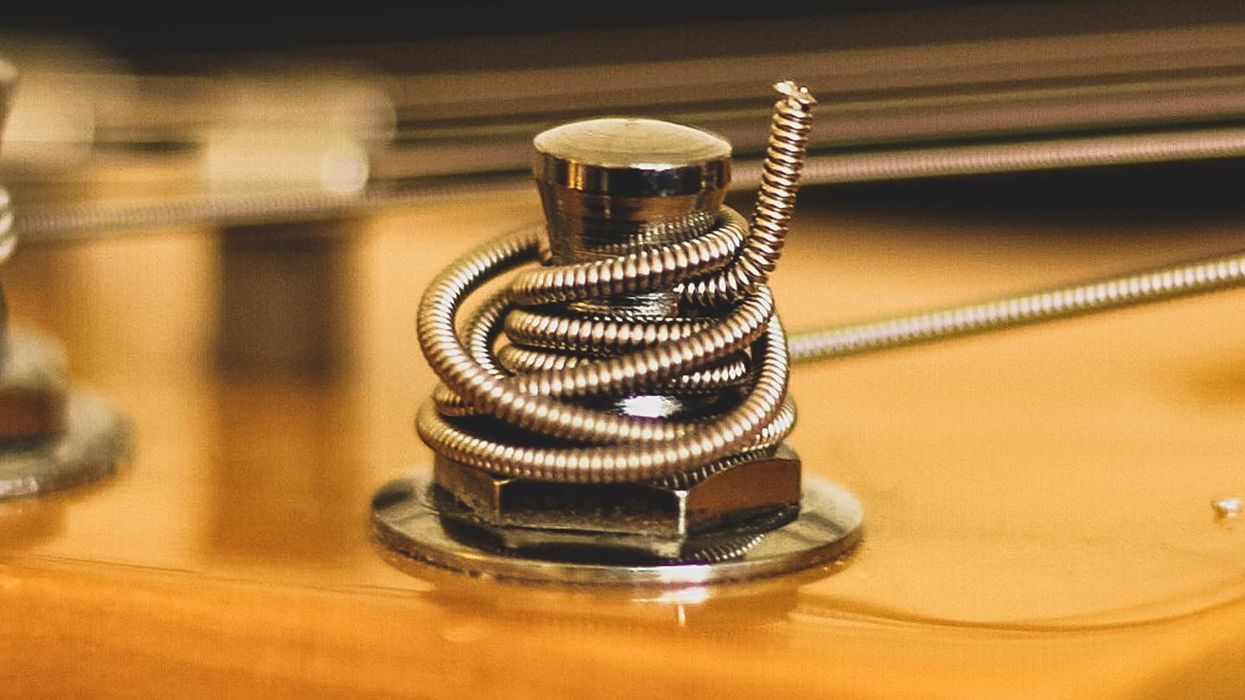
Many people think it’s right and important to wind up the complete string length so it can stay in tune better because of the many windings, adding stability (Photo 1). Exactly the opposite is true. The more windings you have on your post, the greater the chance for tuning problems. Getting as few windings as possible on the post is the way to go. Have a look at a locking tuner. They have zero windings on the post for the best possible tuning stability. We’ll talk about how to do this in a minute. The best and funniest statement I’ve heard over the years was from a customer, when I tried to explain that it’s not a good idea to wind up the complete string length. He explained he’ll continue doing this because the manufacturer has good reasons to choose this length. I suppose somebody must do whatever makes somebody happy.
Possible Problem No. 3: Loose Tuners
Whenever you change your strings, make sure all screws and hex nuts from your tuners are tight. With a loose and moving tuner you’ll not only have tuning problems, but it’s also a common source for strange noises you can even hear in the amplified tone of a guitar. Sounds trivial but it’s important.
Possible Problem No. 4: Improper String Installation
This is by far the most common problem, and everyone has their own way of stringing up guitars. Some are superior to others. I don’t say my method I use in the shop is the best and only way that works. But over the years I tried a lot of different methods and the one I want to show and recommend to you is the best-working one for me. It incorporates what we just talked about: putting the least windings possible on the post for maximum tuning stability, mimicking the way a locking tuner works. This works on all standard tuners and is very easy to learn, so give it a try.
If you don’t want to compromise, there is no way around using locking tuners on your guitar. But if locking tuners are 10/10, the winding method that follows is 8.5/10, which is not bad at all.
I’m showing the winding method on an acoustic guitar with a 3/3 tuner configuration, but it also works with a 6L or 6R tuner configuration. It won’t work with the ’50s vintage Kluson types you often see on Stratocasters and Telecasters because there is no string hole on the post other than the one on top.
1. Position the post of the tuner so the string hole will be in line with the corresponding string slot for a string on the nut.
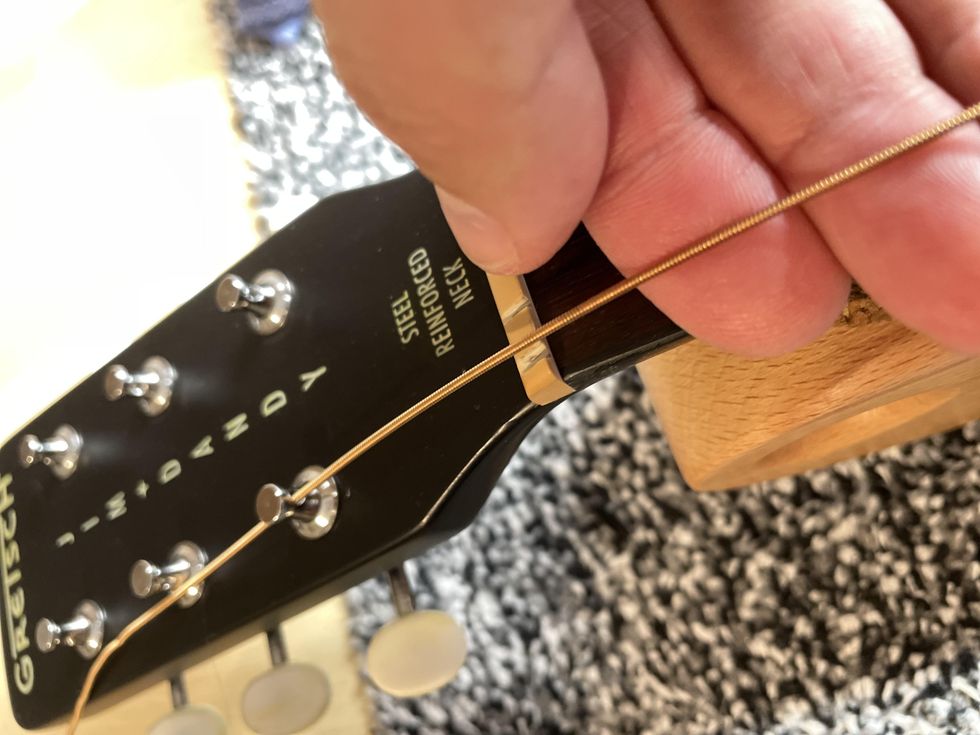
Photo 2
2. Guide the string through the string hole of the post and leave only a little slack. As a guideline, if you can put the fingers of your right hand underneath the strings, that’s enough. Now, use a finger of your right hand and lock the string after the nut, leaving a little slack lying on the fretboard (Photo 2). I like to snip off a good portion of the rest of the string at this point, to make the following process easier. But you can also leave it full length until you’re finished—whatever you like best.
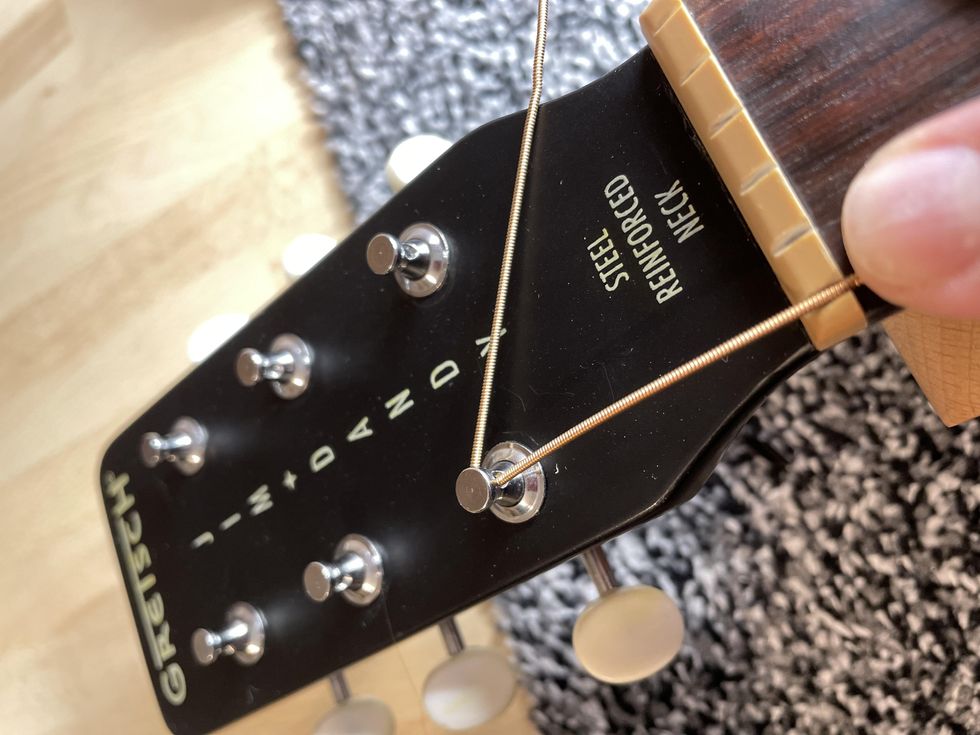
Photo 3
3. Bend the rest of the string around the post sharply so it will form a “V.” Don’t forget to still keep the string locked with a finger (Photo 3).
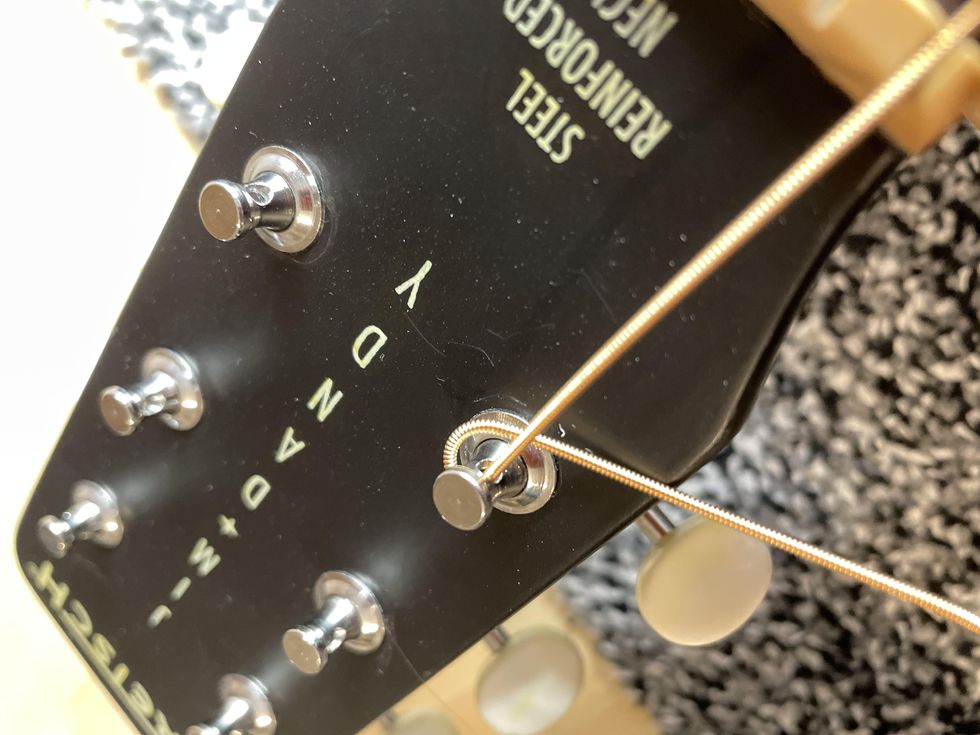
Photo 4
4. Next, put the rest of the string underneath the string, pressing it firmly against the post, still locking the string with your finger, and bend it over the string (Photo 4 and Photo 5).
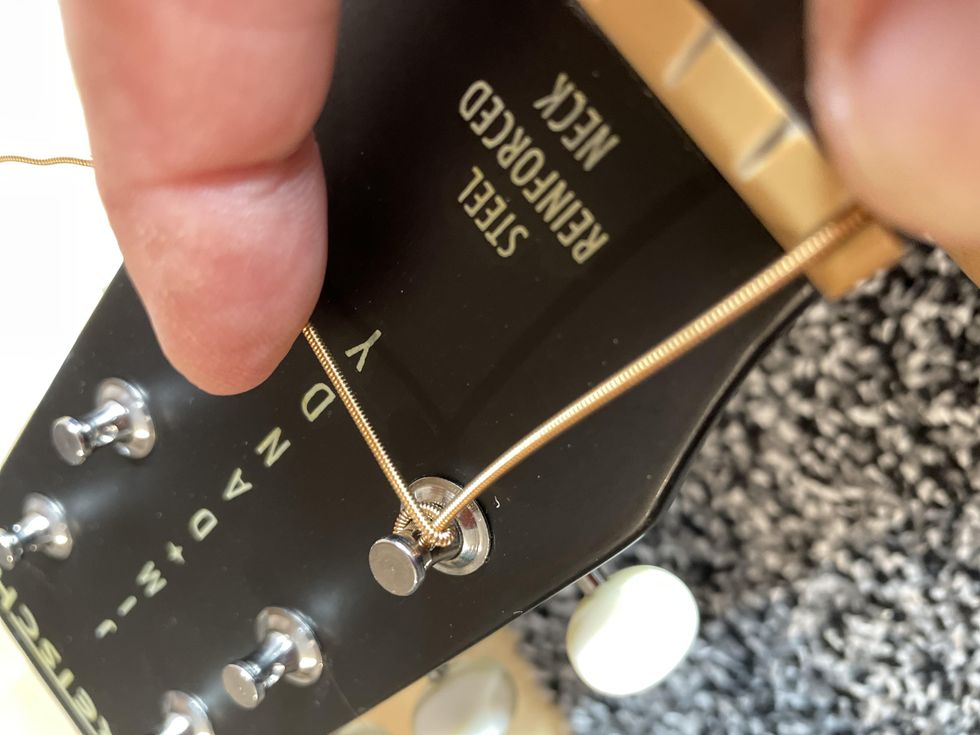
Photo 5
5. Tune up your string and release the finger you used to lock the string. You’ll only need a very small movement of the tuner to get the string up to tune, so this is something you’ll have to get used to. Cut off the rest of the string and you’re done (Photo 6).
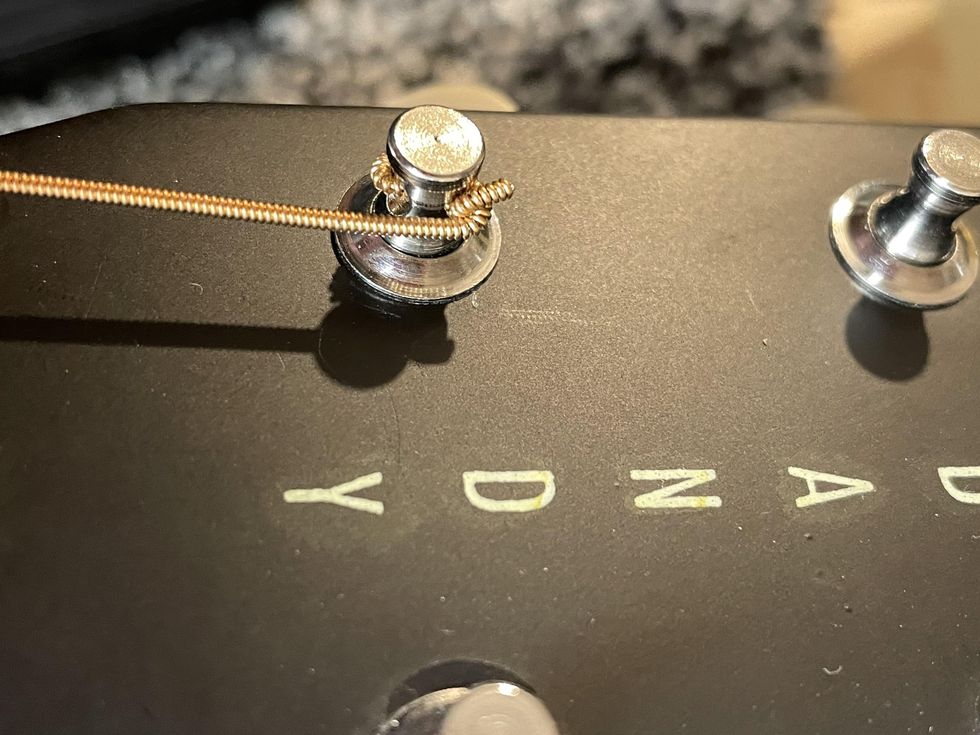
Photo 6
On a 6-in-line tuner configuration, you can proceed with the other strings as shown. With a 3/3 configuration, you’ll have to mirror the process with the G, B, and high-E string. The rule of thumb is the rest of the string is always bent towards the middle of the headstock to create the “V.”
It’s very simple to do and very effective. It’s also important to lock the string with your finger during the whole process until it’s up to tune.
When you have a guitar that won’t stay in tune, chances are good that this is all you need to do. If this doesn’t help, at least you did everything that could be done before consulting your local luthier. And your luthier will be impressed about your troubleshooting, for sure. It will save them some time troubleshooting and it’ll save you some bucks, too.
Next month we’ll finally finish our DIY relic’ing project, so stay tuned.
Until then ... keep on modding!
- D'Addario Releases NYXL Line of Strings ›
- The Recording Guitarist: Should You Change Your Electric's Strings ... ›
- Do Bigger Strings Really Make for a Louder Acoustic Guitar ... ›
- Modifications for a Gretsch Guitar Circuit - Premier Guitar ›
- The Dangers Of Replacing Your Vintage Guitar’s Tuners ›
- Is a Variable Dummy Coil the Solution to Single-Coil Hum? ›
Advanced
Intermediate
- Learn how to incorporate open strings all the way up the fretboard.
- Build velocity in your playing without practicing speed exercises.
- Discover an easy way to steal licks from the pros using YouTube.
It’s universally known in the guitar community that Brad Paisley isn’t just some guy that strums a guitar and sings country songs. He’s widely respected as one of the best players in the country music scene and takes an unusual approach to achieve the sonic insanity that spills out of his guitar. From Telecasters, G-benders, and cranked Dr. Z amps to instrumental records and wild guitar solos getting mainstream country radio airtime, Paisley has solidified his place in the discussion of all-time greats, and not just in the country world. In this lesson, we’ll dive into one of the cornerstones of Brad’s playing that makes him so unique: open strings.
A couple of prefaces:
Most of the licks in this lesson are exponentially easier when hybrid picked.
And in case you didn’t know, YouTube allows you to alter the speed of videos. This is a massive tool to take advantage of when learning licks, practicing them, and getting them up to speed. Simply click the Settings button in the bottom right corner of the video player and select Playback Speed. This will allow you to speed up or slow down the video to your liking without any changes to pitch. Transients will become an issue the farther away from the original speed you go, but not enough to keep you from slowing a solo down 50 percent to really learn and nail the nuances.
We’ll start by just dipping a toe in the water for Ex. 1, looking at a small part of the solo from Brad’s song “Ticks.” This section is found at the 3:06 mark of the video below. Brad really likes to use open strings to provide color to licks, usually with the note falling outside of the established scale. This little nugget is entirely in the E major scale (E–F#–G#–A–B–C#–D#) with exception of the open 3rd string. The use of the open string throws a b3 into the mix, while making it feel faster with little added effort. If you were to play this lick at half speed, the open G string does not sound great—but that’s the whole idea behind what Brad is able to do with open string licks. At tempo, the open string sounds like a natural inflection and the lick has more velocity than if it were omitted.
Ex. 1
Ticks
In Ex. 2 we’re still looking at the “Ticks” solo but focusing on the back half. This entire section of the solo is a smorgasbord of open strings. The first phrase uses sliding and open strings to create an almost bouncy and circus feel. The use of the open G string allows Brad to travel up the fretboard with some very interesting flair. Then he uses the open 1st string in measure 2 to create momentum again, but in this instance, the open-string pull-offs fall inside the E major scale rather than acting as color tones. It’s much easier to connect this section of the lick to the previous by using the third finger to execute the bend and the fourth finger to start the new descending phrase. Lastly, Brad takes the solo home with a simple descending three-note-per-string pull-off lick that combines inside and outside notes.
Ex. 2
If you’ve ever listened to Paisley’s “Time Warp,” you know that it’s a gold mine of licks to steal. In Ex. 3, I’m focusing on a lick Brad plays on the “Live on Letterman” version, which occurs after the piano solo at the 1:23 mark in the video below. It’s worth noting that this is not the same line featured on the album version from Time Well Wasted. This lick is a perfect example of how Brad uses open strings to create velocity and really get going downhill at breakneck speeds. The lick is not overly complicated, but it is extremely fast, especially if you are new to hybrid picking. I’m playing it at roughly 75 percent speed so that the notes are intelligible and not just a blur. The lick is mostly based in the A Aeolian mode (A–B–C–D–E–F–G), with flatted second being the exception.
Ex. 3
Brad Paisley - Time Warp (Live on Letterman)
In this example (Ex. 4), we tackle a fantastic phrase from the solo to “Water.” The lick I’m breaking down falls around the 1:43 mark in the YouTube video. What’s so interesting is that while the song is in F major, Brad utilizes the open A, D, and G strings to navigate the fretboard vertically and create energy. My favorite thing about the descending pull-off section of this lick is that it’s a tame bluegrass-style lick in G, but it’s the placement of the lick over the chord changes that makes it sound interesting.
Ex. 4
Brad Paisley - Water
Ex. 5 is where things get really exciting. It’s from a live performance of “Water” during the 2010 ACM awards. At the 3:40 mark Brad uses an open-string lick to build tension and work his way up the fretboard that caught my attention. As before, it sounds monstrous at tempo but really doesn’t make a ton of sense when slowed down. It’s a fairly simple pull-off lick that isn’t too difficult if you’re already used to hybrid picking, but it creates a ton of movement and excitement when sped up. I’m guilty of stealing both this lick and the idea behind it for “wow” moments in solos.
Ex. 5
Brad Paisley - Water (live ACM Awards 2010)
It’s undeniable how freakishly good of a guitar player Brad Paisley is (try grabbing some of the monster licks from the outro of “Water”). Because of how many tricks he has up his sleeve, he’s nearly impossible to replicate, but that doesn’t mean there isn’t something that everyone can take from Paisley’s bag of tricks. Use this concept of using open strings in unconventional places to add spice, speed, and mystique to your playing.
Unleash your inner metal icon with the Jackson Lee Malia LM-87, a high-performance shred-ready axe designed in collaboration with Bring Me The Horizon guitarist Lee Malia. Featuring custom Jackson signature pickups, a fast D-profile neck, and a TOM-style bridge for rock-solid stability, this signature model is a must-have for commanding metal tone and smooth playability.
British metal icon and Bring Me The Horizon guitarist Lee Malia has partnered with Jackson to create his signature LM-87, a shred-ready axe built for heavy riffing and alternative modern metal. As a founding member and lead guitarist of the Grammy-nominated band, Malia is renowned for his aggressive playing style and intricate solos. This high-performance guitar matches his demanding musicality.
With its offset Surfcaster™ body shape and vintage appeal, the LM-87 melds classic design with modern appointments. The thin open pore finish on the bound Okoume body and neck exudes organic style, while the unique 3-ply pickguard and chrome hardware add striking accents. The fast D-profile 3- piece okoume neck allows smooth riffing across the bound amaranth fingerboard.
Custom Jackson signature pickups, including a bridge humbucker with push-pull coil-split, equip the LM-87 with versatile tone-shaping options to fulfill Malia's sonic vision. The TOM-style bridge with anchored tailpiece and fine tuners provides rock-solid stability for low tunings and heavy picking.
Designed in close collaboration with the legendary guitarist, the Jackson Lee Malia LM-87 is built for shredding. Its blend of vintage vibe and high-performance features make this signature model a must-have for players who value commanding metal tone and smooth playability.
The Tune-o-matic bridge with an anchored tailpiece and fine tuners offers enhanced tuning stability and precise, incremental adjustments. This setup ensures consistent pitch control, improved sustain, and easier fine-tuning without affecting overall string tension.
The guitar’s three-piece set-neck guitar with graphite reinforcement offers exceptional strength, stability, and resistance to warping. The multi-piece construction enhances sustain and tonal clarity, while the graphite reinforcement adds extra durability and prevents neck shifting due to humidity or temperature changes. This design ensures a solid, reliable performance with improved resonance and longevity.
Features Include:
- Okoume body
- Three-piece okoume set neck construction with graphite reinforcement
- 12"-16" compound radius amaranth fingerboard
- 3-ply pickguard
- Chrome hardware
- Custom wound Jackson LM-87 pickups
- Volume with push-pull coil-split and tone control
- TOM-style bridge with anchored tailpiece and fine tuners
- Gig bag included
The Jackson LM-87 carries a street price of $899.99.
For more information, please visit jacksonguitars.com.
Unleashing the Pro Series Signature Lee Malia LM-87 | Jackson Guitars - YouTube
Jackson Pro Series Signature Lee Malia LM-87 Electric Guitar - Open Pore Black
Pro Series Lee Malia Signature LM-87 Open Pore BlackThe Tone King Imperial Preamp Pedal delivers legendary vintage American tube tone with modern control. Featuring two channels mirroring '50s tweed and '60s blackface tones, built-in zero watt poweramp, stereo convolution spring reverb and tremolo, and low-latency impulse response technology. MIDI programmable with up to 128 presets for instant recall.
The Imperial All-Tube Preamp pedal delivers Tone King’s legendary MKII amplifier's '50s tweed, '60s blackface, and vintage British rock tones in a compact, pedalboard-friendly format. It features the exact preamp section and phase inverter circuitry of the Imperial MKII amp, as well as Reverb, Tremolo and Attenuation, resulting in a pedal that sings with harmonic richness and blooming touch response. Powered by three 12AX7 preamp tubes running at high voltage, this preamp delivers the amp's sound, responsiveness, and exquisite interaction with your pickups and effects. The onboard, low-latency impulse response (IR) loader (per channel), Headphones, easy integration and expansion with your existing gear, and MIDI capabilities, takes these iconic tones into the new era of guitar playing.
Legendary Vintage Tube Amp Tones
The Imperial Preamp Pedal features two distinct channels, each mirroring the '50s and '60s flavors of the Imperial MKII.
- The Rhythm Channel evokes the essence of a classic '60s blackface combo's pristine cleans with a touch-sensitive response that transitions smoothly into overdrive.
- The Lead Channel is inspired by the iconic tweed amps of the '50s’ with the ability to glide between warm articulate cleans and aggressive midrange bark. This channel's Mid-Bite control adds a further layer of tone shaping, focusing the low-end, while adding high-end presence and gain for a British-flavored rock crunch.
Built-In Zero Watt Poweramp - Phase Inverter
The Imperial Pre-Amp Pedal includes the exact phase inverter circuitry of the actual Imperial MKII amp, utilizing one of its three 12AX7 tubes. This built-in “0 watt poweramp” authentically provides the harmonic and dynamic content of the Tone King poweramp section. This revolutionary design is the cornerstone that delivers the ENTIRE Imperial MKII experience right on your pedal board.
Stereo Convolution Spring Reverb & Stereo Tremolo
Like its namesake amp, the Imperial Preamp boasts foot-switchable spring reverb and tremolo (digital on the preamp pedal) which are assignable to each channel. A signature of the Tone King Imperial MKII tube amplifier, these era-correct effects add dimension and movement while transporting you to a golden age of electric guitar tone.
Impulse Response (IR) Cabinet & Power Amp Sim
The Imperial Preamp pedal's low latency IR and power amp simulation technology delivers its tube tones directly to the front of house or your interface. That’s especially evident in the 15 included OwnHammer-made IRs. Each channel has three of our favorites, preloaded, and selectable via dual 3-way toggle switches.
OH 112 Imperial TK1660: Tone King 1660 speaker in a Tone King Imperial 1x12 combo. Captured using a Shure SM57, a Neumann U87, and a Royer 121 through '70s API 312 preamps.
OH 212 Class A Blue: Celestion Blues from 1963 in a Vox AC30 2x12 combo. Captured using a Shure SM57, a Neumann U87, and a Royer 121 through '70s API 312 preamps.
OH 412 Basketweave M25: Celestion G12M-25 speakers from 1971 in a basket-weave 1960B 4x12 cabinet. Captured using a Shure SM57, Telefunken MD421, and Royer 121.
There are 12 additional IRs to choose from in the included Tone King Editor software (powered by Synergy) which are easy to swap in and out of the pedal's six available slots. You can also disengage the onboard IR loader entirely to use the preamp with an external IR loader or powered cabinet.
Tone King Editor Software
You can assign the Reverb, Tremolo and IR to each of the channels right on the pedal itself, making it a powerful and easy-to-use sonic tool. Tone King offers an Editor software, powered by Synergy, which takes the Pre-Amp's capabilities to another level, allowing you to fine-tune all of the preamp's digitally controlled parameters and save them in up to 128 MIDI presets
- Control the independent power amp simulation HF Comp and Low-Pass filters
- Access all 15 included OwnHammer IRs• Easily load your own IRs and manage your IR library
- Assign any of your IRs to the pedal's six available slots (three per channel)• Control your reverb, reverb tails, tremolo and effects loop bypass settings• Save these settings to up to 128 presets for instant recall via MIDI
The Tone King Editor software also unlocks all of the Imperial Preamp's modern control. Fully MIDI-capable, you can save your presets and access them instantly with a MIDI pedalboard controller or the laptop running your entire show. It is the perfect marriage of modern control and classic tube tone.
Expanding Your Rig's Capabilities
The Imperial Preamp Pedal is the perfect DI recording and performing solution. But that's just scratching the surface.
Add Channels to Your Current Guitar Amplifier
A standout feature of the Imperial preamp pedal is its ability to easily integrate with your existing amplifiers (must have a series effects loop). A straightforward 3-cable connection is all it takes, and you can instantly alternate between the Imperial Preamp as your amp's front end or your amp's preamp channels.
Networking with Other Effects-Loop-Equipped Preamp Pedals
Create the ultimate pedalboard-based rig with other preamp pedals (with effects loops). Using the same 3-cable method, you get both Imperial channels, your other preamp’s tones, the Imperial's stereo effects loop, and its onboard IRs. Additionally, you can assign the Imperial's spring reverb and tremolo effects to your other preamp channels.
Classic American Tube Tone for Every Stage & Studio
Whether you're a gigging musician, a recording artist, or simply a tone enthusiast, the Tone King Imperial Preamp pedal offers endless possibilities. Use it as a standalone preamp for recording or for silent stages and practice, add its two channels to your existing amplifier, pair it with a power amp and cabinet to move some air, or combine it with other preamp pedals for an even wider range of pedalboard-based tones.
Tone King Imperial Preamp Pedal is the ultimate marriage of legendary, vintage American tube tone and modern control.
For more information, please visit toneking.com
Features
- Two Channel High-Voltage preamp – DI
- 3 x 12AX7 preamp tubes running at proper high voltages
- Built-In zero watt poweramp - phase inverter circuit
- Two channels with independent Volume and Attenuation controls
- Rhythm Channel (top)
- '60s-era American blackface combo tone
- Bass and Treble controls
- Lead Channel (Bottom)
- '50s-era American tweed combo and British rock tones
- Tone and Mid-Bite controls
- Spring Reverb (convolution)
- Reverb and Dwell controls
- Independently assignable to each channel
- Tremolo (digital)
- Depth and Speed controls
- Independently assignable to each channel
- Stereo, Series FX loop (bypassable)
- MIDI programmable
- Save up to 128 presets for instant recall via an external MIDI switcher
- Presets save:
- Channel selection
- Master bypass settingo IR selection
- IR bypass setting
- Effects loop bypass setting
- Reverb bypass and tails settings
- Tremolo bypass settings
- Onboard Impulse Response (IR) Technology
- Low-latency Impulse Response cabinet simulation (bypassable)
- 3-position CAB/IR select switch per channel (programmable via software)
- Included OwnHammer IRs
- Poweramp simulation with software editable HF Comp and Low-Pass filters (per channel)
- Connections:
- Dual stereo balanced XLR outputs with Ground Lift Switch
- ¼" Headphone output
- Effects Send and Stereo Return Jacks
- MIDI 5-pin standard connector
- USB-C connector for use with the included Tone King Editor software editor
- To Amp In, From Amp Send and From Amp Return Jacks – for adding Imperial channels to your amp or preamp
- Included
- 6’ USB Cable
- Universal 12V Power Supply
- Dimensions: 7.2” (W) x 5.7” (D) x 2.75” (H)
- Weight: 1.9 lbs.
With a bit of downtime back in Nashville, co-shredders-in-chief Megan and Rebecca Lovell joined Shred With Shifty to deconstruct their face-melting leads on “Summertime Sunset,” off of their 2022 record Blood Harmony.
The Georgia-born, Nashville-based roots-rock outfit Larkin Poe have had a busy year. Last summer, they toured across the U.S. supporting Slash, and released their seventh studio album, Bloom, on January 22. With a bit of downtime back in Nashville, co-shredders-in-chief Megan and Rebecca Lovell joined Shred With Shifty to deconstruct their face-melting leads on “Summertime Sunset,” off of their 2022 record Blood Harmony.
The Lovells grew up reading sheet music and learning violin via the Suzuki method—there was little room for going off the beaten path until they fell in love with Jerry Douglas’ dobro playing on Alison Krauss records. Rebecca took up the mandolin, while Megan went for the dobro and the slide side of things. It took a while for them to get comfortable turning up from their bluegrass roots, but eventually they built Larkin Poe’s amplified, blues-rock sound.
First up, Rebecca, playing a pristine ’60s SG, shows how she put together her stinging, fuzzy solo by “hunting and pecking out” melodies in her mind, building up the chops to follow her intuition. Then Megan, playing a Rickenbacker-inspired lap steel of her own design through a Rodenberg TB Drive, details her dizzyingly fast slide acrobatics, and her particular “rake” technique that she copped from Jerry Douglas and Derek Trucks.
Tune in to hear them talk about how to sustain family relationships while going professional, keeping music community-minded, and whether or not they’ll go back to bluegrass.
If you’re able to help, here are some charities aimed at assisting musicians affected by the fires in L.A:
https://guitarcenterfoundation.org
https://www.cciarts.org/relief.html
https://www.musiciansfoundation.org
https://fireaidla.org
https://www.musicares.org
https://www.sweetrelief.org
Credits
Producer: Jason Shadrick
Executive Producers: Brady Sadler and Jake Brennan for Double Elvis
Engineering Support by Matt Tahaney and Matt Beaudion
Video Editor: Addison Sauvan
Graphic Design: Megan Pralle
Special thanks to Chris Peterson, Greg Nacron, and the entire Volume.com crew.