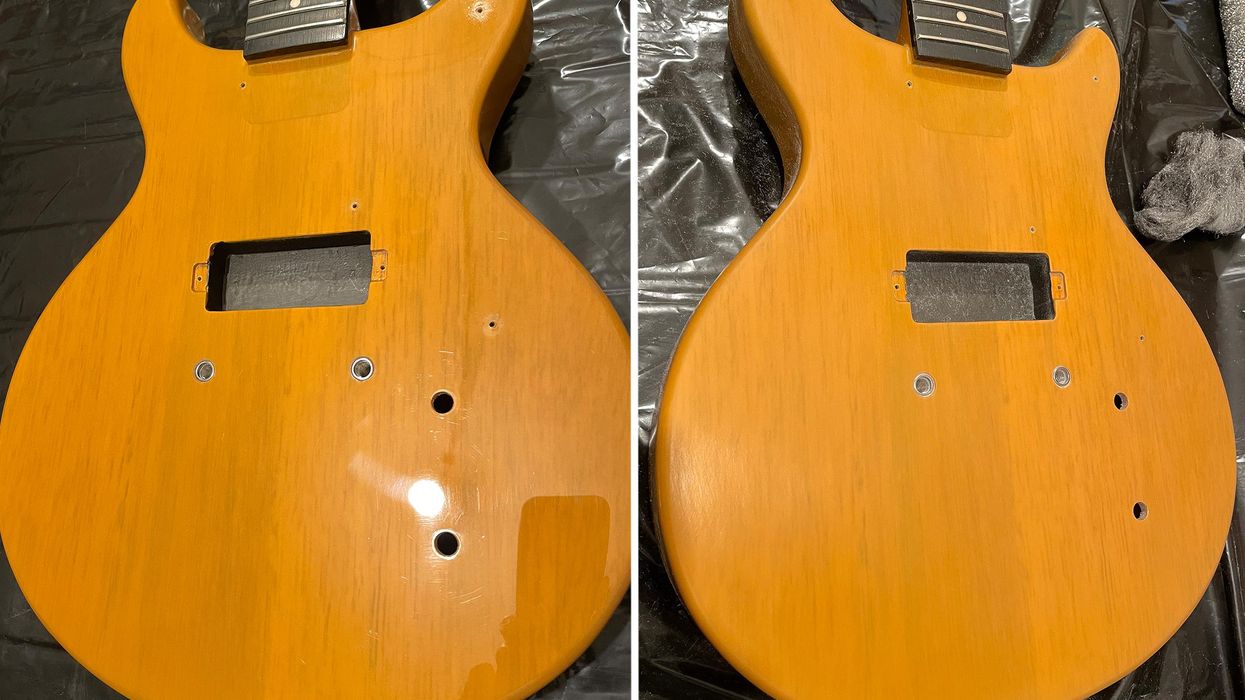
Photo 1 (left) and Photo 2 (right)
A lot of you have been waiting for this penultimate step of our guitar aging project, so let’s do some damage!
Welcome back to Mod Garage. Today we’ll continue to work on our aging project, and some of you might be wondering why there was such a long break. The reason is simple: suboptimal timing from my side. The last part of this column was in the middle of autumn, and I wanted you to do the following steps outside (if possible) and not on the kitchen table. Wintertime is not the best time for such a challenge but now is a good starting point, so let’s go!
We’re almost done with our project, can you believe it? In this installment, we’ll take care of the color, talk about fading, and we’ll crack the lacquer—something a lot of you have been waiting for—before we add some dings and dongs in the last part of this series, which is the final touch before we put it all together again.a
We also have an advice column on aging from my friend and colleague Matthias “Matti” Meyer, from the German-based Bassart Guitars. Matti is one of the best pro agers I know. Please follow his advice and recipe for aging wood at the end of this column—we will need these tools in the next and final part of this project.
Aging the Color
Over time, the colors on guitar bodies start to fade, and depending on the type of color and the paint-job method itself, discolorations can show up. The two main factors are if the guitar was exposed to ultraviolet light and if the paint job is all intact. A famous example is the Gibson Les Paul goldtop guitars with the golden color turning greenish, or the Gibson sunburst Les Pauls losing the red color of the sunburst spray job over time. But Fender guitars also suffer similar problems.
What we want to mimic is an old nitro lacquer, but with our Harley Benton guitar we have two problems:
- The mustard color is not a real TV yellow, as discussed before. TV yellow is much lighter, so even when we find a way to fade the color, it won’t look like a faded TV yellow, but a faded mustard yellow. We can’t change this easily, so we must work with what we have and love it for what it is rather than hating it for what it’s not.
- It’s not nitro lacquer on our Harley Benton but a modern, not-so-thin, ultra-durable poly lacquer. In a technical way, this modern lacquer does a much better job than any vintage nitro stuff regarding protection of the guitar. The downside is that we can’t make poly look like nitro when aging; it will only be an approximation. But again, it is what it is, and we’ll make the best out of it.
If you have the time, exposing the guitar to direct sunlight for some weeks or months will cause a fading of the color to a certain degree. Over the years, I’ve seen the oddest attempts to do such things, including regularly placing the guitar inside a home solarium. Using artificial UV light is also an option but building a well-working construction for such a big object, like a set-neck guitar, is not easy and you’d need a lot of UV lamps for that. Such devices are often used to make yellowed plastic materials look shiny white again. An overspray with the correct color is also an option. but a lighter color on a darker one is always difficult to do—especially with a semi-transparent color like TV yellow. And I doubt it’s worth the time and money. Not everything is doable and this falls into that category. But we’ll do other things to make it look old and cool, so leave the color as it is.
Let’s begin. As usual, grab your steel wool and abrasive cloth to break the shine of the high-gloss lacquer, and don’t forget the backside of the neck. The difference can be seen in Photo 1 (before) and Photo 2 (after).
Aging the Lacquer
This is what a lot of you have been waiting for and today we’ll finally do it: cracking the lacquer!We all know the look of cracked lacquer on vintage guitars, which is part of their special appearance and charm. On vintage guitars this happens over time, the softener disappears, and the paint starts to crack. Here again, facing that our Harley Benton is poly and not nitro-painted, we must follow a different route to get a good result.
Generally, there are two basic methods to do this:
- Mimicking the cracks by using a razor blade to cut the cracks into the paint.
- Using a combination of heat and cold to crack the lacquer.
In both cases this is only the first step. Next, we’ll have to make the cracks more visible, but first things first.
I decided to use the second method: using heat and cold to crack the lacquer. Please note, this will take some time and patience to do it right: It won’t be done in 15 minutes. You don’t need much for this, just a heat gun and several bottles of cooling spray. The process is easy but safety first: Only do this outside, wear gloves and goggles, and place a bucket with cold water or an extinguisher near you … a heat gun gets very hot!
You can’t do this in one step, and you’ll need to work in smaller areas, one by one. Heat up the first area with the heat gun and be careful—you only want to heat up the lacquer and not melt or burn it. If you want to intentionally add some burned spots, a heat gun is the way to go, too. Depending on the type and thickness of the lacquer as well as the power of your heat gun, it can take some time until the lacquer is ready to crack. Start to heat it up from a distance and not with the heat gun directly on the guitar, checking the temperature of the lacquer from time to time with one of your hands. Never put your hand directly under the heat gun! Take the guitar body and your hands away from the gun when you check the temperature. If you feel that it’s not hot enough, keep heating it up until it’s good to go.
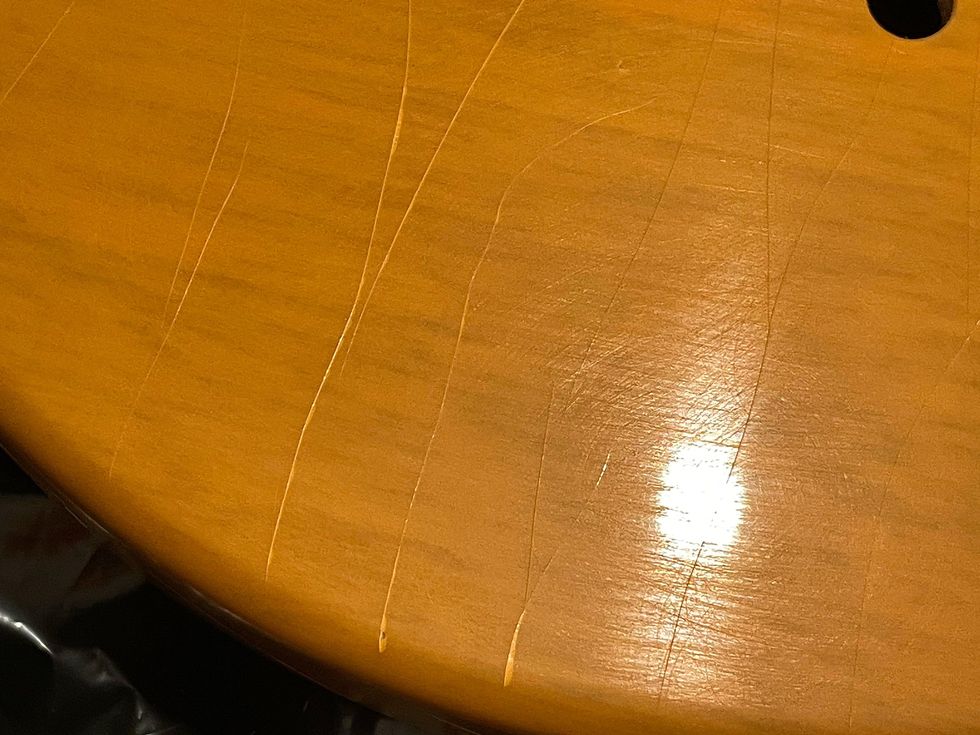
Photo 3
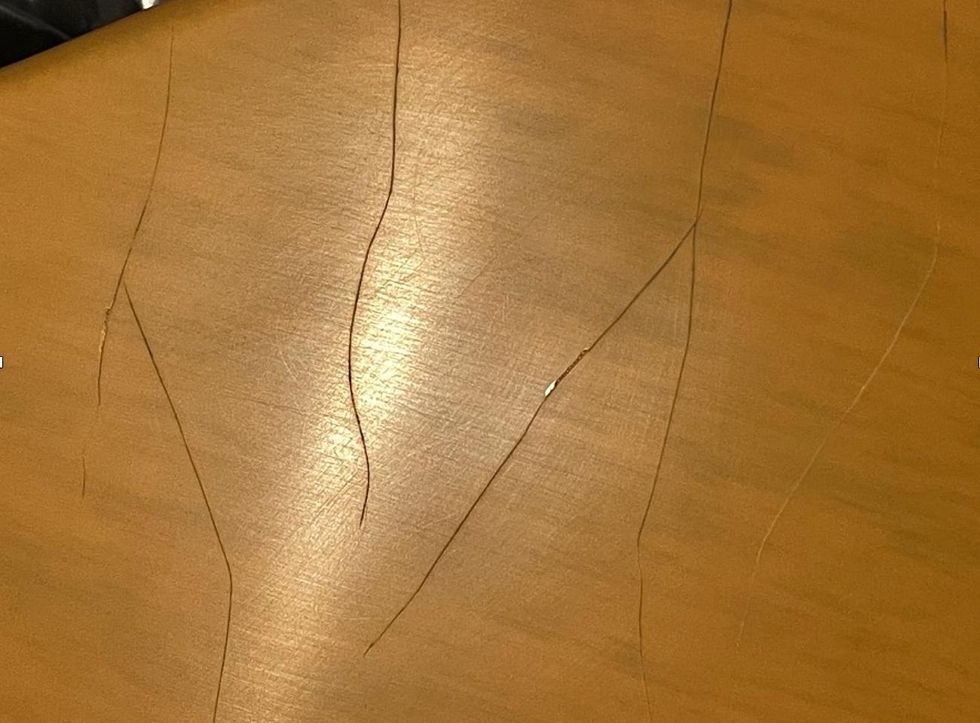
Photo 4
There are no rules set in stone because it depends on the things mentioned above. So, you have to try and see what works on your guitar. If you think the lacquer is hot enough, take away the heat gun and immediately spray the heated area with the cooling spray to create a sudden temperature gradient. You’ll likely have to repeat the process several times until the lacquer starts to crack, and usually you can hear when it cracks, which is a good sign. Work your way all over the guitar and crack it area by area. I needed approximately 90 minutes and four bottles of cooling spray until I was finished (Photo 3).
Does it look the same as cracked nitro lacquer? No, it’s not the same cracking pattern because of two reasons. On a nitro-lacquered guitar, the cracking happens because the softener disappears over time, which is a completely different thing. Poly is hard as glass and will never lose its softener. So, the vintage guitars of the future, let’s say in 100 years from now, will look much different compared to today—no more cracks. The second reason is that only in the middle of the spray is the lowest possible temperature not on the edge of the spray. But it’s the same ballpark, so don’t worry.
After you’re done with the entire guitar, let it cool down for some time before we start to make the cracks more visible. Again, there are different ways to do this. I prefer to use a strong black tea or coffee. Warm up the guitar slightly and dip some paper towels into the black tea or coffee before covering the guitar with them. Let them sit there for some hours before you remove them. The moisture will creep into the cracks, coloring them slightly, so they are more visible. This is a permanent process: The cracks will not lose their color again over time. On poly-lacquered guitars, I’ve also seen and tried alternative methods like using Coca-Cola, potassium permanganate, coffee grounds, stains, and more. The tea/coffee method works great and with good results and is, of course, harmless. But feel free to try other methods if you want to experiment, there’s no law against it.
After removing the paper towels, let it dry for some time before removing any residues from the lacquer using a dampish paper towel. Then, heat up the guitar slightly and let it cool down again. And voila, done! You can see the cracks are now brighter in Photo 4.
Congratulations, we are only one step away from finishing our aging project! Next, we’ll add some dings, dongs, and scratches, which is a lot of fun and a great way to individualize your guitar.
That’s it for now. Next month we’ll do another cool guitar mod, so stay tuned. Until then ... keep on modding!
Teatime: How to Age Wood at Home
Matthias Meyer of Bassart Guitars
Hi PG readers,
Did you ever wonder how it’s possible to add a special gray and dark color to the exposed wood on aged guitars? Here is my recommendation for how to do this with some simple household stuff you already have.
You will need: vinegar essence, water, black tea, steel wool, paper coffee filters, and some jars.
First, twitch a good handful of steel wool and put it in a jar. Next, fill up the jar with vinegar essence, close the jar, and let it sit for one or two days. The reaction of the steel wool and the vinegar will result in iron(II) acetate, which you can use as a dye. Use a cone-shaped paper coffee filter to percolate the liquid into a new jar and you hold the panacea in your hands. By adding some water, you can mitigate the dying effect and it’s easy to make some different aging dyes this way, from very dark to light gray.
Now it’s teatime. Make a strong black tea by using 6 to 8 tea bags in a pot, let it cool down, remove the tea bags, and pour the tea in a new jar.
One way of aging the exposed wood is to use the tea first, immediately followed by the iron(II) acetate (wet on wet technique). For a different effect and color, use the tea first and let it dry before applying the iron(II) acetate. Or use both liquids individually without the other one. It all depends on your personal taste and, of course, the wood itself. Before applying these liquids directly to your precious instruments, you should try to practice the process on some wood scraps you have lying around. Different woods react in very different ways and often the aging process needs one or two days before it becomes visible.
I hope you enjoy experimenting with this process. Cheers!
—Matthias “Matti” Meyer
www.bassartguitars.de
- Last Call: Someday You'll Regret That Relic Job - Premier Guitar ›
- How to Relic Your Guitar Neck Pt. 1 - Premier Guitar ›
- The DIY Relic Job—Fantasy or Reality? - Premier Guitar ›
- The Quick and Dirty Details on Guitar Finishes - Premier Guitar ›
- Can You Really Hear the Difference of Guitar Finishes? - Premier Guitar ›
The proprietor and house producer at Nashville's Smoakstack details how a previous owner's failed relationship put this guitar in the crosshairs of a jilted lover.
With ultra-lightweight construction, slim neck profiles, and a quick-swap pickguard system, Venus Revolution guitars provide tonal versatility and personalized flair.
Venus Guitars, a bold new name in the music world, has officially launched with a mission to empower female musicians with thoughtfully crafted gear designed specifically for them. Driven by the belief that every player deserves an instrument that fits, inspires, and elevates them, Venus Guitars is setting a new standard for inclusivity and performance in the music community.
At the heart of the Venus Guitars launch are the three distinct Venus Revolution guitar models, each thoughtfully designed to cater to a range of players and budgets while maintaining the brand's core ethos of comfort, customization, and quality:
Venus Revolution: Perfect for players seeking an accessible yet high-performing instrument, this model sports the innovative Quick-swap pickguard system and ergonomic hourglass design that define the Venus Revolution series. Weighing just 5.5 pounds, Venus Revolution offers a lightweight white jabon body, slim roasted maple neck, and rosewood fingerboard, plus dual humbuckers with coil-splitting for tonal versatility. Priced at $899
Venus Revolution Elite – Blue Morpho: Expertly crafted in the USA, this high-end model boasts a roasted basswood body, a figured roasted maple neck, and a royal black fingerboard for enhanced resonance and stability, and weighs less than 6.5 lbs. Its shimmering color-shifting blue finish and Quick-swap customizable pickguards ensure it stands out on any stage. DiMarzio Air Classic pickups deliver a rich, dynamic tone, while the Sophia 2-22 Deluxe Trem ensures smooth, expressive playability, and the proprietary bolt-on mounting system enhances sustain. Priced starting at $2799
Venus Revolution Elite – Dark Roast: Another USA-crafted masterpiece, the Dark Roast model features a roasted basswood body, a figured roasted maple neck, and a royal black fingerboard, also weighing less than 6.5 lbs. DiMarzio PAF 36th Anniversary pickups provide vintage-inspired tones, while the the Hipshot US Contour Trem ensures smooth, precise vibrato control. Its rich woodgrain finish offers timeless elegance and dynamic tonal flexibility for players who value simplicity and sophistication. Priced starting at $2799
Venus Revolution guitars are designed with innovation and inclusivity at their core. Here’s what makes them unique:
- Ultra-Lightweight Construction: At around 6 pounds, these guitars are designed for maximum comfort without sacrificing tone or durability.
- Slim Neck Profile: Crafted with smaller hands in mind, the slim roasted 24" scale maple necks ensure smooth and effortless playability.
- Quick-Swap Pickguard System: Customize your guitar’s look in seconds by changing the shape or color of the pickguard—no tools required.
- Tonal Versatility: High-quality pickups deliver a wide range of tones, from warm cleans to beefy, powerful overdrive.
- Personalized Flair: Optional medallions and unique finishes allow players to make their Venus Revolution truly their own.
"The Venus Revolution isn’t just a guitar—it’s a statement,” shares Christine Taunton, Product Specialist and spokesperson for Venus Guitars. “It’s an instrument that reflects who you are as an artist and a player. Venus isn’t just about filling a gap—it’s about creating instruments that make women feel powerful, seen, and unstoppable."
For more information, please visit venus-guitars.com.
Introducing the Venus Revolution Guitar - YouTube
Enjoy the videos and music you love, upload original content, and share it all with friends, family, and the world on YouTube.Our columnist takes a good look at his guitars—and a stroll down memory lane—via famed luthier Joe Glaser’s new, free Gearcheck service.
I started buying gear in junior high and I’m still using some of it. My organizational skills have not really improved since then, so the inventory looks like a stamped-on ant pile. The daily 6-strings are stuffed on racks in my room and in gig bags or cases near my door, good-to-go. The less-used guitars are hidden in closets, stashed under couches/beds, and loaned out to friends. Then there are six or seven old battle axes that I’ve played for years that have grown so valuable that they now spend most of their time locked in a huge gun safe in the guest room. I’ve tried several times to catalogue the tools using a notebook, and then a few different long-since-dead computers. I had no idea how many guitars I owned ... until now, thanks to my friend Joe Glaser’s Gearcheck.
Glaser, a famed luthier here in Nashville, started Gearcheck as a software platform for cataloging instruments. Gearcheck gives you a personal and private digital gear room where you can list instruments’ basic model details (year, wood, pickups, etc.), then document them with photos, receipts, Reverb listings, reputable repair records, appraisals, insurance details, as well as your setup specs, string gauge, action, and relief. I even track who I loaned them out to or where they are stored. This is not static information, and tracking the life of a guitar this way gives insight and builds the stories that we care about. All of this establishes provenance, which is a difference between just something and something collectible.
If you’re interested in how this works, go to gearcheck.com. The free membership gets you 1 GB of memory to list your instruments. You can subscribe to get more memory should you need it. To give you some idea of what 1 GB worth of gear looks like, I have 55 instruments listed (49 guitars, 2 mandolins, 3 pedal steels, 1 lap steel) with between three to 12 photos per instrument—some with short descriptions and some with long war stories of modifications, accidents and gig abuse, as well as high points of the instrument’s history. So far, I’ve used .93 of my free gigabyte. I’m setting a limit now: My gear gluttony ends at .999 GB of storage.
The listing process was good for me. I spent my free time over the past 10 days, working late into the night, tracking down all my guitars. I discovered a few I had not seen in years and thinned the herd a bit. I also found some guitars that were great but had some glitch that kept me from playing them, like this killer Kiesel Custom Shop T-build whose middle pickup was wired out of phase, so I finally got off my ass and rewired it, and while I was at it, I swapped the original pickups that were a bit too hot with some Pete A. Flynn ’buckers that I’d been holding.
“My favorite instruments have had a Red Violin-style odyssey.”
Once I decided who made the cut, I started taking photos and uploading guitars starting with my favs. At first, I just listed the main details and basic photos, but then I thought, “Why not make it more about the stories?” Stories are always more interesting than things.
My favorite instruments have had a Red Violin-style odyssey. Their pasts before I got them are mostly guesswork and imagination, but I can document the highlights of my short time in their history. For instance, my 1954 Les Paul has a second jack input in the body that was later refilled. No idea what that was about, but Michael Wilton of Queensrÿche, who sold me the guitar, documented what happened during his time with it. Wilton played it on Queensrÿche’s albums Promised Land and Hear in the Now Frontier. Wilton replaced the bridge pickup wire in the cavity (because the original disintegrated) and replaced a dead potentiometer. Since I’ve had it, Glaser refretted and Plek’d the neck, and added his Stud Finder bridge. I’ve also played it on a ton of gigs. Now I’ve got all these details safely documented on Gearcheck, along with some photos of me playing that goldtop with Lainey Wilson on her first awards show.
Similarly, my 1969 Fender Thinline had some mysteries when I bought it from Chicago Music Exchange. I’ll never know why somebody added a second input jack, but I did document my adding a Glaser B-bender and a 22-fret sweet, flat neck that Fender’s Chip Ellis built to replace the original neck that never really fit in the neck pocket.
Antonio Stradivari made 960 violins between 1666 and 1737. At least 282 still exist and are potentially being played. I imagine, with some basic care, that at least several guitars I live with today will still be rocking 350 years from now. I’m glad I can document our brief time together. You don’t really own legacy instruments, you just keep them for the next player, all the while adding to their legacy.
Small spring, big splash—a pedal reverb that oozes surfy ambience and authenticity.
A vintage-cool sonic alternative to bigger tube-driven tanks and digital springs that emulate them.
Susceptible to vibration.
$199
Danelectro Spring King Junior
danelectro.com
Few pedal effects were transformed, enhanced, and reimagined by fast digital processors quite like reverb. This humble effect—readily available in your local parking garage or empty basketball gymnasium for free—evolved from organic sound phenomena to a very unnatural one. But while digital processing yields excellent reverb sounds of every type and style, I’d argue that the humble spring reverb still rules in its mechanical form.
Danelectro’s Spring King Junior, an evolution of the company’s Spring King from the ’aughts, is as mechanical as they come. It doesn’t feature a dwell control or the huge, haunted personality of a Fender Reverb unit. But the Spring King Junior has a vintage accent and personality and doesn’t cost as much as a whole amplifier like a Fender Reverb or reverb-equipped combo does. But it’s easy to imagine making awesome records and setting deep stage moods with this unit, especially if 1950s and 1960s atmospheres are the aim.
Looking Past Little
Size factors significantly into the way a spring reverb sounds. And while certain small spring tanks sound cool—the Roland RE-201 Space Echo’s small spring reverb for one—it’s plain hard to reproduce the clank and splash from a 17" Fender tank with springs a fraction of that length. Using three springs less than 3 1/2" long, the Accutronics/Belton BMN3AB3E module that powers the Spring King Junior is probably not what you want in a knife fight with Dick Dale. Even so, it imparts real character that splits the difference between lo-fi and garage-y and long-tank expansiveness.
In very practical and objective terms, the Danelectro can’t approach a Fender Reverb’s size and cavernousness. Matching the intensity of the Spring King Junior’s maximum reverb and tone settings to my own Fender Reverb’s means keeping dwell, mix, and tone controls between 25 to 30 percent of their max. Depending on your tastes, that might be a useful limitation. If you’ve used a Fender Reverb unit before, you know they can sound fantastically extreme. It’s overkill for a lot of folks, and the Spring King Junior inhabits spaces that don’t overpower a guitar or amplifier’s essence. Many players will find the Spring King Junior simply easier to manage and control.
There are ways to add size to the Spring King Junior’s output. An upstream, edgy clean boost will do much to puff up the Danelectro’s profile next to a Fender. The approach comes with risk: Too much drive excites certain frequencies to the point of feedback. But the Junior’s mellower sounds are abundant and interesting. Darker reverb tones sound awesome, and combined with modest reverb mixes they add a spooky aura to melancholy soul and spartan semi-hollow jazz phrasings—all in shades mostly distinct from Fender units.
Watch Your Step!
Spring reverbs come with operational challenges that you won’t experience in a digital emulation. And though the Spring King Junior is well built, its relative slightness compounds some of those challenges. The spring module, for instance, is affixed to the Spring King Junior’s back panel with two pieces of foam tape. And while kicking a spring reverb to punctuate a dub mix or surf epic is a gas, the Spring King Junior can be susceptible to less intentional applications of this effect. At extra-loud volumes, the unit picks up vibrations from the amplifier’s output when amp and effect are in tight proximity. And sometimes, merely clicking the bypass switch elicits an echo-y “clank”. This doesn’t happen in every performance setting. But it’s worth considering settings where you’ll use the Spring King Junior and how loud and vibration-resistant those spaces will be.
Though the Spring King Junior’s size makes it susceptible to vibration, many related ghost tones—taken in the right measure—are a cool and essential part of its voice. It’s an idiosyncratic effect, so evaluating its compatibility with specific instruments, amps, studio environments, and performance settings is a good idea. But for those that do find a place for the Spring King Junior, its combination of tone color, compact size, and hazy 1960s ambience could be a deep well of inspiration.