A lot of you have been waiting for this penultimate step of our guitar aging project, so let’s do some damage!
Welcome back to Mod Garage. Today we’ll continue to work on our aging project, and some of you might be wondering why there was such a long break. The reason is simple: suboptimal timing from my side. The last part of this column was in the middle of autumn, and I wanted you to do the following steps outside (if possible) and not on the kitchen table. Wintertime is not the best time for such a challenge but now is a good starting point, so let’s go!
We’re almost done with our project, can you believe it? In this installment, we’ll take care of the color, talk about fading, and we’ll crack the lacquer—something a lot of you have been waiting for—before we add some dings and dongs in the last part of this series, which is the final touch before we put it all together again.a
We also have an advice column on aging from my friend and colleague Matthias “Matti” Meyer, from the German-based Bassart Guitars. Matti is one of the best pro agers I know. Please follow his advice and recipe for aging wood at the end of this column—we will need these tools in the next and final part of this project.
Aging the Color
Over time, the colors on guitar bodies start to fade, and depending on the type of color and the paint-job method itself, discolorations can show up. The two main factors are if the guitar was exposed to ultraviolet light and if the paint job is all intact. A famous example is the Gibson Les Paul goldtop guitars with the golden color turning greenish, or the Gibson sunburst Les Pauls losing the red color of the sunburst spray job over time. But Fender guitars also suffer similar problems.
What we want to mimic is an old nitro lacquer, but with our Harley Benton guitar we have two problems:
- The mustard color is not a real TV yellow, as discussed before. TV yellow is much lighter, so even when we find a way to fade the color, it won’t look like a faded TV yellow, but a faded mustard yellow. We can’t change this easily, so we must work with what we have and love it for what it is rather than hating it for what it’s not.
- It’s not nitro lacquer on our Harley Benton but a modern, not-so-thin, ultra-durable poly lacquer. In a technical way, this modern lacquer does a much better job than any vintage nitro stuff regarding protection of the guitar. The downside is that we can’t make poly look like nitro when aging; it will only be an approximation. But again, it is what it is, and we’ll make the best out of it.
If you have the time, exposing the guitar to direct sunlight for some weeks or months will cause a fading of the color to a certain degree. Over the years, I’ve seen the oddest attempts to do such things, including regularly placing the guitar inside a home solarium. Using artificial UV light is also an option but building a well-working construction for such a big object, like a set-neck guitar, is not easy and you’d need a lot of UV lamps for that. Such devices are often used to make yellowed plastic materials look shiny white again. An overspray with the correct color is also an option. but a lighter color on a darker one is always difficult to do—especially with a semi-transparent color like TV yellow. And I doubt it’s worth the time and money. Not everything is doable and this falls into that category. But we’ll do other things to make it look old and cool, so leave the color as it is.
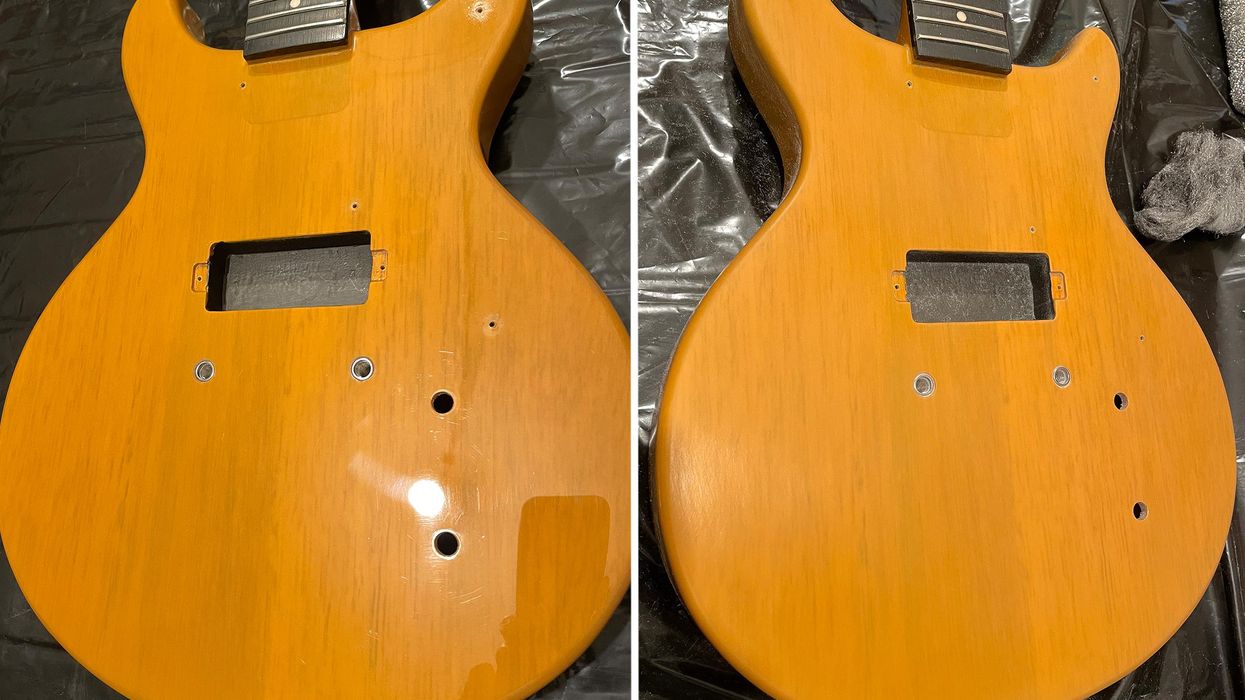
Let’s begin. As usual, grab your steel wool and abrasive cloth to break the shine of the high-gloss lacquer, and don’t forget the backside of the neck. The difference can be seen in Photo 1 (before) and Photo 2 (after).
Aging the Lacquer
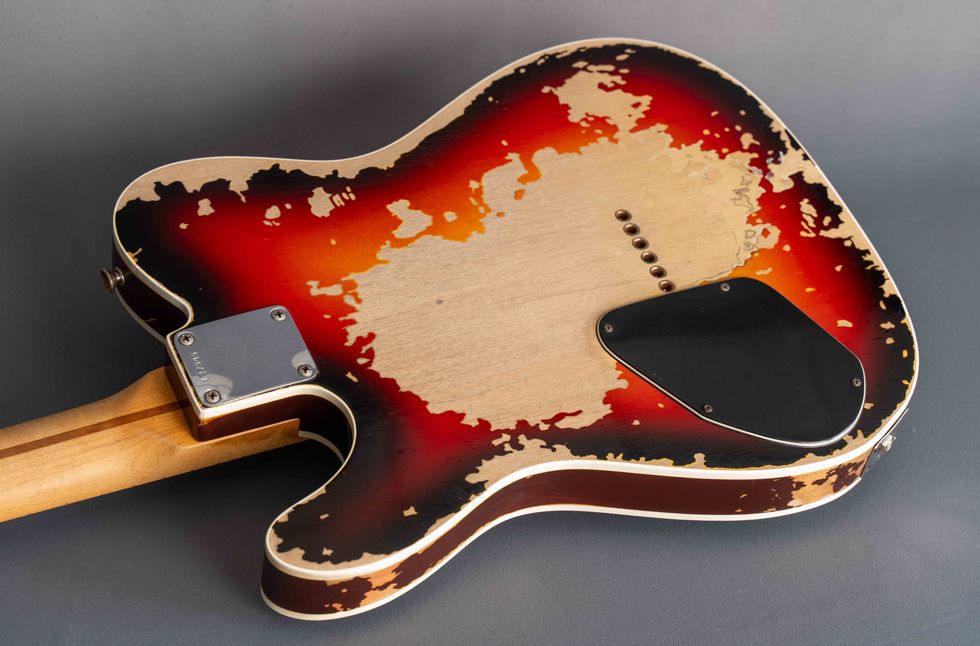
This is what a lot of you have been waiting for and today we’ll finally do it: cracking the lacquer!We all know the look of cracked lacquer on vintage guitars, which is part of their special appearance and charm. On vintage guitars this happens over time, the softener disappears, and the paint starts to crack. Here again, facing that our Harley Benton is poly and not nitro-painted, we must follow a different route to get a good result.
Generally, there are two basic methods to do this:
- Mimicking the cracks by using a razor blade to cut the cracks into the paint.
- Using a combination of heat and cold to crack the lacquer.
In both cases this is only the first step. Next, we’ll have to make the cracks more visible, but first things first.
I decided to use the second method: using heat and cold to crack the lacquer. Please note, this will take some time and patience to do it right: It won’t be done in 15 minutes. You don’t need much for this, just a heat gun and several bottles of cooling spray. The process is easy but safety first: Only do this outside, wear gloves and goggles, and place a bucket with cold water or an extinguisher near you … a heat gun gets very hot!
You can’t do this in one step, and you’ll need to work in smaller areas, one by one. Heat up the first area with the heat gun and be careful—you only want to heat up the lacquer and not melt or burn it. If you want to intentionally add some burned spots, a heat gun is the way to go, too. Depending on the type and thickness of the lacquer as well as the power of your heat gun, it can take some time until the lacquer is ready to crack. Start to heat it up from a distance and not with the heat gun directly on the guitar, checking the temperature of the lacquer from time to time with one of your hands. Never put your hand directly under the heat gun! Take the guitar body and your hands away from the gun when you check the temperature. If you feel that it’s not hot enough, keep heating it up until it’s good to go.
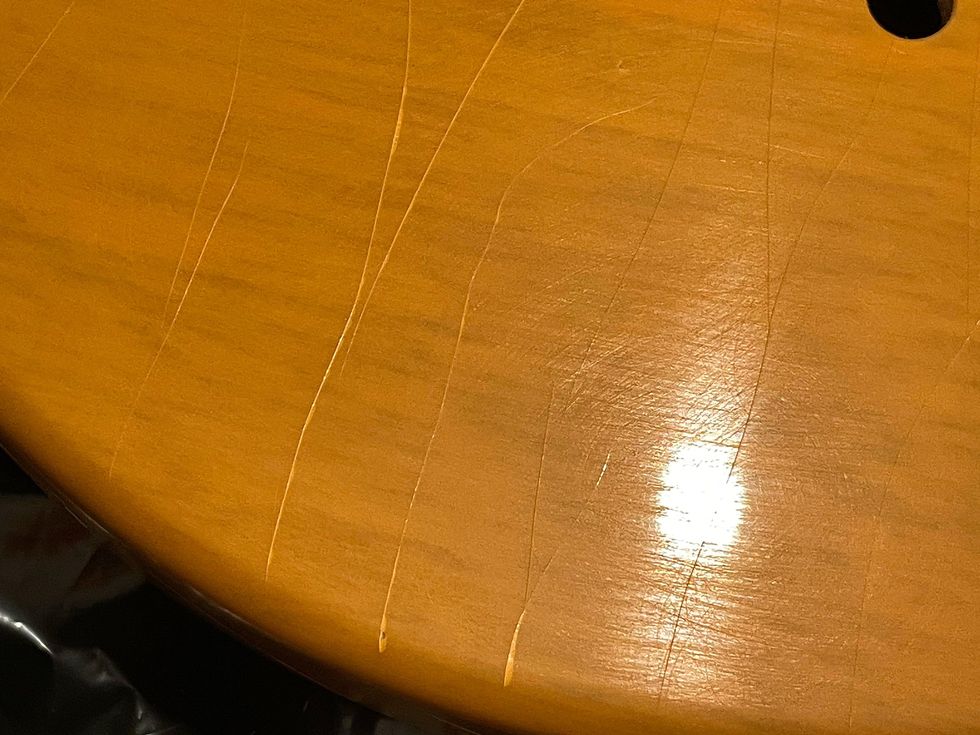
Photo 3
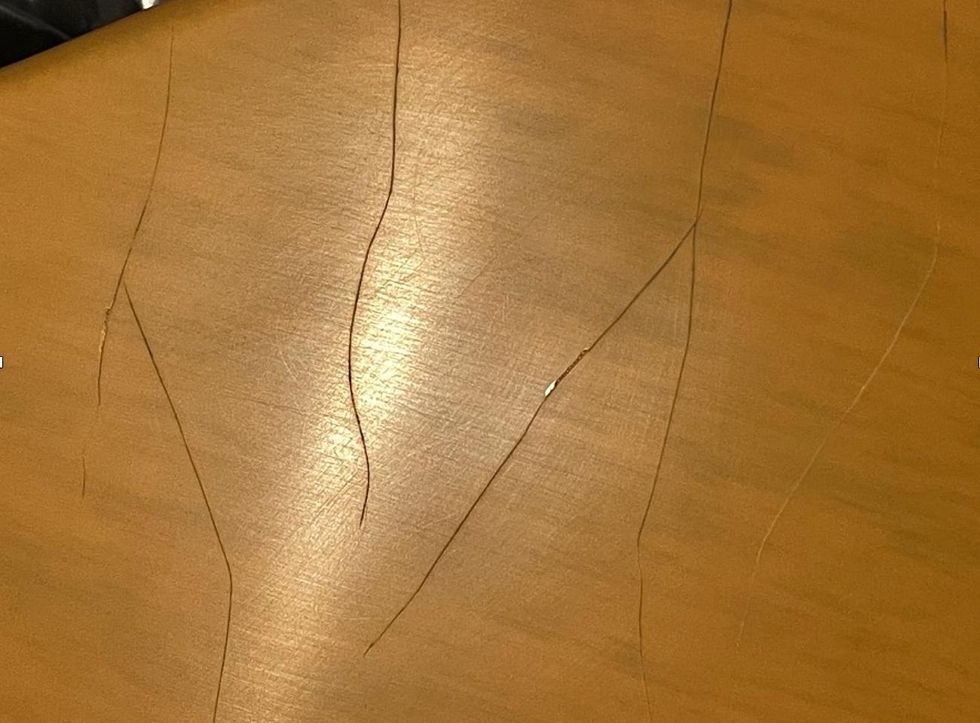
Photo 4
There are no rules set in stone because it depends on the things mentioned above. So, you have to try and see what works on your guitar. If you think the lacquer is hot enough, take away the heat gun and immediately spray the heated area with the cooling spray to create a sudden temperature gradient. You’ll likely have to repeat the process several times until the lacquer starts to crack, and usually you can hear when it cracks, which is a good sign. Work your way all over the guitar and crack it area by area. I needed approximately 90 minutes and four bottles of cooling spray until I was finished (Photo 3).
Does it look the same as cracked nitro lacquer? No, it’s not the same cracking pattern because of two reasons. On a nitro-lacquered guitar, the cracking happens because the softener disappears over time, which is a completely different thing. Poly is hard as glass and will never lose its softener. So, the vintage guitars of the future, let’s say in 100 years from now, will look much different compared to today—no more cracks. The second reason is that only in the middle of the spray is the lowest possible temperature not on the edge of the spray. But it’s the same ballpark, so don’t worry.
After you’re done with the entire guitar, let it cool down for some time before we start to make the cracks more visible. Again, there are different ways to do this. I prefer to use a strong black tea or coffee. Warm up the guitar slightly and dip some paper towels into the black tea or coffee before covering the guitar with them. Let them sit there for some hours before you remove them. The moisture will creep into the cracks, coloring them slightly, so they are more visible. This is a permanent process: The cracks will not lose their color again over time. On poly-lacquered guitars, I’ve also seen and tried alternative methods like using Coca-Cola, potassium permanganate, coffee grounds, stains, and more. The tea/coffee method works great and with good results and is, of course, harmless. But feel free to try other methods if you want to experiment, there’s no law against it.
After removing the paper towels, let it dry for some time before removing any residues from the lacquer using a dampish paper towel. Then, heat up the guitar slightly and let it cool down again. And voila, done! You can see the cracks are now brighter in Photo 4.
Congratulations, we are only one step away from finishing our aging project! Next, we’ll add some dings, dongs, and scratches, which is a lot of fun and a great way to individualize your guitar.
That’s it for now. Next month we’ll do another cool guitar mod, so stay tuned. Until then ... keep on modding!
Teatime: How to Age Wood at Home
Matthias Meyer of Bassart Guitars
Hi PG readers,
Did you ever wonder how it’s possible to add a special gray and dark color to the exposed wood on aged guitars? Here is my recommendation for how to do this with some simple household stuff you already have.
You will need: vinegar essence, water, black tea, steel wool, paper coffee filters, and some jars.
First, twitch a good handful of steel wool and put it in a jar. Next, fill up the jar with vinegar essence, close the jar, and let it sit for one or two days. The reaction of the steel wool and the vinegar will result in iron(II) acetate, which you can use as a dye. Use a cone-shaped paper coffee filter to percolate the liquid into a new jar and you hold the panacea in your hands. By adding some water, you can mitigate the dying effect and it’s easy to make some different aging dyes this way, from very dark to light gray.
Now it’s teatime. Make a strong black tea by using 6 to 8 tea bags in a pot, let it cool down, remove the tea bags, and pour the tea in a new jar.
One way of aging the exposed wood is to use the tea first, immediately followed by the iron(II) acetate (wet on wet technique). For a different effect and color, use the tea first and let it dry before applying the iron(II) acetate. Or use both liquids individually without the other one. It all depends on your personal taste and, of course, the wood itself. Before applying these liquids directly to your precious instruments, you should try to practice the process on some wood scraps you have lying around. Different woods react in very different ways and often the aging process needs one or two days before it becomes visible.
I hope you enjoy experimenting with this process. Cheers!
—Matthias “Matti” Meyer
www.bassartguitars.de
- Last Call: Someday You'll Regret That Relic Job - Premier Guitar ›
- How to Relic Your Guitar Neck Pt. 1 - Premier Guitar ›
- The DIY Relic Job—Fantasy or Reality? - Premier Guitar ›
- The Quick and Dirty Details on Guitar Finishes - Premier Guitar ›
- Can You Really Hear the Difference of Guitar Finishes? - Premier Guitar ›
Some of these are deep cuts—get ready for some instrumental bonus tracks and Van Halen III mentions—and some are among the biggest radio hits of their time. Just because their hits, though, doesn’t mean we don’t have more to add to the conversation.
Naturally, every recording Eddie Van Halen ever played on has been pored over by legions of guitar players of all styles. It might seem funny, then, to consider EVH solos that might require more attention. But your 100 Guitarists hosts have their picks of solos that they feel merit a little discussion. Some of these are deep cuts—get ready for some instrumental bonus tracks and Van Halen III mentions—and some are among the biggest radio hits of their time. Just because their hits, though, doesn’t mean we don’t have more to add to the conversation.
We can’t cover everything EVH—Jason has already tried while producing the Runnin’ With the Dweezil podcast. But we cover as much as we can in our longest episode yet. And in the second installment of our current listening segment, we’re talking about new-ish music from Oz Noy and Bill Orcutt.
A dual-channel tube preamp and overdrive pedal inspired by the Top Boost channel of vintage VOX amps.
ROY is designed to deliver sweet, ringing cleans and the "shattered" upper-mid breakup tones without sounding harsh or brittle. It is built around a 12AX7 tube that operates internally at 260VDC, providing natural tube compression and a slightly "spongy" amp-like response.
ROY features two identical channels, each with separate gain and volume controls. This design allows you to switch from clean to overdrive with the press of a footswitch while maintaining control over the volume level. It's like having two separate preamps dialed in for clean and overdrive tones.
Much like the old amplifier, ROY includes a classic dual-band tone stack. This unique EQ features interactive Treble and Bass controls that inversely affect the Mids. Both channels share the EQ section.
Another notable feature of this circuit is the Tone Cut control: a master treble roll-off after the EQ. You can shape your tone using the EQ and then adjust the Tone Cut to reduce harshness in the top end while keeping your core sound.
ROY works well with other pedals and can serve as a clean tube platform at the end of your signal chain. It’s a simple and effective way to add a vintage British voice to any amp or direct rig setup.
ROY offers external channel switching and the option to turn the pedal on/off via a 3.5mm jack. The preamp comes with a wall-mount power supply and a country-specific plug.
Street price is 299 USD. It is available at select retailers and can also be purchased directly from the Tubesteader online store at www.tubesteader.com.
The compact offspring of the Roland SDE-3000 rack unit is simple, flexible, and capable of a few cool new tricks of its own.
Tonalities bridge analog and digital characteristics. Cool polyrhythmic textures and easy-to-access, more-common echo subdivisions. Useful panning and stereo-routing options.
Interactivity among controls can yield some chaos and difficult-to-duplicate sounds.
$219
Boss SDE-3 Dual Digital Delay
boss.info
Though my affection for analog echo dwarfs my sentiments for digital delay, I don’t get doctrinaire about it. If the sound works, I’ll use it. Boss digital delays have been instructive in this way to me before: I used a Boss DD-5 in a A/B amp rig with an Echoplex for a long time, blending the slur and stretch of the reverse echo with the hazy, wobbly tape delay. It was delicious, deep, and complex. And the DD-5 still lives here just in case I get the urge to revisit that place.
Tinkering with theSDE-3 Dual Digital Delay suggested a similar, possibly enduring appeal. As an evolution of the Roland SDE-3000rack unit from the 1980s, it’s a texture machine, bubbling with subtle-to-odd triangle LFO modulations and enhanced dual-delay patterns that make tone mazes from dopey-simple melodies. And with the capacity to use it with two amps in stereo or in panning capacity, it can be much more dimensional. But while the SDE-3 will become indispensable to some for its most complex echo textures, its basic voice possesses warmth that lends personality in pedestrian applications too.
Tapping Into the Source
Some interest in the original SDE-3000 is in its association with Eddie Van Halen, who ran two of them in a wet-dry-wet configuration, using different delay rates and modulation to thicken and lend dimension to solos. But while EVH’s de facto endorsement prompted reissues of the effect as far back as the ’90s, part of the appeal was down to the 3000’s intrinsic elegance and simplicity.
In fact, the original rack unit’s features don’t differ much from what you would find on modern, inexpensive stompbox echoes. But the SDE-3000’s simplicity and reliable predictability made it conducive to fast workflow in the studio. Critically, it also avoided the lo-fi and sterility shortcomings that plagued some lesser rivals—an attribute designer Yoshi Ikegami chalks up to analog components elsewhere in the circuit and a fortuitous clock imprecision that lends organic essence to the repeats.
Evolved Echo Animal
Though the SDE-3 traces a line back to the SDE-3000 in sound and function, it is a very evolved riff on a theme. I don’t have an original SDE-3000 on hand for comparison, but it’s easy to hear how the SDE-3 bridges a gap between analog haze and more clinical, surgical digital sounds in the way that made the original famous. Thanks to the hi-cut control, the SDE-3’s voice can be shaped to enhance the angular aspect of the echoes, or blunt sharp edges. There’s also a lot of leeway to toy with varied EQ settings without sacrificing the ample definition in the repeats. That also means you can take advantage of the polyrhythmic effects that are arguably its greatest asset.
“There’s a lot of leeway to toy with varied EQ settings without sacrificing the ample definition in the repeats.”
The SDE-3’s offset control, which generates these polyrhythmic echoes, is its heart. The most practical and familiar echos, like quarter, eighth, and dotted-eighth patterns, are easy to access in the second half of the offset knobs range. In the first half of the knob’s throw, however, the offset delays often clang about at less-regular intervals, producing complex polyrhythms that are also cool multipliers of the modulation and EQ effects. For example, when emphasizing top end in repeats, using aggressive effects mixes and pitch-wobble modulation generates eerie ghost notes that swim through and around patterns, adding rhythmic interest and texture without derailing the drive behind a groove. Even at modest settings, these are great alternatives to more staid, regular subdivision patterns. Many of the coolest sounds tend toward the foggy reverb spectrum. Removing high end, piling on feedback, and adding the woozy, drunken drift from modulation creates fascinating backdrops for slow, sparse chord melodies. Faster modulations throb and swirl like old BBC Radiophonic Workshop sci-fi sound designs.
By themselves, the modulations have their own broad appeal. Chorus tones are rarely the archetypal Roland Jazz Chorus or CE type—tending to be a bit darker and mistier. But they do a nice job suggesting that texture without lapsing into caricature. There are also really cool rotary-speaker-like textures and vibrato sounds that offer alternatives to go-to industry standards.
The Verdict
The SDE-3’s many available sounds and textures would be appealing at $219—even without the stereo and panning connectivity options, a useful hold function, and expression pedal control that opens up additional options. The panning capabilities, in particular, sparked all kinds of thoughts about studio applications. Mastering the SDE-3 takes just a little study—certain polyrhythms can be dramatically reshaped by the interactivity of other controls and you need to take care to achieve identical results twice. But this is a pedal that, by virtue of its relative simplicity and richness and breadth of sounds, exceeds the utility of some similarly priced rivals, all while opening up possibilities well outside the simple echo realm
With a few clicks on Reverb, a reptile-inspired shred machine was born.
With this guitar, I wanted to create a shadowbox-type vibe by adding something you could see inside. I have always loved the Yamaha Pacifica guitars because of the open pickup cavity and the light weight, so I purchased this body off Reverb (I think I am addicted to that website). I also wanted a color that was vivid and bold. The seller had already painted it neon yellow, so when I read in the description, “You can see this body from space,” I immediately clicked the Buy It Now button. I also purchased the neck and pickups off of Reverb.
I have always loved the reverse headstock, simply because nothing says 1987 (the best year in the history of the world) like a reverse headstock. The pickups are both Seymour Duncan—an SH-1N in the neck position and TB-4 in the bridge, both in a very cool lime green color. Right when these pickups got listed, the Buy It Now button once again lit up like the Fourth of July. I am a loyal disciple of Sperzel locking tuners and think Bob Sperzel was a pure genius, so I knew those were going on this project even before I started on it. I also knew that I wanted a Vega-Trem; those units are absolutely amazing.
When the body arrived, I thought it would be cool to do some kind of burst around the yellow so I went with a neon green. It turned out better than I imagined. Next up was the shaping and cutting of the pickguard. I had this crocodile-type, faux-leather material that I glued on the pickguard and then shaped to my liking. I wanted just a single volume control and no tone knob, because, like King Edward (Van Halen) once said, “Your volume is your tone.”
T. Moody
I then shaped and glued the faux-leather material in the cavity. The tuning knobs, volume knob, pickguard, screws, and selector switch were also painted in the lemon-lime paint scheme. I put everything together, installed the pickups, strung it up, set it up, plugged it in, and I was blown away. I think this is the best-playing and -sounding guitar I have ever tried.
The only thing missing was the center piece and strap. The latter was easy because DiMarzio makes their ClipLock in neon green. The center piece was more difficult because originally, I was thinking that some kind of gator-style decoration would be cool. In the end, I went with a green snake, because crocodiles ain’t too flexible—and they’re way too big to fit in a pickup cavity!
The Green Snake’s back is just as striking as the front.