
When aging a project guitar, it’s best to take it apart and start small. First, we focus on the metal.
This month, we'll discuss some basics about DIY aging/relic'ing and I'll explain a project I recently did. I chose a budget electric guitar that retails at €199 including shipping (about $217 USD). A guitar in this price range is perfect for a beginner relic'ing project, because if it's not perfect or you ruin something by accident, it's not the end of the world. Besides this, I was curious about the build quality of such a guitar, plus it gives us a perfect base to enhance and make more individual.
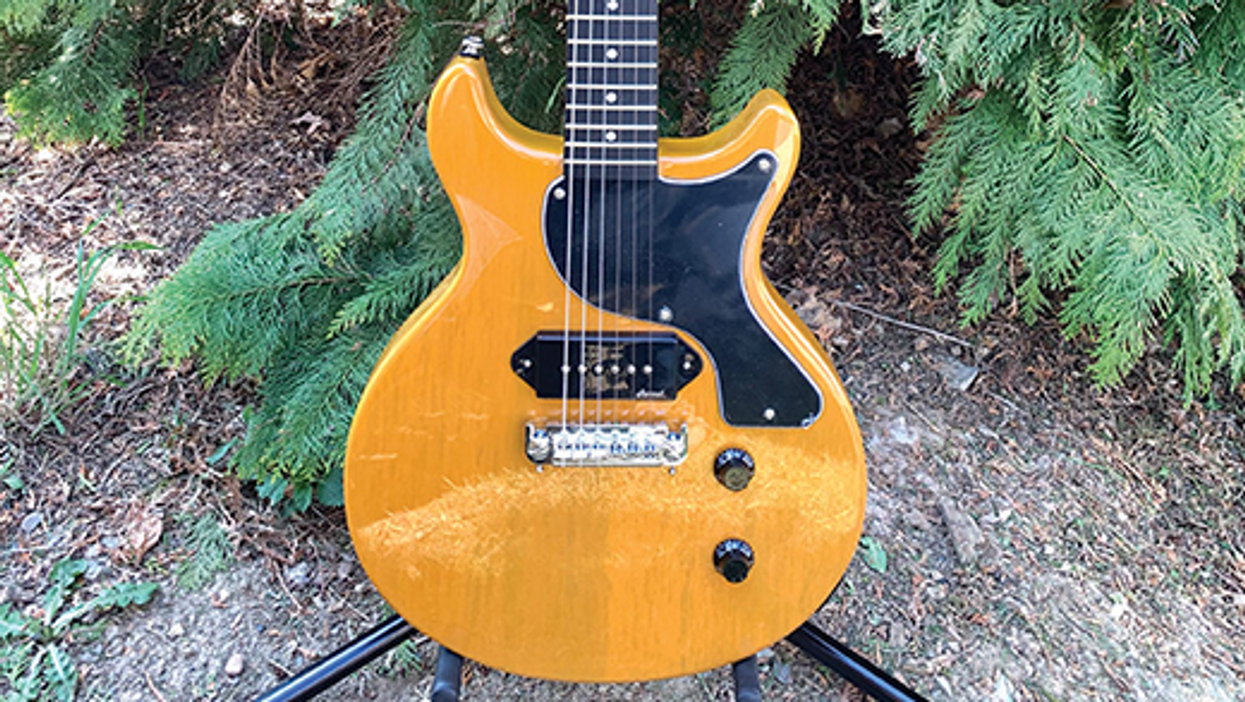
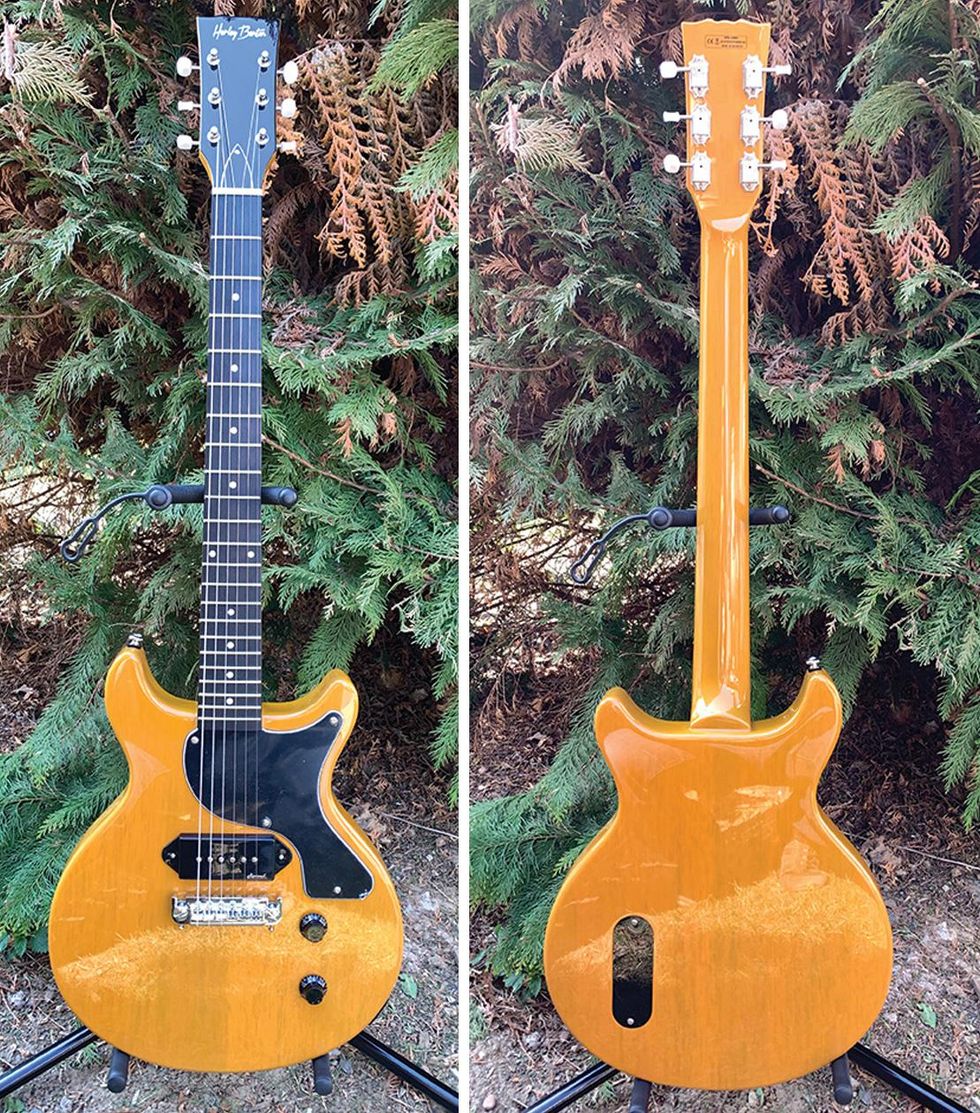
I decided on a Les Paul Junior Double Cut copy, a guitar design that Gibson released in 1958 and that's still in production today. It's a basic design: a single P-90 pickup placed above the wraparound bridge, with a Telecaster-like master volume/master tone configuration. This model is called DC-Junior TV Yellow and is made by Harley Benton, which is the home brand of the German-based Thomann company, one of the biggest guitar retailers in Europe.
A guitar in this price range is perfect for a beginner relic'ing project, because if it's not perfect or you ruin something by accident, it's not the end of the world.
The guitar offers good basic parameters: a solid mahogany body with a glued-in mahogany neck, a dark-stained amaranth (peltogyne) fretboard, aka purpleheart, instead of the classic rosewood material. The rest of the specs are close to vintage. We'll discuss single parts and aging them one by one, and replacing some of them for optical or performance reasons, as part of this project.
When the guitar arrived, I was more than surprised about the overall quality and craftsmanship. I brought it up to tune, plugged it in, and could instantly rock. Fret job, paint job, intonation, and action were excellent. The pickup sounds really good. What else could one expect for this price? Especially the fret job and the use of factory D'Addario strings (.010–.046) are remarkable in this price range.
Images 1 (left) and 2 (right)
Courtesy of singlecoil.com
Images 1 and 2 show the guitar as received, so you have a first impression of what I'm talking about. It's not a real TV yellow, and more of a butterscotch/caramel/mustard color, but with a nice transparency so you can see the grain of the wood. We'll come back to this later in the project.
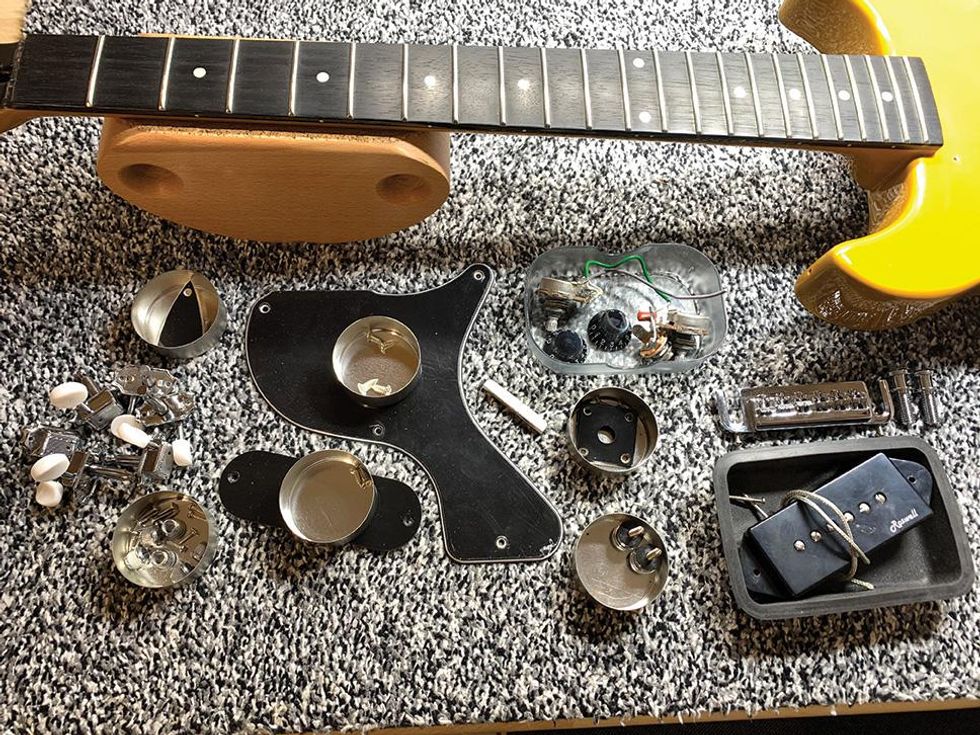
Photo 3
Courtesy of singlecoil.com
The first step is to completely disassemble your guitar, as I did, which you can see in Image 3. It's helpful to separate and label all small parts so you don't have any difficulties putting them back together. Take photos of the whole guitar and the details before you take it apart, and get some small containers (empty cans, boxes, cups, or whatever) to store all parts during the project. Store the screws together with the corresponding hardware, i.e. the screws from the pickguard taped on the back of it ... you get the idea. Also, as the proud owner of several cats and a dog, I speak from experience when I highly recommend using containers with a lid so you can close them, at least when your furry buddies have access to your working space.
I completely took the guitar apart except the bushings (aka "inserts" or "anchors"), because it was obvious that glue was used additionally to secure them. It's not difficult to get them out with the right tools, but in the process you could end up damaging the wood, having to repair the damage by re-drilling the hole and filling it with a wooden plug. There's a lot of debate on the possible tonal influence of the bushings, but my experience is that it's very, very little (if any) as long as it sits tight and can't move. I decided to leave them alone, but it's also possible to slightly age the visible part of the bushings so they won't stand out from the rest.
Let's proceed with an easy-yet-effective aging procedure. We will start with all the screws, followed by the rest of the metal parts.
Your shopping list for this is very small. Here we go:
- Goggles, gloves, surgical mask, and a shop apron to protect yourself. (We'll need this all through this series: safety first!)
- Old newspapers to protect your working space.
- A soft piece of wood like spruce, pine, fir, etc.
- Some Q-tips and paper towels.
- An old cup filled with cold water.
- Steel wool (preferably 0000 grade) or sanding pads (e.g. Micro-Mesh).
- Iron (III) oxide (ferric oxide) liquid.
You don't need much of the ferric oxide; a small bottle will do. This chemical is often used for etching printed circuit boards, so it should be easy to find. Be careful with this stuff! Chemicals can do harm if not used properly. Only use them in well-ventilated areas, always wear goggles, gloves, apron, and a surgical mask—and don't forget to protect your working space with old newspapers.
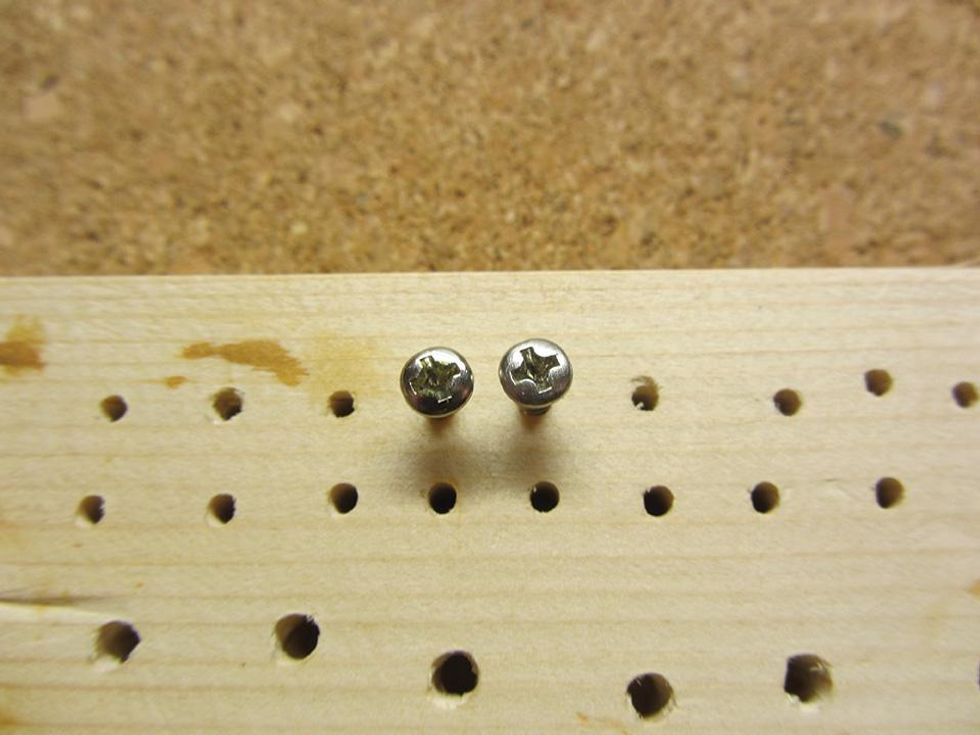
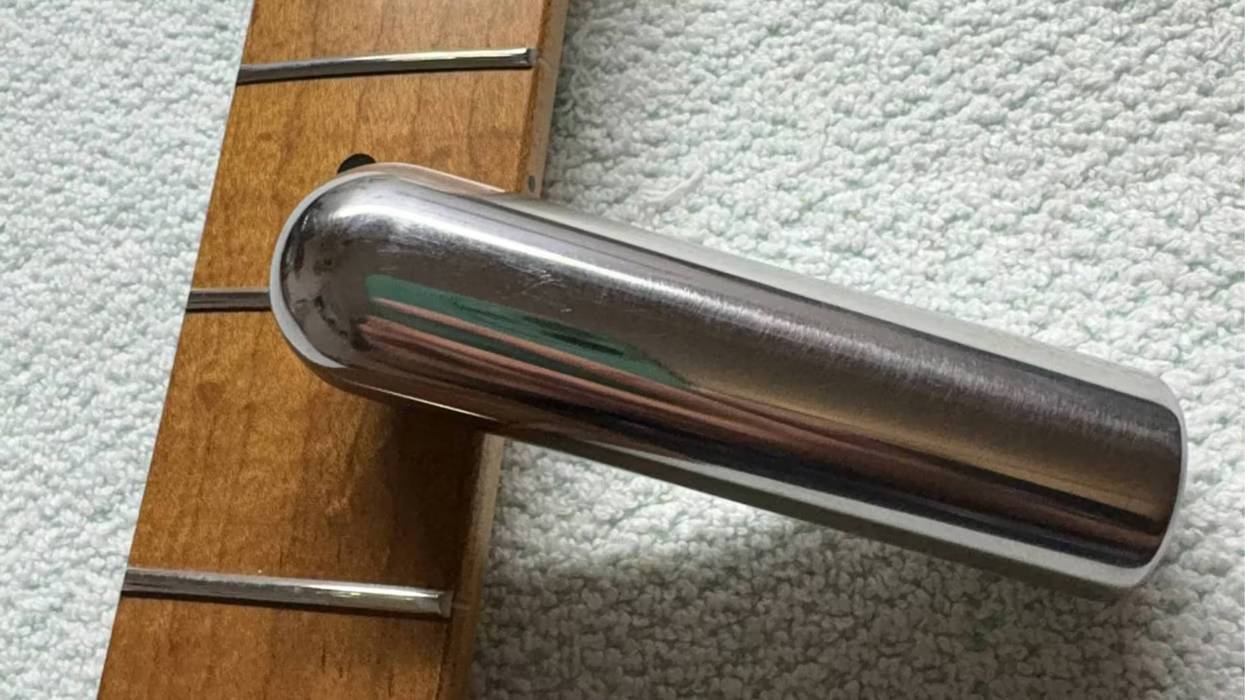
Photo 4
Courtesy of singlecoil.com
So here we go. Remember basic rule #1: break the shine! All screws on this guitar are nickel plated and very shiny. First, lightly rub them with steel wool or a fine-sanding pad until the glossy shine is gone and the color is dulled. Don't forget the edges of the screws. Image 4 is a before/after photo of this process. I used a flexible Micro-Mesh pad with 400 grid.
A lot of people are happy with the optical results after this simple treatment, but for more effect, we'll add some light signs of corrosion in the next step.
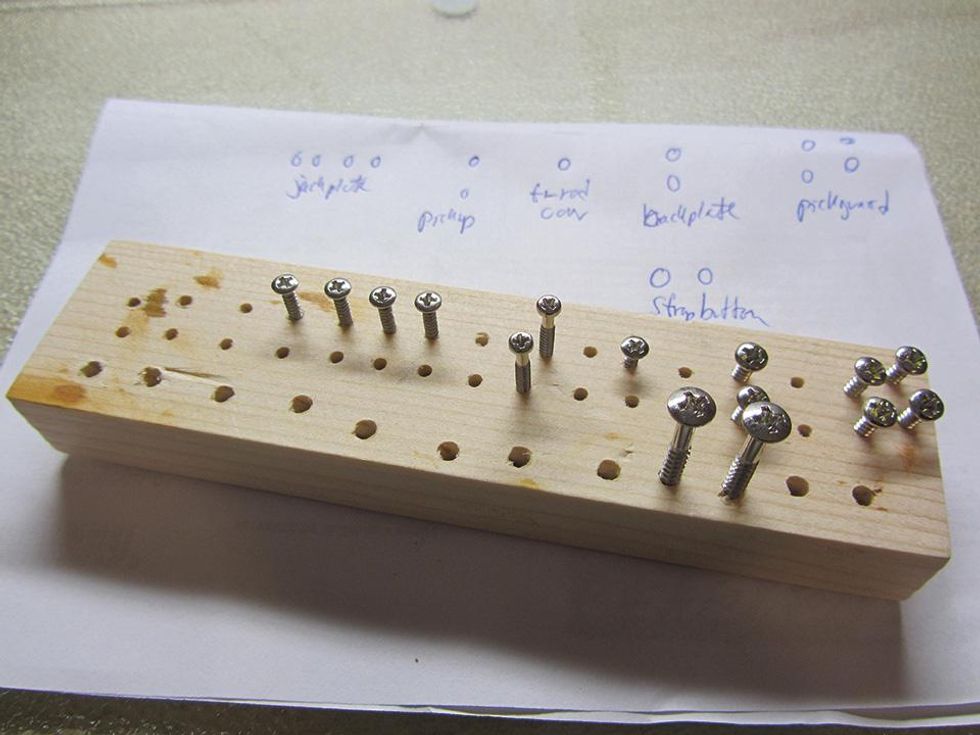
Photo 5
Courtesy of singlecoil.com
Take a piece of soft wood and screw in all of the screws with a screwdriver that matches the head type and size on your screws (Image 5). You don't need to screw them all the way in—just until they can't move or tip over. To keep the overview, arrange them in groups and make a kind of roadmap of what goes where. This way you won't mistake any of the screws as you reassemble the guitar.
Place the wooden piece with the screws on an even surface covered with old newspapers in a ventilated area. Place a cup with cold water within reach. Now dip a Q-tip into the ferric oxide liquid, but remember to use gloves, goggles, etc. to protect yourself. Place the Q-tip on the head of the screws to apply the ferric oxide. The oxidation process will start immediately. Depending on the metal of the screws and your personal taste, this process can range from seconds up to a minute, so it's a good idea to get a feeling for this by first testing it out on a few extra screws. To stop the process, simply dip the screw into the glass of cold water near you and rub it instantly with a piece of paper towel. Caution: Ferric oxide can color the coating of your sink. That's why a cup of water is advised here instead of rinsing screws with running water under a faucet.
Photo 6
Courtesy of singlecoil.com
You can see the process and all three stages side by side in Image 6. If you feel the oxidation process was too much and you don't like the look, you can use steel wool or a Mesh pad to remove some of the oxidation.
Don't overdo it. I've never seen any rusty screws on a vintage guitar. They're usually a little bit dull, showing some light corrosion, if any. Perhaps breaking the shine will be enough without adding any of the ferric oxide. Simply test it on some extra screws and see what you prefer.
Next month we'll perform a different guitar mod before we return to age more metal parts: the bridge, strap buttons, and the tuners. For this, I'll leave you with a little homework to prepare: Get yourself a small bucket with a lid (larger yogurt buckets work perfectly) and collect a nice mixture of funny things like rusty nails, broken glass, gravel, sand, little stones, basalt, etc. to put in your bucket. Until then ... keep on modding!
[Updated 7/26/2021]
- Last Call: Someday You'll Regret That Relic Job - Premier Guitar ›
- The DIY Relic Job—Fantasy or Reality? - Premier Guitar ›
- Paranormal Guitar Mods That’ll Rock Your DIY World - Premier Guitar | The best guitar and bass reviews, videos, and interviews on the web. ›
- The DIY Relic Job—Fantasy or Reality? - Premier Guitar ›
- DIY Relic’ing: Hardware Continued - Premier Guitar ›
- DIY Relic’ing: Neck Treatment - Premier Guitar ›
- Chibson Announce The Priority Delay Pedal ›
A live editor and browser for customizing Tone Models and presets.
IK Multimedia is pleased to release the TONEX Editor, a free update for TONEX Pedal and TONEX ONE users, available today through the IK Product Manager. This standalone application organizes the hardware library and enables real-time edits to Tone Models and presets with a connected TONEX pedal.
You can access your complete TONEX library, including Tone Models, presets and ToneNET, quickly load favorites to audition, and save to a designated hardware slot on IK hardware pedals. This easy-to-use application simplifies workflow, providing a streamlined experience for preparing TONEX pedals for the stage.
Fine-tune and organize your pedal presets in real time for playing live. Fully compatible with all your previous TONEX library settings and presets. Complete control over all pedal preset parameters, including Global setups. Access all Tone Models/IRs in the hardware memory, computer library, and ToneNET Export/Import entire libraries at once to back up and prepare for gigs Redesigned GUI with adaptive resize saves time and screen space Instantly audition any computer Tone Model or preset through the pedal.
Studio to Stage
Edit any onboard Tone Model or preset while hearing changes instantly through the pedal. Save new settings directly to the pedal, including global setup and performance modes (TONEX ONE), making it easy to fine-tune and customize your sound. The updated editor features a new floating window design for better screen organization and seamless browsing of Tone Models, amps, cabs, custom IRs and VIR. You can directly access Tone Models and IRs stored in the hardware memory and computer library, streamlining workflow.
A straightforward drop-down menu provides quick access to hardware-stored Tone Models conveniently sorted by type and character. Additionally, the editor offers complete control over all key parameters, including FX, Tone Model Amps, Tone Model Cabs/IR/VIR, and tempo and global setup options, delivering comprehensive, real-time control over all settings.
A Seamless Ecosystem of Tones
TONEX Editor automatically syncs with the entire TONEX user library within the Librarian tab. It provides quick access to all Tone Models, presets and ToneNET, with advanced filtering and folder organization for easy navigation. At the same time, a dedicated auto-load button lets you preview any Tone Model or preset in a designated hardware slot before committing changes.This streamlined workflow ensures quick edits, precise adjustments and the ultimate flexibility in sculpting your tone.
Get Started Today
TONEX Editor is included with TONEX 1.9.0, which was released today. Download or update the TONEX Mac/PC software from the IK Product Manager to install it. Then, launch TONEX Editor from your applications folder or Explorer.
For more information and videos about TONEX Editor, TONEX Pedal, TONEX ONE, and TONEX Cab, visit:
www.ikmultimedia.com/tonexeditor
The luthier’s stash.
There is more to a guitar than just the details.
A guitar is not simply a collection of wood, wire, and metal—it is an act of faith. Faith that a slab of lumber can be coaxed to sing, and that magnets and copper wire can capture something as expansive as human emotion. While it’s comforting to think that tone can be calculated like a tax return, the truth is far messier. A guitar is a living argument between its components—an uneasy alliance of materials and craftsmanship. When it works, it’s glorious.
The Uncooperative Nature of Wood
For me it all starts with the wood. Not just the species, but the piece. Despite what spec sheets and tonewood debates would have you believe, no two boards are the same. One piece of ash might have a bright, airy ring, while another from the same tree might sound like it spent a hard winter in a muddy ditch.
Builders know this, which is why you’ll occasionally catch one tapping on a rough blank, head cocked like a bird listening. They’re not crazy. They’re hunting for a lively, responsive quality that makes the wood feel awake in your hands. But wood is less than half the battle. So many guitarists make the mistake of buying the lumber instead of the luthier.
Pickups: Magnetic Hopes and Dreams
The engine of the guitar, pickups are the part that allegedly defines the electric guitar’s voice. Sure, swapping pickups will alter the tonality, to use a color metaphor, but they can only translate what’s already there, and there’s little percentage in trying to wake the dead. Yet, pickups do matter. A PAF-style might offer more harmonic complexity, or an overwound single-coil may bring some extra snarl, but here’s the thing: Two pickups made to the same specs can still sound different. The wire tension, the winding pattern, or even the temperature on the assembly line that day all add tiny variables that the spec sheet doesn’t mention. Don’t even get me started about the unrepeatability of “hand-scatter winding,” unless you’re a compulsive gambler.
“One piece of ash might have a bright, airy ring, while another from the same tree might sound like it spent a hard winter in a muddy ditch.”
Wires, Caps, and Wishful Thinking
Inside the control cavity, the pots and capacitors await, quietly shaping your tone whether you notice them or not. A potentiometer swap can make your volume taper feel like an on/off switch or smooth as an aged Tennessee whiskey. A capacitor change can make or break the tone control’s usefulness. It’s subtle, but noticeable. The kind of detail that sends people down the rabbit hole of swapping $3 capacitors for $50 “vintage-spec” caps, just to see if they can “feel” the mojo of the 1950s.
Hardware: The Unsung Saboteur
Bridges, nuts, tuners, and tailpieces are occasionally credited for their sonic contributions, but they’re quietly running the show. A steel block reflects and resonates differently than a die-cast zinc or aluminum bridge. Sloppy threads on bridge studs can weigh in, just as plate-style bridges can couple firmly to the body. Tuning machines can influence not just tuning stability, but their weight can alter the way the headstock itself vibrates.
It’s All Connected
Then there’s the neck joint—the place where sustain goes to die. A tight neck pocket allows the energy to transfer efficiently. A sloppy fit? Some credit it for creating the infamous cluck and twang of Fender guitars, so pick your poison. One of the most important specs is scale length. A longer scale not only creates more string tension, it also requires the frets to be further apart. This changes the feel and the sound. A shorter scale seems to diminish bright overtones, accentuating the lows and mids. Scale length has a definite effect on where the neck joins the body and the position of the bridge, where compromises must be made in a guitar’s overall design. There are so many choices, and just as many opportunities to miss the mark. It’s like driving without a map unless you’ve been there before.
Alchemy, Not Arithmetic
At the end of the day, a guitar’s greatness doesn’t come from its spec sheet. It’s not about the wood species or the coil-wire gauge. It’s about how it all conspires to either soar or sink. Two guitars, built to identical specs, can feel like long-lost soulmates or total strangers. All of these factors are why mix-and-match mods are a long game that can eventually pay off. But that’s the mystery of it. You can’t build magic from a parts list. You can’t buy mojo by the pound. A guitar is more than the sum of its parts—it’s a sometimes unpredictable collaboration of materials, choices, and human touch. And sometimes, whether in the hands of an experienced builder or a dedicated tinkerer, it just works.
Two Iconic Titans of Rock & Metal Join Forces for a Can’t-Miss North American Trek
Tickets Available Starting Wednesday, April 16 with Artist Presales
General On Sale Begins Friday, April 18 at 10AM Local on LiveNation.com
This fall, shock rock legend Alice Cooper and heavy metal trailblazers Judas Priest will share the stage for an epic co-headlining tour across North America. Produced by Live Nation, the 22-city run kicks off September 16 at Mississippi Coast Coliseum in Biloxi, MS, and stops in Toronto, Phoenix, Los Angeles, and more before wrapping October 26 at The Cynthia Woods Mitchell Pavilion in The Woodlands, TX.
Coming off the second leg of their Invincible Shield Tour and the release of their celebrated 19th studio album, Judas Priest remains a dominant force in metal. Meanwhile, Alice Cooper, the godfather of theatrical rock, wraps up his "Too Close For Comfort" tour this summer, promoting his most recent "Road" album, and will have an as-yet-unnamed all-new show for this tour. Corrosion of Conformity will join as support on select dates.
Tickets will be available starting Wednesday, April 16 at 10AM local time with Artist Presales. Additional presales will run throughout the week ahead of the general onsale beginning Friday, April 18 at 10AM local time at LiveNation.comTOUR DATES:
Tue Sep 16 – Biloxi, MS – Mississippi Coast Coliseum
Thu Sep 18 – Alpharetta, GA – Ameris Bank Amphitheatre*
Sat Sep 20 – Charlotte, NC – PNC Music Pavilion
Sun Sep 21 – Franklin, TN – FirstBank Amphitheater
Wed Sep 24 – Virginia Beach, VA – Veterans United Home Loans Amphitheater
Fri Sep 26 – Holmdel, NJ – PNC Bank Arts Center
Sat Sep 27 – Saratoga Springs, NY – Broadview Stage at SPAC
Mon Sep 29 – Toronto, ON – Budweiser Stage
Wed Oct 01 – Burgettstown, PA – The Pavilion at Star Lake
Thu Oct 02 – Clarkston, MI – Pine Knob Music Theatre
Sat Oct 04 – Cincinnati, OH – Riverbend Music Center
Sun Oct 05 – Tinley Park, IL – Credit Union 1 Amphitheatre
Fri Oct 10 – Colorado Springs, CO – Broadmoor World Arena
Sun Oct 12 – Salt Lake City, UT – Utah First Credit Union Amphitheatre
Tue Oct 14 – Mountain View, CA – Shoreline Amphitheatre
Wed Oct 15 – Wheatland, CA – Toyota Amphitheatre
Sat Oct 18 – Chula Vista, CA – North Island Credit Union Amphitheatre
Sun Oct 19 – Los Angeles, CA – Kia Forum
Wed Oct 22 – Phoenix, AZ – Talking Stick Resort Amphitheatre
Thu Oct 23 – Albuquerque, NM – Isleta Amphitheater
Sat Oct 25 – Austin, TX – Germania Insurance Amphitheater
Sun Oct 26 – Houston, TX – The Cynthia Woods Mitchell Pavilion
*Without support from Corrosion of Conformity
MT 15 and Archon 50 Classic amplifiers offer fresh tones in release alongside a doubled-in-size Archon cabinet
PRS Guitars today released the updated MT 15 and the new Archon Classic amplifiers, along with a larger Archon speaker cabinet. The 15-watt, two-channel Mark Tremonti signature amp MT 15 now features a lead channel overdrive control. An addition to the Archon series, not a replacement, the 50-watt Classic offers a fresh voice by producing retro rock “classic” tones reminiscent of sound permeating the radio four and five decades ago. Now twice the size of the first Archon cabinet, the Archon 4x12 boasts four Celestion V-Type speakers.
MT 15 Amplifier Head
Balancing aggression and articulation, this 15-watt amp supplies both heavy rhythms and clear lead tones. The MT 15 revision builds off the design of the MT 100, bringing the voice of the 100’s overdrive channel into its smaller-format sibling. Updating the model, the lead channel also features a push/pull overdrive control that removes two gain stages to produce vintage, crunchier “mid gain” tones. The clean channel still features a push/pull boost control that adds a touch of overdrive crunch. A half-power switch takes the MT to 7 watts.
“Seven years ago, we released my signature MT 15 amplifier, a compact powerhouse that quickly became a go-to for players seeking both pristine cleans and crushing high-gain tones. In 2023, we took things even further with the MT 100, delivering a full-scale amplifier that carried my signature sound to the next level. That inspired us to find a way to fit the 100's third channel into the 15's lunchbox size,” said Mark Tremonti.
“Today, I’m beyond excited to introduce the next evolution of the MT15, now featuring a push/pull overdrive control on the Lead channel and a half-power switch, giving players even more tonal flexibility to shape their sound with a compact amp. Can’t wait for you all to plug in and experience it!”
Archon Classic Amplifier Head
With a refined gain structure from the original Archon, the Archon Classic’s lead channel offers a wider range of tones colored with gain, especially in the midrange. The clean channel goes from pristine all the way to the edge of breakup. This additional Archon version was developed to be a go-to tool for playing classic rock or pushing the envelope into modern territory. The Archon Classic still features the original’s bright switch, presence and depth controls. PRS continues to stock the Archon in retailers worldwide.
“The Archon Classic is not a re-issue of the original Archon, but a newly voiced circuit with the lead channel excelling in '70s and '80s rock tones and a hotter clean channel able to go into breakup. This is the answer for those wanting an Archon with a hotrod vintage lead channel gain structure without changing preamp tube types, and a juiced- up clean channel without having to use a boost pedal, all wrapped up in a retro-inspired cabinet design,” said PRS Amp Designer Doug Sewell.
Archon 4x12 Cabinet
As in the Archon 1x12 and 2x12, the mega-sized PRS Archon 4x12 speaker cabinet features Celestion V-Type speakers and a closed-back design, delivering power, punch, and tight low end. Also like its smaller brethren, the 4x12 is wrapped in durable black vinyl and adorned with a British-style black knitted-weave grill cloth. The Archon 4x12 is only the second four-speaker cabinet in the PRS lineup, next to the HDRX 4x12.
PRS Guitars continues its schedule of launching new products each month in 2025. Stay tuned to see new gear and 40 th Anniversary limited-edition guitars throughout the year. For all of the latest news, click www.prsguitars.com/40 and follow @prsguitars on Instagram, Tik Tok, Facebook, X, and YouTube.