This Tele looks flashy, but its unique wiring scheme is simple and easy to recreate.
Hello and welcome back to Mod Garage. This month, we will explore the Fender John 5 Ghost Telecaster wiring and how you can adopt it for your own Telecaster. Fender recently released this signature Telecaster in a limited edition of 600 pieces, and they quickly sold out. Before many serious musicians could grab one, collectors with big purses bought them all. So, your only chance to get one now is to look for a used one, or hope that Fender will have mercy and build some more. Or, you can read on to learn what’s inside and how to build your own version of this guitar.
I have to confess that this is a matter of heart for me because I’m a John 5 fan. I’m really fascinated with his playing style. This guy can play it all. No matter if he’s picking country swing or shredding death metal, his playing is very close to the traditional tones and techniques, but is always in his own style. Besides this, he’s a very humble guy with a great sense of humor, so I’m really happy to write a piece about his new signature Telecaster.
Fender worked very closely with John 5 on this model. At its core, this guitar is a standard HH Telecaster in arctic white—including the neck and fretboard—with red accents that include the binding, nut, knobs, pickups, and more. It’s a matter of taste, if you like this flashy aesthetic or not.
Let’s have a look at the basic features, so you have a shopping list if you want to build your own:
- alder body with HH pickup routings and binding
- maple neck with a medium C shape, 9.5" radius, and 22 narrow tall frets
- 42 mm synthetic bone nut
- string-through Tele bridge with humbucker pickup cutout and six block steel saddles
- sealed locking tuners
- 1-piece pickguard/control plate combination in mirrored chrome
- .009–.042 nickel-plated steel strings
What makes this guitar really stand out besides its appearance is the wiring, which I think is very special but also minimal. You can put this wiring inside any Telecaster, as long as it accepts two humbuckers. It consists of:
- two DiMarzio D Activator humbucker pickups
- master volume control (most likely 500k audio) without treble-bleed network
- Gibson-style 3-way pickup-selector toggle switch
- momentary kill switch
That’s all John 5 needs to sound like no one else, so let’s go through the pieces step by step and see what is under the hood.
Pickups
The DiMarzio D Activator humbuckers are passive mid-output pickups with ceramic magnets that have been available since 2006. In the John 5 Ghost Telecaster, both pickups are permanently wired to run as full humbuckers with both coils in series. For the wiring diagram, I used the DiMarzio color code: Green and bare wire are going to ground, black and white are connected and taped off, red is the hot output. If you want to use different humbuckers, you will have to transfer the colors of the wires using one of the numerous color code charts on the internet.
On the Ghost Tele, the pickups are red, but they are available in many different colors, too.
Pots
There is only a single master volume control, without a treble-bleed network. I haven’t had an opportunity to look at one of these guitars in person, and Fender has not released a wiring diagram, but I’m pretty sure they choose a 500k audio pot together with these pickups, so that’s what I also recommend using.
John 5 chose a Gibson-style “speed knob” in red, but any knob will work.
Selector Switch
The John 5 model uses a standard Gibson 3-way pickup-selector toggle switch (with a red tip, of course) mounted to the upper bout for swift pickup switching. It should be wired like this:
- bridge pickup as full humbucker alone
- both pickups as full humbuckers in parallel
- neck pickup as full humbucker alone
Kill Switch
Instead of a tone control, there is a kill switch beside the master volume pot (in red ... what else?) that Fender calls “arcade style.” And yes, it reminds me a lot of the hardware of the ’80s game consoles .... Space Invaders or Donkey Kong, anyone?
A kill switch is a momentary switch that is usually used for machine gun sounds or stuttering effects. (A momentary switch only cuts off your guitar’s signal against ground while being pressed and resumes normal sound when released.) For a kill switch, you only need a basic on/off 2-position switch. An SPST (single pole-single throw) switch is ideal. SPST switches have only two contacts on the bottom and the switch simply connects (or disconnects) these two terminals to each other when the switch is pressed.
“What makes this guitar really stand out besides its appearance is the wiring, which I think is very special but also minimal.”
Be sure to buy a good quality switch, and make sure it’s a momentary and not a latching type. The type you need is a “normally open” (off) switch. When you are pressing the switch, you make a connection between the two contacts. The switch returns to the off position when you release the button.
There are special high-quality, all-metal kill switches for guitars available. There are also models with an LED inside if you are looking for a cool look. But keep in mind that you will need a battery for the LED, plus space inside the guitar to install it.
Here we go for the wiring. As usual, I substituted all ground connections with the international symbol for ground to keep the diagram as clean as possible. The wiring itself is very easy to do and is also a good beginner’s project.
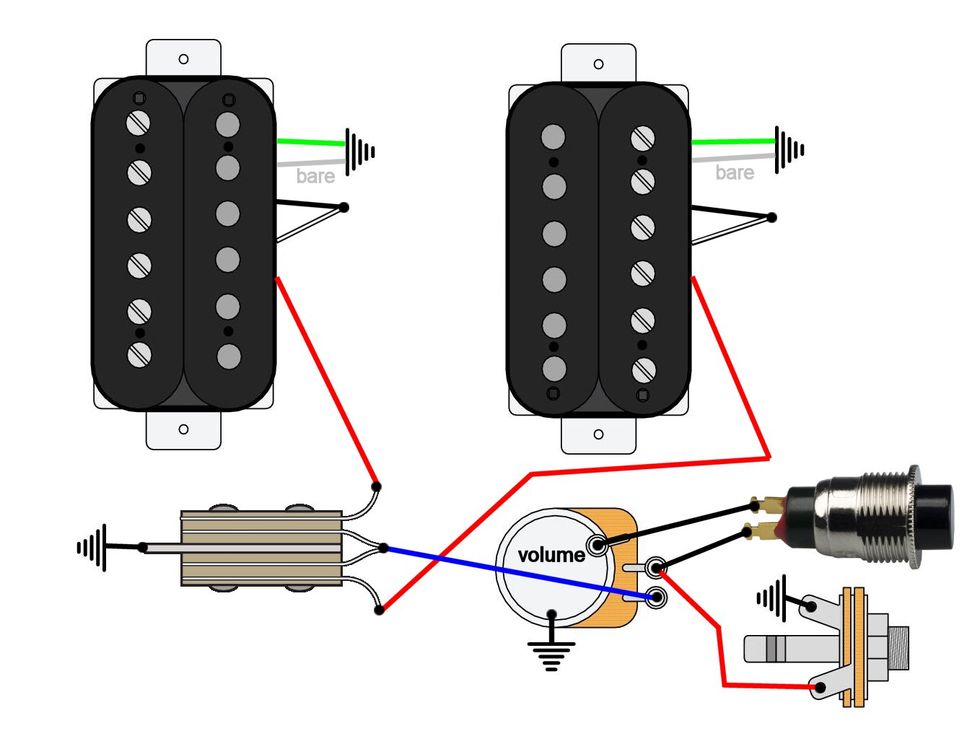
Fig. 1
Illustration courtesy of singlecoil.com
That’s it! Next month, we will take a deep dive into something I received many email requests for, because it’s always confusing and not easy to understand: phase and polarity, and the difference between these two pickup parameters. So, stay tuned!
Until then ... keep on modding!
- Top 10 Big 5 Interviews of 2021 ›
- John 5 on How He Gets Old-School Tones from His Metal-Friendly Tele ›
- Rig Rundown: John 5 ›
Some of these are deep cuts—get ready for some instrumental bonus tracks and Van Halen III mentions—and some are among the biggest radio hits of their time. Just because their hits, though, doesn’t mean we don’t have more to add to the conversation.
Naturally, every recording Eddie Van Halen ever played on has been pored over by legions of guitar players of all styles. It might seem funny, then, to consider EVH solos that might require more attention. But your 100 Guitarists hosts have their picks of solos that they feel merit a little discussion. Some of these are deep cuts—get ready for some instrumental bonus tracks and Van Halen III mentions—and some are among the biggest radio hits of their time. Just because their hits, though, doesn’t mean we don’t have more to add to the conversation.
We can’t cover everything EVH—Jason has already tried while producing the Runnin’ With the Dweezil podcast. But we cover as much as we can in our longest episode yet. And in the second installment of our current listening segment, we’re talking about new-ish music from Oz Noy and Bill Orcutt.
A dual-channel tube preamp and overdrive pedal inspired by the Top Boost channel of vintage VOX amps.
ROY is designed to deliver sweet, ringing cleans and the "shattered" upper-mid breakup tones without sounding harsh or brittle. It is built around a 12AX7 tube that operates internally at 260VDC, providing natural tube compression and a slightly "spongy" amp-like response.
ROY features two identical channels, each with separate gain and volume controls. This design allows you to switch from clean to overdrive with the press of a footswitch while maintaining control over the volume level. It's like having two separate preamps dialed in for clean and overdrive tones.
Much like the old amplifier, ROY includes a classic dual-band tone stack. This unique EQ features interactive Treble and Bass controls that inversely affect the Mids. Both channels share the EQ section.
Another notable feature of this circuit is the Tone Cut control: a master treble roll-off after the EQ. You can shape your tone using the EQ and then adjust the Tone Cut to reduce harshness in the top end while keeping your core sound.
ROY works well with other pedals and can serve as a clean tube platform at the end of your signal chain. It’s a simple and effective way to add a vintage British voice to any amp or direct rig setup.
ROY offers external channel switching and the option to turn the pedal on/off via a 3.5mm jack. The preamp comes with a wall-mount power supply and a country-specific plug.
Street price is 299 USD. It is available at select retailers and can also be purchased directly from the Tubesteader online store at www.tubesteader.com.
The compact offspring of the Roland SDE-3000 rack unit is simple, flexible, and capable of a few cool new tricks of its own.
Tonalities bridge analog and digital characteristics. Cool polyrhythmic textures and easy-to-access, more-common echo subdivisions. Useful panning and stereo-routing options.
Interactivity among controls can yield some chaos and difficult-to-duplicate sounds.
$219
Boss SDE-3 Dual Digital Delay
boss.info
Though my affection for analog echo dwarfs my sentiments for digital delay, I don’t get doctrinaire about it. If the sound works, I’ll use it. Boss digital delays have been instructive in this way to me before: I used a Boss DD-5 in a A/B amp rig with an Echoplex for a long time, blending the slur and stretch of the reverse echo with the hazy, wobbly tape delay. It was delicious, deep, and complex. And the DD-5 still lives here just in case I get the urge to revisit that place.
Tinkering with theSDE-3 Dual Digital Delay suggested a similar, possibly enduring appeal. As an evolution of the Roland SDE-3000rack unit from the 1980s, it’s a texture machine, bubbling with subtle-to-odd triangle LFO modulations and enhanced dual-delay patterns that make tone mazes from dopey-simple melodies. And with the capacity to use it with two amps in stereo or in panning capacity, it can be much more dimensional. But while the SDE-3 will become indispensable to some for its most complex echo textures, its basic voice possesses warmth that lends personality in pedestrian applications too.
Tapping Into the Source
Some interest in the original SDE-3000 is in its association with Eddie Van Halen, who ran two of them in a wet-dry-wet configuration, using different delay rates and modulation to thicken and lend dimension to solos. But while EVH’s de facto endorsement prompted reissues of the effect as far back as the ’90s, part of the appeal was down to the 3000’s intrinsic elegance and simplicity.
In fact, the original rack unit’s features don’t differ much from what you would find on modern, inexpensive stompbox echoes. But the SDE-3000’s simplicity and reliable predictability made it conducive to fast workflow in the studio. Critically, it also avoided the lo-fi and sterility shortcomings that plagued some lesser rivals—an attribute designer Yoshi Ikegami chalks up to analog components elsewhere in the circuit and a fortuitous clock imprecision that lends organic essence to the repeats.
Evolved Echo Animal
Though the SDE-3 traces a line back to the SDE-3000 in sound and function, it is a very evolved riff on a theme. I don’t have an original SDE-3000 on hand for comparison, but it’s easy to hear how the SDE-3 bridges a gap between analog haze and more clinical, surgical digital sounds in the way that made the original famous. Thanks to the hi-cut control, the SDE-3’s voice can be shaped to enhance the angular aspect of the echoes, or blunt sharp edges. There’s also a lot of leeway to toy with varied EQ settings without sacrificing the ample definition in the repeats. That also means you can take advantage of the polyrhythmic effects that are arguably its greatest asset.
“There’s a lot of leeway to toy with varied EQ settings without sacrificing the ample definition in the repeats.”
The SDE-3’s offset control, which generates these polyrhythmic echoes, is its heart. The most practical and familiar echos, like quarter, eighth, and dotted-eighth patterns, are easy to access in the second half of the offset knobs range. In the first half of the knob’s throw, however, the offset delays often clang about at less-regular intervals, producing complex polyrhythms that are also cool multipliers of the modulation and EQ effects. For example, when emphasizing top end in repeats, using aggressive effects mixes and pitch-wobble modulation generates eerie ghost notes that swim through and around patterns, adding rhythmic interest and texture without derailing the drive behind a groove. Even at modest settings, these are great alternatives to more staid, regular subdivision patterns. Many of the coolest sounds tend toward the foggy reverb spectrum. Removing high end, piling on feedback, and adding the woozy, drunken drift from modulation creates fascinating backdrops for slow, sparse chord melodies. Faster modulations throb and swirl like old BBC Radiophonic Workshop sci-fi sound designs.
By themselves, the modulations have their own broad appeal. Chorus tones are rarely the archetypal Roland Jazz Chorus or CE type—tending to be a bit darker and mistier. But they do a nice job suggesting that texture without lapsing into caricature. There are also really cool rotary-speaker-like textures and vibrato sounds that offer alternatives to go-to industry standards.
The Verdict
The SDE-3’s many available sounds and textures would be appealing at $219—even without the stereo and panning connectivity options, a useful hold function, and expression pedal control that opens up additional options. The panning capabilities, in particular, sparked all kinds of thoughts about studio applications. Mastering the SDE-3 takes just a little study—certain polyrhythms can be dramatically reshaped by the interactivity of other controls and you need to take care to achieve identical results twice. But this is a pedal that, by virtue of its relative simplicity and richness and breadth of sounds, exceeds the utility of some similarly priced rivals, all while opening up possibilities well outside the simple echo realm
With a few clicks on Reverb, a reptile-inspired shred machine was born.
With this guitar, I wanted to create a shadowbox-type vibe by adding something you could see inside. I have always loved the Yamaha Pacifica guitars because of the open pickup cavity and the light weight, so I purchased this body off Reverb (I think I am addicted to that website). I also wanted a color that was vivid and bold. The seller had already painted it neon yellow, so when I read in the description, “You can see this body from space,” I immediately clicked the Buy It Now button. I also purchased the neck and pickups off of Reverb.
I have always loved the reverse headstock, simply because nothing says 1987 (the best year in the history of the world) like a reverse headstock. The pickups are both Seymour Duncan—an SH-1N in the neck position and TB-4 in the bridge, both in a very cool lime green color. Right when these pickups got listed, the Buy It Now button once again lit up like the Fourth of July. I am a loyal disciple of Sperzel locking tuners and think Bob Sperzel was a pure genius, so I knew those were going on this project even before I started on it. I also knew that I wanted a Vega-Trem; those units are absolutely amazing.
When the body arrived, I thought it would be cool to do some kind of burst around the yellow so I went with a neon green. It turned out better than I imagined. Next up was the shaping and cutting of the pickguard. I had this crocodile-type, faux-leather material that I glued on the pickguard and then shaped to my liking. I wanted just a single volume control and no tone knob, because, like King Edward (Van Halen) once said, “Your volume is your tone.”
T. Moody
I then shaped and glued the faux-leather material in the cavity. The tuning knobs, volume knob, pickguard, screws, and selector switch were also painted in the lemon-lime paint scheme. I put everything together, installed the pickups, strung it up, set it up, plugged it in, and I was blown away. I think this is the best-playing and -sounding guitar I have ever tried.
The only thing missing was the center piece and strap. The latter was easy because DiMarzio makes their ClipLock in neon green. The center piece was more difficult because originally, I was thinking that some kind of gator-style decoration would be cool. In the end, I went with a green snake, because crocodiles ain’t too flexible—and they’re way too big to fit in a pickup cavity!
The Green Snake’s back is just as striking as the front.