Make your life on the workbench easier with a couple inexpensive gizmos.
Hello and welcome back to Mod Garage. In this column, we will have a deeper look at servicing a Stratocaster and some hacks from the shop to make this task much easier and faster.
In general, Leo Fender’s credo was that “the design of each element should be thought out in order to be easy to make and easy to repair.” His approach was to build high-quality instruments while maintaining low manufacturing costs with mass production. When thinking about the design of the Stratocaster, there are at least two elements where one can have some doubts about the easy-to-repair approach, at least from today’s perspective: pickguards you can’t take off without removing the strings and truss rods you can’t access without removing the pickguard.
Within the historical context of Leo Fender’s time, I think he would say that he did everything right. Right from the start, the Fender company cared a lot about setting up their guitars before they were shipped out. The setup was meant to be set-it-and-forget-it, so truss rod access was not very important—accessing it from the neck heel was the design following function.
I’m not sure if this was really easier to build this way compared to accessing it from the headstock, but it was the method that offered better headstock stability and longevity. Nine out of 10 Stratocaster headstock repairs I see in the shop are guitars with truss-rod access from the headstock. Because of its design, this is a weak spot in the wood, so drilling a hole to access the truss rod will weaken it more. In old Fender papers I found an interesting bulletin that the neck was never meant to be repaired or refretted. Instead, a customer was simply meant to change the complete bolt-on neck.
Back in the ’50s, things like replacement pickups, mods, push-pull pots, multi-stage pickup switches, and the like were not yet invented, so there was no need to design the Stratocaster pickguard for easy access. It would only have to be removed for a serious repair, which shouldn’t have happened very often.
Times have changed noticeably, and today it is usual to perform a setup regularly to compensate for changing weather conditions, different string gauges, and so on. And trying new pickups, tone caps, mods, etc. is a kind of popular sport among most guitarists—set-it-and-forget-it was forgotten long ago!
“Back in the ’50s, things like replacement pickups, mods, push-pull pots, multi-stage pickup switches, and the like were not yet invented, so there was no need to design the Stratocaster pickguard for easy access.”
The design of the Stratocaster hasn’t changed much since the mid ’50s. Of course, standard procedure is now to have truss-rod access from the headstock, so at least the setup thing is finally solved. But Stratocasters with access to the pickguard from behind is something that would make a lot of things much simpler. Let’s see what can be done to make things easier and, of course, faster when you do have to remove your guitar’s neck or loosen the strings to get to the pickguard.
The gold standard way of servicing a Stratocaster is to remove the old strings so you have full access to the pickguard. This is especially perfect when you want to do some work under the hood of the pickguard like changing a pot, pickup, or any other electronics work. You can test everything before you put on the new strings and there is no additional work to consider. For setups this is a great starting point—you can roughly pre-adjust the neck to your preferences, but for the final setup, there is no way around putting on the new set of strings. Here are two of my favorite hacks in the shop to save some time and nerves.
The IKEA Hack
You all know these plastic kitchen sealing clips for resealing opened bags and packages. I like the IKEA model because they’re super sturdy, well-made, and will last a very long time. Take one of these clips—we will need the large version—open it, and cut six small grooves in it using a round needle file or any other similar tool for this. Try to come close to the string spacing behind the nut with your grooves. I usually take a black sharpie to mark the spacing on the plastic clip before using the file.
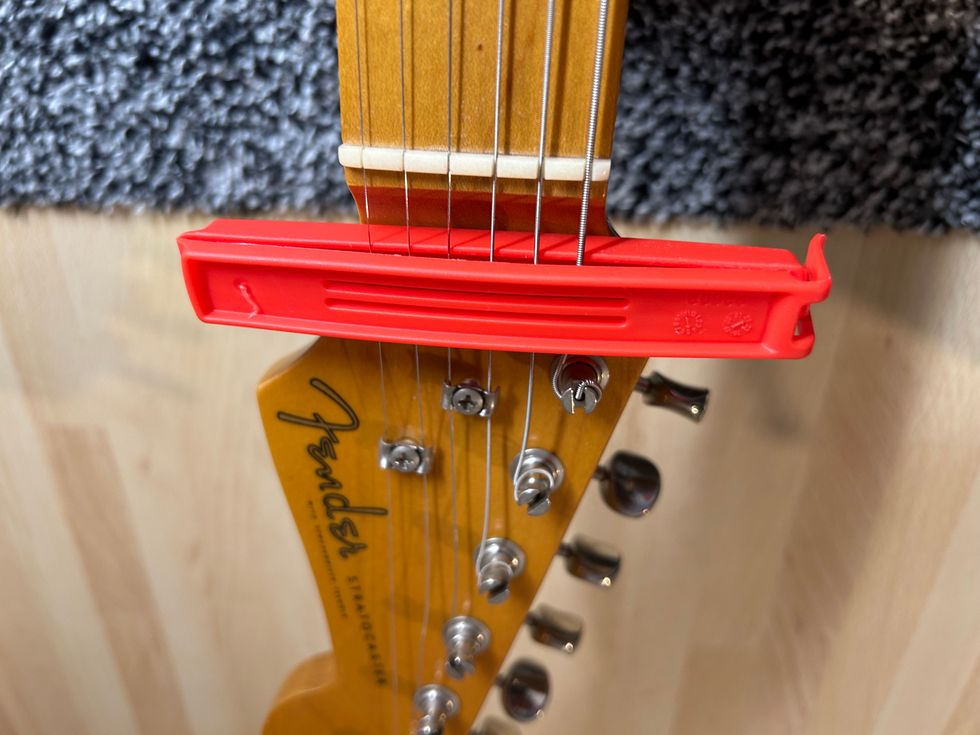
Photo courtesy of SINGLECOIL
After you’re finished, loosen the strings but don’t take them out of the tuner posts. Slide the opened clip under the strings behind the nut, put each string in one of the grooves, and close the clip. Now, you can pull the strings out of their posts and put them aside to have full access to the pickguard and the neck-heel truss rod. Because the modified clip will hold the strings in place, they will not tangle up into a bird’s nest of strings. For vintage-Kluson-style tuners or locking tuners, it can be very easy to pull the strings out of the posts and back in. For other types, you’ll need a little bit more patience to get the strings back in place, but it’s worth the effort.
The Old-Style Capo Hack
My first capo that I got when I was around 10 years old or so is still alive and employed in my shop. It’s a Dunlop 11C toggle-action capo that is still in production, and I bet a lot of you started with this capo, too. I use the curved version that my parents bought by accident for my classical guitar because they didn’t know about flat and curved fretboards. This one works great on all electric guitars.
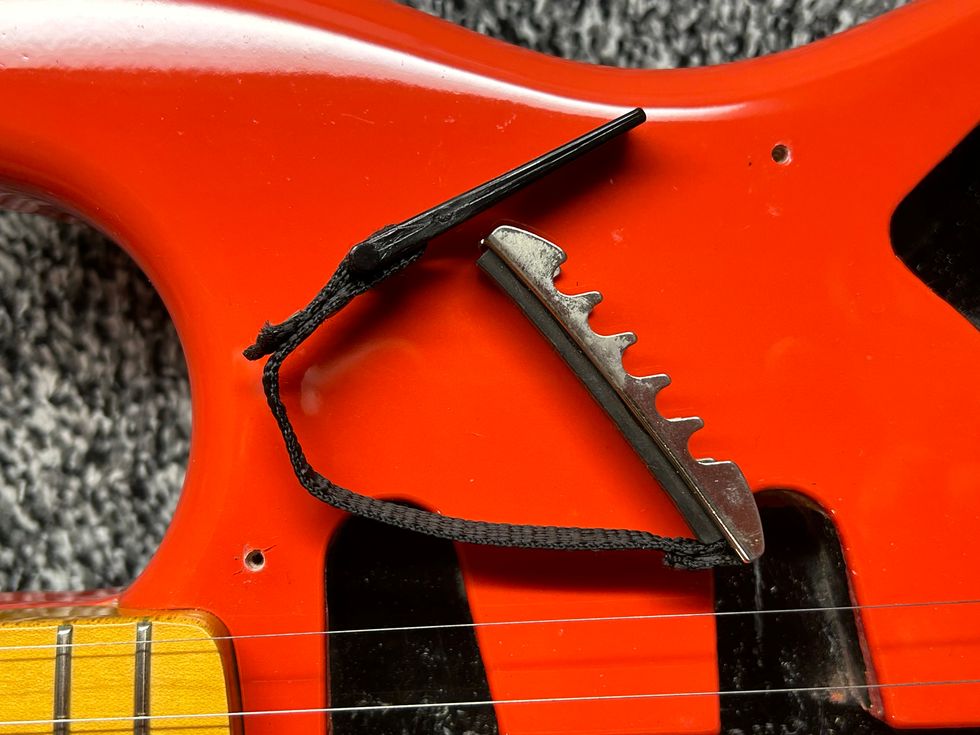
Photo courtesy of SINGLECOIL
Loosen all the strings slightly so they will not slip out of their posts. Put the capo on the first fret and close it. The strings can no longer slip out of the nut, the string trees, and the posts of the tuners.
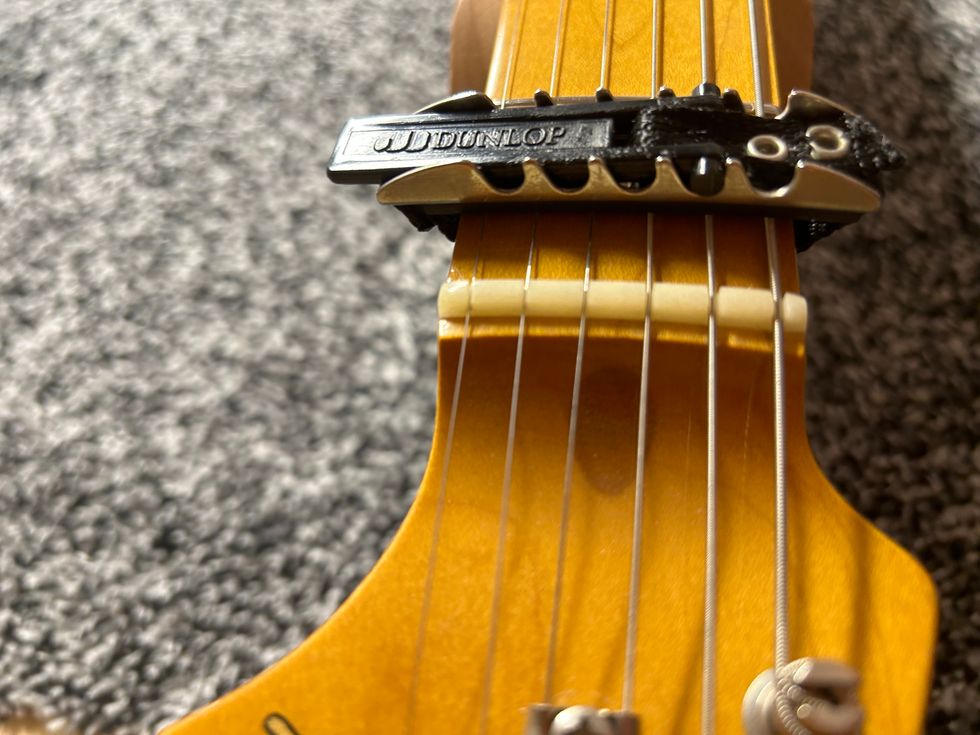
Photo courtesy of SINGLECOIL
Now, when you remove the neck, the capo will hold the strings in place. Putting the neck back on will be very easy: Fasten the screws, take off the capo, and tune the strings to pitch.
You see, there are at least two alternative ways to avoid changing the strings, especially if they are as good as new with only a few playing hours upon them. Often, little gizmos make a big difference.
Next month we will dive down into Epiphone history and see what they electronically cooked up in the mid ’60s, so stay tuned.
Until then ... keep modding!
- Fender Acoustasonic Telecaster Electric Guitar Review ›
- Reader Guitar of the Month: Sundial Fender Stratocaster ›
- Trash or Treasure: Fender Tex-Mex Stratocaster ›
Revv Amplification's limited-edition G-Series V2 pedals offer three fresh flavors of boutique Canadian tone, with V2 circuit revisions.
Celebrating 10 years of Revv & 5 years since the release of the G2, Revv is debuting V2 circuit revisions of the G2, G3, & G4, implementing new designs for more tone in 3 little pedals, in a limited edition colorway.
The Revv Amplification 5th Anniversary G-Series V2 Lineup features:
- 3 Fresh Flavors of Boutique Canadian Tone - G-Series pedals are sonic recreations of 3 of Revv’s boutique amp channels used by Nashville session stars & metal touring artists alike.
- The Standard, Redefined - V2 circuit revisions are based on the Generator 120 MK3 Rev. B & incorporate new design elements for the most tube-like response & tone ever.
- Limited Edition - Exclusive new colorway featuring a black enclosure w/ custom graphics, embossed Revv badge, & color-coded knobs.
- Find Your Sound - The G2 is a powerful & versatile overdrive capable of everything from touch-sensitive boost to organic vintage stack tones, taken from Revv’s Green Channel.
- High Gain Clarity - The G3 utilizes Revv’s legendary Purple Channel, a tight & responsive high gain tone perfect for drop tuning & cutting through any mix.
- Fat Solo Tones - The G4 is based on Revv’s thick & saturated Red Channel, the ideal sound for chewy crunch, modern rock wall of sound, & liquid sustaining solos.
- Made in Canada - 100% analog circuit w/ top jacks, true bypass, & 2 year warranty.
Revv’s G-Series pedals have a street price of $229 & can be ordered immediately through many fine dealers worldwide.
For more information, please visit revvamplification.com.
Revv G3 Purple Channel Preamp/Overdrive/Distortion Pedal - Anniversary Edition
G3 Purple Ch Preamp/Hi-Gain Pedal - AnniversaryGuest picker Carmen Vandenberg of Bones UK joins reader Samuel Cosmo Schiff and PG staff in divulging their favorite ways to learn music.
Question: What is your favorite method of teaching or learning how to play the guitar?
Guest Picker - Carmen Vandenberg, Bones UK
The cover of Soft, Bones UK’s new album, due in mid-September.
A: My favorite method these days (and to be honest, from when I started playing) is to put on my favorite blues records, listen with my eyes closed, and, at the end, see what my brain compartmentalizes and keeps stored away. Then, I try and play back what I heard and what my fingers or brain decided they liked!
Bone UK’s labelmade, Des Rocks.
Obsession: Right now, I am into anyone trying to create sounds that haven’t been made before—bands like Queens of the Stone Age, Jack White, and our labelmate, Des Rocs! There’s a Colombian band called Diamanté Electrico who I’ve been really into recently. Really anyone who’s trying to create innovative and inspiring sounds.
Reader of the Month - Sam C. Schiff.
Sam spent endless hours trying to learn the solo Leslie West played on “Long Red,” off of The Road Goes Ever On.
A: The best way to learn guitar is to listen to some good guitar playing! Put on a record, hear something tasty, and play on repeat until it comes out of your fingers. For me, it was Leslie West playing “Long Red” on the Mountain album, The Road Goes Ever On. I stayed up all night listening to that track until I could match Leslie’s phrasing. I still can’t, no one can, but I learned a lot!
Smith’s own low-wattage amp build.
Obsession: My latest musical obsession is low-wattage tube amps like the 5-watt Fender Champ heard on the Laylaalbum. Crank it up all the way for great tube distortion and sustain, and it’s still not loud enough to wake up the neighbors!
Gear Editor - Charles Saufley
Charles Saufley takes to gear like a duck to water!
A: Learning by ear and feel is most fun for me. I write and free-form jam more than I learn other people’s licks. When I do want to learn something specific, I’ll poke around on YouTube for a demo or a lesson or watch films of a player I like, and then typically mangle that in my own “special” way that yields something else. But I rarely have patience for tabs or notation.
The Grateful Dead’s 1967 debut album.
Obsession: Distorted and overdriven sounds with very little sustain—Keith Richards’ Between the Buttons tones, for example. Jerry Garcia’s plonky tones on the first Grateful Dead LP are another cool, less-fuzzy version of that texture.
Publisher - Jon Levy
A: I’m a primitive beast: The only way I can learn new music is by ear, so it’s a good thing I find that method enjoyable. I’m entirely illiterate with staff notation. Put sheet music in front of me and I’ll stare at it with twitchy, fearful incomprehension like an ape gaping at the monolith in 2001: A Space Odyssey. I’m almost as clueless with tab, but I can follow along with chord charts if I’m under duress.
The two-hit wonders behind the early ’70s soft-rock hits, “Fallin’ in Love” and “Don't Pull Your Love.”
Obsession: Revisiting and learning AM-radio pop hits circa 1966–1972. The Grass Roots, Edison Lighthouse, the Association, the Archies, and Hamilton, Joe Frank & Reynolds—nothing is too cheesy for me to dissect and savor. Yes, I admit I have a serious problem.
Diamond Pedals introduces the Dark Cloud delay pedal, featuring innovative hybrid analog-digital design.
At the heart of the Dark Cloud is Diamond’s Digital Bucket Brigade Delay (dBBD) technology, which seamlessly blends the organic warmth of analog companding with the precise control of an embedded digital system. This unique architecture allows the Dark Cloud to deliver three distinct and creative delay modes—Tape, Harmonic, and Reverse—each meticulously crafted to provide a wide range of sonic possibilities.
Three Distinct Delay Modes:
- Tape Delay: Inspired by Diamond’s Counter Point, this mode offers warm, saturated delays with tape-like modulation and up to 1000ms of delay time.
- Harmonic Delay: Borrowed from the Quantum Leap, this mode introduces delayedoctaves or fifths, creating rich, harmonic textures that swirl through the mix.
- Reverse Delay: A brand-new feature, this mode plays delays backward, producing asmooth, LoFi effect with alternating forward and reverse playback—a truly innovativeaddition to the Diamond lineup.
In addition to these versatile modes, the Dark Cloud includes tap tempo functionality with three distinct divisions—quarter note, eighth note, and dotted eighth—ensuring perfect synchronization with any performance.
The Dark Cloud holds special significance as the final project conceived by the original Diamondteam before their closure. What began as a modest attempt to repurpose older designs evolved into a masterful blend of the company's most beloved delay algorithms, combined with an entirely new Reverse Delay setting.
The result is a “greatest hits” of Diamond's delay technology, refined into one powerful pedal that pushes the boundaries of what delay effects can achieve.
Pricing: $249
For more information, please visit diamondpedals.com.
Main Features:
- dBBD’s hybrid architecture Analog dry signal New reverse delay setting
- Three distinct, creative delay modes: Tape, Harmonic, Reverse
- Combines the sound and feel of analog Companding and Anti-Aliasing with an embedded system delay line
- Offering 3 distinct tap divisions with quarter note, eighth note and dotted eighth settings for each of the delay modes
- Pedalboard-friendly enclosure with top jacks
- Buffered bypass switching with trails
- Standardized negative-center 9VDC input with polarity protection
Dark Cloud Multi-Mode Delay Pedal - YouTube
Curious about building your own pedal? Join PG's Nick Millevoi as he walks us through the StewMac Two Kings Boost kit, shares his experience, and demos its sound.