This month we're going to explore four ways to configure any humbucker that has 4-conductor wiring. (Note: These wiring schemes are not intended for an old-school humbucker with 2-conductor wiring, but rather the modern humbucker that allows coil-splitting and other wiring mods.)
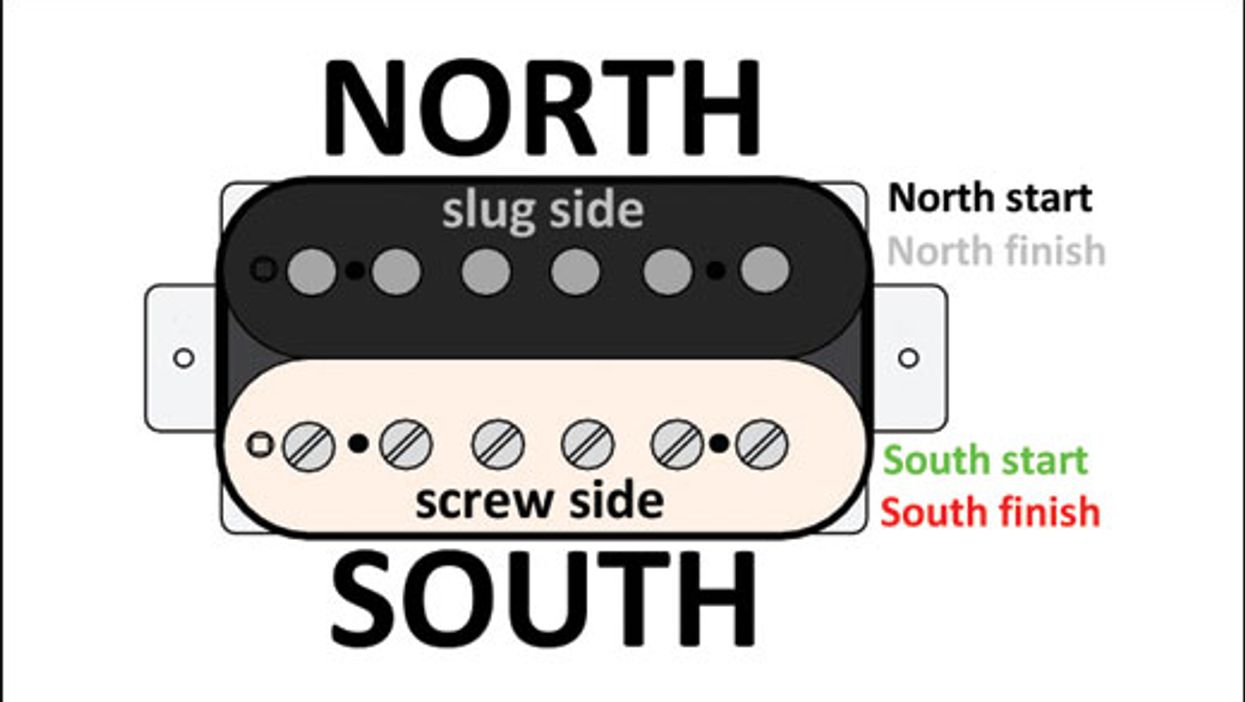
For starters, let's review our terminology. Looking at a humbucker from the front, we call the lower coil "south" and the upper coil "north." The south coil is always the "screw side," while the north coil is the "slug side." The latter is named for the type of magnetic material used on this coil. Each coil is wrapped with very fine wire, and this wire has a start and a finish. This results in a total of five wires coming from the humbucker:
- North coil start plus north coil finish.
- South coil start plus south coil finish.
- Ground.
The bare wire or braided shield always goes to ground—there's no exception—so that leaves us with four wires to play with. Having access to the start and finish of each coil wire not only makes it easy to solve potential out-of-phase issues (a subject we'll cover in another column), but it also gives you the option to wire up your humbucker in one of four different ways. If you're ambitious, you can use a switch to put several options at your fingertips.
The south coil is always the "screw side," while the north coil is the "slug side."
Every pickup company uses its own color-code scheme for these four wires. This makes discussing humbucker wiring a little more confusing than necessary, but that's the way it is. As usual, I'll use the Seymour Duncan color code as a quasi-standard. You should be able to get color-code information for your pickups from their maker, and there are several charts available on the internet that let you compare color-code schemes from different manufacturers. You can use such charts to translate the following wirings into whatever color code corresponds to your particular brand of humbucker. Fortunately that's not too hard—you only need to know which color wire on your pickup indicates the start or finish of which coil. Once you have that info, you can draw up a reference chart to decode this column's wirings.
Here's the Seymour Duncan 4-conductor humbucker color code:
- North coil start is black; north coil finish is white.
- South coil start is green; south coil finish is red.
- Ground is bare wire.
Fig. 1 sums up what we've covered so far in the Seymour Duncan format. Now let's walk through the four ways you can wire up a humbucker. Ready?
Standard humbucker wiring: both coils connected in series.
This is the default wiring in almost every guitar loaded with one or more humbuckers because it produces a warm, fat tone with maximum output while offering hum-cancelling capability. (It's also the factory standard for all humbuckers with 2-conductor wiring consisting of only hot and ground.)
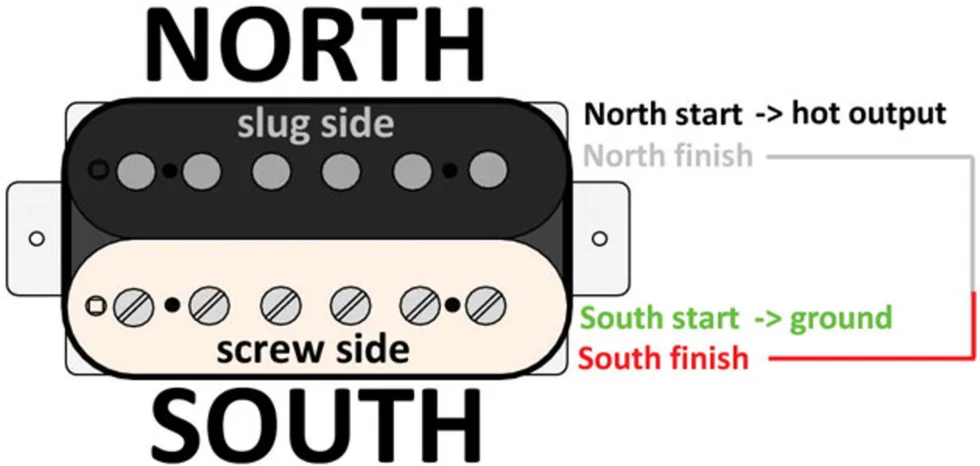
Fig. 2
illustration courtesy of singlecoil.com
Here are the connections for series wiring (Fig. 2):
- North coil start is the hot output.
- North coil finish and south coil finish are soldered together and taped off (this is the series link).
- South coil start is soldered together with the bare wire going to ground.
“Single-coil" humbucker wiring: both coils connected in parallel.
This option gives you a single-coil-like tone, but still retains hum-cancelling capability. It doesn't deliver a crystal-clear Strat or Tele tone, but to my ears it at least resembles a single-coil pickup—maybe closer to a P-90 than to a standard single-coil. Every type of humbucker sounds a little different when wired this way, so it's simply a matter of giving it a try to determine if you like the sound.
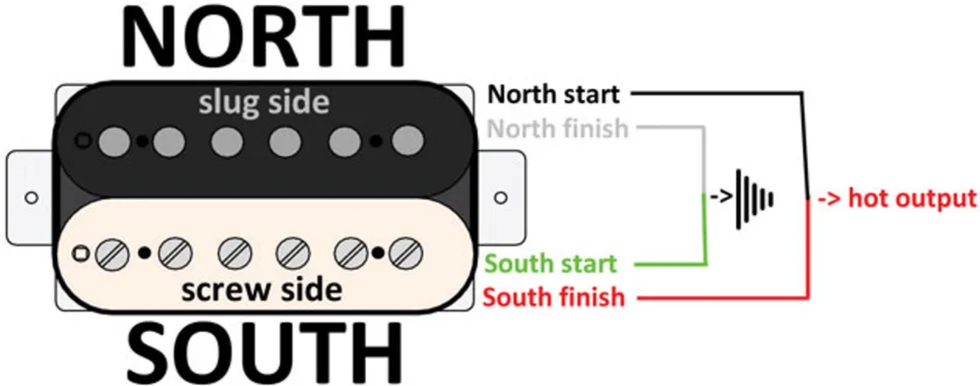
Fig. 3
illustration courtesy of singlecoil.com
Parallel wiring (Fig. 3) requires the following connections:
- North coil start and south coil finish are soldered together as the hot output.
- North coil finish and south coil start are soldered together with the bare ground wire.
Coil-splitting humbucker wiring #1: splitting to the south coil.
This wiring splits the humbucker in half, shunting one coil to ground and leaving the other coil engaged like a true single-coil pickup. In this mode, the hum-cancelling function is no longer active, so you'll get the hum and noise of any single-coil pickup. But don't expect a true Strat or Tele tone: If that's your goal, investigate the special breed of humbuckers that are made out of two real single-coil pickups. The downside of this type of pickup is that it doesn't sound great in full humbucker mode, so, as we're so often reminded, it's about compromise.
Splitting to the humbucker's south coil, which is the screw side, is only recommended for neck pickups. (You'll learn why we're excluding the bridge pickup when we get to our fourth wiring scheme.) Let's also remember that in most guitars with neck humbuckers, the south, screw-side coil lies closest to the neck.
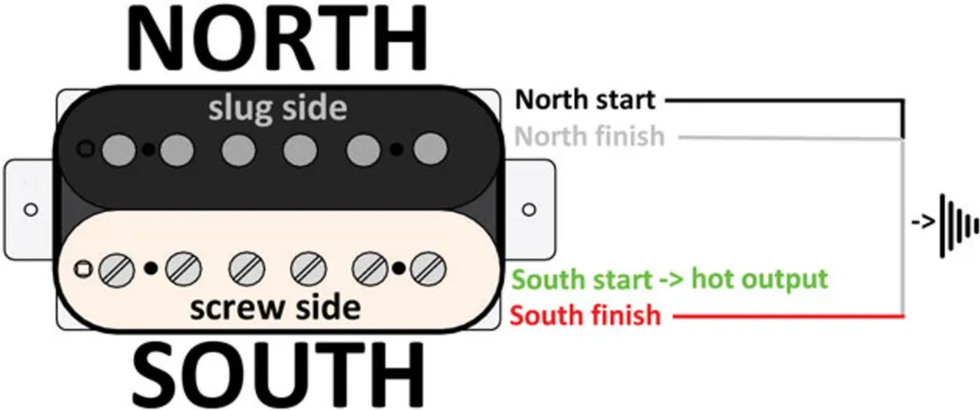
Fig. 4
illustration courtesy of singlecoil.com
For this coil-splitting wiring (Fig. 4), you need the following connections:
- South coil start is the hot output.
- North coil start, north coil finish, and south coil finish are soldered together with the bare ground wire.
Coil-splitting humbucker wiring #2: splitting to the north coil.
This wiring follows the same concept as our previous coil-splitting recipe, but leaves the north coil active—that's the slug side. This version is recommended for a bridge humbucker because pole-piece slugs deliver a fuller sound than pole-piece screws.
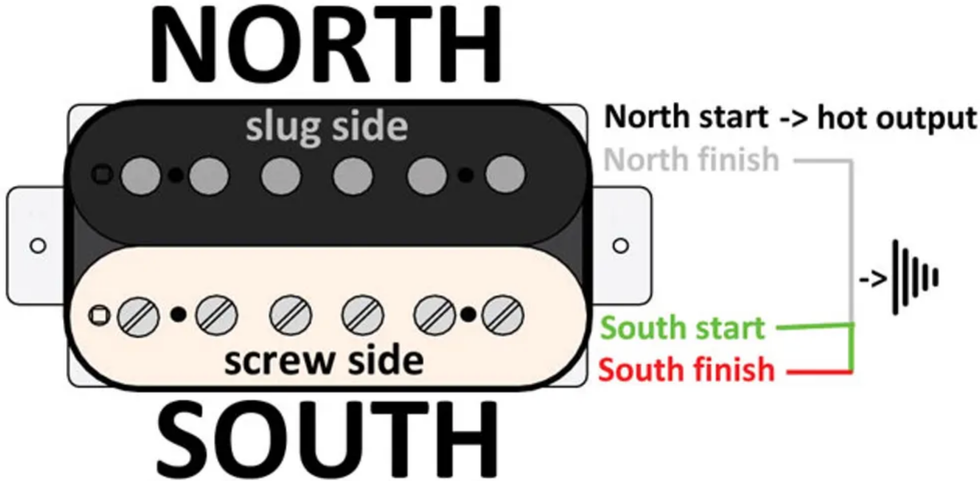
Fig. 5
illustration courtesy of singlecoil.com
Here are the connections for our second coil-splitting wiring (Fig. 5):
- North coil start is the hot output.
- North coil finish, south coil start, and south coil finish are soldered together with the bare ground wire.
Well, that's it. In a future column we'll explore how to integrate and control all these options with the help of a switching device. And, of course, we'll learn how to compensate for possible out-of-phase issues that can occur when you combine several humbuckers or a humbucker with a single-coil. But next month, we'll dig into a project designed to make a Telecaster more sonically flexible. Until then ... keep on modding!
[Updated 9/15/21]


