Luthier Dave Helmer shows you how to cure buzzy strings, bad intonation, gnarly frets, high action, and other common troubles with off-the-shelf axes.
Guitars are the best. We love them. It’s fun to fall in love with a guitar at a store, buy it, and proudly bring it home. But we’ve all been there … where after a month that new guitar is just not playing as good as it was before. As guitar players, we know what feels good and what feels bad when it comes to playability. Maybe you have setup preferences that you like on all your guitars, or maybe you want to experiment with changes to your setup?
With a few tools, you can perform a handful of tasks that will make your new axe play better and stay in tune. This article is for folks who already know how to tighten loose parts, raise and lower string saddles or bridges, and adjust their truss rods—though I’ll share a tip on how to check it with even more accuracy.
Is that big bulky stock nut uncomfortable on your hand? Let’s trim it down and reshape it. If the action feels high and the neck looks straight, I’ll show you how to lower the action. And haven’t we all swapped out pickups and wondered, “Do they really sound better, or do I think that just because they’re new?” Before you swap your pickups, I’ll share some pickup-height measurements that might make you change your mind.
But wait! There’s more. With everything feeling and playing great, does moving into the upper register start to sound out of tune? Intonation is very easy to check and adjust. When you go to vibrato or hold a note, do the frets feel “sandy”? Are the fret ends rubbing against your hand while you play? Let’s flush and polish those up.
To be clear, we’re not swapping out anything on your new guitar: We’re simply refining the setup. Be sure to go online to see eight videos I made showing various processes covered in this story.
Begin the Beguine
There is an order of operations for best results. Neck relief is the first item to dial in, followed by getting the nut slots cut to the proper depth. After that, setting your string and pickup heights is in order. The final step is setting intonation.
Fret polishing is its own event and can happen anytime between string changes. Getting the frets feeling comfortable and well-polished will take some time and attention. You’ll also need some specialized tools as well as some that can be found in most households. Check the box for my list.
Tools You’ll Need
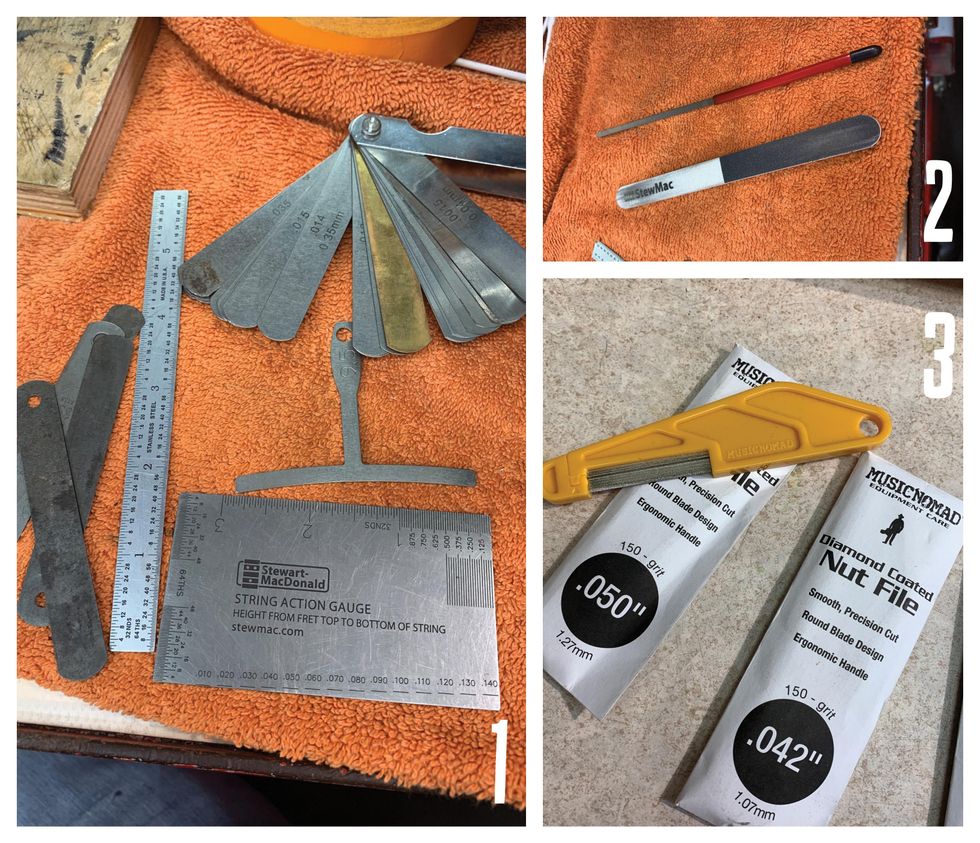
All of the specialized tools in this list are available through online suppliers, including StewMac and Amazon.
- 6" Ruler with measures in 64ths
- String action gauge [Photo 1]
- Miscellaneous screwdrivers
- Allen wrenches
- Radius blocks
- Understring radius gauges (with the radius on the bottom and the top)
- Fret-end dressing file
- Micro-Mesh sticks [Photo 2]
- Tape (low tack)
- Cotton swabs
- Paper towels (blue shop towels preferred)
- Clean cotton rags
- Nut files [Photo 3]
- Stikit sandpaper
- Tri-Flow lubricant
- Capo
- Feeler gauges
- Simichrome polish
Polishing the Frets
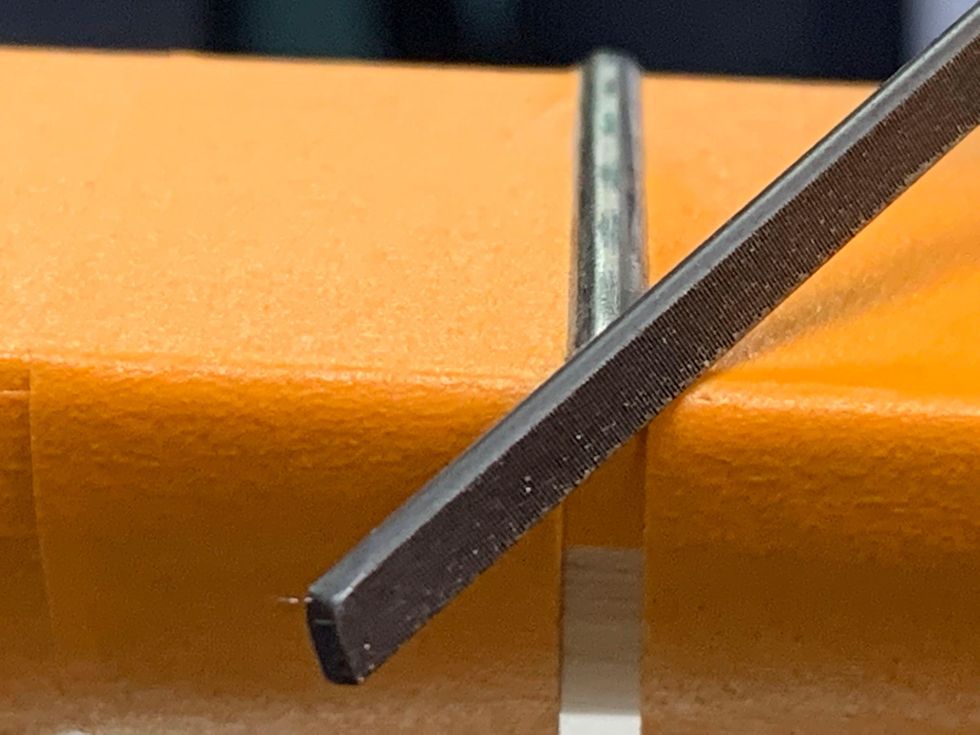
Photo 4
Let’s start with the most Zen of these tasks: fret polishing.
Tape off the fretboard using low-tack tape, exposing only the frets. De-tack each piece of tape on your clothing or maybe a rag—I use my jeans or my sweatshirt. Making it less sticky helps prevent pulling finish off a maple fretboard or the neck. Taping the fretboard also prevents putting any cross-grain scratches into it while you file and polish. You can choose to tape off the entire fretboard or work your way down one fret at a time. Dealer’s choice.
One thing to note about tape, any tape: Even when you de-tack it, you do not want to leave it on overnight. If that happens, rub the tape with your finger, which will break the surface tension. Then carefully pull the tape off from a corner, making sure you’re pulling it off at an angle and not at a straight line with the fretboard edge.
Every fret end has a small burr on the corner from the initial fret job. The fret-end dressing file has a non-marring smooth side for rounding the fret end, and a safe square edge for getting into the corner of the fret end. So, take the fret-end dressing file, use the squared off-side, and file both corners of the fret end [Photo 4].
How to Polish Frets
Here’s how easy it is to polish and smooth frets.
One or two strokes is all you’ll need. Then, using the non-marring side of the file, slightly round off the fret ends.
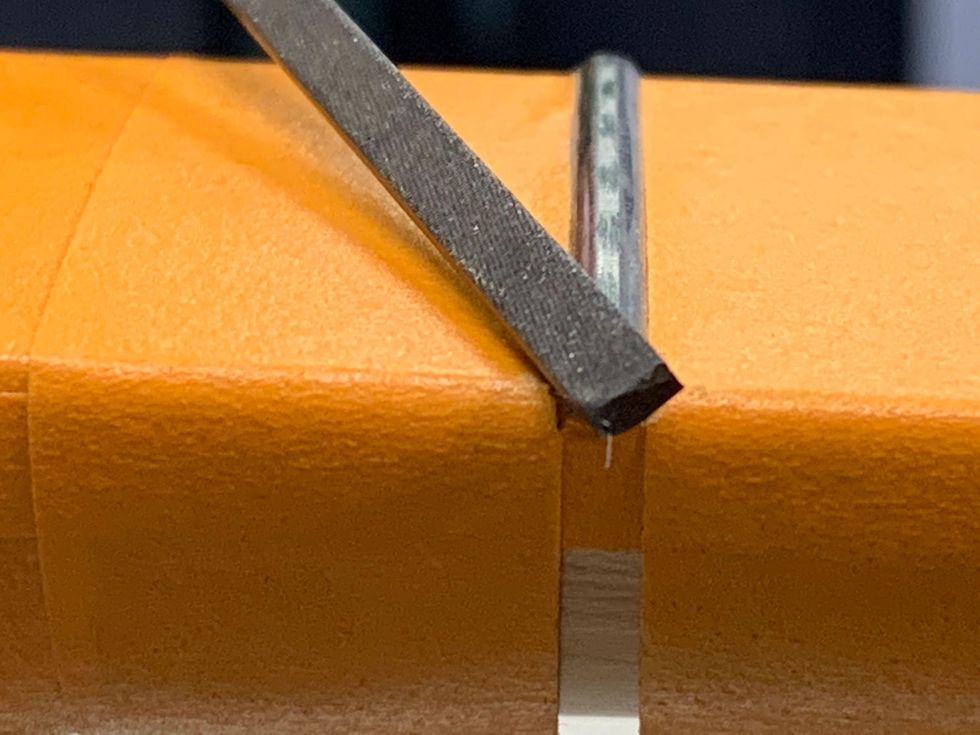
Photo 5
With the file positioned vertically, file downward to make the fret end flush with the edge of the fretboard.
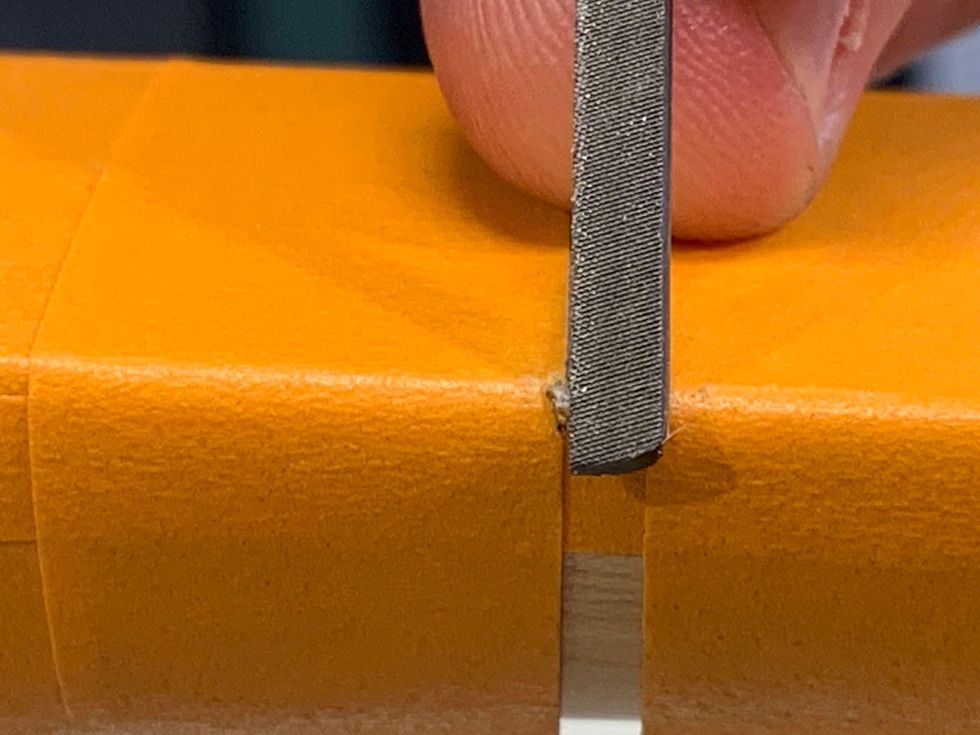
Photo 6
For a nice, rounded-off look, polish the frets using the same rounding motion from the previous step, working through all three grits of the Micro-Mesh stick.
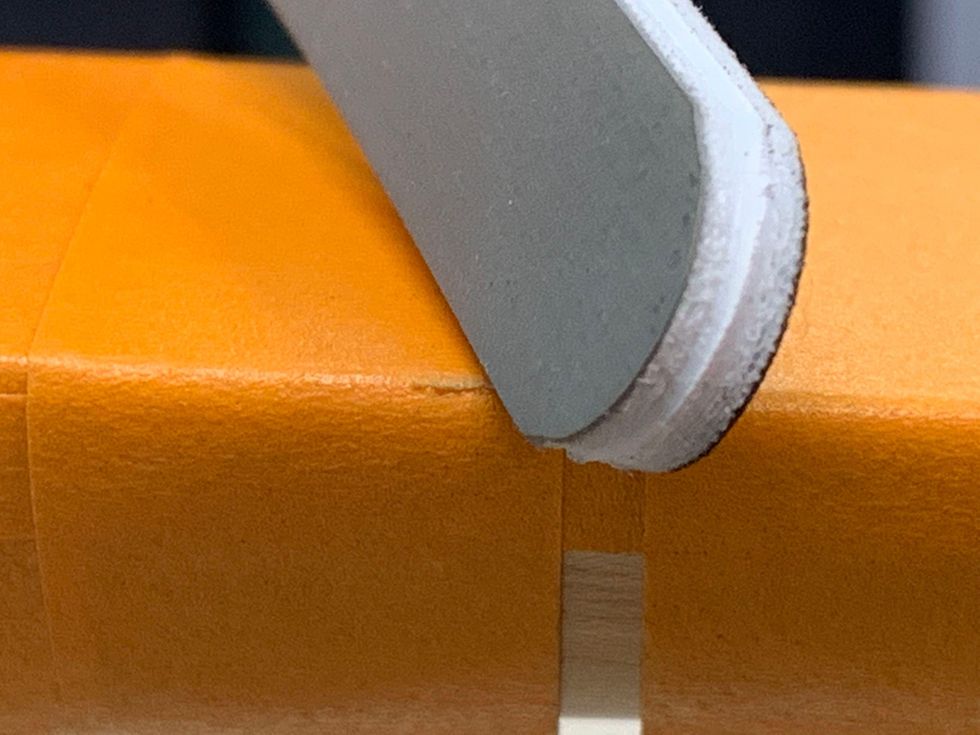
Photo 7
Then, polish both the sides and the top of the frets.
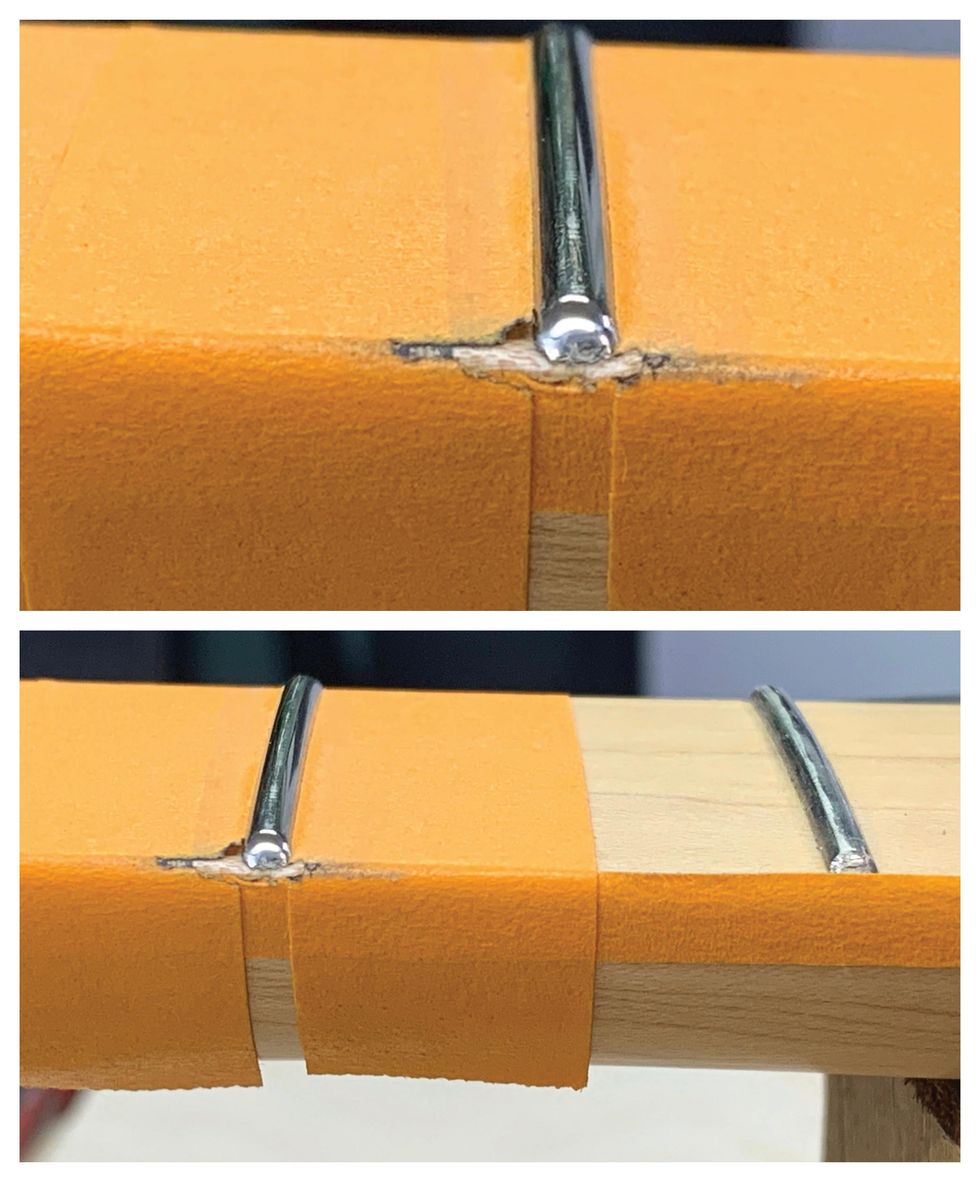
Photos 8 (top) & 9 (bottom)
Using a soft cloth and Simichrome, buff every fret. This will give you a great shine and help prevent oxidation. Now it’s time to remove the tape and condition the fingerboard if it needs it.
Note: Every fret has two fret ends to clean up and polish along with the fret itself. This is a fair amount of handwork. If you’ve never done it, you will get tired and need a break. Take that break. Take multiple breaks. Let the process take however long it requires without rushing. If you’re new, do all the fret polishing over a weekend or a few days. It should be fun, not painful. If it is difficult, call your local luthier and hire them to do it for you.
Adjusting Neck Relief
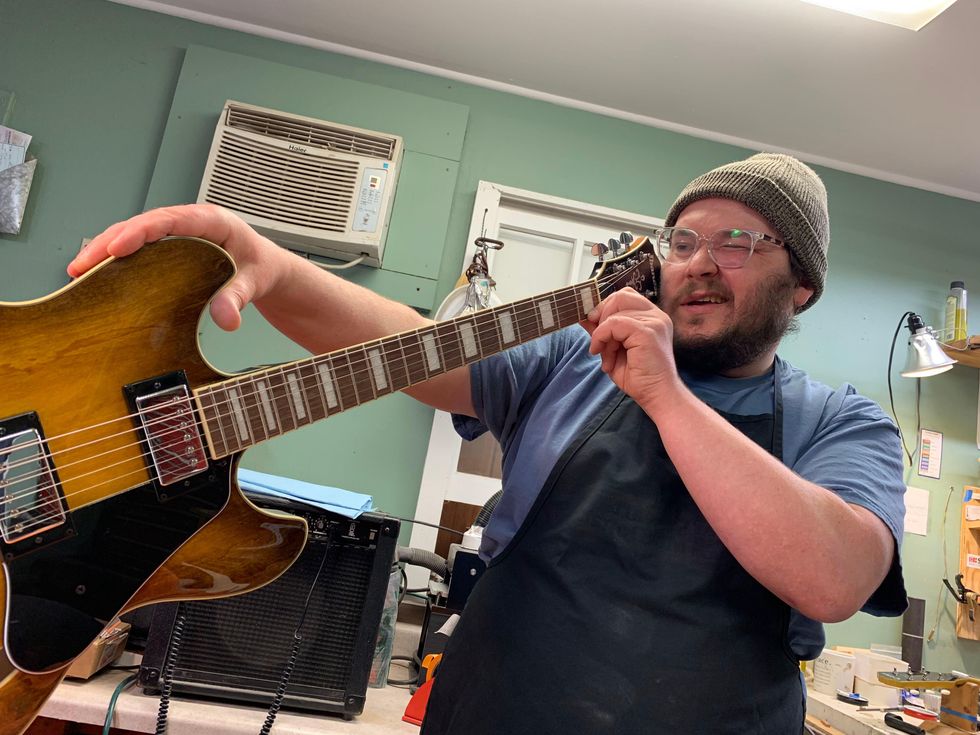
Photo 10
Neck relief refers to the slight amount of concave bowing intentionally created in the neck of a guitar or bass by adjusting the truss rod. For the safety of the guitar, be sure to slack the strings before doing any adjustments to the truss rod. Neither you nor your guitar needs to be tense during this process.
Before whipping out an Allen wrench for the truss rod, start by sight-checking the neck’s straightness. You can sight the neck with the guitar on its back, but I like to put it on edge and look at it that way. It’s easier to see how much curve there is when the guitar is on its side. I feel like gravity plays tricks on my eyes when I sight the neck with the guitar on its back. When I play the guitar, it’s on its side anyway, so looking at it from this vantage point is best.
Tune the guitar to pitch, put a capo on the first fret, and press fret 15 with your left hand.
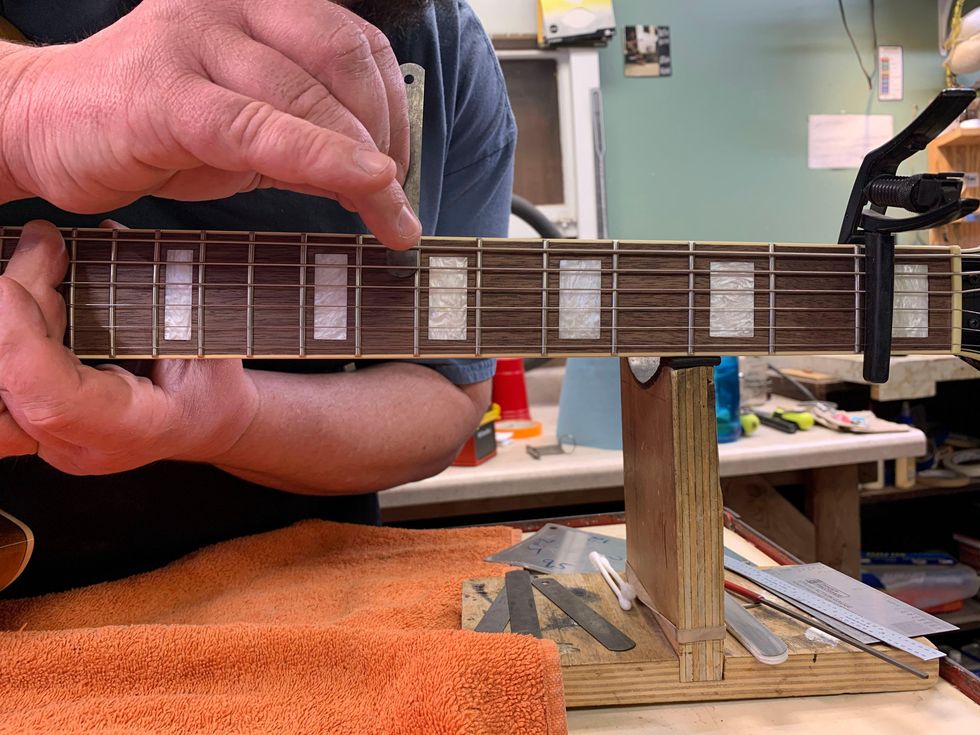
Photo 11
With your right hand, take a feeler gauge and check the gap at frets 7 through 9 (left-handed players, flip your hands around) [Photo 11].
From the top of the fret to the bottom of the string, the gap is usually anywhere from .003" to .012", depending on the feel you are going for. The feeler gauge should fit just between the top of the fret and the bottom of the string. The string shouldn’t move. This will tell you how much “relief” is in the neck. If you find this challenging, keep going—this will take some practice.
When dialing in the relief, I go back and forth between adjusting the truss rod and the string action. Getting the strings low and playing clean on a budget axe can be a challenge. Usually the fretwork isn’t that great, and in the upper register the frets can be unlevel, causing buzzes and clanks. If you need to raise the string action to get the notes to play clean, some fret leveling may be in order. (For more on fret leveling, go online to our article “About Fret Leveling,” from the December 2007 issue.) For good energy transfer, the neck should be as straight as possible. If the neck is straight and the frets are not level, the strings will buzz with low action.
In general, the flatter the radius on the fretboard, the straighter you can get the neck with the truss rod adjustment. On a fretboard with a 12" radius, you should be able to get .005" relief, and on a vintage 7.25" radius board you may need as much as .014" relief. The only way to get better at checking and setting relief is practice.
Refining the Nut
String buzzes, pinging noises when you tune, strings sticking in the slots, and too much string motion in the nut slots are all indicators of trouble. Before getting out the sandpaper and Micro-Mesh sticks, be sure you know if your guitar’s nut is TUSQ or bone. TUSQ is softer, so you should leave TUSQ nut slots a little higher. This leaves room for the TUSQ to wear without causing buzzing on the first fret. With bone, you can cut the slots lower, because it holds up to string wear.
How to Shape Your Guitar's Nut
Watch as Dave Helmer sands down the back half of a nut and creates a smooth finish.
The back side of the nut is usually very bulky and could often stand to lose some material to be more comfortable on your hand. So, let’s start there. Tape off the neck and headstock around the nut using a few layers of tape to protect the headstock face and fretboard. Then, slack the strings and pull them to either side of the nut.
Sand a bevel into the backside—the side closest to the headstock—of the nut using P320 and P400 grit Stikit sandpaper on a flat sanding stick.
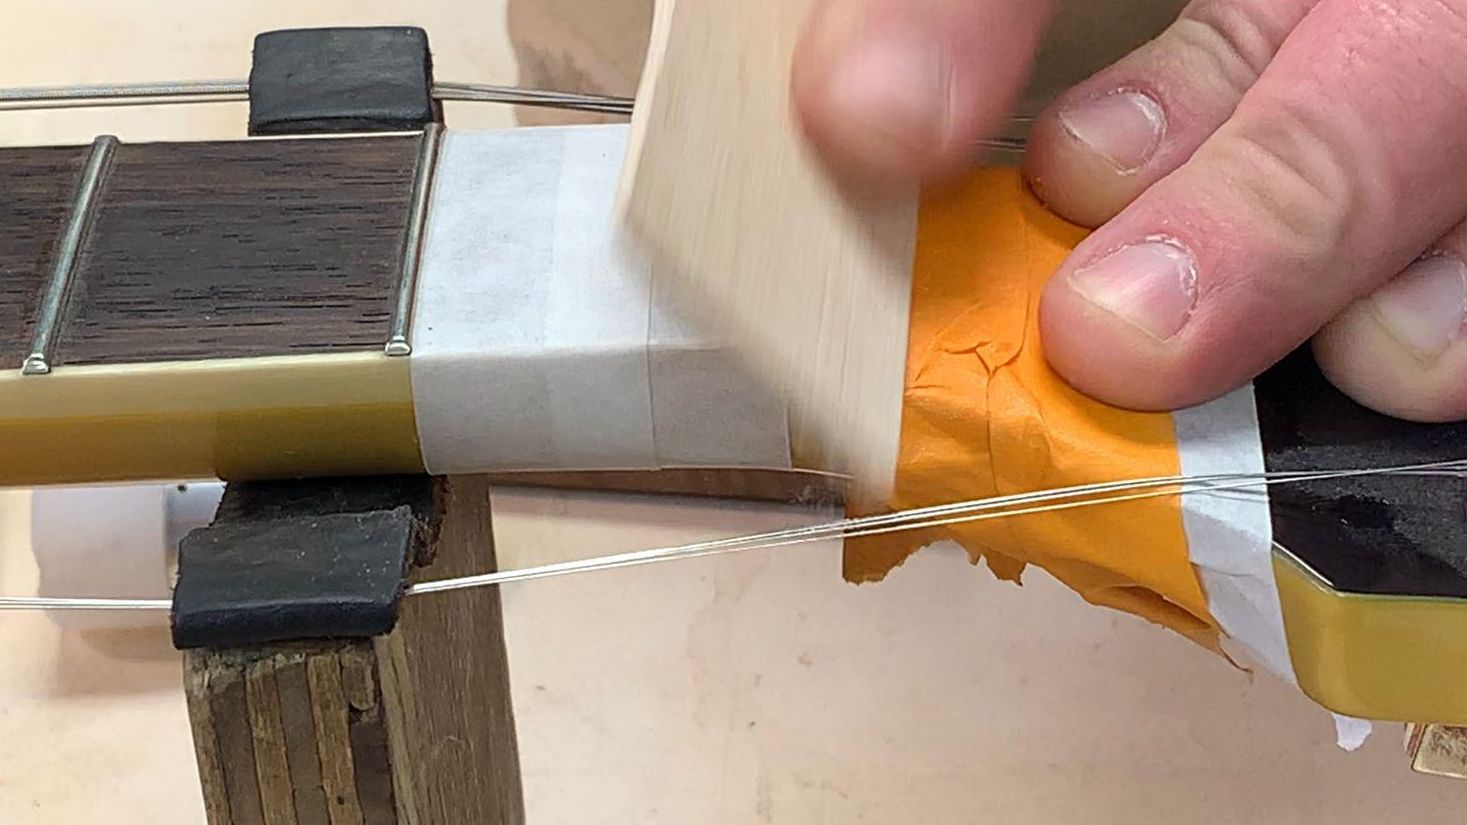
Photo 12
The bevel should start at the back of the nut and come forward about one-third to one-half the thickness of the nut [Photo 12]. Use P320 for most of the sanding and switch to P400 for the last 5 to 10 strokes.
Next, take a fresh Micro-Mesh stick and work through the various grits to buff/round over the bevel you’ve sanded into back of the nut, so it looks and feels good.
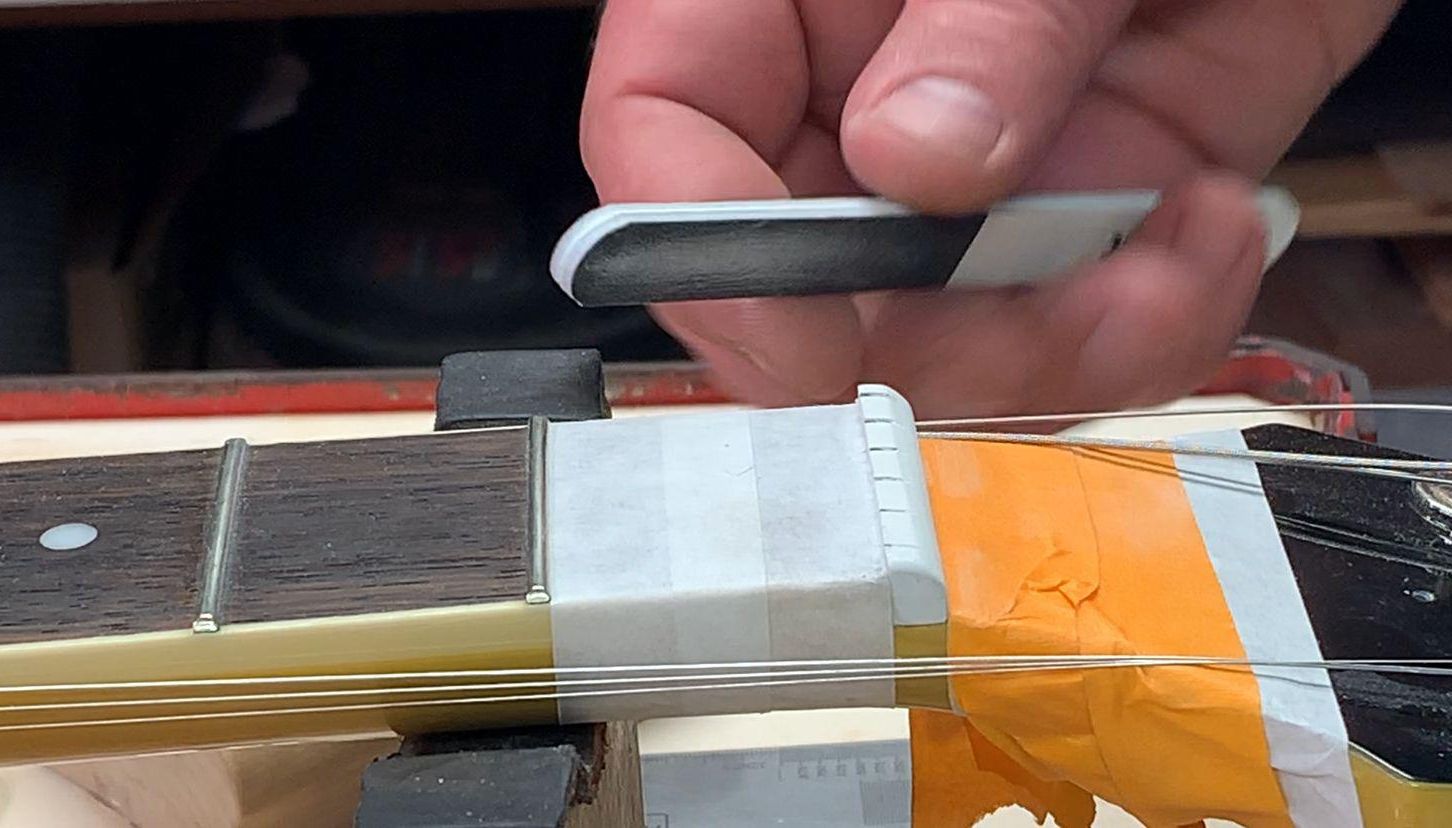
Photo 13
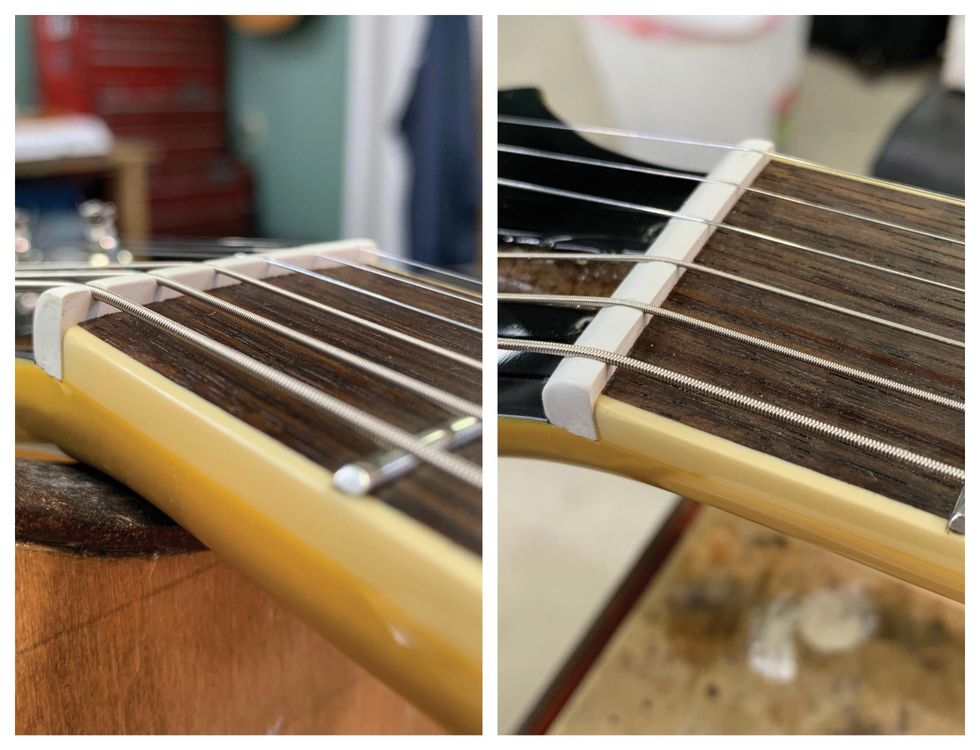
TUSQ nuts are often tall, and the strings sit deep in the slots.
Photos 14 (left) & 15 (right)
Wound strings require 50 percent of the diameter of the string to sit in the nut slot, with the other 50 percent above the top of the nut surface. The plain strings should be flush with the top of the nut. Take a look at the wrong appearance [Photo 14] and the correct look [Photo 15] for properly seated strings.
How to Sand Your Guitar's Nut
Our luthier shows you how to use a radius block and sand down a nut.
Use a radius block that matches the radius of your fretboard.
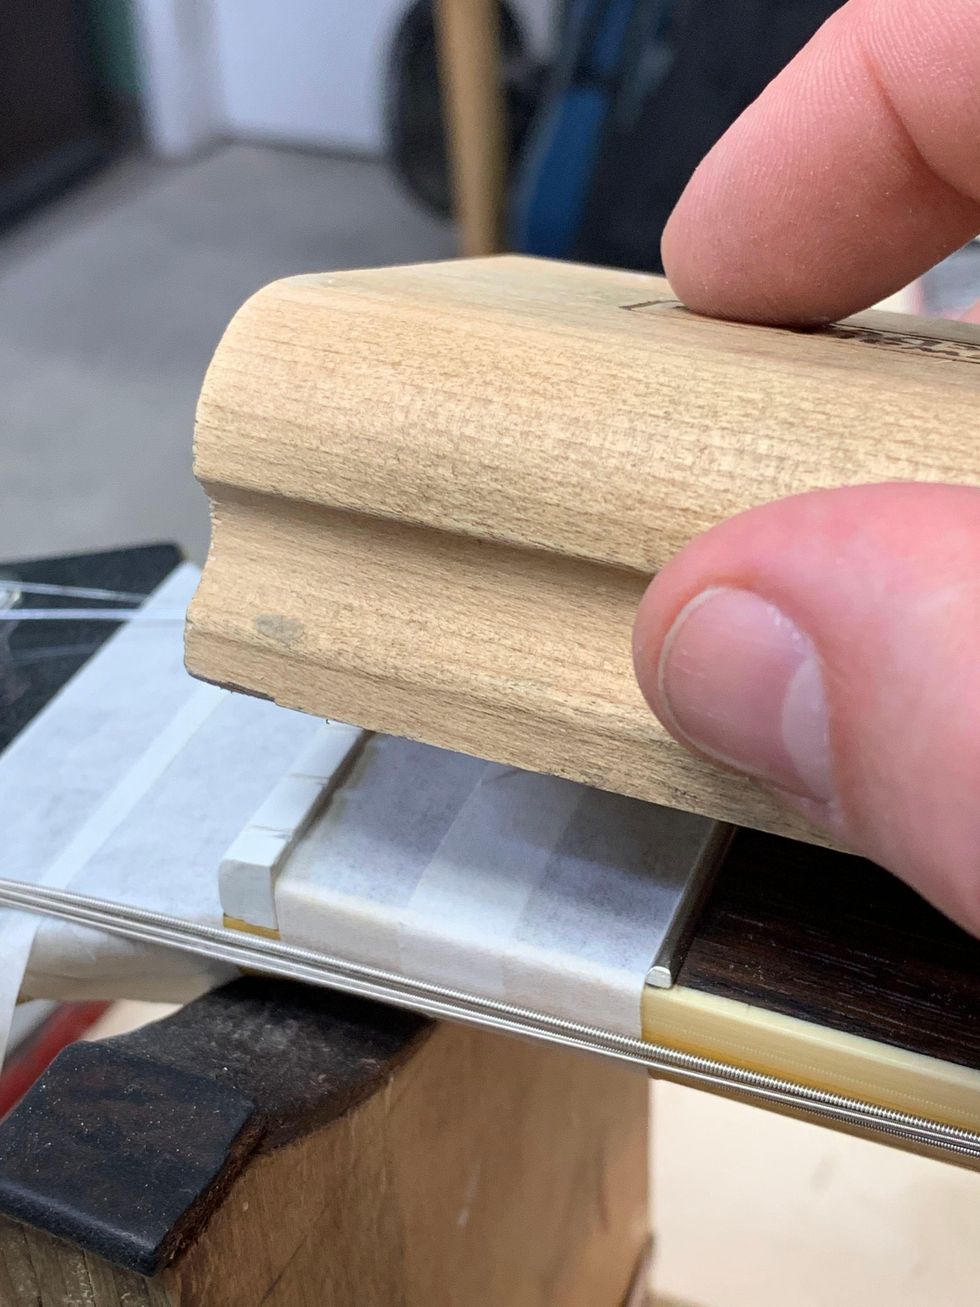
Photo 16
With P320 and P400 grit Stikit sandpapers, use mild pressure to sand down the top of the nut. Sand a bit and check your progress by setting the strings in the slots and putting a little tension on them. Tuning to pitch isn’t necessary. Use the P320 for most of the sanding, and switch to P400 when you are close to the 50/50 height for the wound strings. The radius block sanding will leave a flat, sharp edge on each side of the TUSQ nut [Photo 16]. To round over the sharp edge, use the sanding block and Micro-Mesh stick.
Use the coarse grit of a Micro-Mesh stick to round over and blend the bevel from the back into the top of the nut. Work through the grit gauges until it’s smooth. There is a fine balance between the bevel at the back of the nut and the top radius of the nut. Go back and forth between the two steps to get a nice, finished look and a nut that functions at optimal levels.
… And Refining the Nut Slots
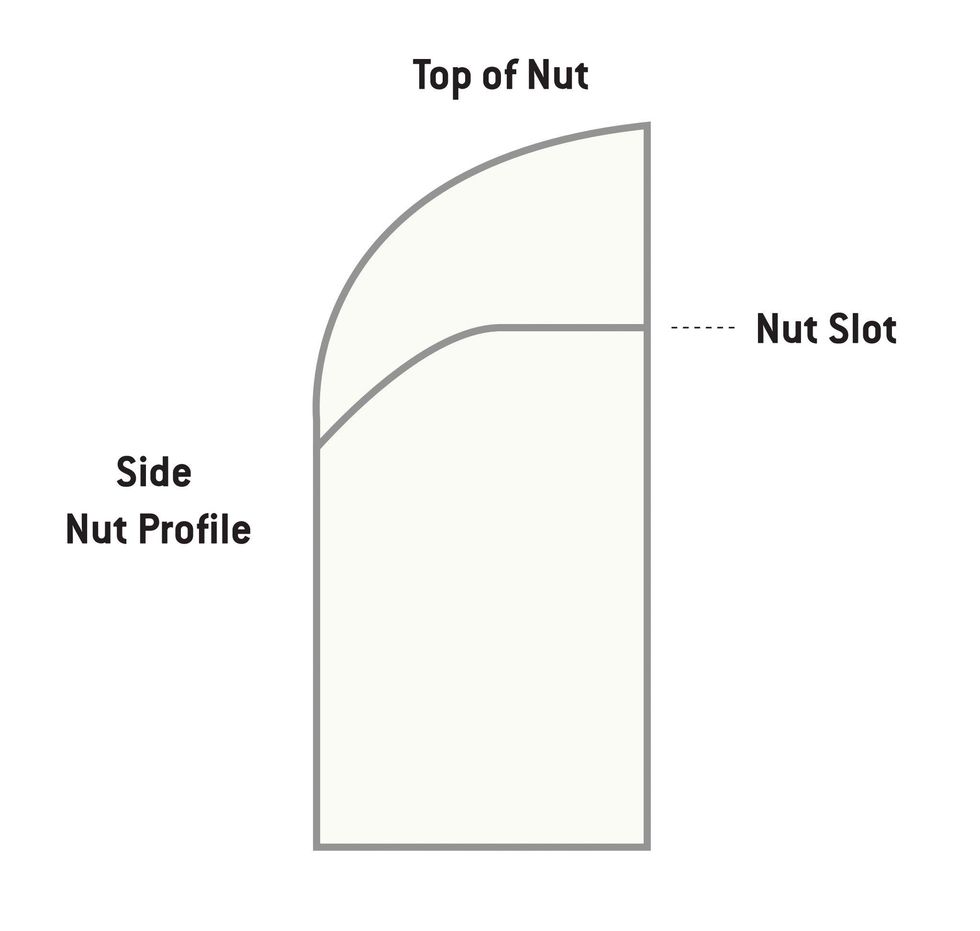
Photo 17
Nut height is the distance from the top of the first fret to the bottom of the string. A good height on the wound strings is about .020", and for the plain strings about .015". Measuring this gap with a feeler gauge can be tricky because of the fretboard radius. Many repair folks do this by eye and feel, based on experience. It takes some practice. A good check: At pitch, fret the third fret and check for a small gap between the string and the top of the first fret.
How to Widen Your Guitar's Nut Slots
A diamond file can make quick work of deepening and widening nut slots.
The bottom of the string should be sitting on the bottom of the front half of the nut slot [Photo 17]. File down each nut slot to its proper depth using the corresponding nut file. There are diamond nut files on the market in multiple sizes to accommodate many string gauges. Make sure to keep your strokes straight. The standard-toothed files have less sizes and usually require rolling them from side to side to get a well-fit string.
Next, using a proper-sized file, round over the bottom back half of the nut slots down, toward the face of the headstock and away from the strings. This will allow the strings to move freely during tuning or bending, while still having support from the front half of the slot.
How to File D and G String Slots on Guitar
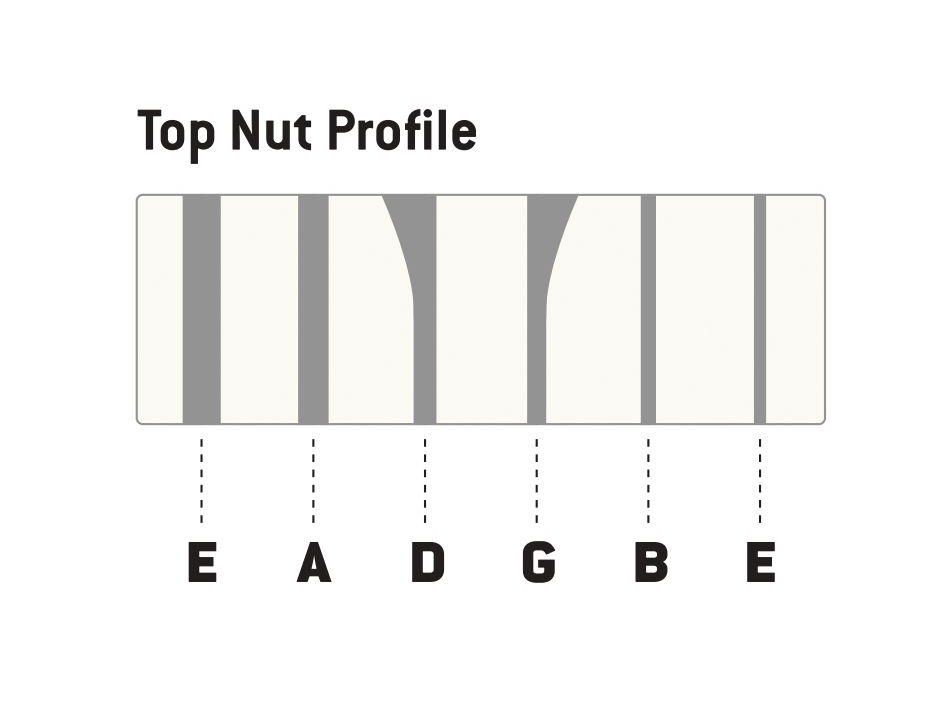
Photo 18
On guitars with 3x3 headstock configurations, the D and G strings need the back half of the slots feathered out away from the center, so the string has a direct path to the tuner post. Using a file that is one size bigger than the string and rolling it side to side on the back of the nut slot will give the string a straight path to the tuner post. Photo 18 is my illustration showing which slots need feathering.
Watch How to File D and G String Slots on Guitar
The D and G nut slots require special attention on 3x3-style headstock configurations.
Additionally, use pencil lead to lubricate the slots. Just get in there with the point of a pencil and mark the slot with its graphite. You might also put a drop of Tri-Flow on the front of the string tree. Tri-Flow will run down the string, so take a cotton swab or cloth to clean up any excess. Tri-Flow has Teflon in it, so you don’t need much.
Adjusting String Action
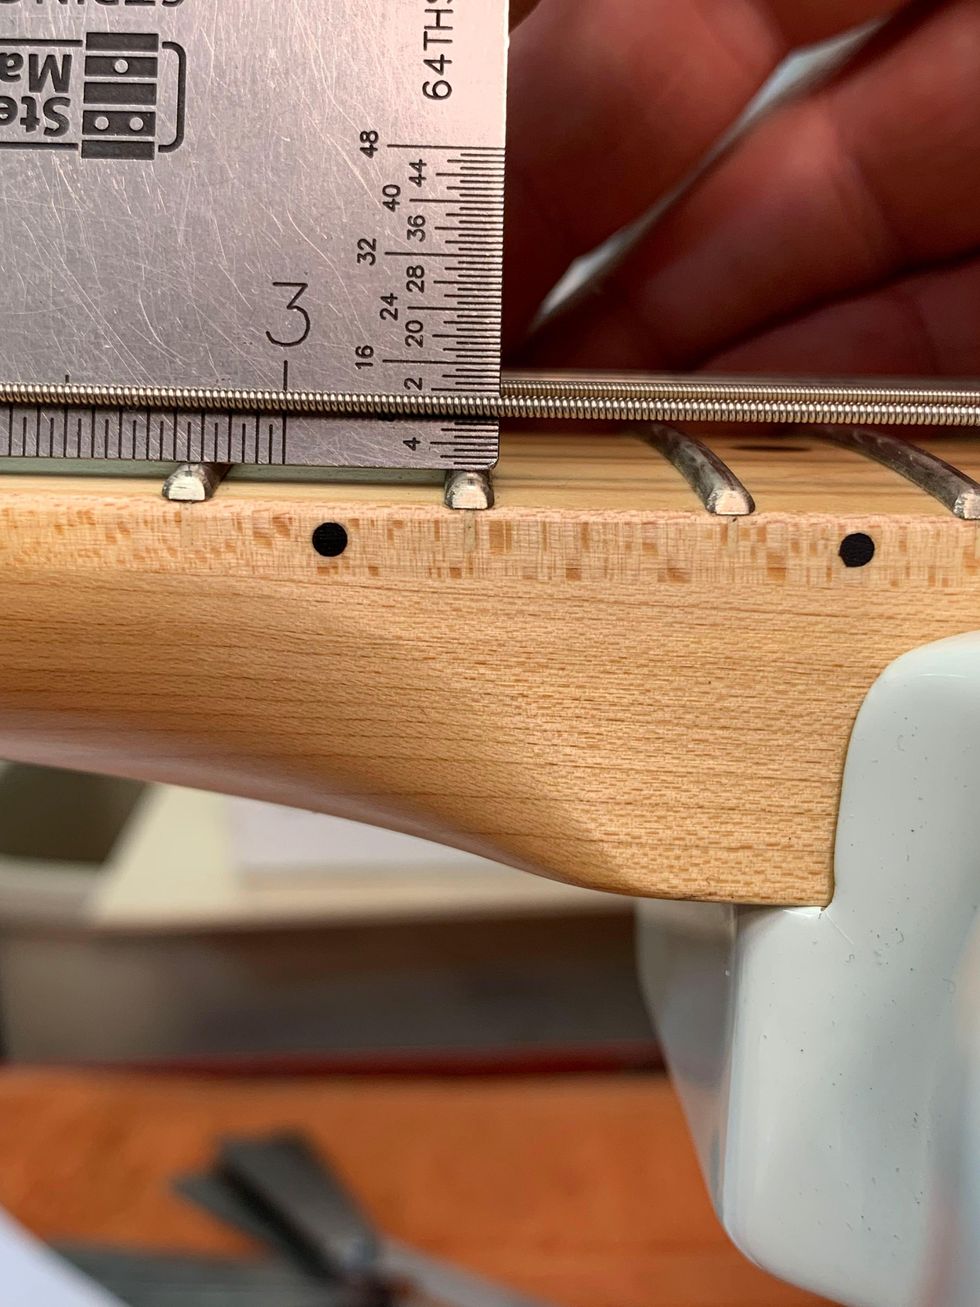
Photo 19
First, find your string height by measuring the string action at the 17th fret on a Fender-style guitar and at the 15th fret on a Gibson-style instrument.On electric guitars, action can range from 3/64" to 3/32", depending on the player’s comfort. My preferences are 1/16" on the treble side and 5/64"on the bass side on both Fender- and Gibson-style guitars measured at the appropriate fret.
How to Adjust Guitar Action
Here’s a look at how our author adjusts the action.
Always loosen the string tension before making action adjustments. This will save wear and tear on the small bridge components. Take either a 6" ruler or a string action gauge and set it on the frets. Measure from the top of the fret to the bottom of the string [Photo 19].
If the action is high, you will lower that string’s saddle or that side of the bridge. If it is low, you will raise it. Make sure the individual saddles are sitting square and upright to the face of the bridge. You do not want them sitting at an angle or leaning over. This will cause buzzing.
The bottom of the strings should match the radius of the fretboard when measured with an understring radius gauge.
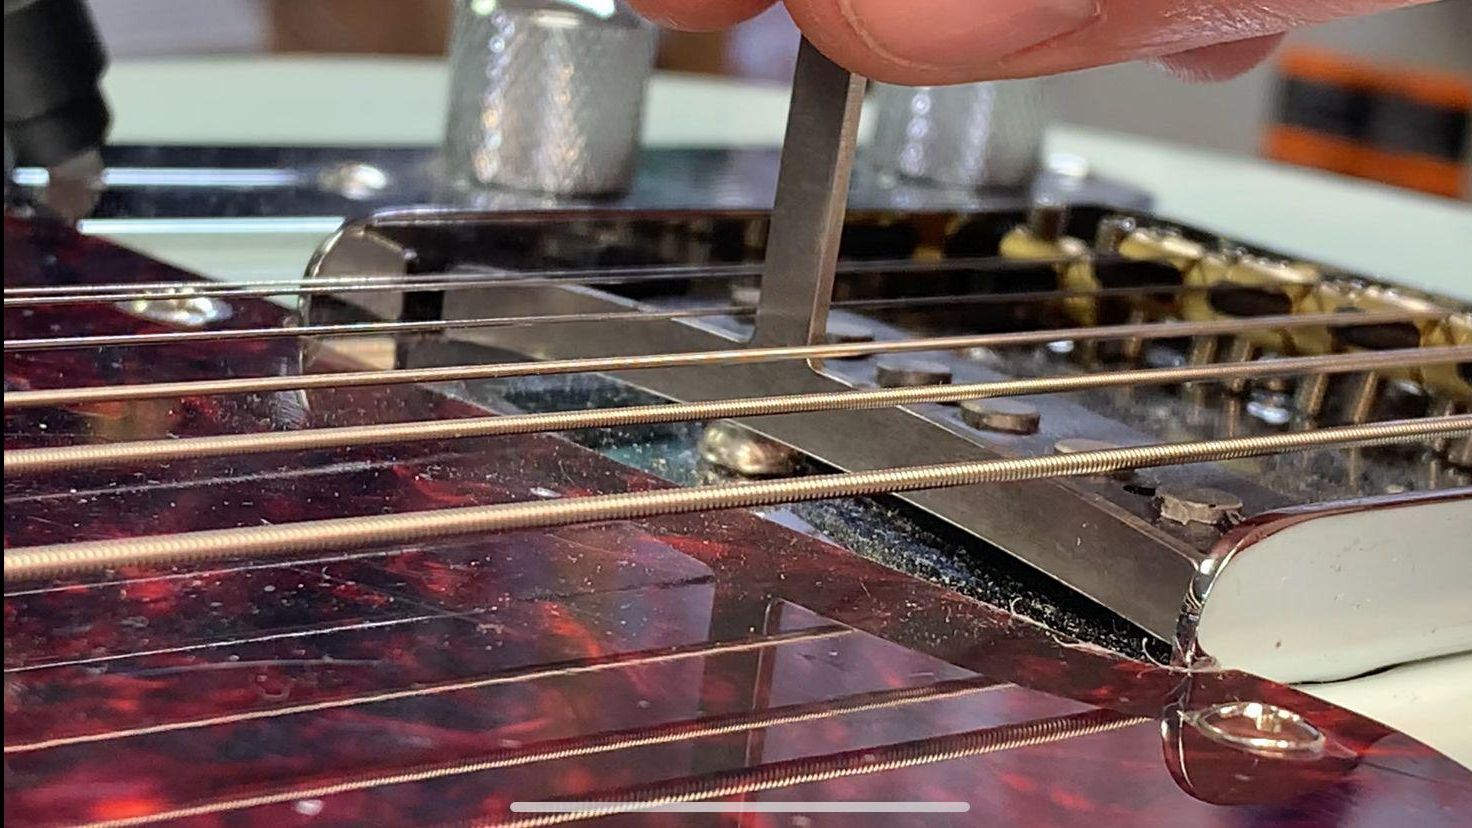
Photo 20
Start your adjustment with the outside strings, working toward the center. On Fender-style guitars, set the two outside strings to the height you want and have the middle four strings a bit higher than that. Bring the gauge up from underneath and just touch the two outside strings. Then, bring the strings down a little at a time until the radius matches.
On a Gibson-style Tune-o-matic, the saddles are not individually adjustable. So, if the radius doesn’t match, the saddles will need to be filed. To do this, I recommend using toothed nut files and a rolling side-to-side motion. Do a little work and check your progress. Remember to slack your strings when adjusting the saddle or bridge up or down.
Changing Pickup Height
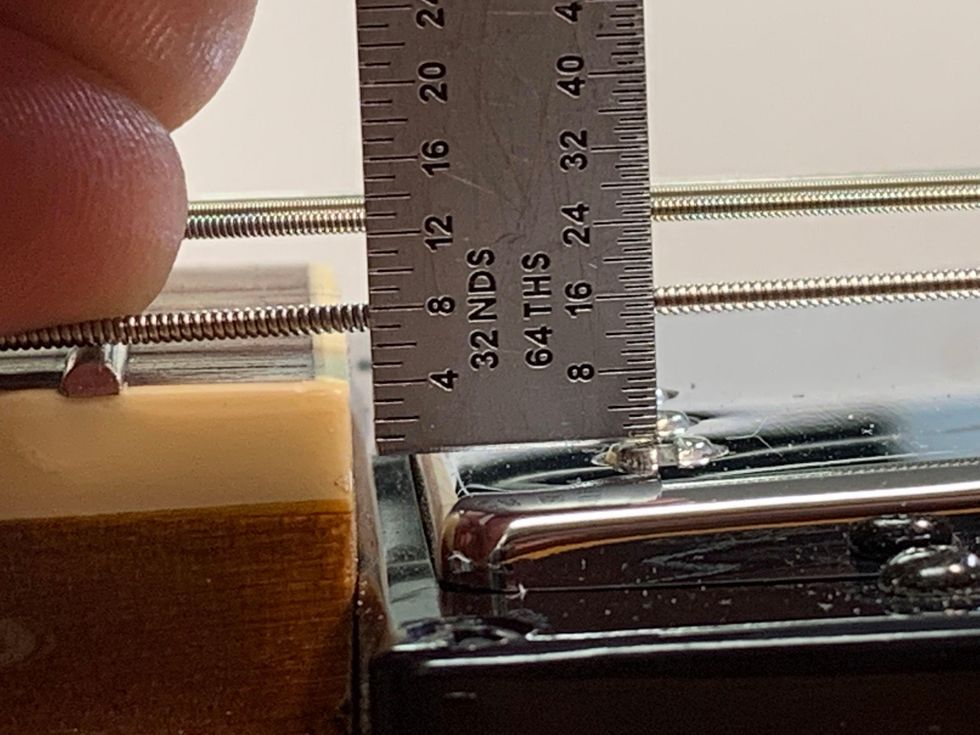
Photo 21
Finally, let’s take a look at pickup-height adjustment. First, to check pickup height, use the two outside strings again. Press the top wound string on the last fret and measure the distance from the top of the pole piece to the bottom of the string [Photo 21]. This distance can range from 3/64" to 1/8". My preferences are 1/16" on the treble side and 5/64" on the bass side.
Adjusting Guitar Pickup Height
Dave Helmer walks you through the process of adjusting the height of your guitar’s pickups.
On most styles of pickups, there are height adjustment screws on either side of the pickup to raise or lower it. The closer the pickup gets to the strings, the more present string frequencies become. If you get too close, the magnetic pull can affect the string’s vibration and you may hear some strange sounds as you go into the upper register.
On Strats, the neck pickup is regularly set too close, and at the 12th fret and above, the low E and A can sound choked, honky, and not clear. Lowering the neck pickup with a screwdriver usually solves this issue.
Setting Intonation
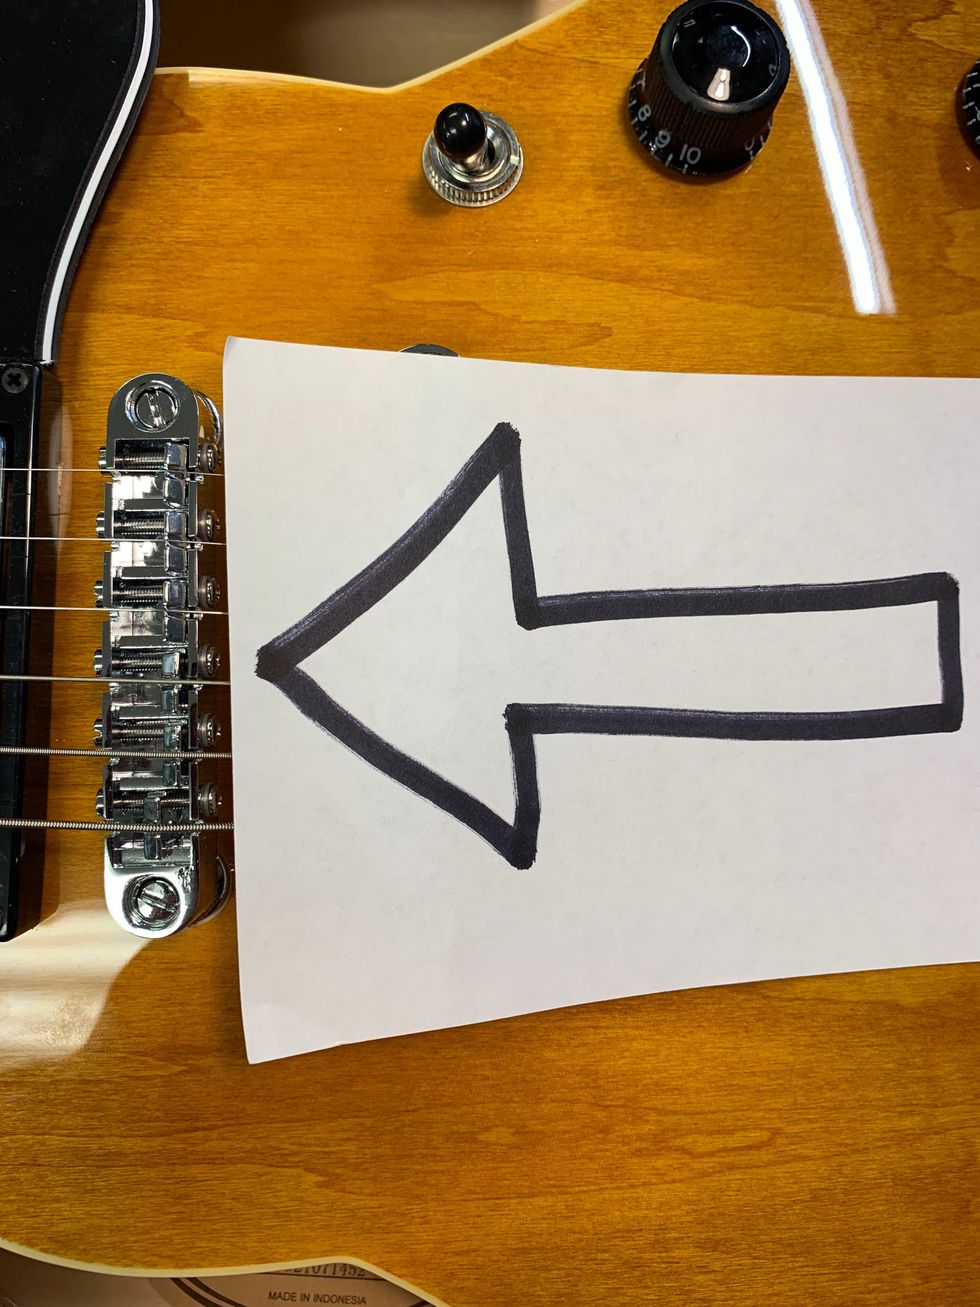
Photo 22
If you can’t get your guitar accurately in tune, you might need to check its intonation. Adjust all saddles as far back as possible so every string will play flat at the 12th fret. You will adjust the saddles forward, gradually making the octave play sharper until it’s in tune with the open string [Photo 22].
Adjust Your Guitar's Intonation
With a tuner and a screwdriver, Dave Helmer shows you how to adjust your guitar’s intonation.
Depending on your vibrato style, experiment with intonating the plain strings slightly flat. Use your ear and do what sounds good. Sometimes, the plain strings can have perfect intonation, but playing with vibrato can make them sound sharp.
To fine-tune intonation, the individual bridge saddles must be adjustable. Once the intonation is set, recheck the string radius using the understring radius gauge and adjust as needed. The radius can change as the saddles come forward during intonation.
Tri-Flow is great for lubricating saddle parts. Put a small drop on the saddle-height adjustment screws and capillary action will suck it in. Adjust the saddle up and down a few times to coat the threads. Clean up any excess with a cotton swab or cloth. Put a drop or two onto a cotton swab and apply the Tri-Flow to the top of each saddle where the string rests. This will help strings move freely during tuning and after any bends or vibrato.
And that’s it! For a relatively small investment in tools and time, you’re now ready to supercharge your new guitar—and maybe your long-treasured axes, too.
- DIY: How to Set Up a Fender Stratocaster - Premier Guitar ›
- 12-String Setup Secrets - Premier Guitar ›
- DIY: How to Set Up and Intonate an Acoustic Guitar - Premier Guitar ›
- Reader Guitar of the Month—Pickups and Finishes - Premier Guitar ›
- DIY Guitar: 7 Cool Reader Mods - Premier Guitar ›
Improved tracking and richness in tones. Stereo panning potential. 100 presets.
Can be hard to use intuitively. Expensive!
$645
Electro-Harmonic POG III
It’s been a very rainy, moody couple of weeks, which is to say, perfect weather for getting lost in the labyrinthine depths of the new Electro-Harmonix POG III polyphonic octave generator. The POG III is yet another evolution (mutation?) within EHX’s now rather expansive stable of octave effects. But to those who know the POG through its original incarnation, or one of several simpler subsequent variants, the POG III represents a pretty dramatic leap forward.
There’s a few things you should know about the POG III straight away. First, it’s very expensive. At $645, it’s 245 clams more than its predecessor, the POG 2, (which was already a considerable investment) and more than twice the price of the simplest POG pedals like the Micro and Pico. Cold hard cash isn’t all you’re likely to trade away, either. Extracting the most value and utility from the POG III takes time and effort—even if you’re experienced with other pedals in the POG family. But for the guitarist and musician whose creations and pleasures transcend traditional playing styles and song forms, or for whom sound design is a primary pursuit, the POG III is a potential studio fixture and portal to musical parts undiscovered.
Copious Control
This is no cop out: The POG III has many more features and combinations thereof than can be mentioned in the space of this review—even if we merely listed them. The manual that EHX included (and is a must-read) is 23 pages long. It’s digestible, certainly. But there is much to learn.
“The Organ Swell reveals much about how rich and organic octave tones can sound in the POG III.”
Even so, the POG III’s 10 factory presets (you can create up to 100 of them) are great jumping-off points for crafting your own sounds and understanding the pedal’s basic dynamics, functionality, and interactivity among the controls. The organ swell preset is a great place to start. Players and bands that use keyboard and synth pads behind their guitar phrases were among POG’s early adopters. POG III’s organ sounds are pretty impressive. And while few will be fooled into thinking you have the pipe organ from St. Stephen’s Cathedral at your fingertips, the Organ Swell reveals much about how rich and organic octave tones can sound in the POG III. With precise timing and fretting, crafty chord phrasing and spacing, the right attack setting, and less aggressive guitar volume and tone settings, you can fashion a pretty convincing Bach organ arpeggio—particularly if you add a suitably expansive reverb or delay.
Cooking Up Wider, Weirder Images
A very cool new feature on the POG III is the panning knobs that accompany individual bands. Panning each band as part of a stereo image adds dimensionality. But it can also lend a more organic “live” flavor to a tone composite by situating fundamental sounds front and center, while sounds that serve as harmonic support can be mixed lower and reoriented spatially to offer more or less emphasis. These relationships can be enhanced and manipulated further by using the stereo spread control and the detune slider to create pitch modulation effects that range from mellow chorus to an almost rotary-speaker-like movement. This stereo mixing process is among the most fun and engaging parts of using the POG III.
Unusual filtering effects are here in abundance for exploring, too. Like so many modes on the POG III, the possible permutations feel endless, but here are some interesting examples.
• High-mid filter emphasis, matched to a quacky, fast envelope trigger, a sprinkle of perfect 5th, an even healthier scoop of +1 and +1 octave, and a strong foundation of -2 octave, all driven by a melodic pattern of staccato 16th notes—the result is a strange percolating pattern of carnival organ sounds against an anchor of low-resonant cello tones.
• Shifting the filter emphasis to the low end with similar envelope sensitivity, bumping the -2 octave and fifths, and subjecting the dry signal to the same filtering effects yields tectonic sub-rumbles and swells that a film- or game-sound designer could use to suggest the propulsion unit for a city-sized alien mothership. Even leaning my guitar against my amplifier and bouncing a racquet ball against the guitar body sounds amazing here. (And yes! You should really try this!)
Granted, many of these sounds fall as much into the category of sound effects and design as much as music in the songs-and-riffs sense. But I think strength in one category can reinforce the other, and in the case of the POG III, there is enough range in both directions to intrigue players everywhere along the spectrum. It still excels at funky bass textures, twisted faux 12-string, and at providing ghostly, backgrounded high-harmony lines for leads. But these time-tested POG applications merely scratch the surface.
The Verdict
The POG has come a long way since its old bent-metal, big box days. The tracking is excellent, and there’s a lot less fighting against artificial, cheesy sounds once you grasp the finer points of crafting a sound and your dynamic approach. The POG III’s complexity makes the going a little harder on fly-by-the-seat-of-your-pants intuitive tinkerers, and musicians with experience in synthesis will probably navigate the unit’s features much more readily than some. As expensive as it is, it’s probably best to be sure you can find a place for it in your work before you take the leap. But if you can afford $645 to take a chance, the POG III may illuminate whole directions you might not have considered with a less expansive effect.
Vox’s Valvenergy Tone Sculptor
Two new pedals from the Valvenergy series use a Nutube valve to generate unique dynamics and tone ranges that can be used to radical ends.
When tracking in a studio or DAW, you’re likely to use compression and EQ on most things. Many enduringly amazing and powerful records were made using little else. And though many musicians regard both effects as a bit unglamorous and utilitarian, EQs and comps are as capable of radical sounds as more overtly “weird” effects—particularly when they are used in tandem.
I spent a day workshopping ideas in my studio using just the Vox Valvenergy Smooth Impact compressor and Tone Sculptor EQ, and a dash of amp tremolo and reverb to taste. In the process, I produced more arresting sounds than I had heard from my guitars in many days. There were radical direct-to-desk-style Jimmy Page/Beatles distortion tones, sun-sized, cosmic electric 12-string, Bakersfield twang that could burn through crude, and many other sweet and nasty colors. Most decent EQ and compressor combinations can achieve variations on all those themes. But the Smooth Impact and Tone Sculptor also reveal interesting personalities in unexpected places.
The individuality and energy in the Vox Valvenergy pedals is attributable, in part, to the Nutube vacuum tube used in the circuit. Though it looks little like a vacuum tube as most guitarists know them, the thin, wafer-like Nutube is, in fact, a real vacuum tube like those used in fluorescent displays. Fluorescent display tubes have limitations. A maximum operating voltage of around 40 volts means they aren’t useful for bigger power tube applications like a 6L6, which has an operating voltage of about 400 volts. But it can work quite well as a preamp tube in concert with an op amp power section, which is how the Nutube is used in the new Valvenergy pedals, as well as older Vox products like the Vox MV50 and Superbeetle amps.
Valvenergy Tone Sculptor
When you think about “cinematic” effects, you likely imagine big reverb or modulation sounds that create a vivid picture and feeling of space or motion. But narrow, hyper-focused EQ profiles can evoke very different and equally powerful images. Radical EQ settings can add aggression, claustrophobic intimacy, and stark, explosive dark-and-light contrasts more evocative of Hitchcock’s Psycho than Ridley Scott’s Blade Runner.
Any of these moods can be summoned from the Valvenergy Tone Sculptor. Six sliders cut or boost 10 dB frequency bands spanning 100 Hz to 5.6 kHz. A seventh slider cuts or boosts the master output by 12 dB. This platter of options might not sound like much. But you can use these seven controls together to very specific ends.
“Radical EQ settings can add aggression, near-claustrophobic intimacy, and stark, explosive dark-and-light contrasts.”
For example, bumping the high-midrange and the master output produces narrow cocked-wah-like filter sounds with enough push to produce extra amp overdrive—effectively turning the Tone Sculptor into a buzzy, almost fuzz-like filter effect. But unlike a wah, you can carefully scoop high end or add a spoonful of bass to blunt harsh frequencies or give the tone a bit more weight. You can also broaden the palette of an amp/guitar pairing. I matched a particularly trebly Jazzmaster bridge pickup with a very hot and toppy Vox AC15-flavored amp for this test—a recipe that can be spiky on the best days. But with the Tone Sculptor in the line, I could utilize the same sharp, fuzzy, and filtered Mick Ronson wah tones while shaving some of the most piercing frequencies.
EQ pedals exist on many points along the cost spectrum. And at $219, the Tone Sculptor lives on the high side of the affordable range. Does it offer something less expensive models can’t deliver? Well, for one thing, I found it relatively quiet, which is nice whether you’re shaping toppy high-contrast effects or performing more surgical adjustments. And the sliders feel nuanced and nicely tapered rather than like a dull axe with a few basic frequency notches. But in many situations I also liked the color imparted by the circuit—generated, presumably, by the Nutube. “Color,” in audio terms, is a broad and subjective thing, and one should not necessarily expect the warm, tube-y glow of a vintage tube Pultec. Still, the Tone Sculptor has many forgiving, flattering qualities—typical of studio EQs—that enable fine tuning and experimentation with more radical and creative applications of the effect.
Valvenergy Smooth Impact
As with the Tone Sculptor, the Smooth Impact’s use of Nutube engenders certain expectations. It’s easy to surmise that because Smooth Impact has a vacuum tube in the circuit that it will behave like a little Teletronix LA-2A leveling amplifier. That’s a big ask for a $219 stompbox. On the other hand, the Smooth Impact exhibits some appealing characteristics of studio tube compression. At lower compression levels, it works well as a thickening agent—adding mass without much additional noise. And at higher compression levels it can sound snappy, crisp, and tight without feeling like you’ve bled every trace of overtone from your signal.
The Smooth Impact’s controls aren’t totally atypical. But because it lacks some familiar features like variable attack and release, yet is more complicated than a 1-knob DynaComp, you have to trust your ear to navigate interactions among the controls. The most unfamiliar of these is the 3-way vintage/natural/sag toggle. The first two are defined by preset attack and release settings: Vintage is slow attack and long release, and natural is the opposite. The sag mode’s compression is more like what you get from tube saturation, and it’s useful for adding thickness and complexity to a thin amp tone at modest compression levels.
Though the vintage and natural modes certainly have a different feel, they don’t always sound worlds apart. And like the sag mode, the thing they have in common is the way they enrich lifeless amp output at low to medium compression, with a bit of grind from the tube gain and a little extra makeup gain from the output. At the most aggressive settings, the tube gain can get a little crispy. And really crushing the compression can flatline your tone without adding much in the way of extra sustain. These are limitations common to many compressors with similar features. But unless I was chasing very ultra-snappy Prince and Nile Rodgers fast-funk caricatures, I enjoyed the Smooth Impact most in its in-between ranges, where mass, mild, harmonious drive, and low noise showcase the pedal’s sometimes studio-like personality.
Significantly smaller and lighter than original TAE. Easy to configure and operate. Great value. Streamlined control set.
Air Feel Level control takes the place of more surgical and realistic resonance controls. Seventy watts less power in onboard power amp. No Bluetooth connectivity with desktop app.
$699
Boss Waza Tube Amp Expander Core
Boss streamlines the size, features, and price of the already excellent Waza Tube Expander with little sacrifice in functionality.
Many of our younger selves would struggle to understand the urge—indeed, the need—to play quieter. My first real confrontation with this ever-more-present reality arrived when Covid came to town. For many months, I could only sneak into my studio space late at night to jam or review anything loud. Ultimately, the thing that made it possible to create and do my job in my little apartment was a reactive load box (in this case, a Universal Audio OX). I set up a Bassman head next to my desk and, with the help of the OX, did the work of a gear editor as well as recorded several very cathartic heavy jams, with the Bassman up to 10, that left my neighbors none the wiser.
Boss’ firstWaza Tube Amp Expander, built with an integrated power amp that enables boosted signal as well as attenuated sounds, was and remains the OX’s main competition. Both products have copious merits but, at $1,299 (Boss) and $1,499 (Universal Audio), each is expensive. And while both units are relatively compact, they aren’t gear most folks casually toss in a backpack on the way out the door. The new Waza Tube Expander Core, however, just might be. And though it sacrifices some refinements for smaller size, its much-more accessible price and strong, streamlined fundamental capabilities make it a load-box alternative that could sway skeptics.
Micro Manager
The TAE Core is around 7 1/2" wide, just over 7 " long, and fewer than 4 " tall, including the rubber feet. That’s about half the width of an original TAE or OX. The practical upside of this size reduction is obvious and will probably compel a lot of players to use the unit in situations in which they’d leave a full-size TAE at home. The streamlined design is another source of comfort. With just five knobs on its face, the TAE Core has fewer controls and is easier to use than many stompboxes. In fact, the most complicated part of integrating the TAE Core to your rig might be downloading the necessary drivers and related apps.
Connectivity is straightforward, though there are some limitations. You can use TAE Core wirelessly with an iOS or Windows tablet or smartphone, as long as you have the BT-DUAL adaptor (which is not included and sets you back around 40 bucks). However, while desktop computers recognize the TAE Core as a Bluetooth-enabled device, you cannot use the unit wirelessly with those machines. Instead, you have to connect the TAE Core via USB. In a perfectly ordered world, that’s not a big problem. But if you use the TAE Core in a small studio—where one less cable is one less headache—or you prefer to interface with the TAE Core app on a desktop where you can toggle fast and easily between large, multi-track sessions and the app, the inability to work wirelessly on a desktop can be a distraction. The upside is that the TAE Core app itself is, functionally and visually, almost identical in mobile and desktop versions, enabling you to select and drag and drop virtual microphones into position, add delay, reverb, compression, and EQ effects, choose various cabinets with different speaker configurations and sizes, and introduce new rigs and impulse responses to a tone recipe in a flash. And though the TAE Core app lacks some of the photorealistic panache and configuration options in the OX app, the TAE Core’s app is just as intuitive.Less Is More
One nice thing about the TAE Core’s more approachable $699 price is that you don’t have to feel too bad on nights that you “underutilize” the unit and employ it as an attenuator alone. In this role, the TAE Core excels. Even significantly attenuated sounds retain the color and essence of the source tone. Like any attenuator-type device, you will sacrifice touch sensitivity and dynamics at a certain volume level, yielding a sense of disconnection between fingers, gut, guitar, and amp. But if you’re tracking “big” sounds in a small space, you can generate massive-sounding ones without interfacing with an amp modeler and flat-response monitors, which is a joy in my book. And again, there’s the TAE Core’s ability to “expand” as well as attenuate, which means you can use the TAE Core’s 30-watt onboard power amp to amplify the signal from, say, a 5-watt Fender Champion 600 with a 6" speaker, route it to a 2x12, 4x12, or virtual equivalent in the app, and leave your bandmate with the Twin Reverb and bad attitude utterly perplexed.
The Verdict
Opting for the simpler, thriftier TAE Core requires a few sacrifices. Power users that grew accustomed to the original TAE’s super-tunable “resonance-Z” and “presence-Z” controls, which aped signal-chain impedance relationships with sharp precision, will have to make do with the simpler but still very effective stack and combo options and the “air feel level” spatial ambience control.The DC power jack is less robust. It features only MIDI-in rather than MIDI-in/-through/-out jacks, and, significantly, 70 watts less power in the onboard power amp. But from my perspective, the Core is no less “professional” in terms of what it can achieve on a stage or in a studio of any size. Its more modest feature set and dimensions are, in my estimation, utility enhancements as much as limitations. If greater power and MIDI connectivity are essentials, then the extra 600 bones for the original TAE will be worth the price. For many of us, though, the mix of value, operational efficiencies, and the less-encumbered path to sound creation built into the TAE Core will represent a welcome sweet spot that makes dabbling in this very useful technology an appealing, practical proposition.
IK Multimedia is pleased to announce the release of new premium content for all TONEX users, available today through the IK Product Manager.
The latest TONEX Factory Content v2 expands the creative arsenal with a brand-new collection of Tone Models captured at the highest quality and presets optimized for live performance. TONEX Tone Models are unique captures of rigs dialed into a specific sweet spot. TONEX presets are used for performance and recording, combining Tone Models with added TONEX FX, EQ, and compression.
Who Gets What:
TONEX Pedal
- 150 crafted presets matched to 150 Premium Tone Models
- A/B/C layout for instant access to clean, drive, and lead tones
- 30 Banks: Amp & cab presets from classic cleans to crushing high-gain
- 5 Banks: FX-driven presets featuring the 8 new TONEX FX
- 5 Banks: Amp-only presets for integrating external IRs, VIR™, or amps
- 5 Banks: Stompbox presets of new overdrive/distortion pedals
- 5 Banks: Bass amp & pedal presets to cover and bass style
TONEX Mac/PC
- 106 new Premium Tone Models + 9 refined classics for TONEX MAX
- 20 new Premium Tone Models for TONEX and TONEX SE
TONEX ONE
- A selection of 20 expertly crafted presets from the list above
- Easy to explore and customize with the new TONEX Editor
Gig-ready Tones
For the TONEX Pedal, the first 30 banks deliver an expansive range of amp & cab tones, covering everything from dynamic cleans to brutal high-gain distortion. Each bank features legendary amplifiers paired with cabs such as a Marshall 1960, ENGL E412V, EVH 412ST and MESA Boogie 4x12 4FB, ensuring a diverse tonal palette. For some extremely high-gain tones, these amps have been boosted with classic pedals like the Ibanez TS9, MXR Timmy, ProCo RAT, and more, pushing them into new sonic territories.
Combined with New FX
The following 5 banks of 15 presets explore the depth of TONEX's latest effects. There's everything from the rich tremolo on a tweed amp to the surf tones of the new Spring 4 reverb. Users can also enjoy warm tape slapback with dotted 8th delays or push boundaries with LCR delay configurations for immersive, stereo-spanning echoes. Further, presets include iconic flanger sweeps, dynamic modulation, expansive chorus, stereo panning, and ambient reverbs to create cinematic soundscapes.
Versatile Control
The TONEX Pedal's A, B, and C footswitches make navigating these presets easy. Slot A delivers clean, smooth tones, Slot B adds crunch and drive, and Slot C pushes into high-gain or lead territory. Five dedicated amp-only banks provide a rich foundation of tones for players looking to integrate external IRs or run directly into a power amp. These amp-only captures span clean, drive, and high-gain categories, offering flexibility to sculpt the sound further with IRs or a real cab.
Must-have Stompboxes
TONEX Pedals are ideal for adding classic effects to any pedalboard. The next 5 banks focus on stompbox captures, showcasing 15 legendary overdrive, distortion, and fuzz pedals. This collection includes iconic models based on the Fulltone Full-Drive 2, Marshall DriveMaster, Maxon OD808, Klon Centaur, ProCo RAT, and more.
For Bass Players, Too
The last 5 banks are reserved for bass players, including a selection of amp & cab Tone Models alongside a few iconic pedals. Specifically, there are Tone Models based on the Ampeg SVT-2 PRO, Gallien-Krueger 800RB, and Aguilar DB750, alongside essential bass pedals based on the Tech21 SansAmp, Darkglass B7K and EHX Big Muff. Whether it's warm vintage thump, modern punch, or extreme grit, these presets ensure that bassists have the depth, clarity and power they need for any playing style.For more information and instructions on how to get the new Factory
Content v2 for TONEX, please visit:
www.ikmultimedia.com/products/tonex