Luthier Dave Helmer shows you how to cure buzzy strings, bad intonation, gnarly frets, high action, and other common troubles with off-the-shelf axes.
Guitars are the best. We love them. It’s fun to fall in love with a guitar at a store, buy it, and proudly bring it home. But we’ve all been there … where after a month that new guitar is just not playing as good as it was before. As guitar players, we know what feels good and what feels bad when it comes to playability. Maybe you have setup preferences that you like on all your guitars, or maybe you want to experiment with changes to your setup?
With a few tools, you can perform a handful of tasks that will make your new axe play better and stay in tune. This article is for folks who already know how to tighten loose parts, raise and lower string saddles or bridges, and adjust their truss rods—though I’ll share a tip on how to check it with even more accuracy.
Is that big bulky stock nut uncomfortable on your hand? Let’s trim it down and reshape it. If the action feels high and the neck looks straight, I’ll show you how to lower the action. And haven’t we all swapped out pickups and wondered, “Do they really sound better, or do I think that just because they’re new?” Before you swap your pickups, I’ll share some pickup-height measurements that might make you change your mind.
But wait! There’s more. With everything feeling and playing great, does moving into the upper register start to sound out of tune? Intonation is very easy to check and adjust. When you go to vibrato or hold a note, do the frets feel “sandy”? Are the fret ends rubbing against your hand while you play? Let’s flush and polish those up.
To be clear, we’re not swapping out anything on your new guitar: We’re simply refining the setup. Be sure to go online to see eight videos I made showing various processes covered in this story.
Begin the Beguine
There is an order of operations for best results. Neck relief is the first item to dial in, followed by getting the nut slots cut to the proper depth. After that, setting your string and pickup heights is in order. The final step is setting intonation.
Fret polishing is its own event and can happen anytime between string changes. Getting the frets feeling comfortable and well-polished will take some time and attention. You’ll also need some specialized tools as well as some that can be found in most households. Check the box for my list.
Tools You’ll Need
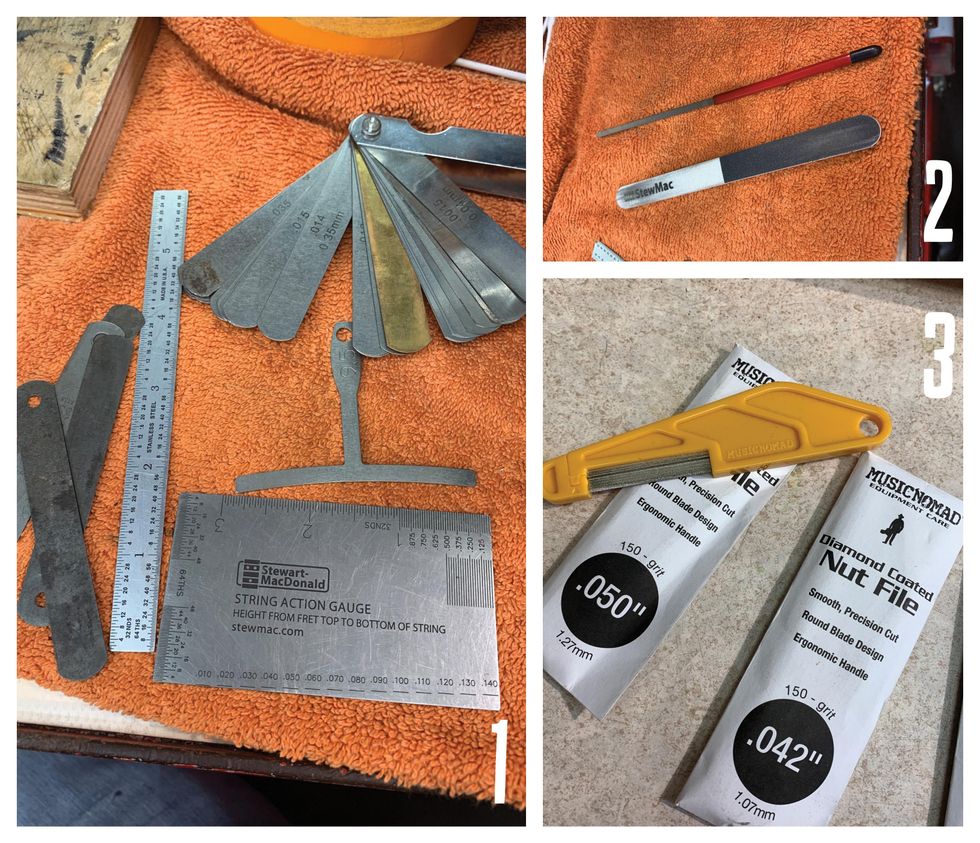
All of the specialized tools in this list are available through online suppliers, including StewMac and Amazon.
- 6" Ruler with measures in 64ths
- String action gauge [Photo 1]
- Miscellaneous screwdrivers
- Allen wrenches
- Radius blocks
- Understring radius gauges (with the radius on the bottom and the top)
- Fret-end dressing file
- Micro-Mesh sticks [Photo 2]
- Tape (low tack)
- Cotton swabs
- Paper towels (blue shop towels preferred)
- Clean cotton rags
- Nut files [Photo 3]
- Stikit sandpaper
- Tri-Flow lubricant
- Capo
- Feeler gauges
- Simichrome polish
Polishing the Frets
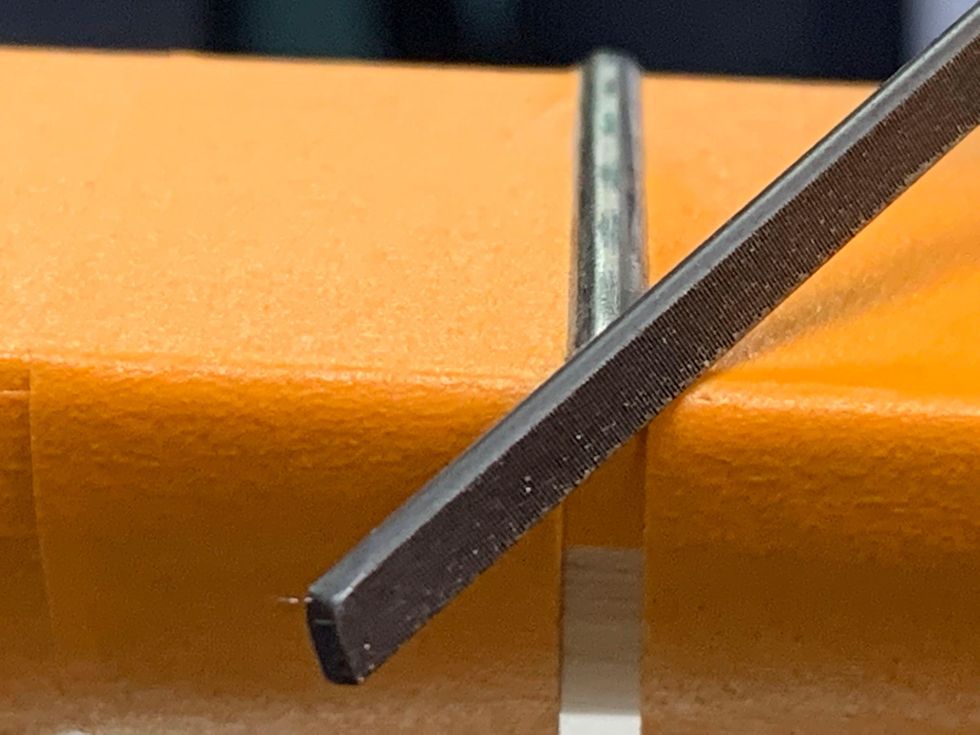
Photo 4
Let’s start with the most Zen of these tasks: fret polishing.
Tape off the fretboard using low-tack tape, exposing only the frets. De-tack each piece of tape on your clothing or maybe a rag—I use my jeans or my sweatshirt. Making it less sticky helps prevent pulling finish off a maple fretboard or the neck. Taping the fretboard also prevents putting any cross-grain scratches into it while you file and polish. You can choose to tape off the entire fretboard or work your way down one fret at a time. Dealer’s choice.
One thing to note about tape, any tape: Even when you de-tack it, you do not want to leave it on overnight. If that happens, rub the tape with your finger, which will break the surface tension. Then carefully pull the tape off from a corner, making sure you’re pulling it off at an angle and not at a straight line with the fretboard edge.
Every fret end has a small burr on the corner from the initial fret job. The fret-end dressing file has a non-marring smooth side for rounding the fret end, and a safe square edge for getting into the corner of the fret end. So, take the fret-end dressing file, use the squared off-side, and file both corners of the fret end [Photo 4].
How to Polish Frets
Here’s how easy it is to polish and smooth frets.
One or two strokes is all you’ll need. Then, using the non-marring side of the file, slightly round off the fret ends.
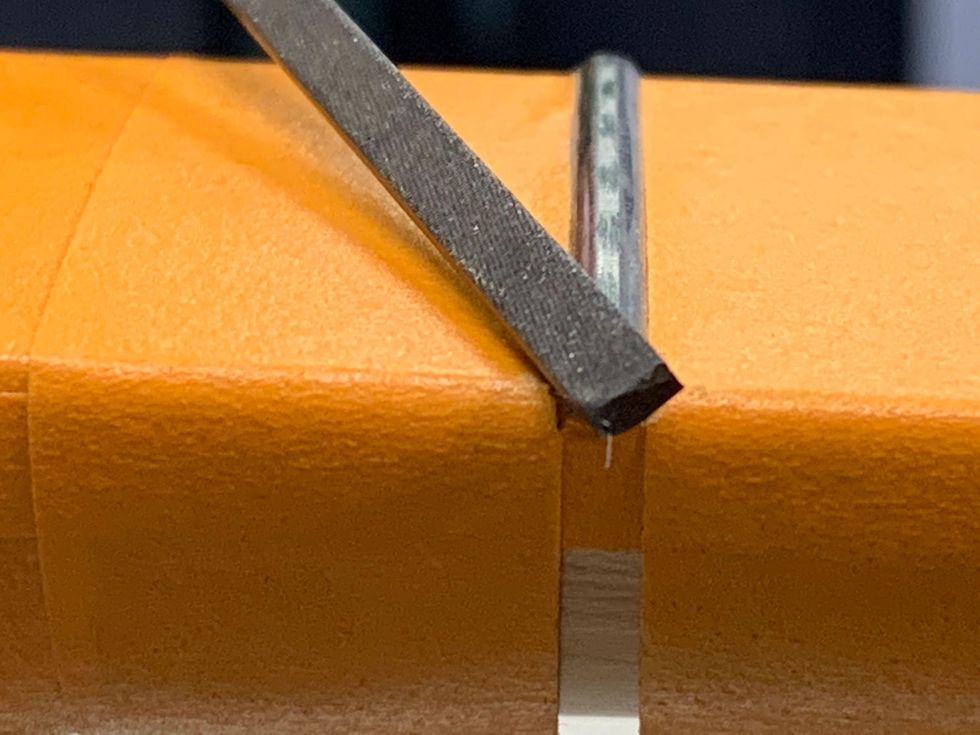
Photo 5
With the file positioned vertically, file downward to make the fret end flush with the edge of the fretboard.
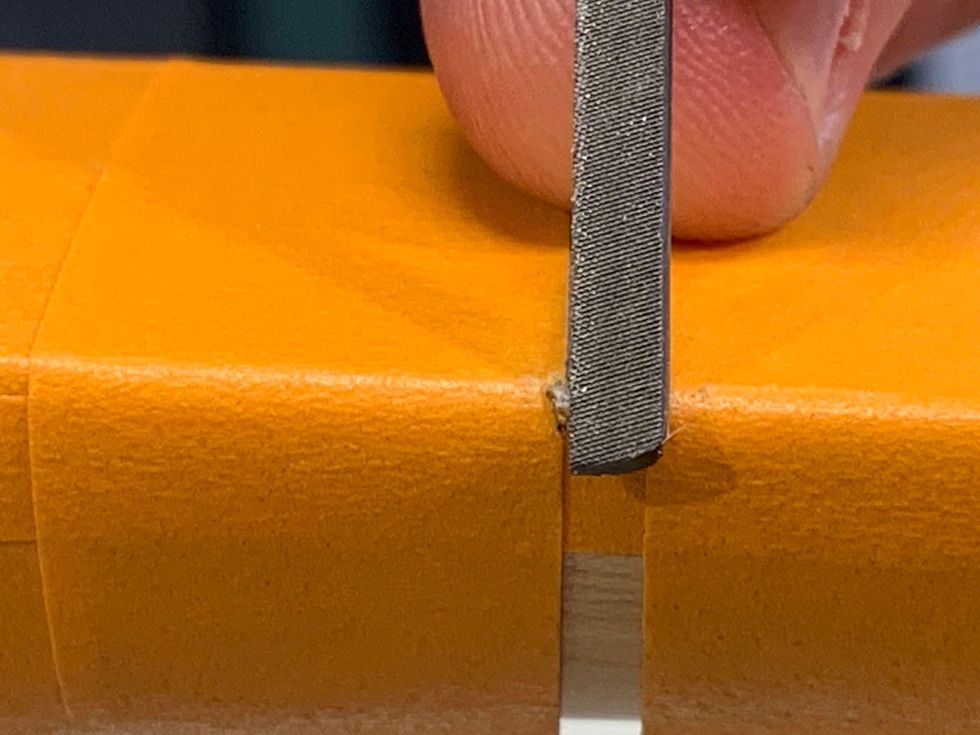
Photo 6
For a nice, rounded-off look, polish the frets using the same rounding motion from the previous step, working through all three grits of the Micro-Mesh stick.
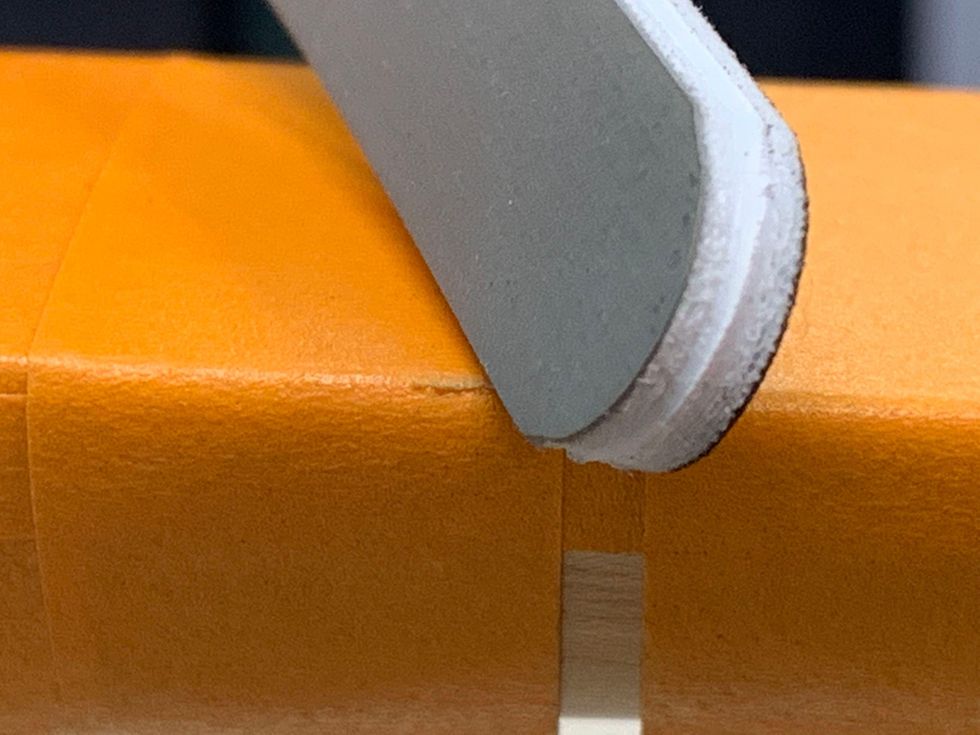
Photo 7
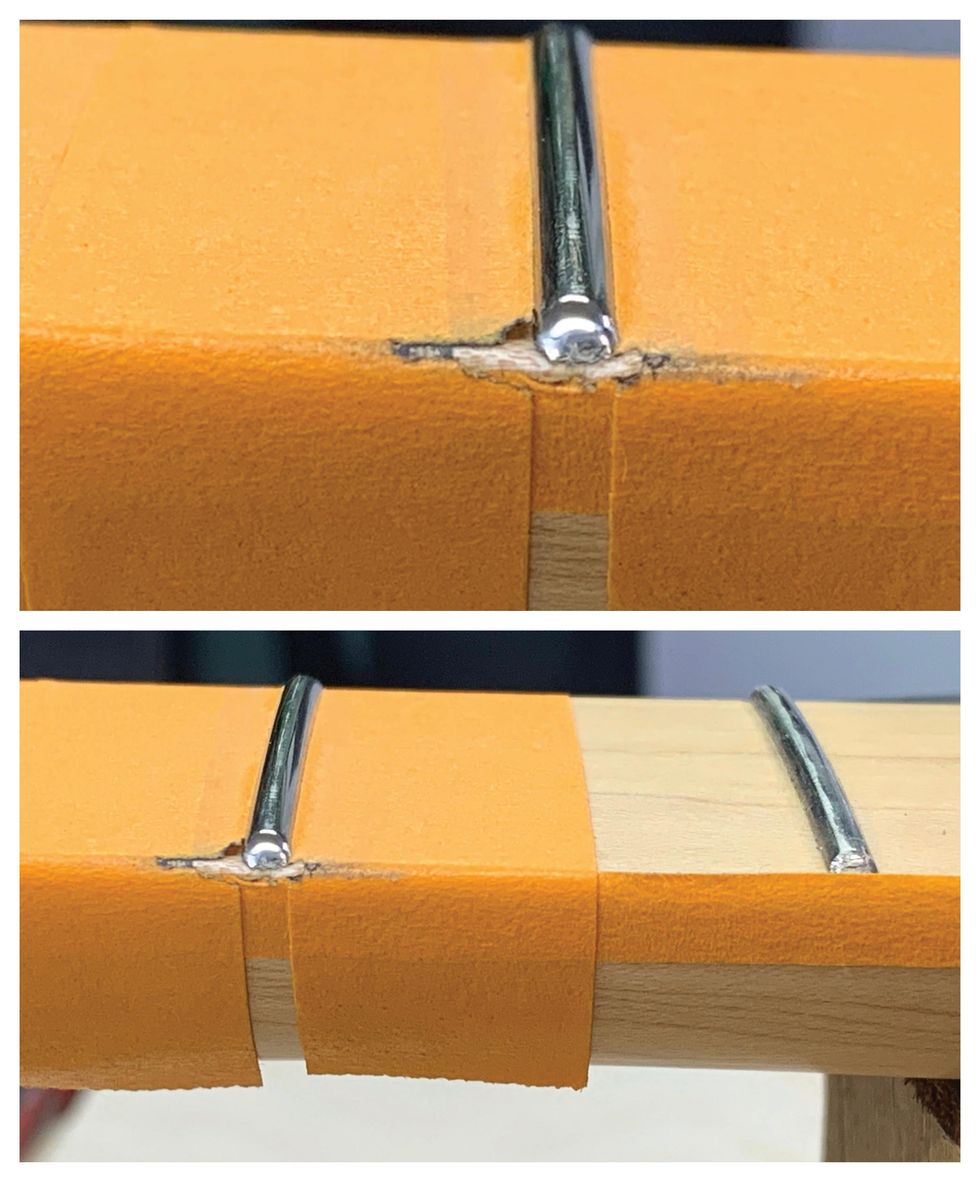
Then, polish both the sides and the top of the frets.
Photos 8 (top) & 9 (bottom)
Using a soft cloth and Simichrome, buff every fret. This will give you a great shine and help prevent oxidation. Now it’s time to remove the tape and condition the fingerboard if it needs it.
Note: Every fret has two fret ends to clean up and polish along with the fret itself. This is a fair amount of handwork. If you’ve never done it, you will get tired and need a break. Take that break. Take multiple breaks. Let the process take however long it requires without rushing. If you’re new, do all the fret polishing over a weekend or a few days. It should be fun, not painful. If it is difficult, call your local luthier and hire them to do it for you.
Adjusting Neck Relief
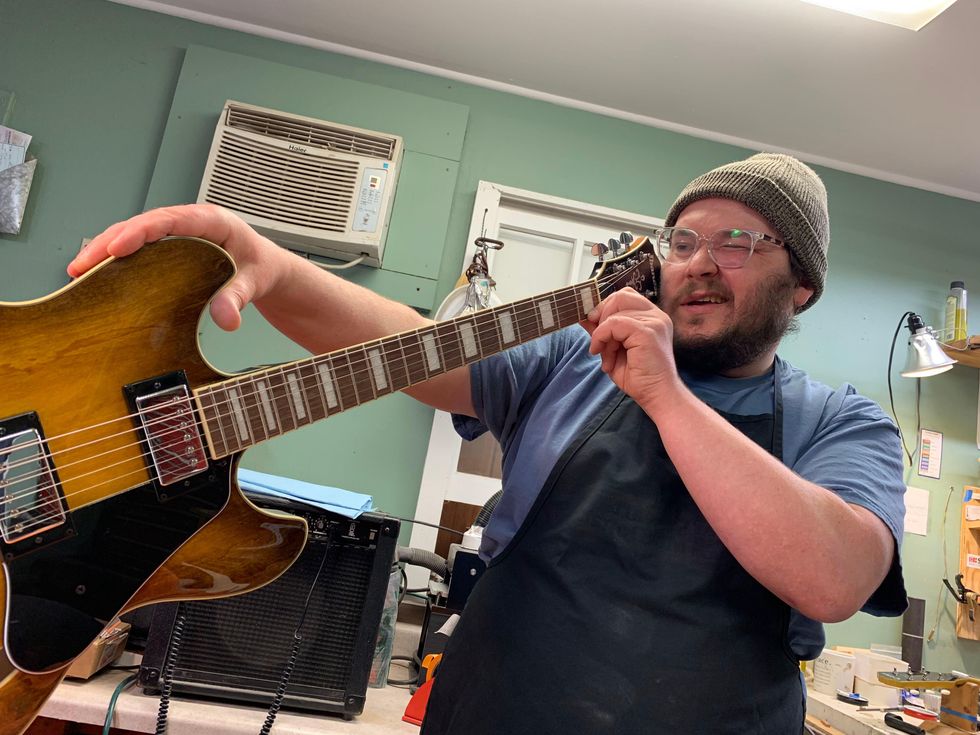
Photo 10
Neck relief refers to the slight amount of concave bowing intentionally created in the neck of a guitar or bass by adjusting the truss rod. For the safety of the guitar, be sure to slack the strings before doing any adjustments to the truss rod. Neither you nor your guitar needs to be tense during this process.
Before whipping out an Allen wrench for the truss rod, start by sight-checking the neck’s straightness. You can sight the neck with the guitar on its back, but I like to put it on edge and look at it that way. It’s easier to see how much curve there is when the guitar is on its side. I feel like gravity plays tricks on my eyes when I sight the neck with the guitar on its back. When I play the guitar, it’s on its side anyway, so looking at it from this vantage point is best.
Tune the guitar to pitch, put a capo on the first fret, and press fret 15 with your left hand.
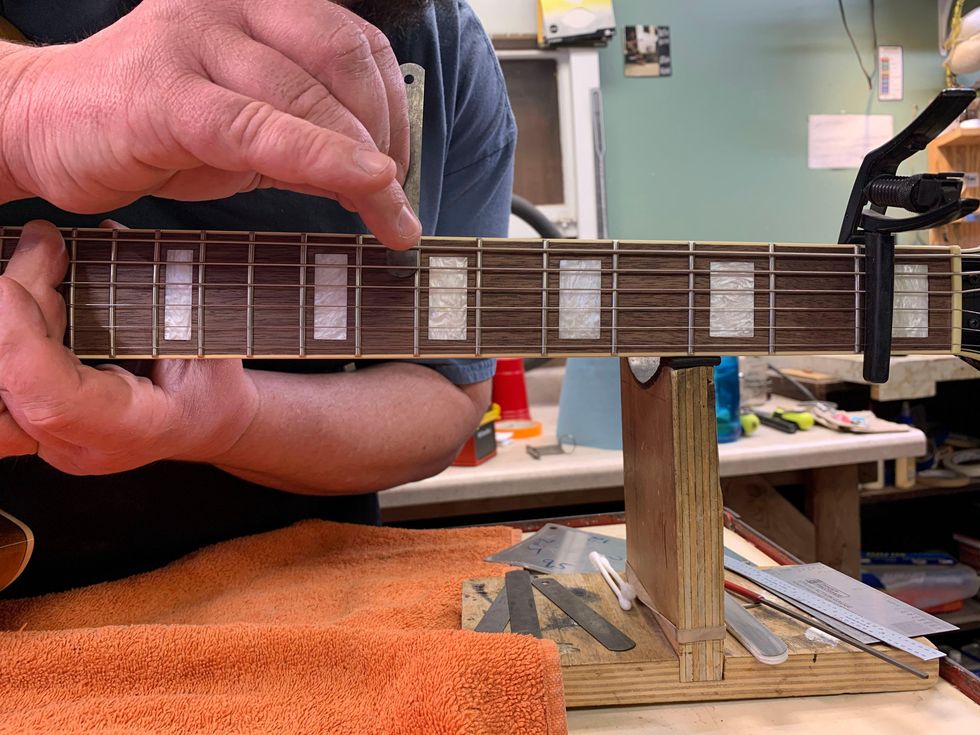
Photo 11
With your right hand, take a feeler gauge and check the gap at frets 7 through 9 (left-handed players, flip your hands around) [Photo 11].
From the top of the fret to the bottom of the string, the gap is usually anywhere from .003" to .012", depending on the feel you are going for. The feeler gauge should fit just between the top of the fret and the bottom of the string. The string shouldn’t move. This will tell you how much “relief” is in the neck. If you find this challenging, keep going—this will take some practice.
When dialing in the relief, I go back and forth between adjusting the truss rod and the string action. Getting the strings low and playing clean on a budget axe can be a challenge. Usually the fretwork isn’t that great, and in the upper register the frets can be unlevel, causing buzzes and clanks. If you need to raise the string action to get the notes to play clean, some fret leveling may be in order. (For more on fret leveling, go online to our article “About Fret Leveling,” from the December 2007 issue.) For good energy transfer, the neck should be as straight as possible. If the neck is straight and the frets are not level, the strings will buzz with low action.
In general, the flatter the radius on the fretboard, the straighter you can get the neck with the truss rod adjustment. On a fretboard with a 12" radius, you should be able to get .005" relief, and on a vintage 7.25" radius board you may need as much as .014" relief. The only way to get better at checking and setting relief is practice.
Refining the Nut
String buzzes, pinging noises when you tune, strings sticking in the slots, and too much string motion in the nut slots are all indicators of trouble. Before getting out the sandpaper and Micro-Mesh sticks, be sure you know if your guitar’s nut is TUSQ or bone. TUSQ is softer, so you should leave TUSQ nut slots a little higher. This leaves room for the TUSQ to wear without causing buzzing on the first fret. With bone, you can cut the slots lower, because it holds up to string wear.
How to Shape Your Guitar's Nut
Watch as Dave Helmer sands down the back half of a nut and creates a smooth finish.
The back side of the nut is usually very bulky and could often stand to lose some material to be more comfortable on your hand. So, let’s start there. Tape off the neck and headstock around the nut using a few layers of tape to protect the headstock face and fretboard. Then, slack the strings and pull them to either side of the nut.
Sand a bevel into the backside—the side closest to the headstock—of the nut using P320 and P400 grit Stikit sandpaper on a flat sanding stick.
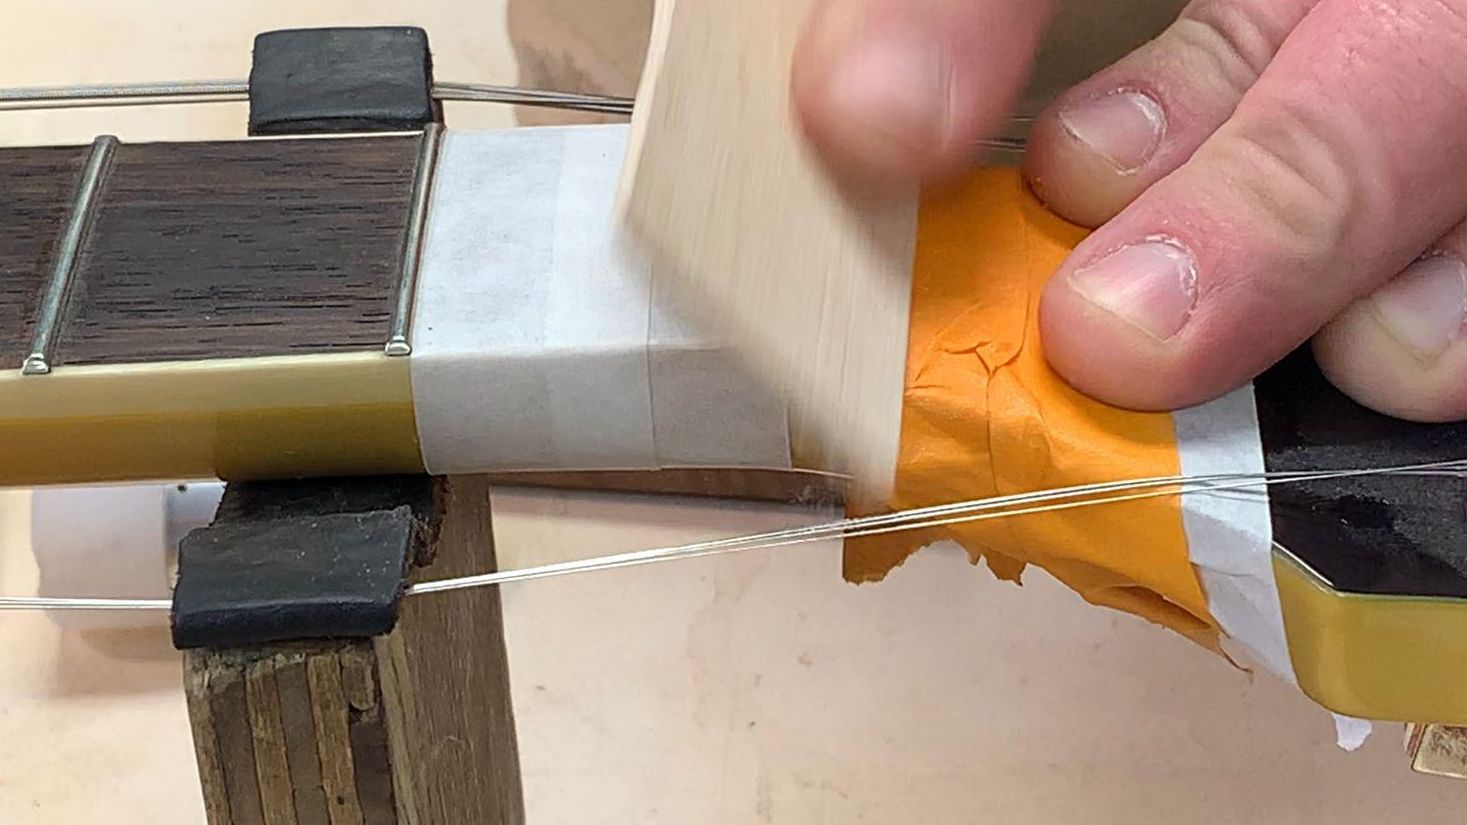
Photo 12
The bevel should start at the back of the nut and come forward about one-third to one-half the thickness of the nut [Photo 12]. Use P320 for most of the sanding and switch to P400 for the last 5 to 10 strokes.
Next, take a fresh Micro-Mesh stick and work through the various grits to buff/round over the bevel you’ve sanded into back of the nut, so it looks and feels good.
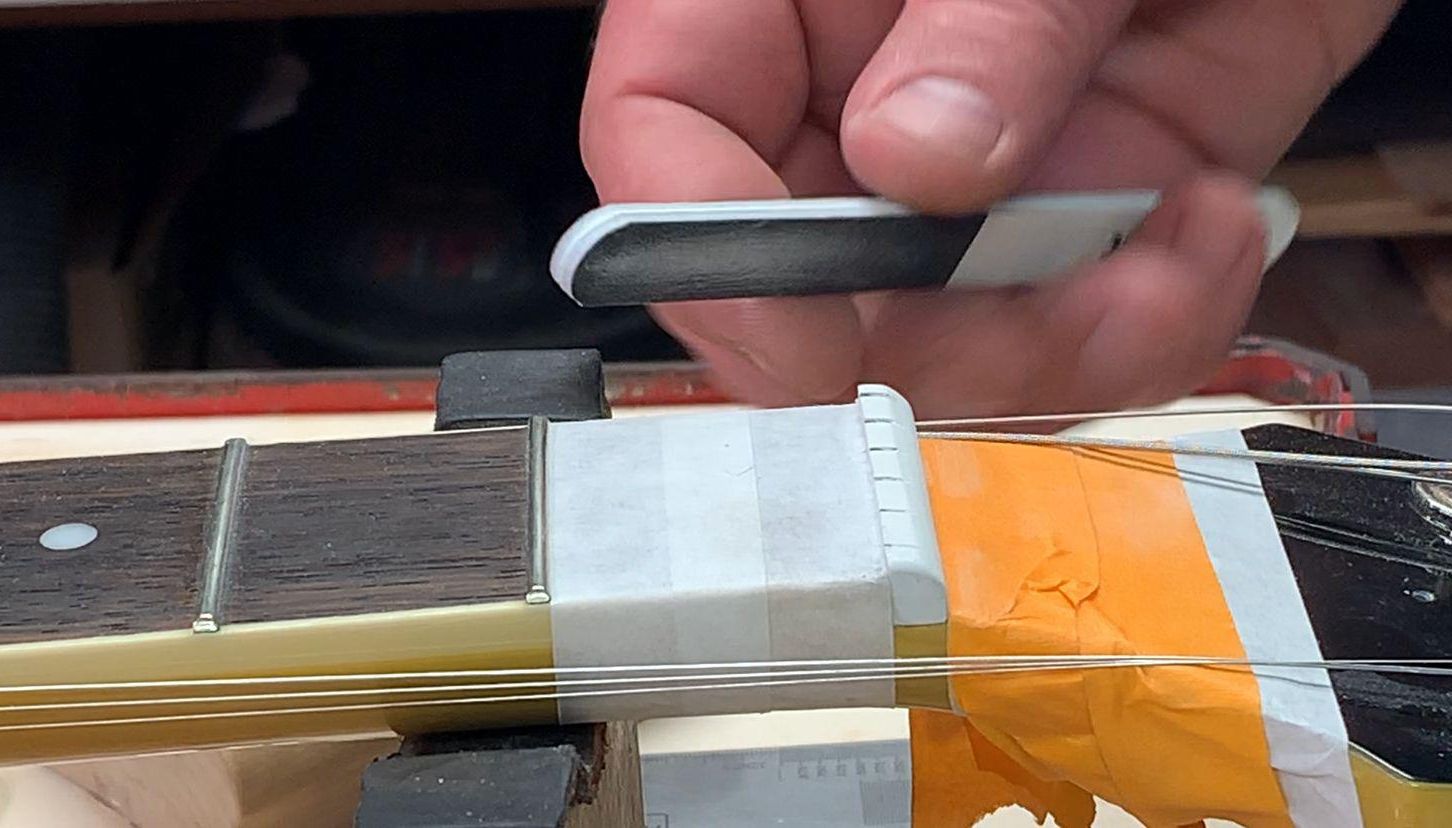
Photo 13
TUSQ nuts are often tall, and the strings sit deep in the slots.
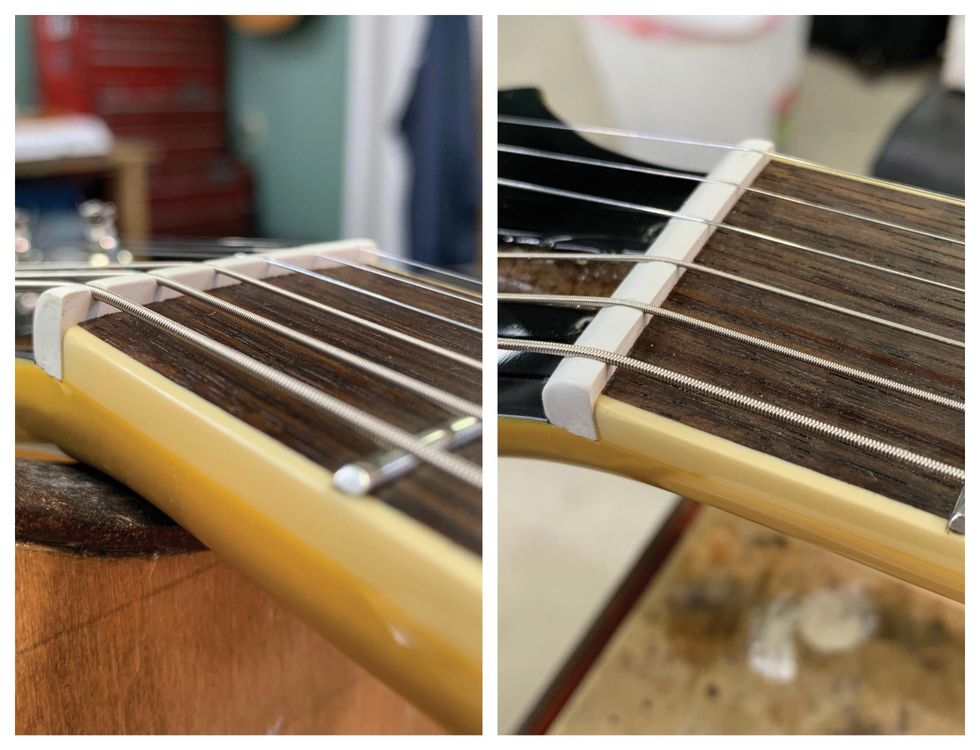
Photos 14 (left) & 15 (right)
Wound strings require 50 percent of the diameter of the string to sit in the nut slot, with the other 50 percent above the top of the nut surface. The plain strings should be flush with the top of the nut. Take a look at the wrong appearance [Photo 14] and the correct look [Photo 15] for properly seated strings.
How to Sand Your Guitar's Nut
Our luthier shows you how to use a radius block and sand down a nut.
Use a radius block that matches the radius of your fretboard.
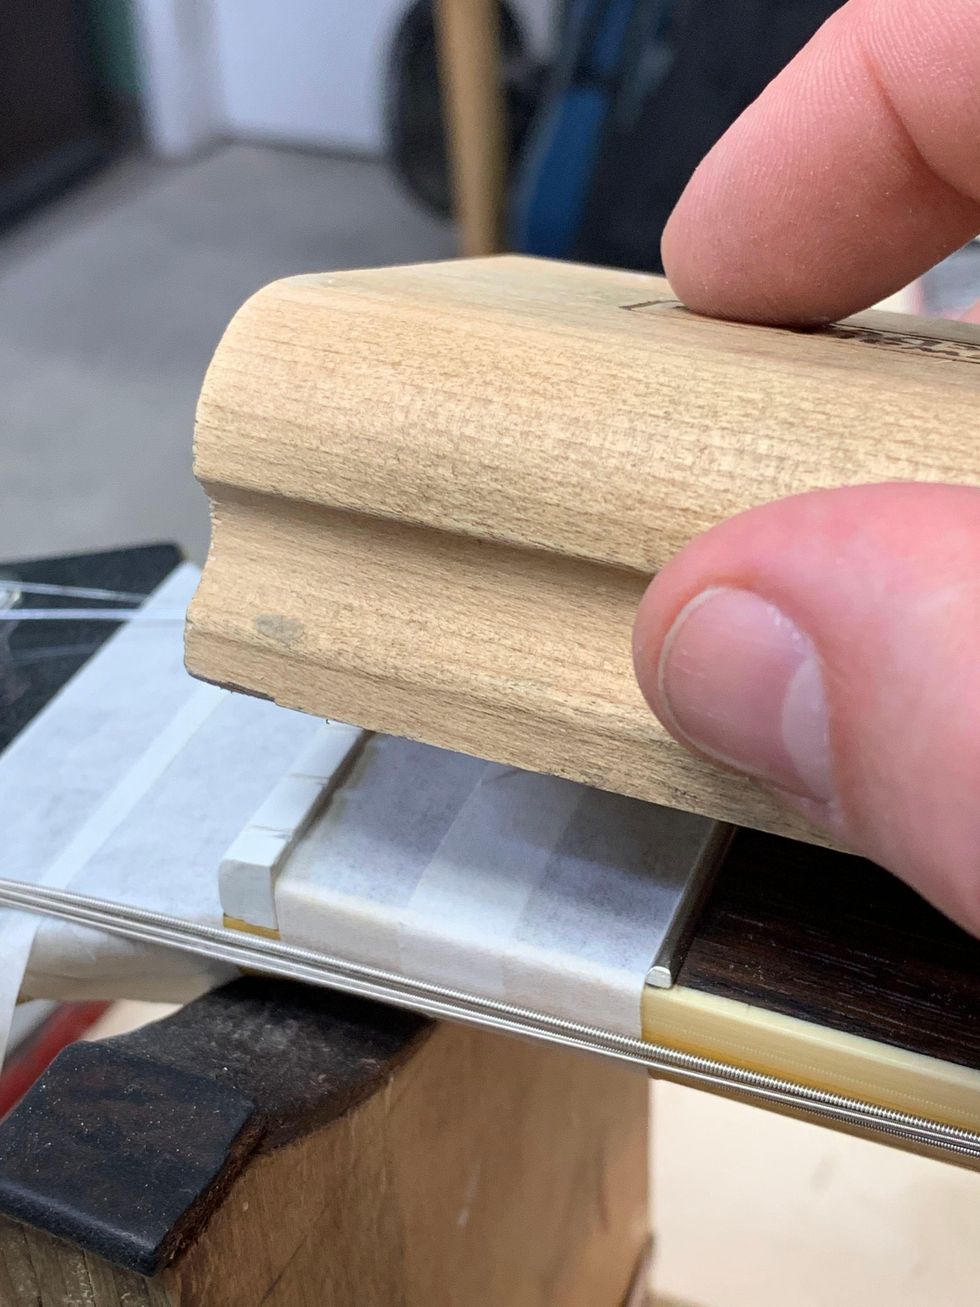
Photo 16
With P320 and P400 grit Stikit sandpapers, use mild pressure to sand down the top of the nut. Sand a bit and check your progress by setting the strings in the slots and putting a little tension on them. Tuning to pitch isn’t necessary. Use the P320 for most of the sanding, and switch to P400 when you are close to the 50/50 height for the wound strings. The radius block sanding will leave a flat, sharp edge on each side of the TUSQ nut [Photo 16]. To round over the sharp edge, use the sanding block and Micro-Mesh stick.
Use the coarse grit of a Micro-Mesh stick to round over and blend the bevel from the back into the top of the nut. Work through the grit gauges until it’s smooth. There is a fine balance between the bevel at the back of the nut and the top radius of the nut. Go back and forth between the two steps to get a nice, finished look and a nut that functions at optimal levels.
… And Refining the Nut Slots
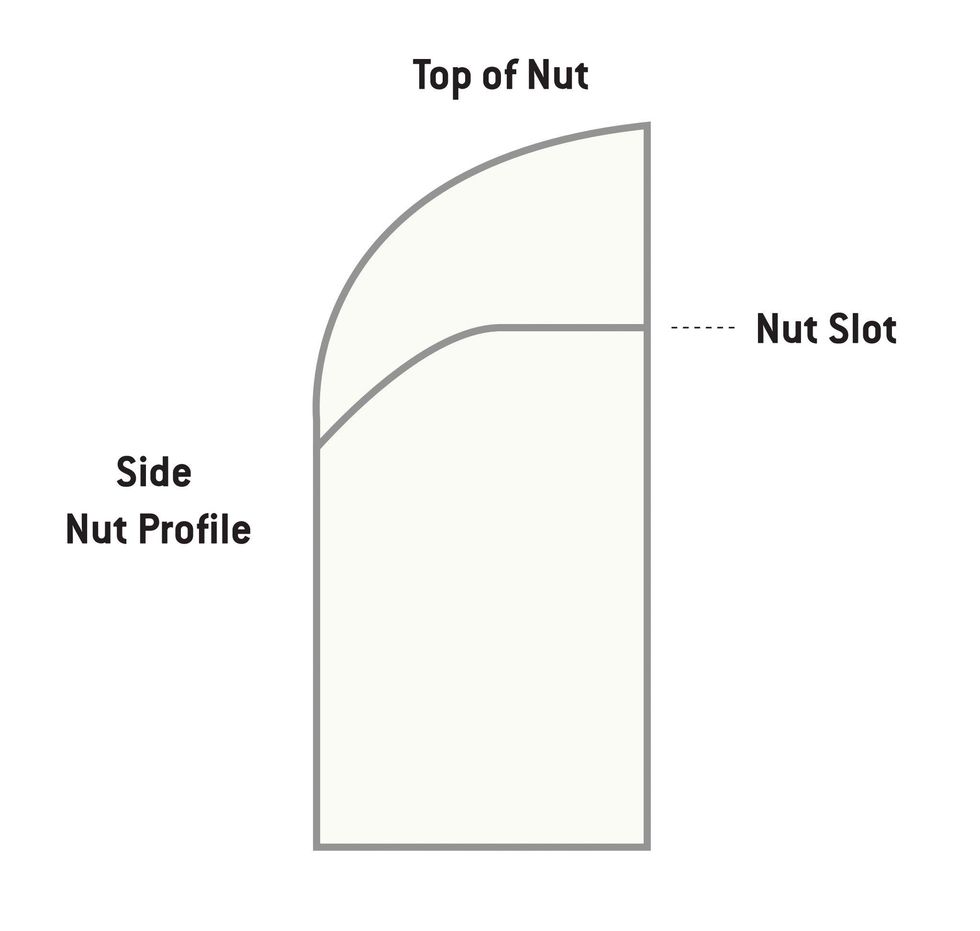
Photo 17
Nut height is the distance from the top of the first fret to the bottom of the string. A good height on the wound strings is about .020", and for the plain strings about .015". Measuring this gap with a feeler gauge can be tricky because of the fretboard radius. Many repair folks do this by eye and feel, based on experience. It takes some practice. A good check: At pitch, fret the third fret and check for a small gap between the string and the top of the first fret.
How to Widen Your Guitar's Nut Slots
A diamond file can make quick work of deepening and widening nut slots.
The bottom of the string should be sitting on the bottom of the front half of the nut slot [Photo 17]. File down each nut slot to its proper depth using the corresponding nut file. There are diamond nut files on the market in multiple sizes to accommodate many string gauges. Make sure to keep your strokes straight. The standard-toothed files have less sizes and usually require rolling them from side to side to get a well-fit string.
Next, using a proper-sized file, round over the bottom back half of the nut slots down, toward the face of the headstock and away from the strings. This will allow the strings to move freely during tuning or bending, while still having support from the front half of the slot.
How to File D and G String Slots on Guitar
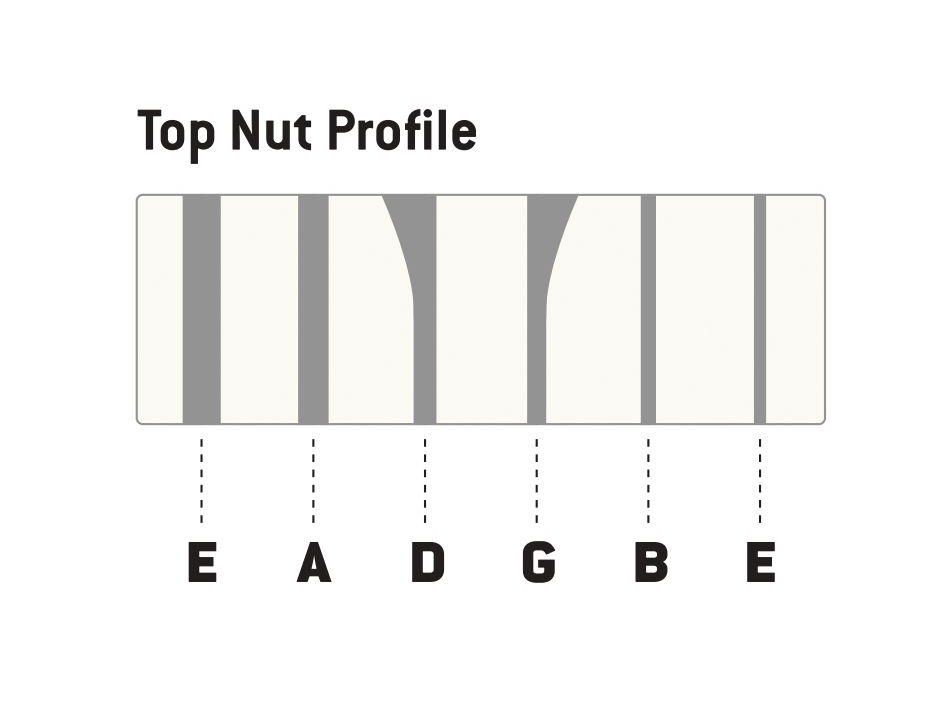
Photo 18
On guitars with 3x3 headstock configurations, the D and G strings need the back half of the slots feathered out away from the center, so the string has a direct path to the tuner post. Using a file that is one size bigger than the string and rolling it side to side on the back of the nut slot will give the string a straight path to the tuner post. Photo 18 is my illustration showing which slots need feathering.
Watch How to File D and G String Slots on Guitar
The D and G nut slots require special attention on 3x3-style headstock configurations.
Additionally, use pencil lead to lubricate the slots. Just get in there with the point of a pencil and mark the slot with its graphite. You might also put a drop of Tri-Flow on the front of the string tree. Tri-Flow will run down the string, so take a cotton swab or cloth to clean up any excess. Tri-Flow has Teflon in it, so you don’t need much.
Adjusting String Action
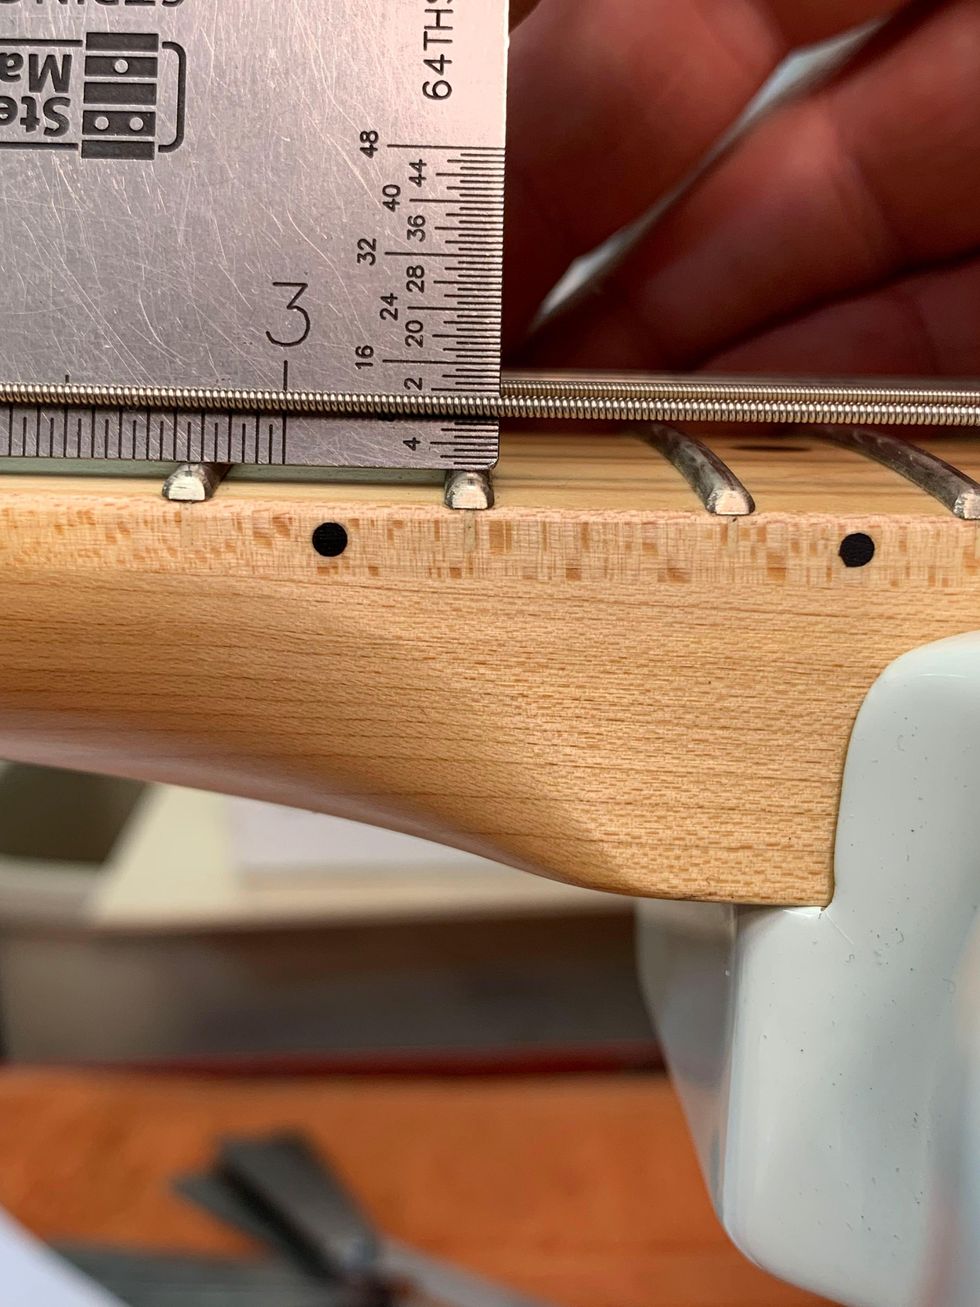
Photo 19
First, find your string height by measuring the string action at the 17th fret on a Fender-style guitar and at the 15th fret on a Gibson-style instrument.On electric guitars, action can range from 3/64" to 3/32", depending on the player’s comfort. My preferences are 1/16" on the treble side and 5/64"on the bass side on both Fender- and Gibson-style guitars measured at the appropriate fret.
How to Adjust Guitar Action
Here’s a look at how our author adjusts the action.
Always loosen the string tension before making action adjustments. This will save wear and tear on the small bridge components. Take either a 6" ruler or a string action gauge and set it on the frets. Measure from the top of the fret to the bottom of the string [Photo 19].
If the action is high, you will lower that string’s saddle or that side of the bridge. If it is low, you will raise it. Make sure the individual saddles are sitting square and upright to the face of the bridge. You do not want them sitting at an angle or leaning over. This will cause buzzing.
The bottom of the strings should match the radius of the fretboard when measured with an understring radius gauge.
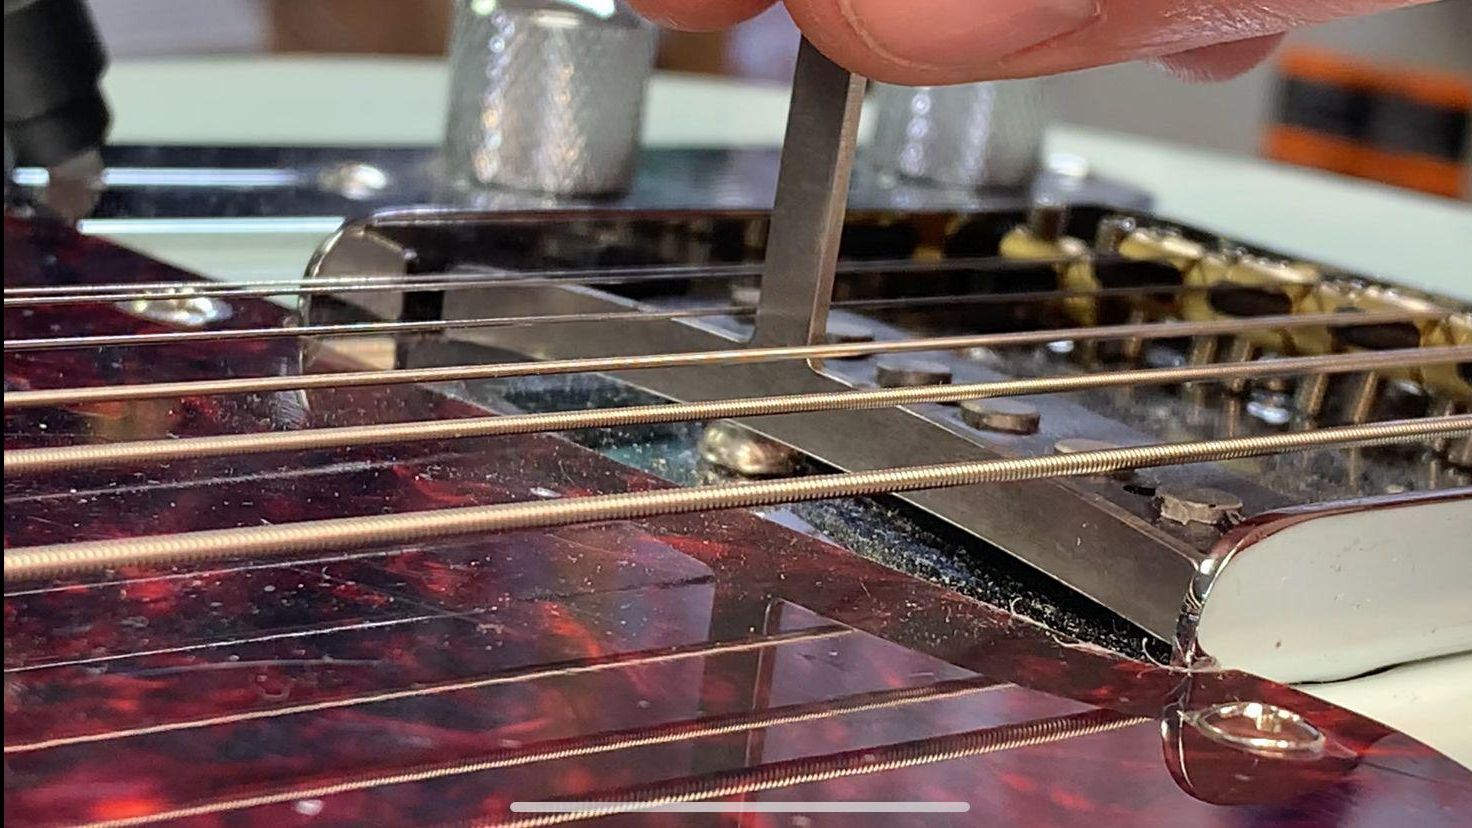
Photo 20
Start your adjustment with the outside strings, working toward the center. On Fender-style guitars, set the two outside strings to the height you want and have the middle four strings a bit higher than that. Bring the gauge up from underneath and just touch the two outside strings. Then, bring the strings down a little at a time until the radius matches.
On a Gibson-style Tune-o-matic, the saddles are not individually adjustable. So, if the radius doesn’t match, the saddles will need to be filed. To do this, I recommend using toothed nut files and a rolling side-to-side motion. Do a little work and check your progress. Remember to slack your strings when adjusting the saddle or bridge up or down.
Changing Pickup Height
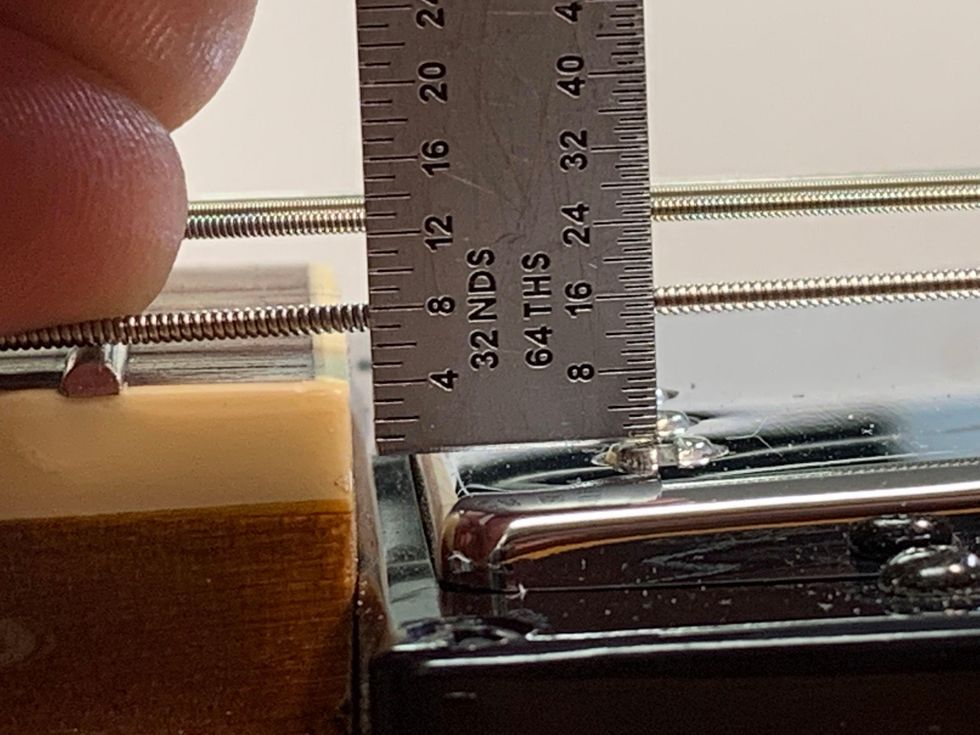
Photo 21
Finally, let’s take a look at pickup-height adjustment. First, to check pickup height, use the two outside strings again. Press the top wound string on the last fret and measure the distance from the top of the pole piece to the bottom of the string [Photo 21]. This distance can range from 3/64" to 1/8". My preferences are 1/16" on the treble side and 5/64" on the bass side.
Adjusting Guitar Pickup Height
Dave Helmer walks you through the process of adjusting the height of your guitar’s pickups.
On most styles of pickups, there are height adjustment screws on either side of the pickup to raise or lower it. The closer the pickup gets to the strings, the more present string frequencies become. If you get too close, the magnetic pull can affect the string’s vibration and you may hear some strange sounds as you go into the upper register.
On Strats, the neck pickup is regularly set too close, and at the 12th fret and above, the low E and A can sound choked, honky, and not clear. Lowering the neck pickup with a screwdriver usually solves this issue.
Setting Intonation
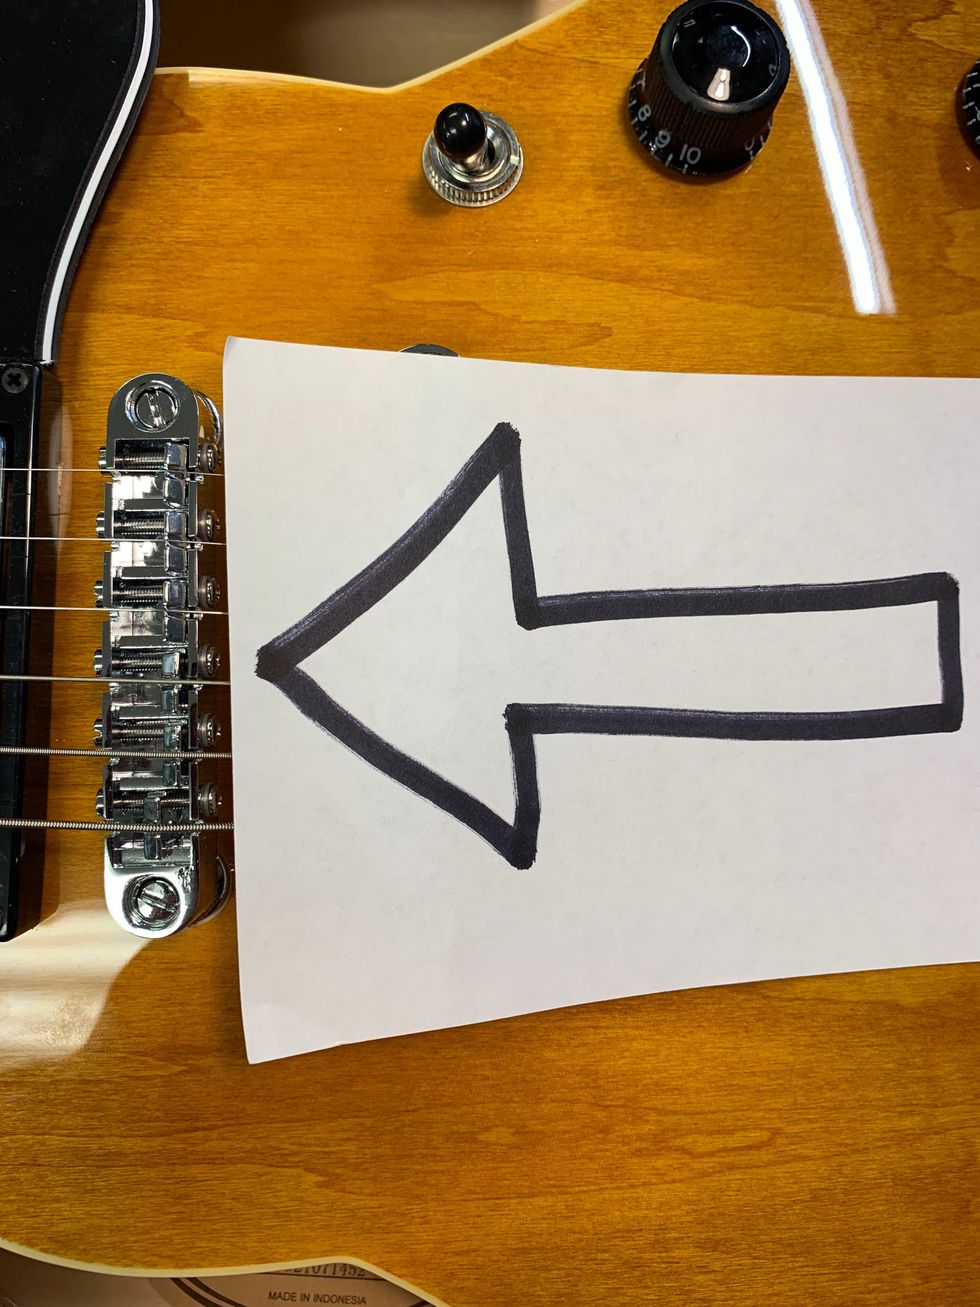
Photo 22
If you can’t get your guitar accurately in tune, you might need to check its intonation. Adjust all saddles as far back as possible so every string will play flat at the 12th fret. You will adjust the saddles forward, gradually making the octave play sharper until it’s in tune with the open string [Photo 22].
Adjust Your Guitar's Intonation
With a tuner and a screwdriver, Dave Helmer shows you how to adjust your guitar’s intonation.
Depending on your vibrato style, experiment with intonating the plain strings slightly flat. Use your ear and do what sounds good. Sometimes, the plain strings can have perfect intonation, but playing with vibrato can make them sound sharp.
To fine-tune intonation, the individual bridge saddles must be adjustable. Once the intonation is set, recheck the string radius using the understring radius gauge and adjust as needed. The radius can change as the saddles come forward during intonation.
Tri-Flow is great for lubricating saddle parts. Put a small drop on the saddle-height adjustment screws and capillary action will suck it in. Adjust the saddle up and down a few times to coat the threads. Clean up any excess with a cotton swab or cloth. Put a drop or two onto a cotton swab and apply the Tri-Flow to the top of each saddle where the string rests. This will help strings move freely during tuning and after any bends or vibrato.
And that’s it! For a relatively small investment in tools and time, you’re now ready to supercharge your new guitar—and maybe your long-treasured axes, too.
- DIY: How to Set Up a Fender Stratocaster - Premier Guitar ›
- 12-String Setup Secrets - Premier Guitar ›
- DIY: How to Set Up and Intonate an Acoustic Guitar - Premier Guitar ›
- Reader Guitar of the Month—Pickups and Finishes - Premier Guitar ›
- DIY Guitar: 7 Cool Reader Mods - Premier Guitar ›
Onstage, Tommy Emmanuel executes a move that is not from the playbook of his hero, Chet Atkins.
Recorded live at the Sydney Opera House, the Australian guitarist’s new album reminds listeners that his fingerpicking is in a stratum all its own. His approach to arranging only amplifies that distinction—and his devotion to Chet Atkins.
Australian fingerpicking virtuoso Tommy Emmanuel is turning 70 this year. He’s been performing since he was 6, and for every solo show he’s played, he’s never used a setlist.
“My biggest decision every day on tour is, ‘What do I want to start with? How do I want to come out of the gate?’” Emmanuel explains to me over a video call. “A good opener has to have everything. It has to be full of surprise, it has to have lots of good ideas, lots of light and shade, and then, hit it again,” he says, illustrating each phrase with his hands and ending with a punch.“You lift off straightaway with the first song, you get airborne, you start reaching, and then it’s time to level out and take people on a journey.”
In May 2023, Emmanuel played two shows at the Sydney Opera House, the best performances from which have been combined on his new release, Live at the Sydney Opera House. The venue’s Concert Hall, which has a capacity of 2,679, is a familiar room for Emmanuel, but I think at this point in his career he wouldn’t bring a setlist if he was playing Wembley Stadium. On the recording, Emmanuel’s mind-blowingly dexterous chops, distinctive attack and flair, and knack for culturally resonant compositions are on full display. His opening song for the shows? An original, “Countrywide,” with a segue into Chet Atkins’ “El Vaquero.”
“When I was going to high school in the ’60s, I heard ‘El Vaquero’ on Chet Atkins’ record, [1964’s My Favorite Guitars],” Emmanuel shares. “And when I wrote ‘Countrywide’ in around ’76 or ’77, I suddenly realized, ‘Ah! It’s a bit like “El Vaquero!”’ So I then worked out ‘El Vaquero’ as a solo piece, because it wasn’t recorded like that [by Atkins originally].
“The co-writer of ‘El Vaquero’ is Wayne Moss, who’s a famous Nashville session guy who played ‘da da da’ [sings the guitar riff from Roy Orbison’s ‘Pretty Woman’]. And he played on a lot of Chet’s records as a rhythm guy. So once when I played ‘El Vaquero’ live, Wayne Moss came up to me and said, ‘You know, you did my part and Chet’s at the same time. That’s not fair!’” Emmanuel says, laughing.
Atkins is the reason Emmanuel got into performing. His mother had been teaching him rhythm guitar for a couple years when he heard Atkins on the radio and, at 6, was able to immediately mimic his fingerpicking technique. His father recognized Emmanuel’s prodigious talent and got him on the road that year, which kicked off his professional career. He says, “By the time I was 6, I was already sleep-deprived, working too hard, and being forced to be educated. Because all I was interested in was playing music.”
Emmanuel talks about Atkins as if the way he viewed him as a boy hasn’t changed. The title Atkins bestowed upon him, C.G.P. (Certified Guitar Player), appears on Emmanuel’s album covers, in his record label (C.G.P. Sounds), and is inlaid at the 12th fret on his Maton Custom Shop TE Personal signature acoustic. (Atkins named only five guitarists C.G.P.s. The others are John Knowles, Steve Wariner, Jerry Reed, and Atkins himself.) For Emmanuel, even today most roads lead to Atkins.
When I ask Emmanuel about his approach to arranging for solo acoustic guitar, he says, “It was really hit home for me by my hero, Chet Atkins, when I read an interview with him a long time ago and he said, ‘Make your arrangement interesting.’ And I thought, ‘Wow!’ Because I was so keen to be true to the composer and play the song as everyone knows it. But then again, I’m recreating it like everyone else has, and I might as well get in line with the rest of them and jump off the cliff into nowhere. So it struck me: ‘How can I make my arrangements interesting?’ Well, make them full of surprises.”
When Emmanuel was invited to contribute to 2015’s Burt Bacharach: This Guitar’s in Love with You, featuring acoustic-guitar tributes to Bacharach’s classic compositions by various artists, Emmanuel expresses that nobody wanted to take “(They Long to Be) Close to You,” due to its “syrupy” nature. But for Emmanuel, this presented an entertaining challenge.
He explains, “I thought, ‘Okay, how can I reboot “Close to You?’ So even the most jaded listener will say, ‘Holy fuck—I didn’t expect that! Wow, I really like that; that is a good melody!’ So I found a good key to play the song in, which allowed me to get some open notes that sustain while I move the chords. Then what I did is, in every phrase, I made the chord unresolve, then resolve.
Tommy Emmanuel's Gear
“I’m writing music for the film that’s in my head,” Emmanuel says. “So, I don’t think, ‘I’m just the guitar,’ ever.”
Photo by Simone Cecchetti
Guitars
- Three Maton Custom Shop TE Personals, each with an AP5 PRO pickup system
Amps
- Udo Roesner Da Capo 75
Effects
- AER Pocket Tools preamp
Strings & Picks
- Martin TE Signature Phosphor Bronze (.012–.054)
- Martin SP strings
- Ernie Ball Paradigm strings
- D’Andrea Pro Plec 1.5 mm
- Dunlop medium thumbpicks
“And then to really put the nail in the coffin, at the end, ‘Close to you’ [sings melody]. I finished on a major 9 chord which had that note in it, but it wasn’t the key the song was in, which is a typical Stevie Wonder trick. All the tricks I know, the wonderful ideas that I’ve stolen, are from Michael Jackson, Stevie Wonder, Lionel Richie, James Taylor, Carole King, Neil Diamond. All of the people who wrote really incredibly great pop songs and R&B music—I stole every idea I could, and I tried to make my little two-and-a -half minutes as interesting and entertaining as possible. Because entertainment equals: Surprise me.”
I share with Emmanuel that the performances on Live at the Sydney Opera House, which include his popular “Beatles Medley,” reminded me of another possible arrangement trick. In Harpo Marx’s autobiography, Harpo Speaks, I preface, Marx writes of a lesson he learned as a performer—to “answer the audience’s questions.” (Emmanuel says he’s a big fan of the book and read it in the early ’70s.) That happened for me while listening to the medley, when, after sampling melodies from “She’s a Woman” and “Please Please Me,” Emmanuel suddenly lands on “While My Guitar Gently Weeps.”
I say, “I’m waiting for something that hits more recognizably to me, and when ‘While My Guitar’ comes in, that’s like answering my question.”
“It’s also Paul and John, Paul and John, George,” Emmanuel replies. “You think, ‘That’s great, that’s great pop music,’ then, ‘Wow! Look at the depth of this.’”Often Emmanuel’s flights on his acoustic guitar are seemingly superhuman—as well as supremely entertaining.
Photo by Ekaterina Gorbacheva
A trick I like to employ as a writer, I say to Emmanuel, is that when I’m describing something, I’ll provide the reader with just enough context so that they can complete the thought on their own.
“You can do that musically as well,” says Emmanuel. He explains how, in his arrangement of “What a Wonderful World,” he’ll play only the vocal melody. “When people are asking me at a workshop, ‘How come you don’t put chords behind that part?’ I say, ‘I’m drawing the melody and you’re putting in all the background in your head. I don’t need to tell you what the chords are. You already know what the chords are.’”
“Wayne Moss came up to me and said, ‘You know, you did my part and Chet’s at the same time. That’s not fair!’”
Another track featured on Live at the Sydney Opera House is a cover of Paul Simon’s “American Tune” (which Emmanuel then jumps into an adaptation of the Australian bush ballad, “Waltzing Matilda”). It’s been a while since I really spent time with There GoesRhymin’ Simon (on which “American Tune” was first released), and yet it sounded so familiar to me. A little digging revealed that its melody is based on the 17th-century Christian hymn, “O Sacred Head, Now Wounded,” which was arranged and repurposed by Bach in a few of the composer’s works. The cross-chronological and genre-lackadaisical intersections that come up in popular music sometimes is fascinating.
“I think the principle right there,” Emmanuel muses, “is people like Bach and Beethoven and Mozart found the right language to touch the heart of a human being through their ears and through their senses ... that really did something to them deep in their soul. They found a way with the right chords and the right notes, somehow. It could be as primitive as that.
Tommy Emmanuel has been on the road as a performing guitarist for 64 years. Eat your heart out, Bob Dylan.
Photo by Jan Anderson
“It’s like when you’re a young composer and someone tells you, ‘Have a listen to Elton John’s “Candle in the Wind,”’ he continues. “‘Listen to how those notes work with those chords.’ And every time you hear it, you go, ‘Why does it touch me like that? Why do I feel this way when I hear those chords—those notes against those chords?’ I say, it’s just human nature. Then you wanna go, ‘How can I do that!’” he concludes with a grin.
“You draw from such a variety of genres in your arrangements,” I posit. “Do you try to lean into the side of converting those songs to solo acoustic guitar, or the side of bridging the genre’s culture to that of your audience?”
“I stole every idea I could, and I tried to make my little two-and-a-half minutes as interesting and entertaining as possible. Because entertainment equals: Surprise me.”
“If I was a method actor,” Emmanuel explains, “what I’m doing is—I’m writing music for the film that’s in my head. So, I don’t think, ‘I’m just the guitar,’ ever. I always think it has to have that kind of orchestral, not grandeur, but … palette to it. Because of the influence of Stevie Wonder, Billy Joel, and Elton John, especially—the piano guys—I try to use piano ideas, like putting the third in the low bass a lot, because guitar players don’t necessarily do that. And I try to always do something that makes what I do different.
“I want to be different and recognizable,” he continues. “I remember when people talked about how some players—you just hear one note and you go, ‘Oh, that’s Chet Atkins.’ And it hit me like a train, the reason why a guy like Hank Marvin, the lead guitar player from the Shadows.... I can tell you: He had a tone that I hear in other players now. Everyone copied him—they just don’t know it—including Mark Knopfler, Eric Clapton, Jimmy Page, all those people. I got him up to play with me a few times when he moved to Australia, and even playing acoustic, he still had that sound. I don’t know how he did it, but it was him. He invented himself.”
YouTube It
Emmanuel performs his arrangement of “What a Wonderful World,” illustrating how omitting a harmonic backdrop can have a more powerful effect, especially when playing such a well-known melody.
Bergantino revolutionizes the bass amp scene with the groundbreaking HP Ultra 2000 watts bass amplifier, unlocking unprecedented creative possibilities for artists to redefine the boundaries of sound.
Bergantino Audio Systems, renowned for its innovative and high-performance bass amplification, is proud to announce the release of the HP Ultra 2000W Bass Amplifier. Designed for the professional bassist seeking unparalleled power and tonal flexibility, the HP Ultra combines cutting-edge technology with the signature sound quality that Bergantino is known for.
Operating at 1000W with an 8-ohm load and 2000W with a 4-ohm load, the HPUltra offers exceptional headroom and output, ensuring a commanding presence on stage and in the studio. This powerhouse amplifier is engineered to deliver crystal-clear sound and deep, punchy bass with ease, making it the perfect choice for demanding performances across any genre.
The HP Ultra incorporates the same EQ and feature set as the acclaimedBergantino Forté HP series, offering advanced tonal control and versatility. It includes a highly responsive 4-band EQ, Bergantino’s signature Variable RatioCompressor, Lo-Pass, and Hi-Pass Filters, and a re-imagined firmware that’s optimally tuned for the HP Ultra’s power module. The intuitive user interface allows for quick adjustments and seamless integration with any rig, making it an ideal solution for both seasoned professionals and rising stars.
As compared to previous forte HP iterations (HP, HP2, HP2X), Ultra is truly its own amp. Its behavior, feel, and tonal capabilities will be well noted for bass players seeking the ultimate playing experience. If you’ve been wishing for that extreme lead sled-type heft/force and punch, along with a choice of modern or vintage voicings, on-board parallel compressor, overdrive; high pass and lowpass filters, and more—all in a 6.9 lb., 2ru (8” depth) package...the BergantinoHP Ultra is worth checking out.
Building on the forte’ HP2X’s leading edge platform (including a harmonic enriching output transformer (X) and 3.5db of additional dynamic headroom (2),the HP Ultra’s power focus is not about playing louder...it’s about the ability to play fuller and richer at similar or lower volumes. Many players will be able to achieve a very pleasing bass fill, with less volume, allowing the guitars and vocals to shine thru better in a dense mix. This in turn could easily contribute to a lower stage volume...win-win!
Key Features of the Bergantino HP Ultra 2000W Bass Amplifier:
- Power Output: 1000W @ 8ohms / 2000W @ 4ohms, 1200W RMS @2-Ohms (or 1700W RMS @2.67-Ohms-firmware optimizable via USB
- Dual Voicing Circuits: offer a choice between vintage warmth and modern clarity.
- Custom Cinemag Transformer: elevates harmonic enrichment to new heights
- Variable Low-Pass (VLPF) and Variable High-Pass (VHPF) filters, critical for precise tone shaping and taming of the most challenging gigging environments.
- 4-Band Tone Controls: Bass: +/-10db @40hz, Lo-Mid:+/-10db @250hz,Hi-Mid: +/-10db @ 1khz, Treble: +/-10db @ 3.5khz
- Punch Switch: +4db @110hz
- Bright Switch: +7db @7kHz or +6db @2khz – user selectable● Built-in parallel compression - VRC
- 3.5dB of additional dynamic headroom
- New Drive Circuit featuring our proprietary B.S.D (Bergantino SmartDrive) technology
- Auxiliary Input and Headphone Jack: for personal monitor and practice
- Rack Mountable with optional rack ears
- Effects send and return loop
- Studio quality Direct Output: software selectable Pre or Post EQ
- UPS – Universal power supply 115VAC – 240VAC 50/60Hz
- Weight: 6.9 pounds
- Dimensions: 13.25”W x 8.375”D x 3.75”H
- Street Price: $1895.00
For more information, please visit bergantino.com
The NEW Bergantino Forté HP ULTRA!!! - YouTube
A touch-sensitive, all-tube combo amp perfect for clean & edge of breakup tones. Featuring a custom aesthetic, new voicing, & Celestion Creamback 75 speaker.
Debuted in Spring 2023, the Revv D25 is a clean/crunch combo amplifier perfect for pedals that released to widespread critical claim for its combination of touch-sensitive all-tube tone & modern features that make gigging & recording a breeze. 'D' stands for Dynamis, a series of classic-voiced amplifiers dating back to the early days of Revv Amplification, when A-list artists like Joey Landreth helped give feedback on voicings & designs. Joey is a longtime Revv user & personal friend of the company, & the D25 immediately became a favorite of his upon release.
While the D25 already had features Joey was looking for, we wanted to collaborate to celebrate our long relationship & give players a unique option. We’re proud to announce the D25 - Joey Landreth Edition. Featuring custom aesthetic, new voicing & a Celestion Creamback 75 speaker. The D25 is designed to solve problems & remove the barrier between you & your music - but more importantly, it just plain sounds great. It features a simple single-channel layout perfect for clean & edge of breakup tones. With organic tone you can take anywhere, the D25 - Joey Landreth Edition empowers you to focus on your music on stage, in the studio, & at home.
The D25 - Joey Landreth Edition 1x12 Combo Amplifier features:
- All-tube design with two 12AX7, two 6V6, & selectable 25w or 5w operation.
- Level, treble, middle, bass, & volume controls with switchable gain boost voice.
- Perfect for clean & edge of breakup tones
- Organic, touch-sensitive feel, perfect for pedals.
- Pristine digital reverb & transparent buffered effects loop.
- Two-notes Torpedo-embedded mono direct XLR out reactive load & impulse. responses for zero-compromise direct performance & recording.
- Celestion 75W Creamback Driver
- 32 lbs. Lightweight open-back construction
- Manufactured in Canada.
- 2 year limited warranty
Revv’s D25 Joey Landreth Edition has a street price of $1899 & can be ordered immediately through many fine dealers worldwide or directly at revvamplification.com.
For more information, please visit revvamplification.com.
Featuring a 25.5" scale length, mahogany body, gold hardware, and 490R/498T pickups. Stand out with the unique design and comfortable playing experience of the Gibson RD Custom.
Initially released in 1977, the Gibson RD model has been a cult classic for years. It is famous for its unique appearance, which takes inspiration from both the Gibson Explorer and Firebird designs, as well as its functionality and use by several popular guitarists across multiple genres.
Now, the iconic RD Custom joins the Gibson Custom core lineup for the first time. Not only is this the first Custom Shop-built RD model, but it is also the first 25.5” scale length solidbody core model offered by Gibson Custom. Complete with the classic and comfortable RD body shape, including a rear tummy cut for extra comfort, this model also features a mahogany body with multi-ply top binding, Gibson Custom aesthetics, including gold hardware and mother-of-pearl block inlays on the neck, and a mother-of-pearl Custom split diamond headstock inlay. The RD Custom also has a 25.5” scale mahogany neck with a Medium C profile and long neck tenon, a bound ebony fretboard with 22 medium jumbo frets, and a bound headstock with Grover Rotomatic tuners. The updated electronics include 490R and 498T pickups, CTS potentiometers, and a hand-wired harness.
The Gibson RD Custom is designed to help players stand out from the crowd with its longer scale length, curvaceously elegant body, and classic design. Now is your opportunity to experience the unique and comfortable playing experience of the cult-favorite Gibson RD Custom for yourself. A Custom Shop hardshell case is also included.
For more information, please visit gibson.com.