
Note the cavity cover on the back, which houses the components of Andy Summers’ mid-boost system.
We’ve covered Andy’s iconic guitar and what makes it so special, so now we’ll get to building our own.
Hello and welcome back to Mod Garage for the second installment of the Andy Summers Telecaster wiring. We covered many of the details of this unique guitar last time, so now we’ll jump right in to assembling your own.
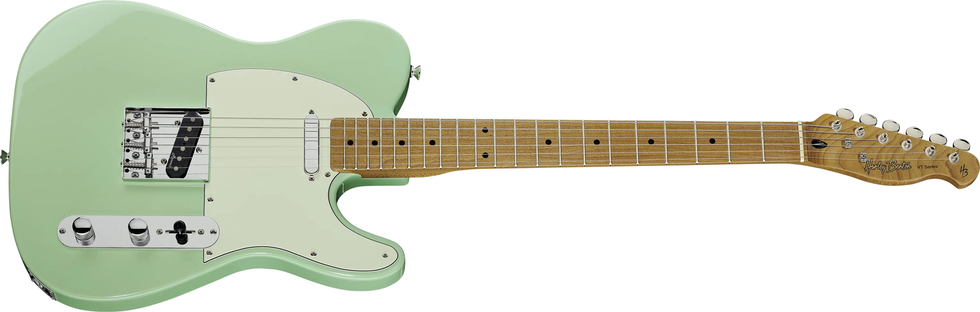
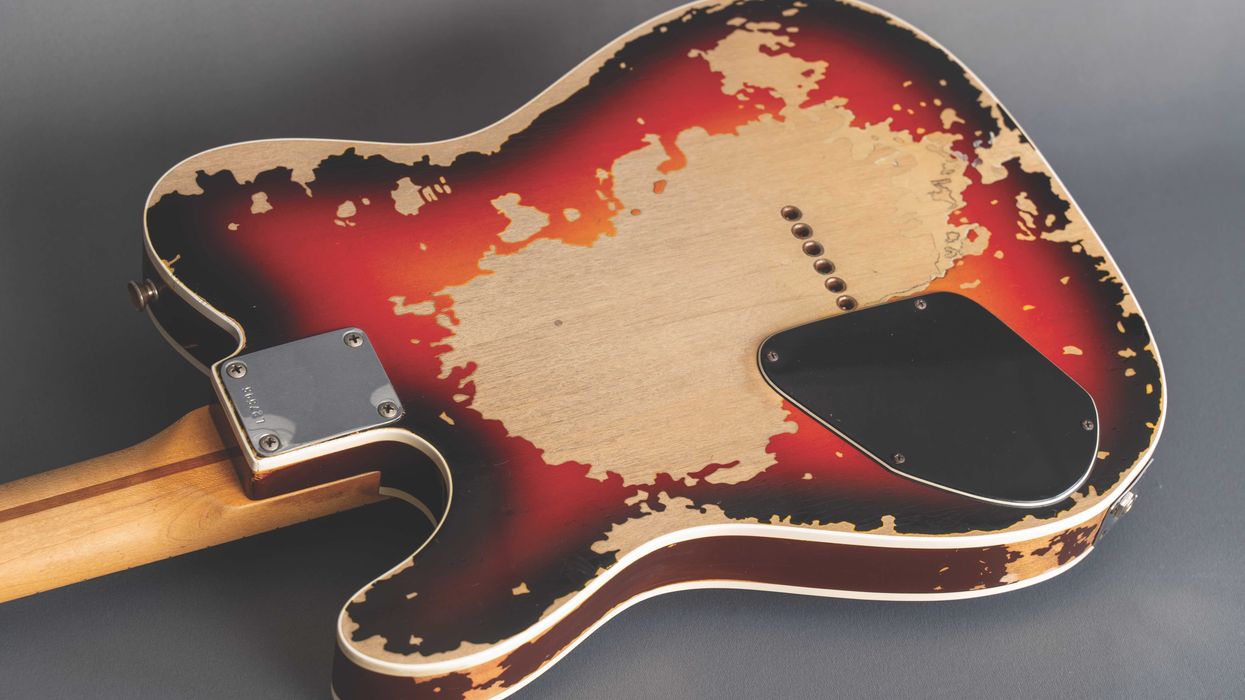
In general, you can use any Telecaster and convert it to Andy Summers’ specs. If you want to stay as close as possible to the original guitar, the way to go is an alder body—just like Andy’s, which is 2-piece—with a 3-tone sunburst finish and white double binding.
The neck should be quarter-sawn, 1-piece maple with a C profile, 21 vintage-style frets, and a 7.25" fretboard radius. Of course, you can choose your own specs here, too. The original guitar has a brass nut rather than bone or plastic, and it should be no problem to find a brass nut blank for a Telecaster. You will need different tools to work on it compared to bone, plastic, or graphite, so keep this in mind. If you do not have the right tools or don’t feel comfortable making nuts, you should leave this task to your local guitar tech. Summers’ guitar has Schaller M6 tuning machines, which are still available from the German Schaller company, and two chrome butterfly string trees. You may not really need two of them—usually one for the B and the high E string will do the trick, especially with a well-made nut.
The original has a heavy brass bridge plate with six individual brass saddles, which will increase overall weight significantly. You can still buy this type of brass bridge from several companies, but there are much lighter bridges on the market.
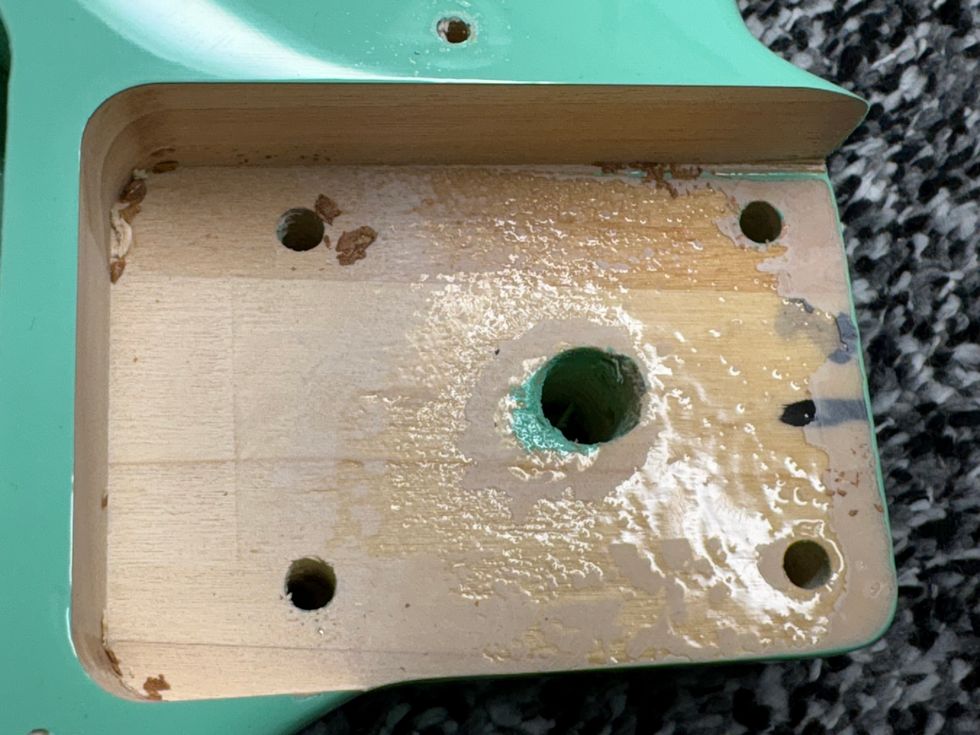
The stereo output jack is installed in a rectangular chrome plate, like on a Les Paul, which I think is superior to the typical Telecaster jack cup. Interestingly, the plate on Summers’ guitar is only held by two of four screws, but do yourself a favor and use all four to make this spot as strong as possible. You should attach the plate really tight, especially when you use an output jack with a tight grip for the plug.
“Electronically, there is nothing too specialized that you will need for the controls.”
The rest of the hardware is chrome and standard: two regular strap buttons, a standard Telecaster control plate, ’60s Telecaster flat-top knobs, a black ’60s-style top-hat switch knob on the 3-way pickup selector switch, and two flat-lever mini-toggle switches. You should have no problem getting all of these parts from any guitar shop. The pickguard is a 3-ply mint green pickguard with a standard humbucker routing for the neck pickup.
Electronically, there is nothing too specialized that you will need for the controls: a standard 3-way pickup selector switch, two 250k audio pots for master volume and master tone, a gain control pot for the booster, and two additional mini DPDT on-on toggle switches for switching the booster on and off and for the phase control of the bridge pickup. The resistance of the gain control pot depends on the booster you want to use: e.g. for the Fender Clapton mid-boost kit, a 500k type will work great.
For the bridge pickup, there is a standard early-’60s-style Telecaster single-coil pickup, and every pickup company will have something like this in their catalog. Because the bridge pickup is installed to an out-of-phase mini-toggle switch, your pickup will need three conductors, with the metal base plate separated from the pickup’s common ground, and a third wire that connects the bridge plate individually to ground. If you have a regular two-conductor model, you need to break this connection, soldering a third wire directly to the base plate.
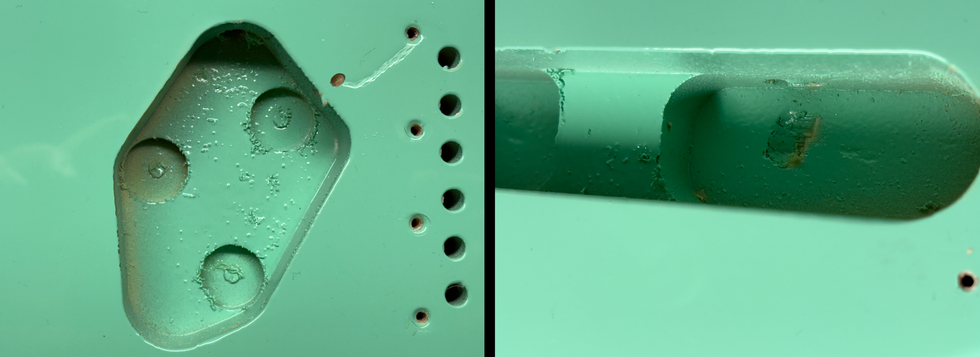
Interestingly, the bridge pickup on Summers’ Tele is installed directly into the wood of the pickup’s cavity. I see no reason why you shouldn’t install it the regular way on your guitar.
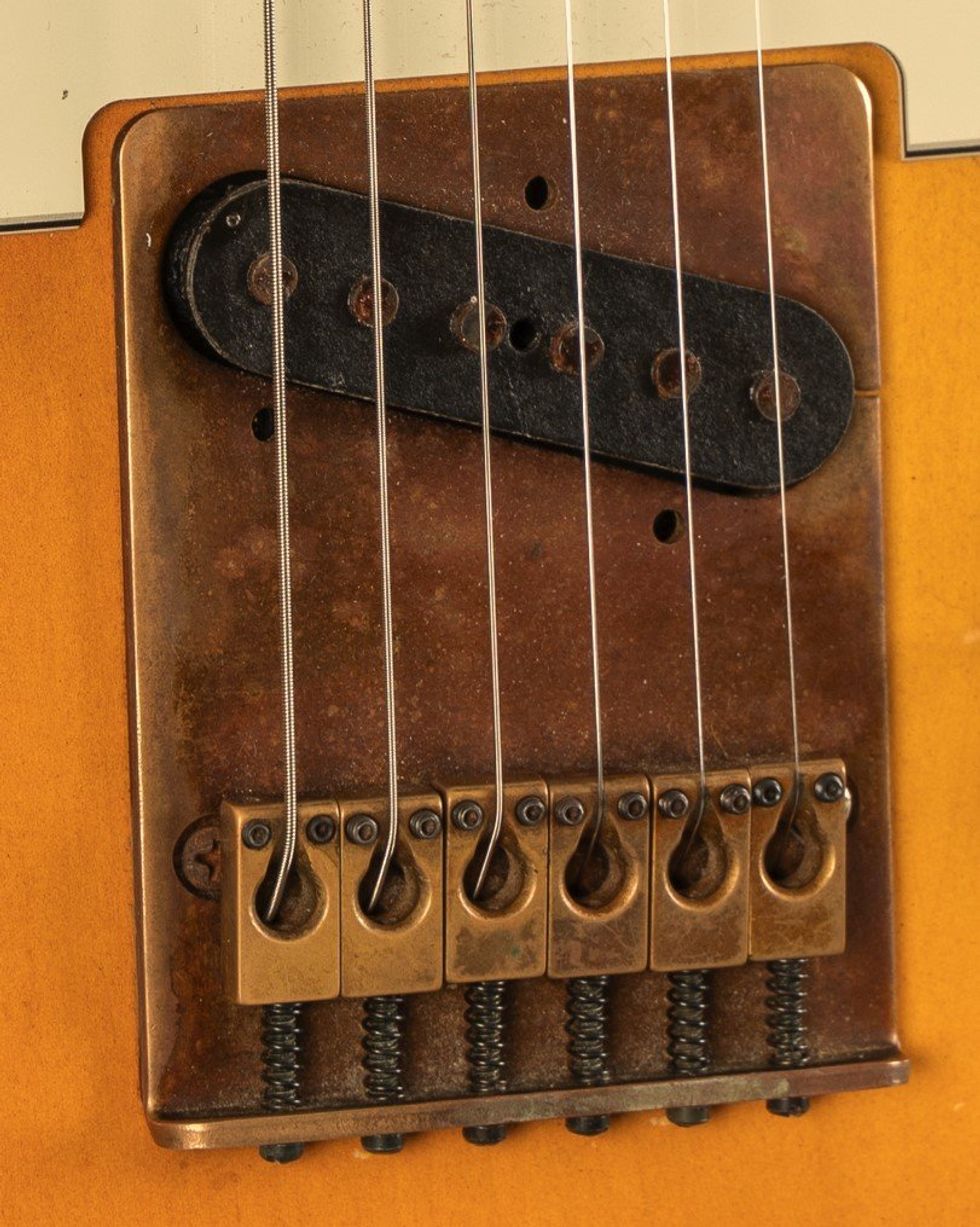
Here’s a close-up of the bridge on Summers’ historic Tele.
Photo courtesy of Ten-Guitars (https://ten-guitars.de)
In the neck position, there is a ’59 PAF humbucker with a conventional two-conductor wiring installed directly into the pickguard in the standard way, with the open pole pieces facing towards the neck. The choice of late-’50s PAF copies has never been better than it is today. You can buy excellent versions from a lot of companies, just make sure to choose the correct string spacing, which is usually called “F-spacing” or something similar, and is usually 2.070" (52.6 mm). (Gibson spacing, or G-spacing, is 1.930" or 49 mm.)
You’ll need humbucker routing on your body to make it fit. If you don’t have a body with humbucker routing and don’t want to get your Tele body re-routed, you can consider one of the numerous stacked humbuckers that will fit into a standard Telecaster neck pickup cavity. My experience is that there is a noticeable difference in tone compared to a full-sized humbucker, and it will be a compromise.
Next is the active booster. Finding a good booster module and wiring it up is much easier than fitting it into the tight space of a Telecaster body. There are a wide range of available booster options. There are complete DIY sets available that include the PCB and all of the necessary parts to build your own, and there are also drop-in PCBs that are already populated, like the well-known Fender mid-boost circuit kit. You can also find mini-sized booster modules using high-quality SMD parts, which only require a fraction of space compared to the regular PCBs.
“Finding a good booster module and wiring it up is much easier than fitting it into the tight space of a Telecaster body.”
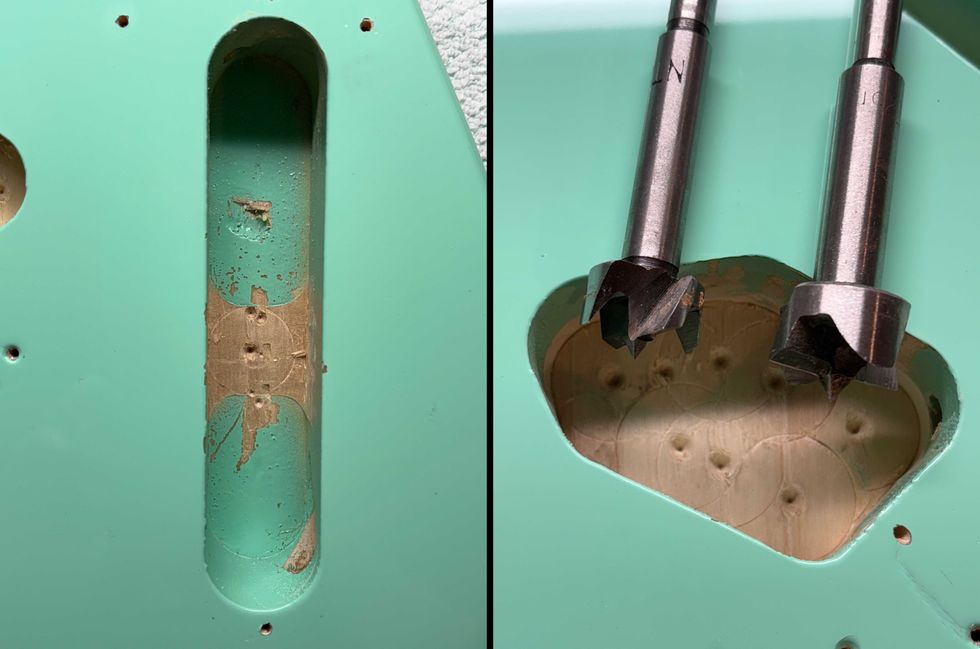
The available options include treble boosters, mid-boost circuits, full-range boosters, etc. Choose what you like best. The problem will be that you need to stuff it into a Telecaster body. As you know, there is not much space inside a Telecaster, and you need to add the booster itself, the 9V battery, an additional pot for controlling the booster, and two additional mini-toggle switches—one for turning the booster on and off, and the other to get the bridge pickup out of phase. This is a lot of stuff! On Summers’ guitar, this problem was solved by adding a large cavity on the back and closing it with a plastic back plate, as on a Gibson Les Paul.
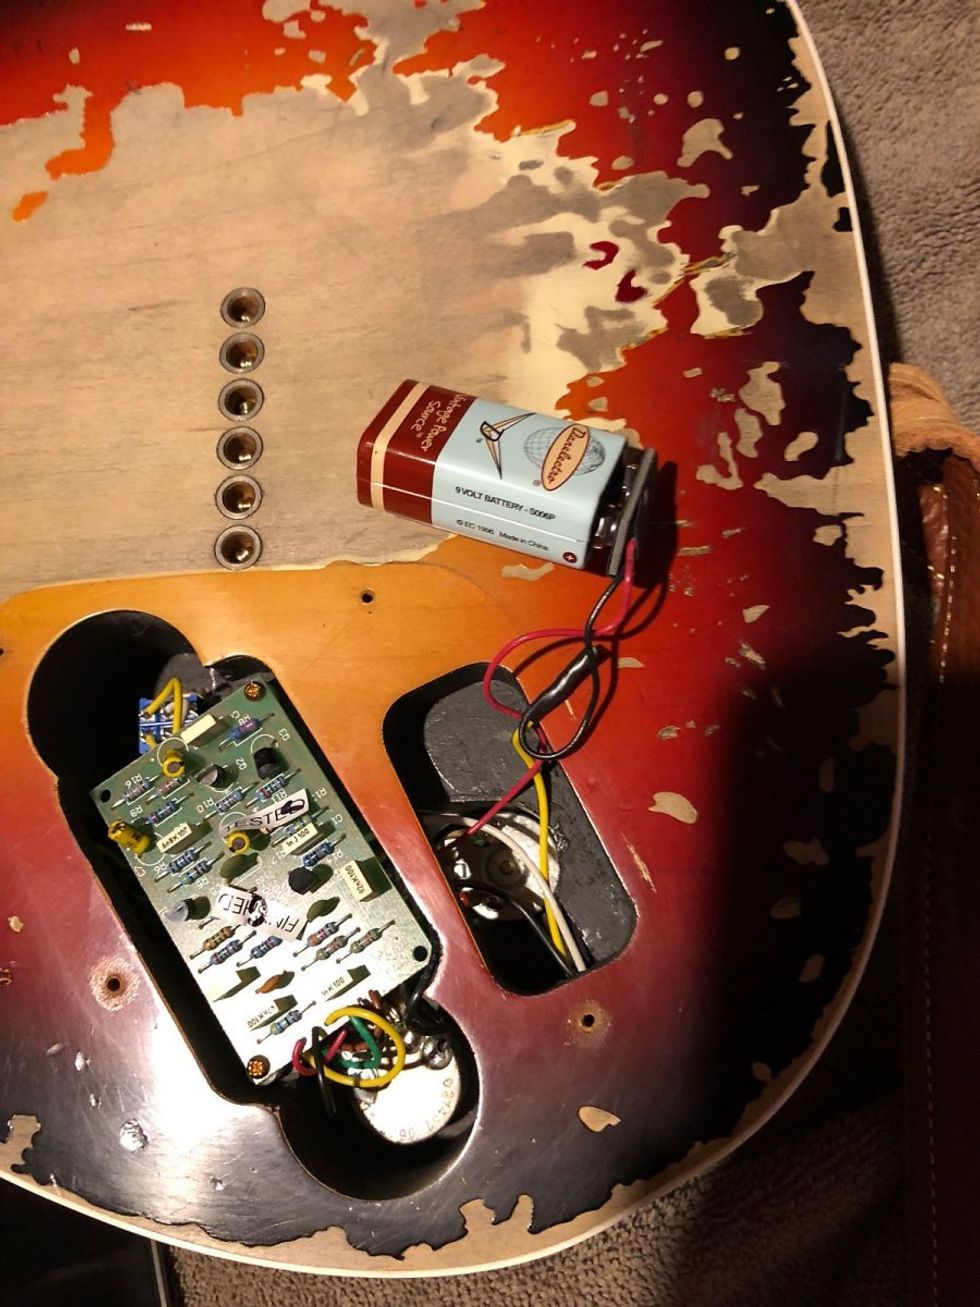
A look inside the cavity for the mid-boost unit.
Photo courtesy of TeleManDon from Vancouver Island, BC (https://tdpri.com)
You can clearly see the two big routings for the booster’s PCB and the 9V battery, plus the additional pot to control the amount of boost as well as the mini-toggle switch to turn the booster on and off. If you are not afraid of routing two big chambers into your Telecaster’s body, this is a suitable way to go.
On a Telecaster, there are not many alternatives I can think of to fit all these parts. One possible way of saving space would be to use a stacked pot with two 250k pots for volume and tone, so you have the second hole in the control plate available for the gain control pot of the booster. Between the two pots, it should be no problem to place the two mini-toggle switches. Or you use a push-pull pot for the gain control to save one of the mini-toggle switches. The guitar will look much cleaner, at least from the front side. But you still have to put the booster PCB and the battery somewhere. A customer of mine did this by completely routing the area under the pickguard. But even with only a regular single-coil neck pickup, it was a really tight fit, so with a regular-sized humbucker, it will be close to impossible. So, you or your luthier will have to be creative, and I wouldn’t be surprised if a company offers Andy Summers Telecaster bodies with all chambers already routed.
Here we go for the wiring. Wherever possible, I tried to keep the diagram as clean as possible. The wiring of the booster is only an example and depends on the booster you want to use, but the basic wiring is always the same.
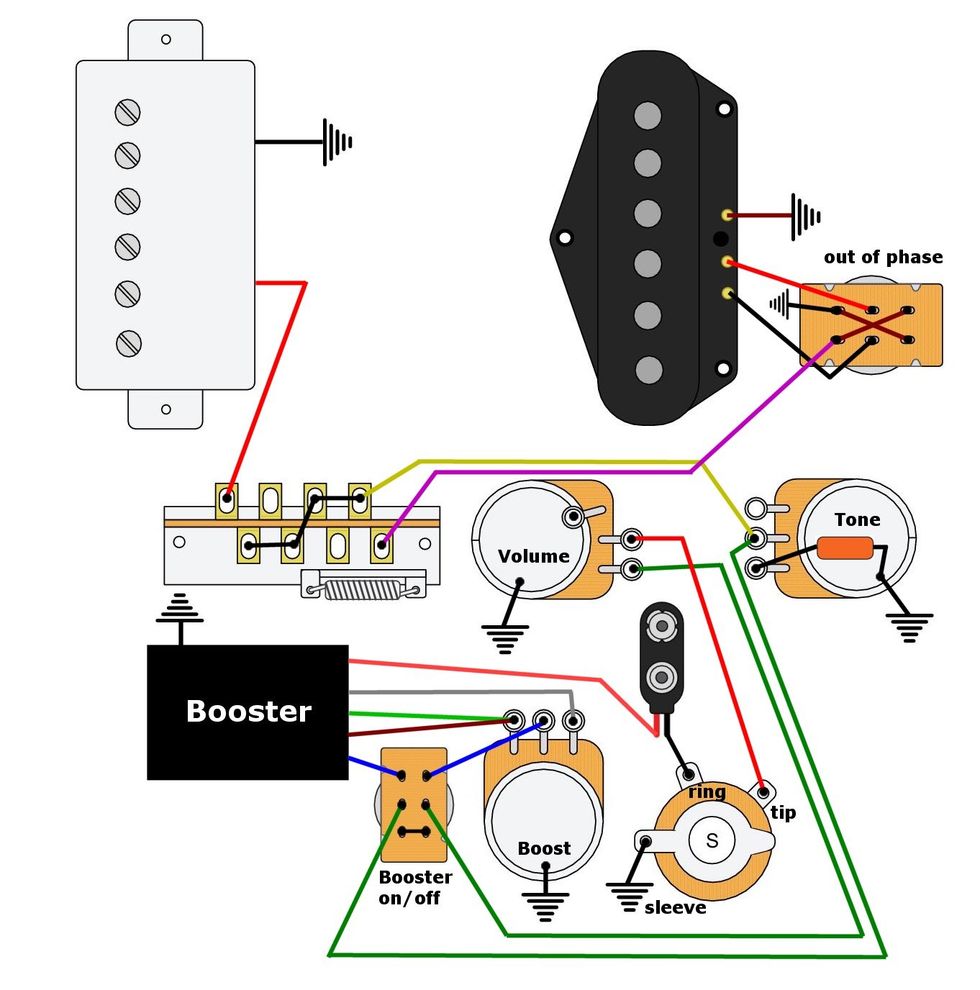
Here’s a helpful schmatic of the Andy Summers‘ Telecaster wiring.
Illustration courtesy of SINGLECOIL (www.singlecoil.com)
That’s it. Next month, we will take a deep look into guitar cables and wires, what really makes a difference, and how you can use this to reshape your guitar tone. So stay tuned!
Until then ... keep on modding!
This legendary vintage rack unit will inspire you to think about effects with a new perspective.
When guitarists think of effects, we usually jump straight to stompboxes—they’re part of the culture! And besides, footswitches have real benefits when your hands are otherwise occupied. But real-time toggling isn’t always important. In the recording studio, where we’re often crafting sounds for each section of a song individually, there’s little reason to avoid rack gear and its possibilities. Enter the iconic Eventide H3000 (and its massive creative potential).
When it debuted in 1987, the H3000 was marketed as an “intelligent pitch-changer” that could generate stereo harmonies in a user-specified key. This was heady stuff in the ’80s! But while diatonic harmonizing grabbed the headlines, subtler uses of this pitch-shifter cemented its legacy. Patch 231 MICROPITCHSHIFT, for example, is a big reason the H3000 persists in racks everywhere. It’s essentially a pair of very short, single-repeat delays: The left side is pitched slightly up while the right side is pitched slightly down (default is ±9 cents). The resulting tripling/thickening effect has long been a mix-engineer staple for pop vocals, and it’s also my first call when I want a stereo chorus for guitar.
The second-gen H3000S, introduced the following year, cemented the device’s guitar bona fides. Early-adopter Steve Vai was such a proponent of the first edition that Eventide asked him to contribute 48 signature sounds for the new model (patches 700-747). Still-later revisions like the H3000B and H3000D/SE added even more functionality, but these days it’s not too important which model you have. Comprehensive EPROM chips containing every patch from all generations of H3000 (plus the later H3500) are readily available for a modest cost, and are a fairly straightforward install.
In addition to pitch-shifting, there are excellent modulation effects and reverbs (like patch 211 CANYON), plus presets inspired by other classic Eventide boxes, like the patch 513 INSTANT PHASER. A comprehensive accounting of the H3000’s capabilities would be tedious, but suffice to say that even the stock presets get deliciously far afield. There are pitch-shifting reverbs that sound like fever-dream ancestors of Strymon’s “shimmer” effect. There are backwards-guitar simulators, multiple extraterrestrial voices, peculiar foreshadows of the EarthQuaker Devices Arpanoid and Rainbow Machine (check out patch 208 BIZARRMONIZER), and even button-triggered Foley effects that require no input signal (including a siren, helicopter, tank, submarine, ocean waves, thunder, and wind). If you’re ever without your deck of Oblique Strategies cards, the H3000’s singular knob makes a pretty good substitute. (Spin the big wheel and find out what you’ve won!)
“If you’re ever without your deck of Oblique Strategies cards, the H3000’s singular knob makes a pretty good substitute.”
But there’s another, more pedestrian reason I tend to reach for the H3000 and its rackmount relatives in the studio: I like to do certain types of processing after the mic. It’s easy to overlook, but guitar speakers are signal processors in their own right. They roll off high and low end, they distort when pushed, and the cabinets in which they’re mounted introduce resonances. While this type of de facto processing often flatters the guitar itself, it isn’t always advantageous for effects.
Effects loops allow time-based effects to be placed after preamp distortion, but I like to go one further. By miking the amp first and then sending signal to effects in parallel, I can get full bandwidth from the airy reverbs and radical pitched-up effects the H3000 can offer—and I can get it in stereo, printed to its own track, allowing the wet/dry balance to be revisited later, if needed. If a sound needs to be reproduced live, that’s a problem for later. (Something evocative enough can usually be extracted from a pedal-form descendant like the Eventide H90.)
Like most vintage gear, the H3000 has some endearing quirks. Even as it knowingly preserves glitches from earlier Eventide harmonizers (patch 217 DUAL H910s), it betrays its age with a few idiosyncrasies of its own. Extreme pitch-shifting exhibits a lot of aliasing (think: bit-crusher sounds), and the analog Murata filter modules impart a hint of warmth that many plug-in versions don’t quite capture. (They also have a habit of leaking black goo all over the motherboard!) It’s all part of the charm of the unit, beloved by its adherents. (Well, maybe not the leaking goo!)
In 2025, many guitarists won’t be eager to care for what is essentially an expensive, cranky, decades-old computer. Even the excitement of occasional tantalum capacitor explosions is unlikely to win them over! Fortunately, some great software emulations exist—Eventide’s own plugin even models the behavior of the Murata filters. But hardware offers the full hands-on experience, so next time you spot an old H3000 in a rack somewhere—and you’ve got the time—fire it up, wait for the distinctive “click” of its relays, spin the knob, and start digging.
The luthier’s stash.
There is more to a guitar than just the details.
A guitar is not simply a collection of wood, wire, and metal—it is an act of faith. Faith that a slab of lumber can be coaxed to sing, and that magnets and copper wire can capture something as expansive as human emotion. While it’s comforting to think that tone can be calculated like a tax return, the truth is far messier. A guitar is a living argument between its components—an uneasy alliance of materials and craftsmanship. When it works, it’s glorious.
The Uncooperative Nature of Wood
For me it all starts with the wood. Not just the species, but the piece. Despite what spec sheets and tonewood debates would have you believe, no two boards are the same. One piece of ash might have a bright, airy ring, while another from the same tree might sound like it spent a hard winter in a muddy ditch.
Builders know this, which is why you’ll occasionally catch one tapping on a rough blank, head cocked like a bird listening. They’re not crazy. They’re hunting for a lively, responsive quality that makes the wood feel awake in your hands. But wood is less than half the battle. So many guitarists make the mistake of buying the lumber instead of the luthier.
Pickups: Magnetic Hopes and Dreams
The engine of the guitar, pickups are the part that allegedly defines the electric guitar’s voice. Sure, swapping pickups will alter the tonality, to use a color metaphor, but they can only translate what’s already there, and there’s little percentage in trying to wake the dead. Yet, pickups do matter. A PAF-style might offer more harmonic complexity, or an overwound single-coil may bring some extra snarl, but here’s the thing: Two pickups made to the same specs can still sound different. The wire tension, the winding pattern, or even the temperature on the assembly line that day all add tiny variables that the spec sheet doesn’t mention. Don’t even get me started about the unrepeatability of “hand-scatter winding,” unless you’re a compulsive gambler.
“One piece of ash might have a bright, airy ring, while another from the same tree might sound like it spent a hard winter in a muddy ditch.”
Wires, Caps, and Wishful Thinking
Inside the control cavity, the pots and capacitors await, quietly shaping your tone whether you notice them or not. A potentiometer swap can make your volume taper feel like an on/off switch or smooth as an aged Tennessee whiskey. A capacitor change can make or break the tone control’s usefulness. It’s subtle, but noticeable. The kind of detail that sends people down the rabbit hole of swapping $3 capacitors for $50 “vintage-spec” caps, just to see if they can “feel” the mojo of the 1950s.
Hardware: The Unsung Saboteur
Bridges, nuts, tuners, and tailpieces are occasionally credited for their sonic contributions, but they’re quietly running the show. A steel block reflects and resonates differently than a die-cast zinc or aluminum bridge. Sloppy threads on bridge studs can weigh in, just as plate-style bridges can couple firmly to the body. Tuning machines can influence not just tuning stability, but their weight can alter the way the headstock itself vibrates.
It’s All Connected
Then there’s the neck joint—the place where sustain goes to die. A tight neck pocket allows the energy to transfer efficiently. A sloppy fit? Some credit it for creating the infamous cluck and twang of Fender guitars, so pick your poison. One of the most important specs is scale length. A longer scale not only creates more string tension, it also requires the frets to be further apart. This changes the feel and the sound. A shorter scale seems to diminish bright overtones, accentuating the lows and mids. Scale length has a definite effect on where the neck joins the body and the position of the bridge, where compromises must be made in a guitar’s overall design. There are so many choices, and just as many opportunities to miss the mark. It’s like driving without a map unless you’ve been there before.
Alchemy, Not Arithmetic
At the end of the day, a guitar’s greatness doesn’t come from its spec sheet. It’s not about the wood species or the coil-wire gauge. It’s about how it all conspires to either soar or sink. Two guitars, built to identical specs, can feel like long-lost soulmates or total strangers. All of these factors are why mix-and-match mods are a long game that can eventually pay off. But that’s the mystery of it. You can’t build magic from a parts list. You can’t buy mojo by the pound. A guitar is more than the sum of its parts—it’s a sometimes unpredictable collaboration of materials, choices, and human touch. And sometimes, whether in the hands of an experienced builder or a dedicated tinkerer, it just works.
Two Iconic Titans of Rock & Metal Join Forces for a Can’t-Miss North American Trek
Tickets Available Starting Wednesday, April 16 with Artist Presales
General On Sale Begins Friday, April 18 at 10AM Local on LiveNation.com
This fall, shock rock legend Alice Cooper and heavy metal trailblazers Judas Priest will share the stage for an epic co-headlining tour across North America. Produced by Live Nation, the 22-city run kicks off September 16 at Mississippi Coast Coliseum in Biloxi, MS, and stops in Toronto, Phoenix, Los Angeles, and more before wrapping October 26 at The Cynthia Woods Mitchell Pavilion in The Woodlands, TX.
Coming off the second leg of their Invincible Shield Tour and the release of their celebrated 19th studio album, Judas Priest remains a dominant force in metal. Meanwhile, Alice Cooper, the godfather of theatrical rock, wraps up his "Too Close For Comfort" tour this summer, promoting his most recent "Road" album, and will have an as-yet-unnamed all-new show for this tour. Corrosion of Conformity will join as support on select dates.
Tickets will be available starting Wednesday, April 16 at 10AM local time with Artist Presales. Additional presales will run throughout the week ahead of the general onsale beginning Friday, April 18 at 10AM local time at LiveNation.comTOUR DATES:
Tue Sep 16 – Biloxi, MS – Mississippi Coast Coliseum
Thu Sep 18 – Alpharetta, GA – Ameris Bank Amphitheatre*
Sat Sep 20 – Charlotte, NC – PNC Music Pavilion
Sun Sep 21 – Franklin, TN – FirstBank Amphitheater
Wed Sep 24 – Virginia Beach, VA – Veterans United Home Loans Amphitheater
Fri Sep 26 – Holmdel, NJ – PNC Bank Arts Center
Sat Sep 27 – Saratoga Springs, NY – Broadview Stage at SPAC
Mon Sep 29 – Toronto, ON – Budweiser Stage
Wed Oct 01 – Burgettstown, PA – The Pavilion at Star Lake
Thu Oct 02 – Clarkston, MI – Pine Knob Music Theatre
Sat Oct 04 – Cincinnati, OH – Riverbend Music Center
Sun Oct 05 – Tinley Park, IL – Credit Union 1 Amphitheatre
Fri Oct 10 – Colorado Springs, CO – Broadmoor World Arena
Sun Oct 12 – Salt Lake City, UT – Utah First Credit Union Amphitheatre
Tue Oct 14 – Mountain View, CA – Shoreline Amphitheatre
Wed Oct 15 – Wheatland, CA – Toyota Amphitheatre
Sat Oct 18 – Chula Vista, CA – North Island Credit Union Amphitheatre
Sun Oct 19 – Los Angeles, CA – Kia Forum
Wed Oct 22 – Phoenix, AZ – Talking Stick Resort Amphitheatre
Thu Oct 23 – Albuquerque, NM – Isleta Amphitheater
Sat Oct 25 – Austin, TX – Germania Insurance Amphitheater
Sun Oct 26 – Houston, TX – The Cynthia Woods Mitchell Pavilion
*Without support from Corrosion of Conformity
MT 15 and Archon 50 Classic amplifiers offer fresh tones in release alongside a doubled-in-size Archon cabinet
PRS Guitars today released the updated MT 15 and the new Archon Classic amplifiers, along with a larger Archon speaker cabinet. The 15-watt, two-channel Mark Tremonti signature amp MT 15 now features a lead channel overdrive control. An addition to the Archon series, not a replacement, the 50-watt Classic offers a fresh voice by producing retro rock “classic” tones reminiscent of sound permeating the radio four and five decades ago. Now twice the size of the first Archon cabinet, the Archon 4x12 boasts four Celestion V-Type speakers.
MT 15 Amplifier Head
Balancing aggression and articulation, this 15-watt amp supplies both heavy rhythms and clear lead tones. The MT 15 revision builds off the design of the MT 100, bringing the voice of the 100’s overdrive channel into its smaller-format sibling. Updating the model, the lead channel also features a push/pull overdrive control that removes two gain stages to produce vintage, crunchier “mid gain” tones. The clean channel still features a push/pull boost control that adds a touch of overdrive crunch. A half-power switch takes the MT to 7 watts.
“Seven years ago, we released my signature MT 15 amplifier, a compact powerhouse that quickly became a go-to for players seeking both pristine cleans and crushing high-gain tones. In 2023, we took things even further with the MT 100, delivering a full-scale amplifier that carried my signature sound to the next level. That inspired us to find a way to fit the 100's third channel into the 15's lunchbox size,” said Mark Tremonti.
“Today, I’m beyond excited to introduce the next evolution of the MT15, now featuring a push/pull overdrive control on the Lead channel and a half-power switch, giving players even more tonal flexibility to shape their sound with a compact amp. Can’t wait for you all to plug in and experience it!”
Archon Classic Amplifier Head
With a refined gain structure from the original Archon, the Archon Classic’s lead channel offers a wider range of tones colored with gain, especially in the midrange. The clean channel goes from pristine all the way to the edge of breakup. This additional Archon version was developed to be a go-to tool for playing classic rock or pushing the envelope into modern territory. The Archon Classic still features the original’s bright switch, presence and depth controls. PRS continues to stock the Archon in retailers worldwide.
“The Archon Classic is not a re-issue of the original Archon, but a newly voiced circuit with the lead channel excelling in '70s and '80s rock tones and a hotter clean channel able to go into breakup. This is the answer for those wanting an Archon with a hotrod vintage lead channel gain structure without changing preamp tube types, and a juiced- up clean channel without having to use a boost pedal, all wrapped up in a retro-inspired cabinet design,” said PRS Amp Designer Doug Sewell.
Archon 4x12 Cabinet
As in the Archon 1x12 and 2x12, the mega-sized PRS Archon 4x12 speaker cabinet features Celestion V-Type speakers and a closed-back design, delivering power, punch, and tight low end. Also like its smaller brethren, the 4x12 is wrapped in durable black vinyl and adorned with a British-style black knitted-weave grill cloth. The Archon 4x12 is only the second four-speaker cabinet in the PRS lineup, next to the HDRX 4x12.
PRS Guitars continues its schedule of launching new products each month in 2025. Stay tuned to see new gear and 40 th Anniversary limited-edition guitars throughout the year. For all of the latest news, click www.prsguitars.com/40 and follow @prsguitars on Instagram, Tik Tok, Facebook, X, and YouTube.