A lot of you have been waiting for this penultimate step of our guitar aging project, so let’s do some damage!
Welcome back to Mod Garage. Today we’ll continue to work on our aging project, and some of you might be wondering why there was such a long break. The reason is simple: suboptimal timing from my side. The last part of this column was in the middle of autumn, and I wanted you to do the following steps outside (if possible) and not on the kitchen table. Wintertime is not the best time for such a challenge but now is a good starting point, so let’s go!
We’re almost done with our project, can you believe it? In this installment, we’ll take care of the color, talk about fading, and we’ll crack the lacquer—something a lot of you have been waiting for—before we add some dings and dongs in the last part of this series, which is the final touch before we put it all together again.a
We also have an advice column on aging from my friend and colleague Matthias “Matti” Meyer, from the German-based Bassart Guitars. Matti is one of the best pro agers I know. Please follow his advice and recipe for aging wood at the end of this column—we will need these tools in the next and final part of this project.
Aging the Color
Over time, the colors on guitar bodies start to fade, and depending on the type of color and the paint-job method itself, discolorations can show up. The two main factors are if the guitar was exposed to ultraviolet light and if the paint job is all intact. A famous example is the Gibson Les Paul goldtop guitars with the golden color turning greenish, or the Gibson sunburst Les Pauls losing the red color of the sunburst spray job over time. But Fender guitars also suffer similar problems.
What we want to mimic is an old nitro lacquer, but with our Harley Benton guitar we have two problems:
- The mustard color is not a real TV yellow, as discussed before. TV yellow is much lighter, so even when we find a way to fade the color, it won’t look like a faded TV yellow, but a faded mustard yellow. We can’t change this easily, so we must work with what we have and love it for what it is rather than hating it for what it’s not.
- It’s not nitro lacquer on our Harley Benton but a modern, not-so-thin, ultra-durable poly lacquer. In a technical way, this modern lacquer does a much better job than any vintage nitro stuff regarding protection of the guitar. The downside is that we can’t make poly look like nitro when aging; it will only be an approximation. But again, it is what it is, and we’ll make the best out of it.
If you have the time, exposing the guitar to direct sunlight for some weeks or months will cause a fading of the color to a certain degree. Over the years, I’ve seen the oddest attempts to do such things, including regularly placing the guitar inside a home solarium. Using artificial UV light is also an option but building a well-working construction for such a big object, like a set-neck guitar, is not easy and you’d need a lot of UV lamps for that. Such devices are often used to make yellowed plastic materials look shiny white again. An overspray with the correct color is also an option. but a lighter color on a darker one is always difficult to do—especially with a semi-transparent color like TV yellow. And I doubt it’s worth the time and money. Not everything is doable and this falls into that category. But we’ll do other things to make it look old and cool, so leave the color as it is.
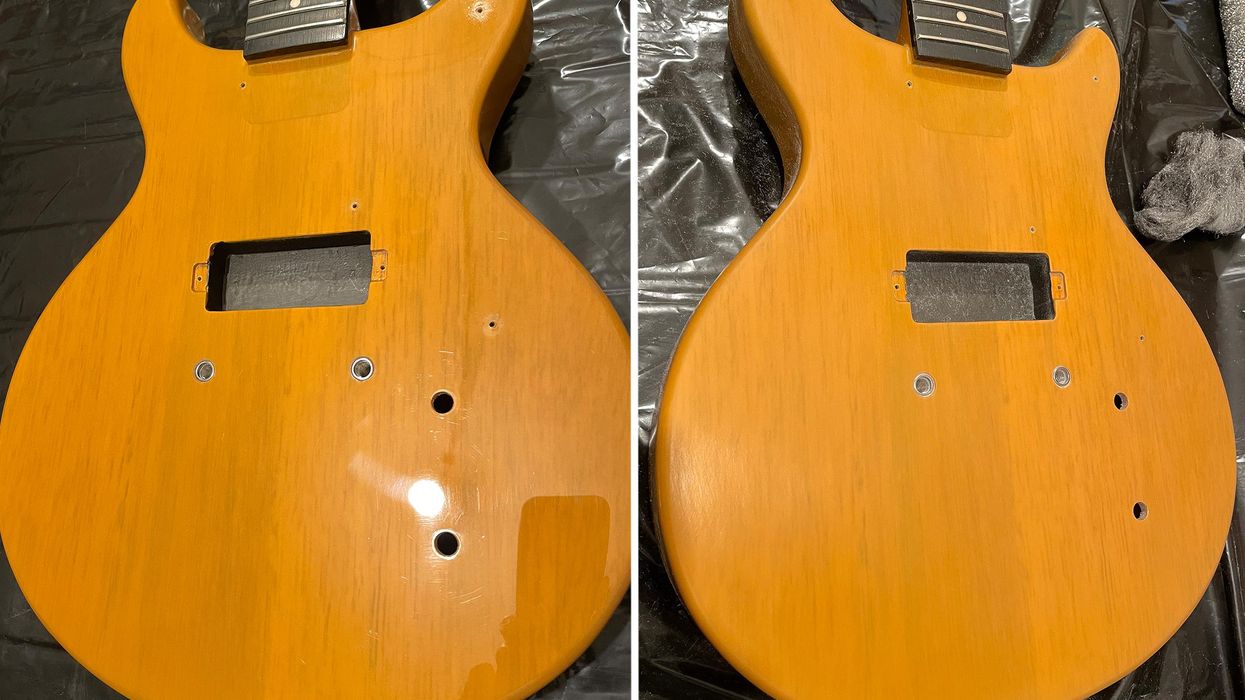
Let’s begin. As usual, grab your steel wool and abrasive cloth to break the shine of the high-gloss lacquer, and don’t forget the backside of the neck. The difference can be seen in Photo 1 (before) and Photo 2 (after).
Aging the Lacquer
This is what a lot of you have been waiting for and today we’ll finally do it: cracking the lacquer!We all know the look of cracked lacquer on vintage guitars, which is part of their special appearance and charm. On vintage guitars this happens over time, the softener disappears, and the paint starts to crack. Here again, facing that our Harley Benton is poly and not nitro-painted, we must follow a different route to get a good result.
Generally, there are two basic methods to do this:
- Mimicking the cracks by using a razor blade to cut the cracks into the paint.
- Using a combination of heat and cold to crack the lacquer.
In both cases this is only the first step. Next, we’ll have to make the cracks more visible, but first things first.
I decided to use the second method: using heat and cold to crack the lacquer. Please note, this will take some time and patience to do it right: It won’t be done in 15 minutes. You don’t need much for this, just a heat gun and several bottles of cooling spray. The process is easy but safety first: Only do this outside, wear gloves and goggles, and place a bucket with cold water or an extinguisher near you … a heat gun gets very hot!
You can’t do this in one step, and you’ll need to work in smaller areas, one by one. Heat up the first area with the heat gun and be careful—you only want to heat up the lacquer and not melt or burn it. If you want to intentionally add some burned spots, a heat gun is the way to go, too. Depending on the type and thickness of the lacquer as well as the power of your heat gun, it can take some time until the lacquer is ready to crack. Start to heat it up from a distance and not with the heat gun directly on the guitar, checking the temperature of the lacquer from time to time with one of your hands. Never put your hand directly under the heat gun! Take the guitar body and your hands away from the gun when you check the temperature. If you feel that it’s not hot enough, keep heating it up until it’s good to go.
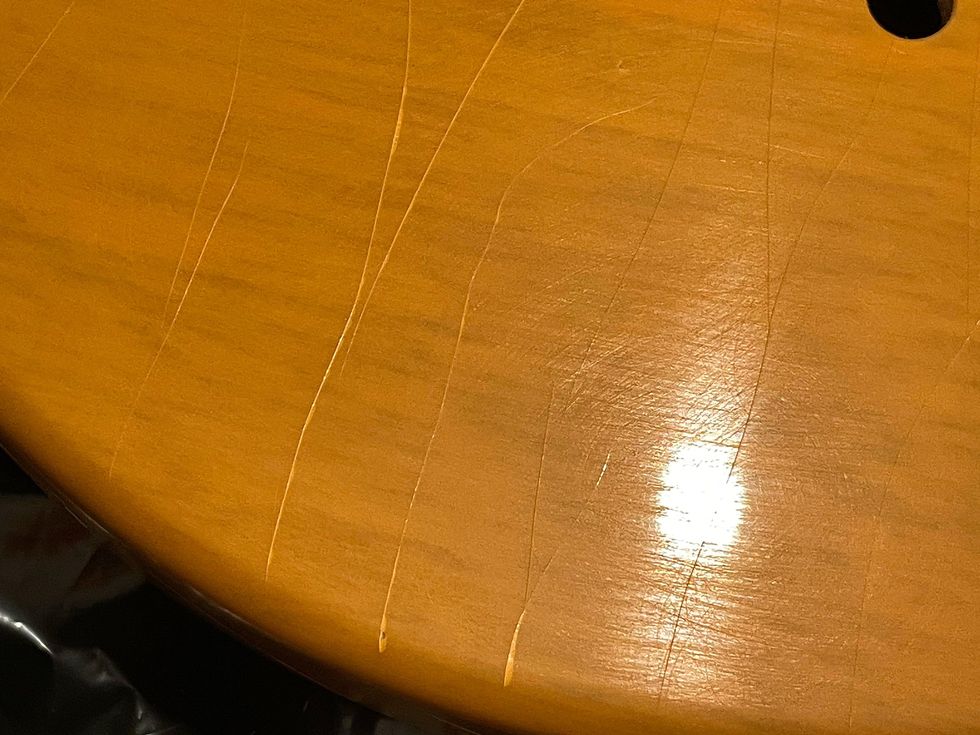
Photo 3
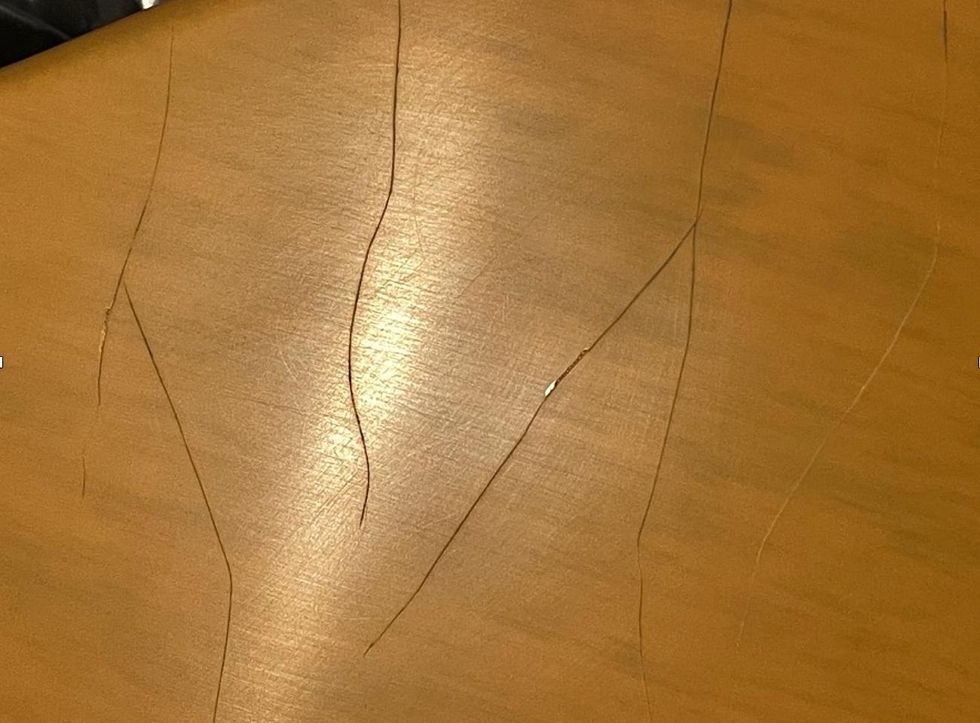
Photo 4
There are no rules set in stone because it depends on the things mentioned above. So, you have to try and see what works on your guitar. If you think the lacquer is hot enough, take away the heat gun and immediately spray the heated area with the cooling spray to create a sudden temperature gradient. You’ll likely have to repeat the process several times until the lacquer starts to crack, and usually you can hear when it cracks, which is a good sign. Work your way all over the guitar and crack it area by area. I needed approximately 90 minutes and four bottles of cooling spray until I was finished (Photo 3).
Does it look the same as cracked nitro lacquer? No, it’s not the same cracking pattern because of two reasons. On a nitro-lacquered guitar, the cracking happens because the softener disappears over time, which is a completely different thing. Poly is hard as glass and will never lose its softener. So, the vintage guitars of the future, let’s say in 100 years from now, will look much different compared to today—no more cracks. The second reason is that only in the middle of the spray is the lowest possible temperature not on the edge of the spray. But it’s the same ballpark, so don’t worry.
After you’re done with the entire guitar, let it cool down for some time before we start to make the cracks more visible. Again, there are different ways to do this. I prefer to use a strong black tea or coffee. Warm up the guitar slightly and dip some paper towels into the black tea or coffee before covering the guitar with them. Let them sit there for some hours before you remove them. The moisture will creep into the cracks, coloring them slightly, so they are more visible. This is a permanent process: The cracks will not lose their color again over time. On poly-lacquered guitars, I’ve also seen and tried alternative methods like using Coca-Cola, potassium permanganate, coffee grounds, stains, and more. The tea/coffee method works great and with good results and is, of course, harmless. But feel free to try other methods if you want to experiment, there’s no law against it.
After removing the paper towels, let it dry for some time before removing any residues from the lacquer using a dampish paper towel. Then, heat up the guitar slightly and let it cool down again. And voila, done! You can see the cracks are now brighter in Photo 4.
Congratulations, we are only one step away from finishing our aging project! Next, we’ll add some dings, dongs, and scratches, which is a lot of fun and a great way to individualize your guitar.
That’s it for now. Next month we’ll do another cool guitar mod, so stay tuned. Until then ... keep on modding!
Teatime: How to Age Wood at Home
Matthias Meyer of Bassart Guitars
Hi PG readers,
Did you ever wonder how it’s possible to add a special gray and dark color to the exposed wood on aged guitars? Here is my recommendation for how to do this with some simple household stuff you already have.
You will need: vinegar essence, water, black tea, steel wool, paper coffee filters, and some jars.
First, twitch a good handful of steel wool and put it in a jar. Next, fill up the jar with vinegar essence, close the jar, and let it sit for one or two days. The reaction of the steel wool and the vinegar will result in iron(II) acetate, which you can use as a dye. Use a cone-shaped paper coffee filter to percolate the liquid into a new jar and you hold the panacea in your hands. By adding some water, you can mitigate the dying effect and it’s easy to make some different aging dyes this way, from very dark to light gray.
Now it’s teatime. Make a strong black tea by using 6 to 8 tea bags in a pot, let it cool down, remove the tea bags, and pour the tea in a new jar.
One way of aging the exposed wood is to use the tea first, immediately followed by the iron(II) acetate (wet on wet technique). For a different effect and color, use the tea first and let it dry before applying the iron(II) acetate. Or use both liquids individually without the other one. It all depends on your personal taste and, of course, the wood itself. Before applying these liquids directly to your precious instruments, you should try to practice the process on some wood scraps you have lying around. Different woods react in very different ways and often the aging process needs one or two days before it becomes visible.
I hope you enjoy experimenting with this process. Cheers!
—Matthias “Matti” Meyer
www.bassartguitars.de
Another day, another pedal! Enter Stompboxtober Day 7 for your chance to win today’s pedal from Effects Bakery!
Effects Bakery MECHA-PAN BAKERY Series MECHA-BAGEL OVERDRIVE
Konnichiwa, guitar lovers! 🎸✨
Are you ready to add some sweetness to your pedalboard? Let’s dive into the adorable world of the Effects Bakery Mecha-Pan Overdrive, part of the super kawaii Mecha-Pan Bakery Series!
🍩 Sweet Treats for Your Ears! 🍩
The Mecha-Pan Overdrive is like a delicious bagel for your guitar tone, but it’s been upgraded to a new level of cuteness and functionality!
Effects Bakery has taken their popular Bagel OverDrive and given it a magical makeover. Imagine your favorite overdrive sound but with more elegance and warmth – it’s like hugging a fluffy cat while playing your guitar!
A twist on the hard-to-find Ibanez MT10 that captures the low-gain responsiveness of the original and adds a dollop of more aggressive sounds too.
Excellent alternative to pricey, hard-to-find, vintage Mostortions. Flexible EQ. Great headroom. Silky low-gain sounds.
None.
$199
Wampler Mofetta
wamplerpedals.com
Wampler’s new Mofetta is a riff on Ibanez’s MT10 Mostortion, a long-ago discontinued pedal that’s now an in-demand cult classic. If you look at online listings for the MT10, you’ll see that asking prices have climbed up to $1k in extreme cases.
It would have been easy for Wampler to simply make a Mostortion clone and call it a day, but they added some unique twists to the Mofetta pedal. While the original Mostortion had a MOSFET-based op amp, it actually used clipping diodes to create its overdrive. The Mofetta is a fairly accurate replica and includes that circuitry, but also has a toggle switch for texture, which lets you choose between the original-style diode-based clipping in the down position and multi-cascaded MOSFET gain stages in the up position.
Luscious Low Gain and Meaty Mid-Gain
The Mofetta’s control panel is very straightforward and conventional with knobs for bass, mids, treble, level, and gain. The original Mostortion was revered for its low-gain tone and is now popular among Nashville session guitarists. Wampler’s tribute captures that edge-of-breakup vibe perfectly. I enjoyed using the pedal with the gain on the lower side, around 9 o’clock, where I heard and felt slight compression that gave single notes a smooth and silky feel. I particularly enjoyed the tone-thickening the Mofetta lent to my Ernie Ball Music Man Axis Sport’s split-coil sound as I played pop melodies and rootsy, triadic rhythm guitar figures. The Mofetta has expansive headroom, and as a result there’s a lot of space in which you can find really bold, cutting tones without muddying the waters too much. Even turning the gain all the way off yields a pleasing volume bump that would work well in a clean boost setting.
There’s a lot of space in which you can find really bold, cutting tones without muddying the waters too much.
Switching the texture switch up engages the MOSFET section, introducing cascading gain stages that elevate the heat and add flavor the original Mostortion didn’t really offer. Classic rock and early metal are readily available via the MOSFET setting. If you need to stretch out to modern metal sounds, the Mofetta probably isn’t the pedal for you. Again, the original Mostortion was, first and foremost, a low-to-mid-gain affair, so unless you’re using it as a boost with a high-gain amp, the Mofetta is not really a vehicle for extreme sounds.
One of the Mofetta’s real treats is its responsiveness. Even at higher gain settings the Mofetta is very touch sensitive. You can tap into a wide range of dynamic shading just by varying the strength of your pick attack. I enjoyed playing fast, ascending scalar passages, picking with a medium attack then really slamming it hard when I hit a high climactic note, to get the guitar to really scream.
The Verdict
Wampler is a reliably great builder who creates pedals with a purpose. I own two of his pedals, the Dual Fusion and the Pinnacle, and both are really exceptional units. The Mofetta captures the essence of the Mostortion and makes it available at an accessible price. But even if you’ve never heard or played an original Mostortion, you’ll appreciate the truly versatile EQ, touch sensitivity, and the bonus texture switch, which expands the Mofetta’s range into more aggressive spaces. The wealth of dirt boxes on the market today can make a player jaded. But Wampler pushed into a relatively unique, satisfying, and interesting place with the Mofetta.
Although inspired by the classic Fuzz Face, this stomp brings more to the hair-growth game with wide-ranging bias and low-cut controls.
One-ups the Fuzz Face in tonal versatility and pure, sustained filth, with the ability to preserve most of the natural sonic thumbprint of your guitar or take your tone to lower, delightfully nasty places.
Pushing the bias hard can create compromising note decay. Difficult to control at extreme settings.
$144
Catalinbread StarCrash
catalinbread.com
Filthy, saturated fuzz is a glorious thing, whether it’s the writ-large solos of Big Brother and the Holding Company’s live “Ball and Chain,” the soaring feedback and pure crush of Jimi Hendrix’s “Foxy Lady,” or the sandblasted rhythm textures of Queens of the Stone Age’s “Paper Machete.” It’s also a Wayback Machine. Step on a fuzz pedal and your tone is transported to the ’60s or early ’70s, which, when it comes to classic guitar sounds, is not a bad place to be.
Catalinbread’s StarCrash is from their new ’70s collection, so the company is laying its Six Million Dollar Man trading cards on the table—upping the ante on traditional fuzz with more controls and, according to the company’s website, a little more volume than the average fuzz pedal, while still staying in the traditional Fuzz Face lane.
The Howler’s Viscera
Arbiter Electronics made the first Fuzz Face in 1966. The StarCrash is inspired by that 2-transistor pedal, but benefits from evolution, as did almost all fuzz pedals in the ’70s, when the standard shifted from germanium to silicon circuitry to improve the consistency of the effect’s performance. The downside is that germanium is gnarlier to some ears, and silicon transistors don’t respond as well to adjustments made via a guitar’s volume control.
While Fuzz Faces have only two knobs, volume and fuzz, the silicon StarCrash has three: volume, bias, and low-cut. Catalinbread’s website explains: “We got rid of that goofy fuzz knob. We know that 95 percent of all players run it dimed, and the remaining 5 percent use their guitar’s volume knob to rein it in.”
I suspect there are plenty of players who, like me, do adjust the fuzz control on their pedals, but the most important thing is that the core fuzz sound here is excellent—bristly and snarling, with a far girthier tone than my reissue Fuzz Face. It’s also, with the bias and low-cut controls, far more flexible. The low-cut control allows you to range from a traditional, comparatively thinner Fuzz Face sound (past noon and further) to the StarCrash’s authentic, beefier voice (noon and lower). Essentially, it cuts bass frequencies from 40 Hz to 500 Hz, resulting in an aural menu that runs from lush and lowdown to buzzy and slicing. And the bias control is a direct route to the spitty, fragmented, so-called Velcro-sound that’s become a staple of the stoner-rock/Jack White school of tone. The company calls this dial a “dying battery simulator,” and it starves the second transistor to achieve that effect.
Sweet Song of the Tribbles
Playing with the StarCrash is a lot of fun. I ran it through a pair of Carr amps in stereo, adding some delay and reverb to mood, and used a variety of single-coil- and humbucker-outfitted guitars. While both pickup types interacted well with the pedal, the humbuckers were most pleasing to my ears with the bias cranked to about 2 o’clock or higher, since the ’buckers higher output allowed me to let notes sustain longer before sputtering out. Keeping the low-cut filter at 9 o’clock or lower also helped sustain and depth in the Velcro-fuzz zone, while letting more of the instruments’ natural voices come through, of course.
With the low-cut filter turned up full and the bias at 10 o’clock, I got the StarCrash to be the perfect doppelganger of my Hendrix reissue Fuzz Face. But that’s such a small part of the pedal’s overall tone profile. It was more fun to roll off just a bit of bass and set the bias knob to about 2 or 3 o’clock. Around these settings, the sound is huge and grinding, and yet barre chords hold their character while playing rhythm, and single-note runs, especially on the low strings, are a filthy delight, with just the right schmear of buttery sustain plus a hint of decay lurking behind every note. It’s such a ripe tone—the sonic equivalent of a delicious, stinky cheese—that I could hang with it all day.
Regarding Catalinbread’s claims about the volume control? Yes, it gets very loud without losing the essence of the notes or chords you’re playing, or the character of the fuzz, which is a distinct advantage when you’re in a band and need to stand out. And it’s a tad louder than my Fuzz Face but doesn’t really bark up to the level of most Tone Bender or Buzzaround clones I’ve heard. In my experience, these germanium-chipped critters of similar vintage can practically slam you through the wall when their volume levels are cranked.
The Verdict
Catalinbread’s StarCrash—with its sturdy enclosure, smooth on/off switch and easy-to-manipulate dials—can compete with any Fuzz Face variant in both price and performance, scoring high points on the latter count. The bias and low-cut dials provide access to a wider-than-usual variety of fuzz tones, and are especially delightful for long, playful solos dappled with gristle, flutter, and sustain. Kudos to Catalinbread for making this pedal not just a reflection of the past, but an improvement on it.
Catalinbread Starcrash 70 Fuzz Pedal - Starcrash 70 Collection
StarCrash 70 Fuzz PedalIntrepid knob-tweakers can blend between ring mod and frequency shifting and shoot for the stars.
Unique, bold, and daring sounds great for guitarists and producers. For how complex it is, it’s easy to find your way around.
Players who don’t have the time to invest might find the scope of this pedal intimidating.
$349
Red Panda Radius
redpandalab.com
The release of a newRed Panda pedal is something to be celebrated. Each of the company’s devices lets us crack into our signal chains and tweak its inner properties in unique, forward-thinking ways, encouraging us to be daring, create something new, and think about sound differently. In essence, they take us to the sonic frontier, where the most intrepid among us seek thrills.
Last January, I got my first glimpse of the Radius at NAMM and knew that Red Panda mastermind Curt Malouin had, once again, concocted something fresh. The pedal offers ring modulation and frequency shifting with pitch tracking and an LFO, and I heard classic ring-mod tones as the jumping off point for oodles of bold sounds generated by envelope and waveform-controlled modulation and interaction. I had to get my hands on one.
Enjoy the Process
I’ve heard some musicians talk about how the functionality of Red Panda’s pedals are deep to a point that they can be hard to follow. If that’s the case, it’s by design, simply because each Red Panda device opens access to an untrodden path. As such, it can feel heady to get into the details of the Radius, which blends between ring modulation and frequency shifting, offering control of the balance and shift ratios of the upper and lower sidebands to create effects including phasing, tremolo, and far less-natural sounds.
As complex as that all might seem, Red Panda’s pedals always make it easy to strip the controls down to their most essential form. The firmest ground for a guitarist to stand with the Radius is a simple ring-mod sound. To get that, I selected the ring mod function, turned off the modulation section by zeroing the rate and amount knobs, kept the shift switch off and the range switch on its lowest setting. With the mix at noon and the frequency knob cranked, I found my sound.
From there, by lowering the frequency range, the Radius will yield percussive tremolo tones, and the track knob helped me dial that in before opening up a host of phaser sounds below noon. By going the other direction and kicking the rate switch into its higher setting, a world of ring-mod tweaking opens up. There are some uniquely warped effects in these higher settings that include dial-up modem sounds and lo-fi dial tones. Exploring the ring mod/frequency shift knob widens the possibilities further to high-pitched, filtered white noise and glitchy digital artifacts at its extremes.
There are wild, active sounds within each knob movement on the Radius, and the modulation section naturally brings those to life in more ways than a simple knob tweak ever could, delivering four LFO waveforms, a step modulator, two x-mod waveforms, and an envelope follower. It’s within these settings that I found rayguns, sirens, Shepard tones, and futuristic sounds that were even harder to describe.
It’s easy to imagine the Radius at the forefront of sonic experiments, where it would be right at home. But this pedal could easily be a studio device when applied in low doses to give a track something special that pops. The possible applications go way beyond guitars.
The Verdict
The Radius isn’t easy to plug and play, but it’s also not hard to use if you keep an open mind. That’s necessary, too: The Radius is not for guitar players who prefer to stay grounded; this pedal is for sonic-stargazers and producers.
I enjoyed pairing the Radius with various guitar instruments—12-string, baritone, bass—and it kept getting me more and more excited about sonic experimentation. That feeling is a big part of what’s special about this pedal. It’s so open-ended and controllable, continuing to reveal more of its capabilities with use. Once you feel like you’ve gotten something down, there are often more sounds to explore, whether that’s putting a new instrument or pedal next to it or exploring the Radius’ stereo, MIDI, or expression-pedal functionality. Like many great instruments, it only takes a few minutes to get started, but it could keep you exploring for years.