
Photo 1
We're getting close to the end of our journey. We've aged most of the metal parts on our project guitar, so now let's take care of the output jack, knobs, back plate, and pickguard.
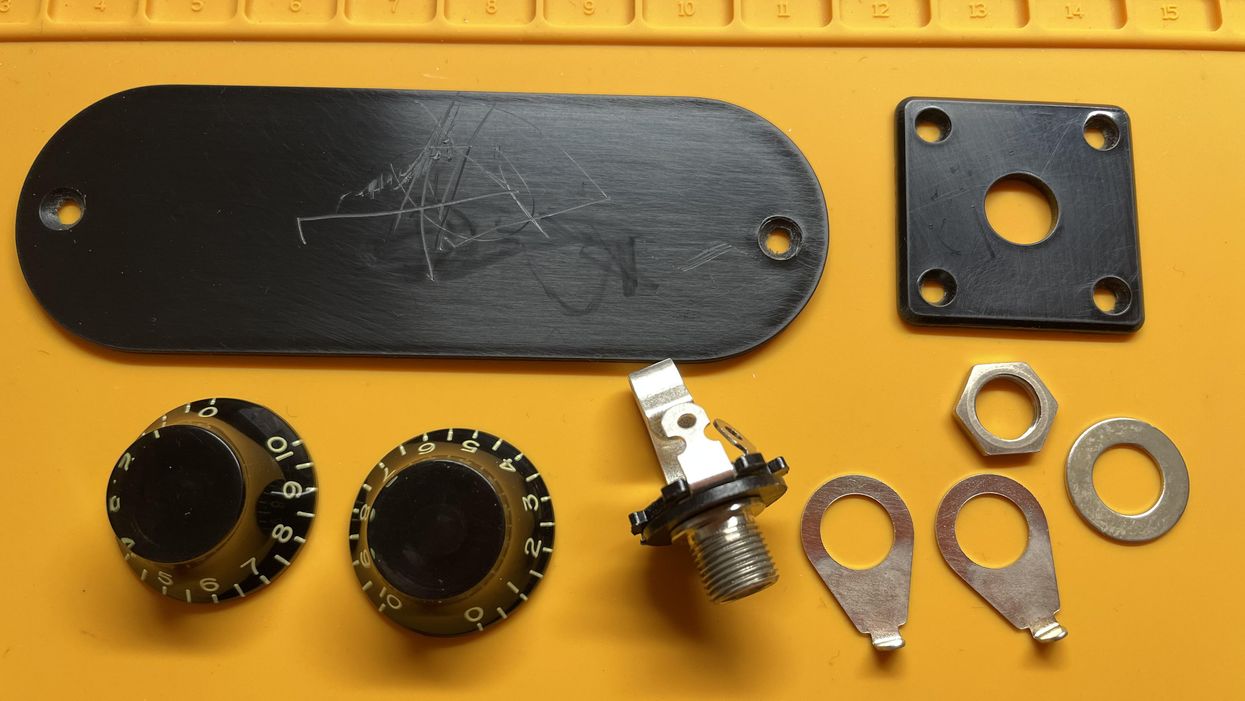
Hello and welcome back to Mod Garage. This month, we'll continue with the aging process of our Harley Benton DC-Junior project guitar (which is a copy of a 1958 Les Paul Junior Double Cut), taking a closer look at the pickguard while aging the rest of the hardware discussed in the last part of this series ["DIY Relic'ing: Harley Benton DC-Junior Electronics"]. If you need a refresher on our aging process for hardware, refer back to "DIY Relic'ing: Break the Shine" for guidance. You can see the parts we'll be discussing today in their "finished" form, aka relic'd, in Photo 1.
1. Output Jack
I'm not a big fan of aging the complete output jack or applying any corrosion to it because it's the transfer point of the signal to the guitar cable. We want this as clean as possible and without any avoidable contact resistance to keep the signal as strong and as fresh as possible. So, aging the parts you can see from the outside is the way to go, meaning the collar, the washer, and the hex nut.
You often see shiny new output jacks on vintage guitars, but why is this? Output jacks don't last forever, and chances are good that a vintage guitar has a replaced output jack that looks new because it is new. If the original output jack is still in a vintage guitar, it's usually dull, often showing some slight rust on the edges of the hex nut. To mimic this appearance, first take off the shine with some steel wool or fine sandpaper as we did before with many other parts. Then use an iron (III) oxide (ferric oxide) liquid to create some patina until you like the result. If you want to mimic some rust on the edges of the hex nut, sand off the nickel until you see the metal underneath—the ferric oxide will do the rest. Just let it sit for soak for a few minutes on these spots.
2. Knobs and Pointers
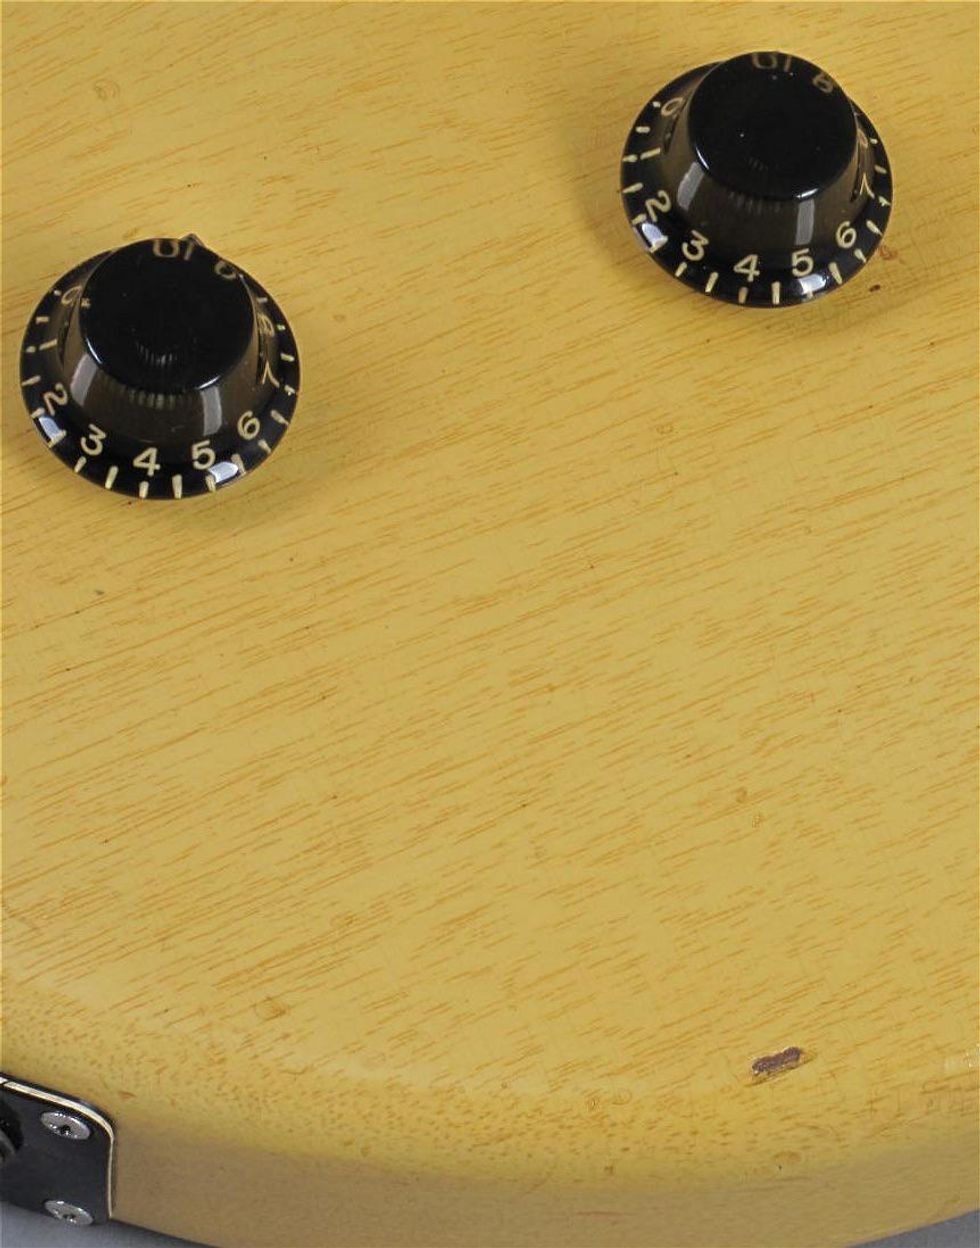
Photo 2
The top-hat knobs on vintage guitars also usually look shiny and new, but for a different reason. Because the knobs are touched and used very often, they get a kind of self-polishing from our fingers through the years, keeping them shiny with a greasy touch. Have a look at the original knobs of a '58 Les Paul Junior, shown in Photo 2, to see what I mean.
To mimic this, you can use a solvent and rub the knobs carefully with a paper towel, the surface will get slightly dull. Afterwards use a polish for plastics (or simply some of your toothpaste) and polish up the knobs a little bit until you like the result. The goal is to find the right mixture between old and new regarding the look. If you like a more beaten-up look, you can add some light scratches and file down some of the edges.
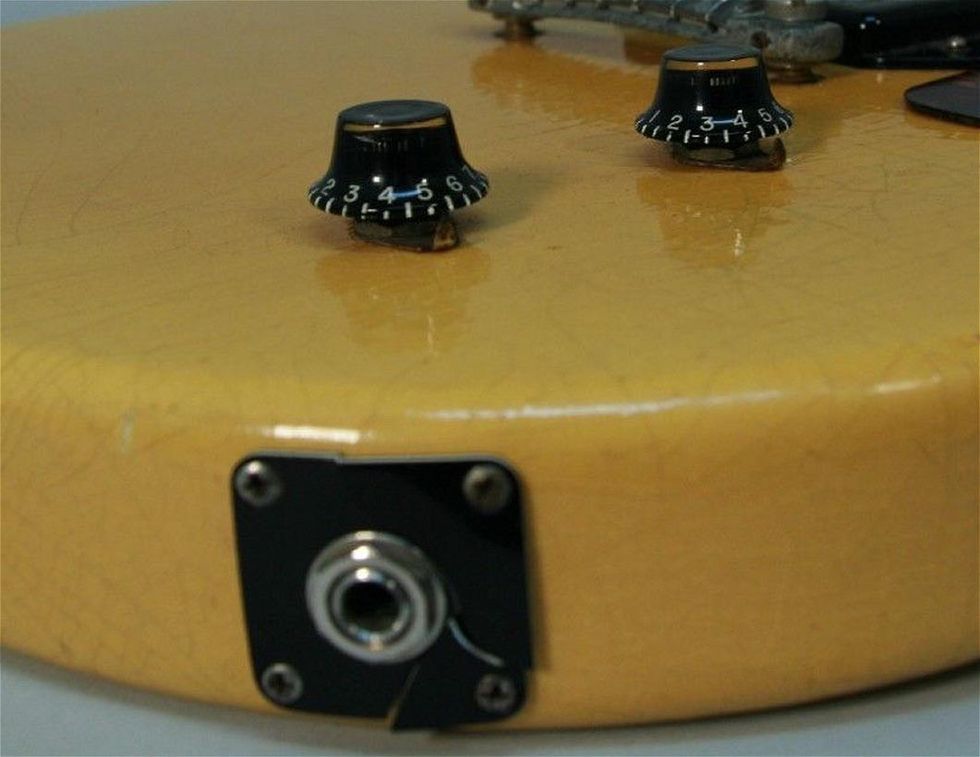
Photo 3
As you can see in Photo 3 of an original Junior from 1958, the pointers usually look dark and rusty. You can use the same process as aging the output jack to give them an old look.
3. Jack Plate and Screws
If you've been following along, you already know how to age screw heads. Nickel works out much better and looks much more authentic compared to chrome, so it's always a good idea to substitute chromed screws like on our Harley Benton with nickel before you proceed.
The jack plate usually shows some dings and scratches from botched attempts to plug in the guitar cable. You can simulate that by scrubbing off the shine with the steel wool, creating some random scratches with sandpaper, and hitting the plastic with the tip of the plug of your guitar cable while the jack plate is lying on a flat and even surface. If you want the jack plate cracked like on the photo of our vintage guitar, as seen in Photo 3, you can sketch out the cracking lines with a fine X-Acto knife on the back of the jack plate. Afterwards, screw it to a flat piece of wood and bolt on the screws very tight until the line cracks. If it doesn't crack, repeat the process and cut deeper with your knife, then install the output jack by fastening the hex nut very tightly.
If you decided to swap the modern 1-ply solid black jack plate for a more authentic 3-ply plate (black/white/black), some more work is required. On vintage guitars, the white sometimes turns to a kind of "nicotine white" or ivory color. To mimic this color, first take off the shine with some steel wool. Now you need something we haven't discussed before: concentrated liquid stain you can mix with alcohol. This is something we'll need again in the future, but as a basis some alcohol like isopropyl or naphtha works great. You also need a stain mixing cup (a small glass) and a spatula or anything else to stir the mixture. To mimic an aged white color, I like to use a stain in amber or vintage amber. Put some alcohol in your glass and add a drop of the stain, stir it, and see what it looks like. If it's too bright, add another drop of the stain and stir again. If it's too dark, add some more alcohol until you like the color.
You can get such stains in almost every luthier supply store. I like to use ColorTone Concentrated Liquid Stain from StewMac. After you finish your mix, take a Q-tip and wipe some of the liquid onto the white layer of your jack plate. Let it dry for a few minutes and watch the result. If it's still too bright, repeat the process. If it's too heavy, use some alcohol to wipe some of it off. You can also use this mix on black plastic parts if you want to mimic some stain spots, with excellent results. Lastly, we use the same mixture of dirt, dust, and ashes that we used for the plastic buttons of the tuners ["DIY Relic'ing Tuners, Part 2"]. I use a mixture of the contents from my vacuum cleaner bag, spiced up with some ashes from my open fireplace. Use your fingers to wipe some dirt onto the white part of the jack plate. Now, how does it look?
I use a mixture of the contents from my vacuum cleaner bag, spiced up with some ashes from my open fireplace.
4. Back Plate and Screws
The back plate of the original '58 Les Paul is a piece of solid black plastic that is held by two screws, and our Harley Benton stays true to this original formula. For the two screws, repeat the process from the jack plate screws. The back plate on vintage guitars usually shows some light scratches, along with some deeper scratches and little chips caused by belt buckles. To mimic this wear, first break the shine with some steel wool, add some random scratches with sandpaper, and use a small chisel or maybe one of your belt buckles to add some deeper scratches and little chips.
By the way, the bottom of the back plate on our Harley Benton is "shielded" with a thick piece of self-adhesive aluminum foil, but it's not connected to ground in any way, so it's pretty useless. If you want to add some shielding, connect it to ground so it can work as it should. There is no shielding inside the cavity of the Harley Benton, same as on the vintage Les Paul. The black color inside the Harley Benton is only black paint but no shielding paint. If you want some shielding in the cavity, go for it, using copper foil or conductive shielding paint.
Congratulations! After you've worked on all these parts, they will look similar to what I did while writing this column for you, as seen in Photo 1.
5. Pickguard
In the last step for today, let's have a look at the pickguard, including the screws. Our Harley Benton comes with a 3-ply (black/white/black) pickguard, so the aging process will be easy: You can simply follow the process from the jack plate. Pickguards usually show scratches from contact with a plectrum, so I recommend using a guitar pick to put some typical scratches on it. Take care of the direction of the pick during this process so it will look authentic afterwards.
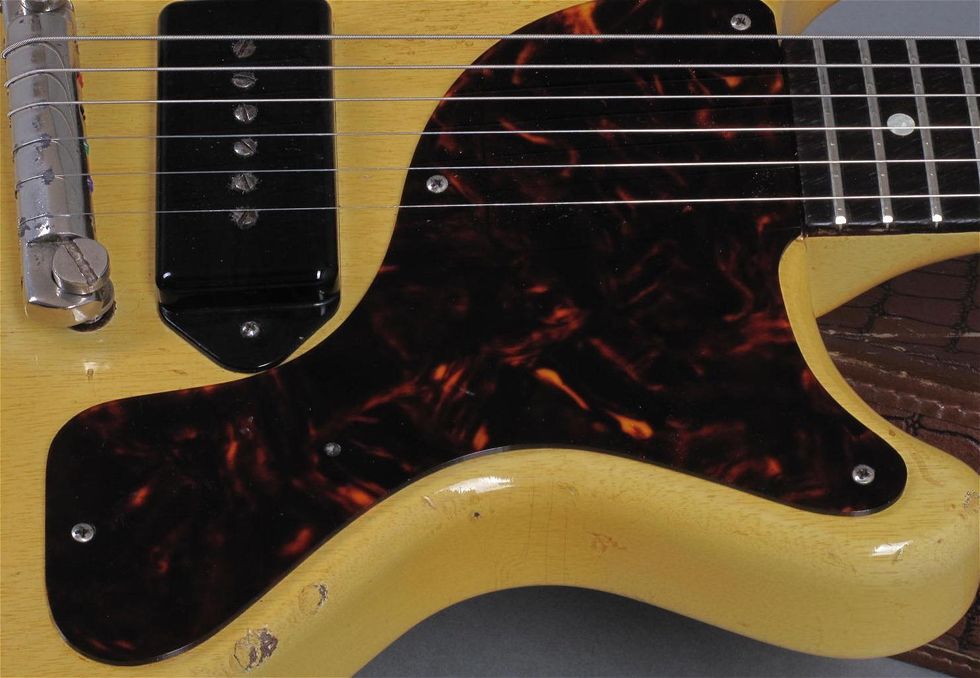
Photo 4
If you're fine with the stock pickguard, you're done for now. The original Les Paul Juniors never had such a pickguard—if they came with a black one, it was always single-ply solid black. Such pickguards are available, and you can swap it if this bothers you. The typical and classic look with a TV yellow Junior guitar was a celluloid tortoise-style pickguard, as seen in Photo 4, which is an original '58 Les Paul Junior.
The old celluloid material was semi-transparent, and the early pickguards had wonderful, rounded edges. The fake tortoiseshell material available today is not transparent in any way, and far from replicating the beauty of the original material. There is a fantastic substitute material called Tortoloid, but it's only available in very thin sheets for acoustic guitars. The only way to come closer to the original would be to use a clear Lucite pickguard and to cover it with a sheet of self-adhesive Tortoloid, or to try to find some of the original celluloid material in the right thickness.
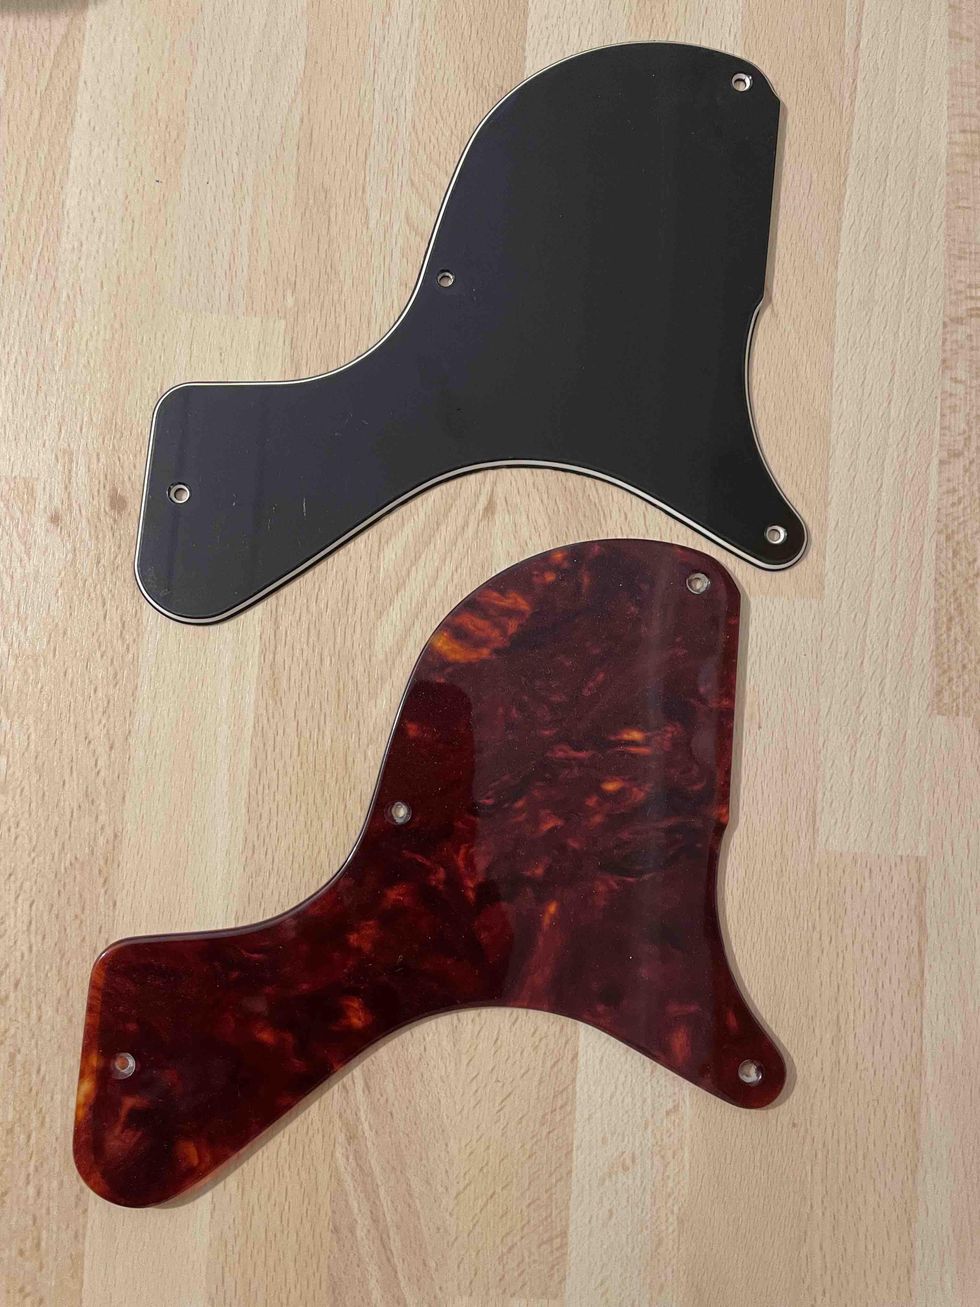
Photo 5
To give this guitar the classic look, and because I love these pickguards very much, I decided to make one for our Harley Benton, using an NOS blank celluloid piece from the '50s, which I got from the Roger Rossmeisl workshop in Berlin. I still have some of these blanks for such projects and working with real celluloid is a pleasure and pain at the same time. Look at this material compared to the stock pickguard in Photo 5.
Photo 6
I think it's a big difference. To get a feel for which you prefer, you can see the different pickguards on the project guitar in Photo 6 and Photo 7.
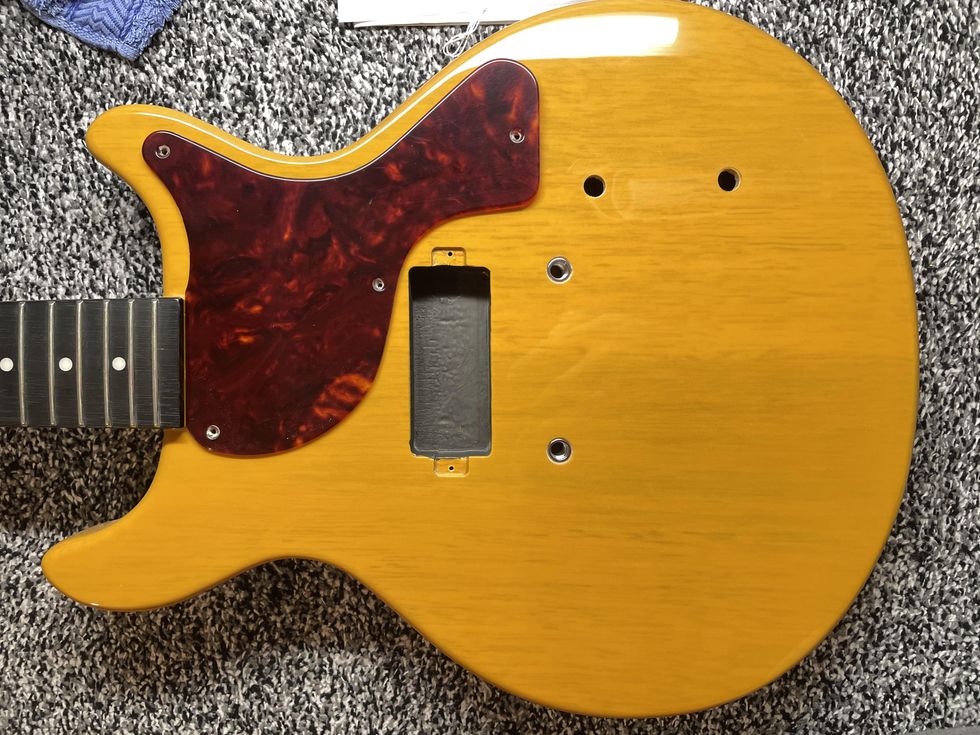
Photo 7
That's it for now. In the next part of this series, we'll work on aging the fretboard and the headstock. But before this, we'll return to guitar mods in the next issue.
Until then ... keep on modding!
- The DIY Relic Job—Fantasy or Reality? - Premier Guitar ›
- DIY: Relic'ing Metal Hardware - Premier Guitar ›
- DIY Relic'ing: Break the Shine - Premier Guitar ›
Grez Guitars has introduced the Grez GrandTour Bass, a short scale semi-hollow carve-top instrument available in 4-string format.
The Grez Grand Tour Bass, designed in collaboration with bass powerhouse Ian MartinAllison is, like all Grez instruments, a modern sleek interpretation of the classic instruments from the 50’s and 60’s.
The instruments feature a carved Spruce top, Honduran Mahogany body and neck. The 30" scale construction includes a Macassar ebony fretboard, 12” radius with 21 jumbofrets. Each bass comes equipped with a Halon bridge, Grez string anchor and LaBellaDeep Talkin’ long scale 45-105 flatwound strings. Electronics include Curtis Novak Bisonic/Darkstar pickups with coil tap.
The Grand Tour bass features a nitro finish and is available in a variety of colors(pictured here in custom Toasted Marshmallow).
Grez Grand Tour Bass with Ian Martin Allison
Barry Grzebik explains: “I love process of design instruments, marrying acoustical,electrical, visual and ergonomic engineering with industrial and artistic design. In this case creating something that artfully balances the desire for a robust acoustic voice with the need to hold up to professional touring and stadium stage volumes. One small notable detail is that although this is a short scale instrument, because of the after-length of string past the bridge, it uses standard long scale strings which dramatically increases sting options and availability.”
Ian Marin Allison shares, “I’m inspired by the unique character of vintage hollow andsemi-hollow basses, but they don’t always live up to our modern expectation of stability, playability, versatility and QUALITY. I’m proud to have helped create something that does”.
The Grez Grand Tour Bass, is available now from Grez Guitars and their dealers with astreet price starting at $5,999. Light customization is welcome with delivery times aslittle as 8 weeks.
$149
Marshall 1959 Super Lead
The very definition of classic, vintage Marshall sound in a highly affordable package.
There’s only one relevant question about Marshall’s new 1959 Super Lead overdrive/distortion pedal: Does it sound like an actual vintage Super Lead head? The answer is, simply and surprisingly, yes. The significant difference I heard within the voice of this stomp, which I ran through a Carr Vincent and a StewMac Valve Factory 18 kit amp for contrast, is that it’s a lot quieter than my 1972 Super Lead.
The Super Lead, which bore Marshall’s 1959 model number, debuted in 1965 and was the amp that defined the plexi sound. That sound is here in spades, clubs, diamonds, and hearts. Like the Super Lead, the pedal is easy to use. The original’s 3-band EQ is replaced by a single, rangeful tone control. The normal dial and the volume, which together mimic the character created by jumping the first and second channels of a plexi head, offer smooth, rich, buttery op-amp driven gain and loudness. And the high-treble dial functions much like the presence control on the original amp.
The pedal is sturdy and handsome, too. A heavy-duty metal enclosure evokes the classic black-with-gold-plate plexi look and a vintage-grille-cloth motif. Switches and knobs (the latter with rubber sides for slip-free turning) are ultra solid, and—refreshingly—there’s a 9V battery option in addition to a barrel-pin connection. Whether with single-coils or humbuckers, getting beefy, sustained, historic tones took moments. I especially delighted in approximating my favorite Super Lead head setting by flooring the high treble, normal, and tone dials, and turning back the tone pots on my Flying V, evoking Disraeli Gears-era Clapton tone. That alone, to me, makes the 1959 Super Lead stomp a bargain at $149.The Miku was introduced about 10 years ago and is based on the vocal stylings of Hatsune Miku, a virtual pop icon. But it does much more than artificial vowels and high-pitched words.
It’s tempting to think of this pedal as a joke. Don’t.
It all started a few years ago through a trade with a friend. I just wanted to help him out—he really wanted to get a fuzz pedal but didn’t have enough cash, so he offered up the Korg Miku. I had no idea then, but it turned out to be the best trade I’ve ever made.
Here’s the truth: the Korg Miku is not your typical guitar pedal. It won’t boost your mids, sculpt your gain, or serve up that warm, buttery overdrive you’ve always worshipped. Nope. This little box does something entirely different: It sings! Yes, sings in a Japanese kawaii accent that’s based on the signature voice of virtual pop icon Hatsune Miku.
At first glance, it’s tempting to dismiss this pedal as just a gimmick—a joke, a collector’s oddity, the kind of thing you buy for fun and then forget next to your Hello Kitty Strat. But here’s the twist: Some take it seriously and I’m one of those people.
I play in a punk band called Cakrux, and lately I’ve been working with a member of a Japanese idol-style girl group—yeah, it’s exactly the kind of wild mashup you’d ever imagine. Somewhere in the middle of that chaos, the Miku found its way into my setup, and weirdly enough, it stuck. It’s quirky, beautiful, occasionally maddening, and somehow … just right. After plenty of time spent in rehearsals, studio takes, and more sonic experiments than I care to admit, I’ve come to appreciate this pedal in unexpected ways. So here are a few things you probably didn’t know about this delightfully strange little box.
It’s Not Organic—and That’s OK
Most guitar pedals are chasing something real. Wah pedals mimic the human voice—or even a trumpet. Tube Screamers? They’re built to recreate the warm push of an overdriven tube amp. Cab sims aim to replicate the tone of real-world speaker setups. But the Miku? It breaks the mold. Instead of emulating reality, it channels the voice of a fictional pop icon. Hatsune Miku isn’t a person—she’s a vocaloid, a fully digital creation made of samples and synthesis. The Miku doesn’t try to sound organic, it tries to sound like her. In that sense, it might be the only pedal trying to reproduce something that never existed in the physical world. And honestly, there’s something oddly poetic about that.
A World-Class Buffer
Here’s a fun fact: I once saw a big-name Indonesian session guitarist—you know, the kind who plays in sold-out arenas—with a Miku pedal on his board. I was like, “No way this guy’s busting out vocaloid lines mid-solo.” Plot twist: He only uses it for the buffer. Yep, the man swears by it and says it’s the best-sounding buffer he’s ever plugged into. I laughed … until I tried it. And honestly? He’s not wrong. Even if you never hear Miku sing a note, this pedal still deserves a spot on your board. Just for the tone mojo alone. Wild, right?
“The Miku is one of those pedals that really shouldn’t work for your music, but somehow, it just does.”
Impossible to Tame
Most pedals are built to make your life easier. The Miku? Not so much. This thing demands patience—and maybe a little spiritual surrender. First off, the tracking can be finicky, especially if you’re using low-output pickups. Latency becomes really noticeable and your picking dynamics suddenly matter a lot more. Then there’s the golden rule I learned the hard way. Never—ever—put anything before the Miku. No fuzz, no wah, no compressor, not even a buffer! It gets confused instantly and says “What is going on here?” And don’t even think about punching in while recording. The vocal results are so unpredictable, you’ll never get the same sound twice. Mess up halfway? You’re starting from scratch. Same setup, same take, same chaotic energy. It’s like trying to recreate a fever dream. Good luck with that.
Full Range = Full Power
Sure, it’s made for guitar, but the Miku really comes to life when you run it through a keyboard amp, bass cab, or even a full-range speaker. Why? Because her voice covers way more frequency range than a regular guitar speaker can handle. Plug it into a PA system or a bass rig, and everything sounds clearer, richer, way more expressive. It’s like letting Hatsune Miku out of her cage.
The Miku is one of those pedals that really shouldn't work for your music, but somehow, it just does. Is it the best pedal out there? Nah. Is it practical? Not by a long shot. But every time I plug it in, I can’t help but smile. It’s unpredictable, a little wild, and it feels like you’re jamming in the middle of a bizarre Isekai anime scene. And honestly, that’s what makes it fun.
This thing used to go for less than $100. Now? It’s fetching many times that. Is it worth the price? That’s up to you. But for me, the Korg Miku isn’t just another pedal—it’s a strange, delightful journey I’m glad I didn’t skip. No regrets here.
Two guitars, two amps, and two people is all it takes to bring the noise.
The day before they played the coveted Blue Room at Third Man Records in Nashville, the Washington, D.C.-based garage-punk duo Teen Mortgage released their debut record, Devil Ultrasonic Dream. Not a bad couple of days for a young band.
PG’s Chris Kies caught up with guitarist and vocalist James Guile at the Blue Room to find out how he builds the band’s bombastic guitar attack.
Brought to you by D’Addario.
Devilish Dunable
Guile has been known to use Telecasters and Gretsches in the past, but this time out he’s sticking with this Dunable Cyclops DE, courtesy of Gwarsenio Hall—aka Jordan Olds of metal-themed comedy talk show Two Minutes to Late Night. Guile digs the Dunable’s lightness on his shoulders, and its balance of high and low frequencies.
Storm Warning
What does Guile like about this Squier Cyclone? Simple: its color. This one is also nice and easy on the back, and Guile picked it up from Atomic Music in Beltsville, Maryland.
Crushing It
Guile also scooped this Music Man 410-HD from Atomic, which he got just for this tour for a pretty sweet deal. It runs alongside an Orange Crush Bass 100 to rumble out the low end.
James Guile’s Pedalboard
The Electro-Harmonix Micro POG and Hiwatt Filter Fuzz MkII run to the Orange, while everything else—a DigiTech Whammy, Pro Co Lil’ RAT, and Death by Audio Echo Dream 2—runs to the Music Man. A TC Helicon Mic Mechanic is on board for vocal assistance, and a TC Electronic PolyTune 3, Morley ABY, and Voodoo Labs Pedal Power 3 Plus keep the ship afloat.