
Passive single-coil pickup systems have an inherent sonic idiosyncrasy: When you turn down the volume—even just a bit—the high-end loss is not proportionate to the volume reduction. In other words, a small cut in volume creates a far greater drop in your guitar's treble response. This is true of the Stratocaster and Telecaster, as well as many other popular models, so I'm sure you're familiar with it.
This quirk of passive electronics isn't really a big deal for all players. Many aren't bothered by it because they've simply gotten used to the sound over the years. Others really like this "problem," since it lets you coax a second tonal color from the same pickup—simply roll back the volume a tad to fatten up the tone. But a lot of guitarists (myself included) prefer to maintain an identical amount of treble at any volume setting.
Using active electronics is the only real solution to combating the "volume-versus-tone" issue—all other strategies are just a compromise. That said, compromise can lead to significant improvements. Personally, I use a compromising solution in all of my own guitars. And my favorite solution is one of the easiest mods ever: add a "treble-bleed network" between the input and output of the volume pot(s) of the guitar. This works with passive single-coils and humbuckers, but if your guitar has more than one volume control, like on a Les Paul, each volume pot needs its own treble-bleed network.
Some Background.
So, what is a treble-bleed network and how does it work? In layman's terms, it's usually a combination of a small capacitor and a resistor in parallel. Techies call this a RC network, but such systems are also called a "treble bypass filter" or TBA, for treble-bypass arrangement. You can also find variations that use only a cap, or a resistor in series with the cap.
The theory behind this little rascal appears straightforward, but it's much more complicated than it seems. So as not to slam you with theory, I'll stick to the basics, which means having to over-simplify the following explanation.
First, the good news: It's possible to calculate the values for a treble-bleed network that will work superbly in a given guitar. The bad news? The formula behind it is complex and beyond the scope of this column. There are many parameters involved in this formula, such as the number, ratio, and resistance of the pots in your guitar, the pickups, the length and capacitance of your guitar cable, the input impedance of your amp, and more. All of these must be calculated in the context of a Fletcher-Munson curve, which defines equal-loudness contours for the human ear. Doable, but really complicated!
Typically, you have to make several simulations and analyze the corresponding curve to see if it matches your goal. Such calculated networks will work wonderfully in the guitar you calculated them for, but when you change one of the parameters—like the length or type of your guitar cable, or you plug into a different amp—the treble-bleed network will stop working perfectly. That's an unavoidable fact. Because of all the parameters involved, it's easy to see why standard "one-size-fits-all" networks are an illusion.
So you can experiment to determine what you like best, based on your own gear and sonic goals, I'll describe the different types and possible value ranges of the components. Because the range of these components is very limited, at minimum you'll achieve good results. But if you want great results, it's important to realize you'll have to experiment with each individual guitar, and this includes a lot of component swapping.
When you roll down the volume, the treble-bleed network starts to filter out some bass frequencies, making the highs more prominent.
The Details.
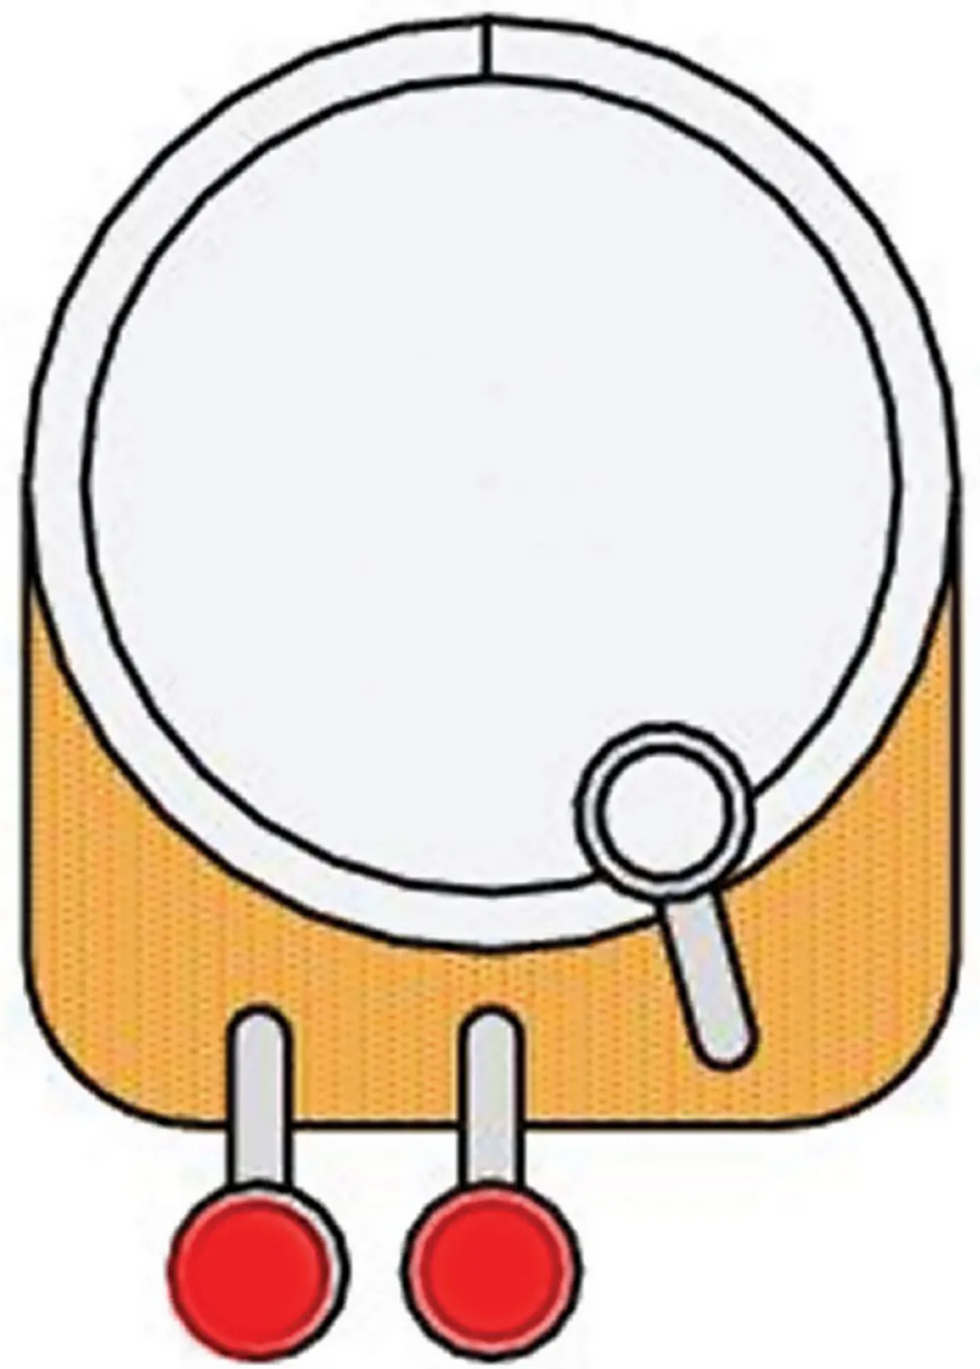
When you roll down the volume, the treble-bleed network starts to filter out some bass frequencies, making the highs more prominent. It won't boost anything (treble, in this case) because a passive device can only filter out certain frequencies. The networks are always connected between the input and output of the volume control, as shown in Fig. 1.
There are basically three different types of treble-bleed networks (Fig. 2), and we'll examine each of them. On the left is "cap only," which isn't a true network because it's a capacitor without a resistor. Fender made this version popular in the '60s when they started installing a 1000 pF cap on Telecaster volume controls. Together with the 1M pots they used at this time, the sonic result was kind of creepy ... thin and bright.
This value is still popular today in many one-size-fits-all solutions. This circuit has one problem: As the volume is turned lower, more of the higher frequencies will predominate—even to the point where the guitar starts to sound very "tinny" as the volume approaches zero. Depending on what you're after sonically, this can be a good thing or not. If you want to experiment with this cap-only configuration, good working values are from 220 pF up to 1500 pF.
Our second type of treble-bleed network is shown in the center of Fig. 2. This consists of a cap with a resistor in parallel. This is the version you'll find in most treble-bleed networks. A very popular combination is a 1000 pF cap with a 150k-ohm resistor in parallel. This works for almost any guitar, when it comes to a one-size-fits-all solution.
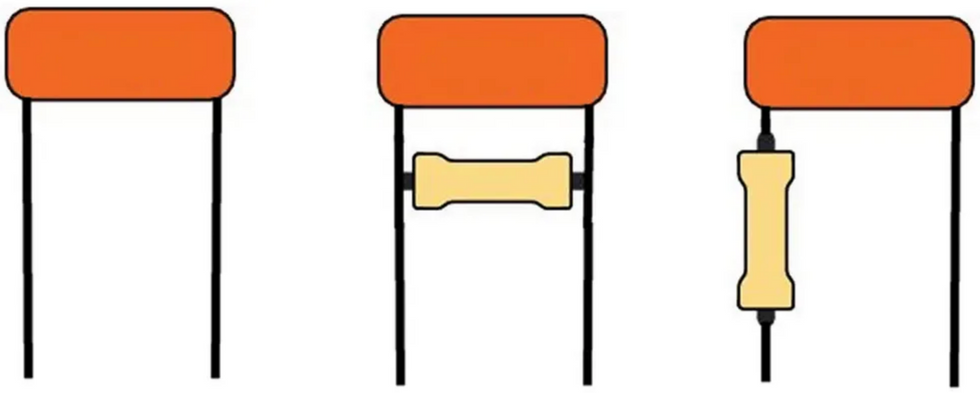
Fig. 2
The cap-with-resistor-in-parallel version can be superior to the cap-only method because, as you turn the volume lower, the higher frequencies don't dominate. The problem with this circuit is that it affects the taper of the volume pot in a negative way when the two values are not carefully matched to each other. Good working values to try are from 220 pF up to 1500 pF for the cap, and 100k-ohm up to 330k-ohm for the resistor.
Our third treble-bleed network, shown on the right, consists of a cap with a resistor in series. This configuration became popular in the '90s when Australian luthier Chris Kinman started to use a 1200 pF cap and a 130k-ohm resistor in series for his guitars. This scheme is regarded by many to be the best of the three versions, because it seems to solve the problem of the volume pot taper and the tinny sound. Even Fender uses it now. Their system employs a 1000 pF cap and a 130k-ohm resistor, and is dubbed the Fender Tone Saver. Values you should try are 470 pF up to 1500 pF for the cap, and 100k-ohm up to 330k-ohm for the resistor.
Regarding the two components, here's a rule of thumb: Brightness is determined by the resistor's value (less ohms yields more highs), but the frequencies that are present are determined by the cap's value—the lower the value, the higher the frequencies, and conversely, the higher the value, the lower the frequencies.
Into the sound lab. To conduct your own treble-bleed network experiments, solder two wires to the input and output of the volume pot and connect alligator clips on the other ends. If you let the two wires hang out from under the pickguard for fast access, you can easily try every combination of cap and resistor. (Be sure to take notes.)
After you find your favorite combination, remove the two wires and permanently install it to the volume pot. Remember, what you choose may be very different from another player. Some like more high end (this is often due to a dark-sounding amp), while others prefer more midrange to get a punchy sound. It's worth taking the time to try several combinations. This simple circuit can turn a muddy-sounding guitar into an articulate one—even with tons of distortion—because the tone will clean up when you roll back the volume.
I can't advise you what to use—you need to explore this yourself or let an experienced tech calculate your personal treble-bleed network, based on your specific rig. Many guitarists like the cap-only version for Strats and Teles, while others prefer a cap and a resistor in parallel. The resistor-in-parallel and resistor-in-series schemes perform more-or-less equally, but the parallel version offers more highs when you turn down the volume. Again, this can be positive or negative, depending on your pickups and amp.
Okay, that's it for now. Until next time ... keep on modding!
[Updated 9/10/21]