Chops: Beginner
Theory: Beginner
Lesson Overview:
• Develop a more relaxed and accurate picking hand.
• Learn the basic elements of a bluegrass rhythm pattern.
• Understand how to work with and without a bass player.
Click here to download a printable PDF of this lesson's notation.
In my last lesson, “10 Commandments of Bluegrass Guitar”, I stressed the importance of strong rhythm in a string-band setting. Let’s get you started by breaking down a basic bluegrass rhythm pattern. We’ll be working with the open G chord most commonly used in bluegrass, which I consider a power chord of sorts due to the absence of the third (B). So the chord looks like this:
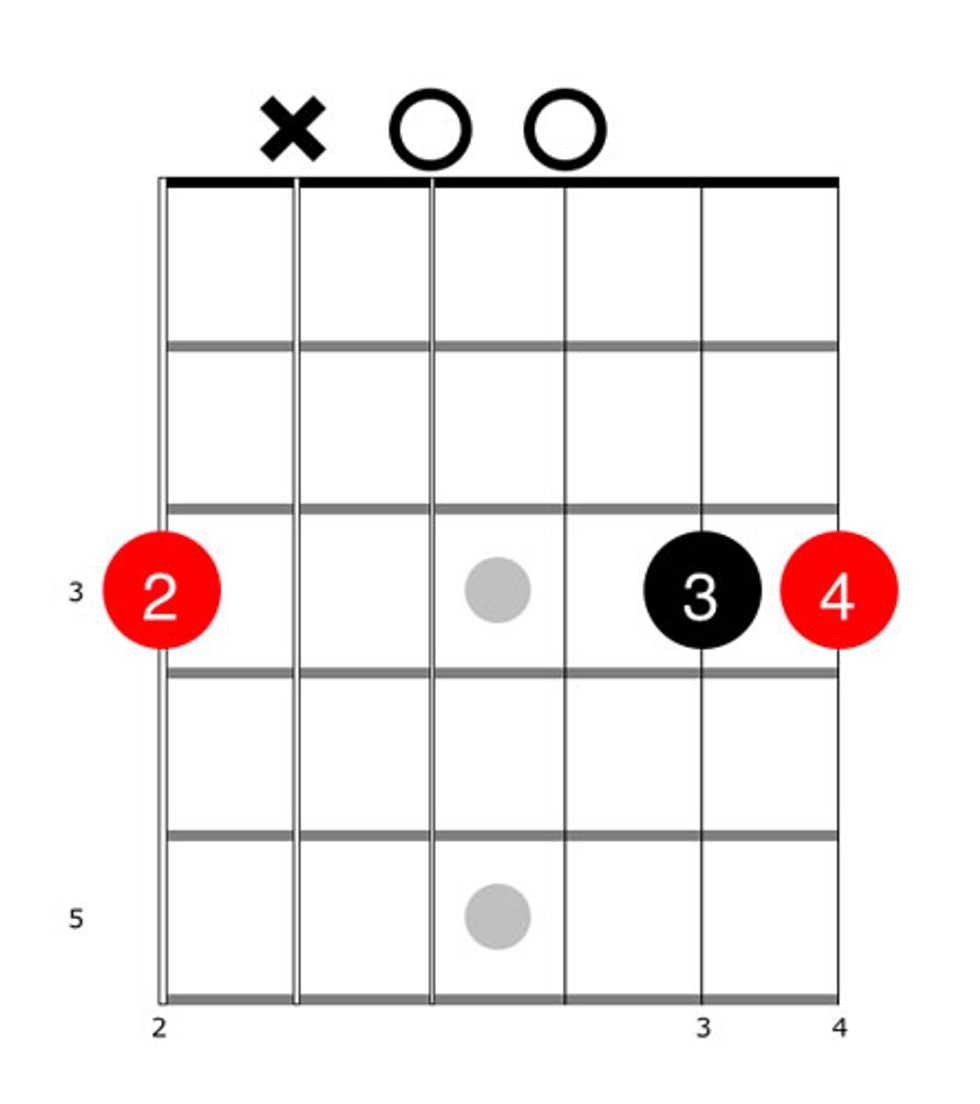
Notice how you mute the 5th string with your second finger (which is fretting the 6th string at the 3rd fret) by angling your finger slightly so it touches the 5th string just enough to keep it from sounding. Take a look at Photo 1 to see how your hand should be placed. This also frees up your first finger, which can be used to play ornamental notes and G runs, but we’ll get in to that a bit later. For now, let’s get going on the basic rhythmic pattern.
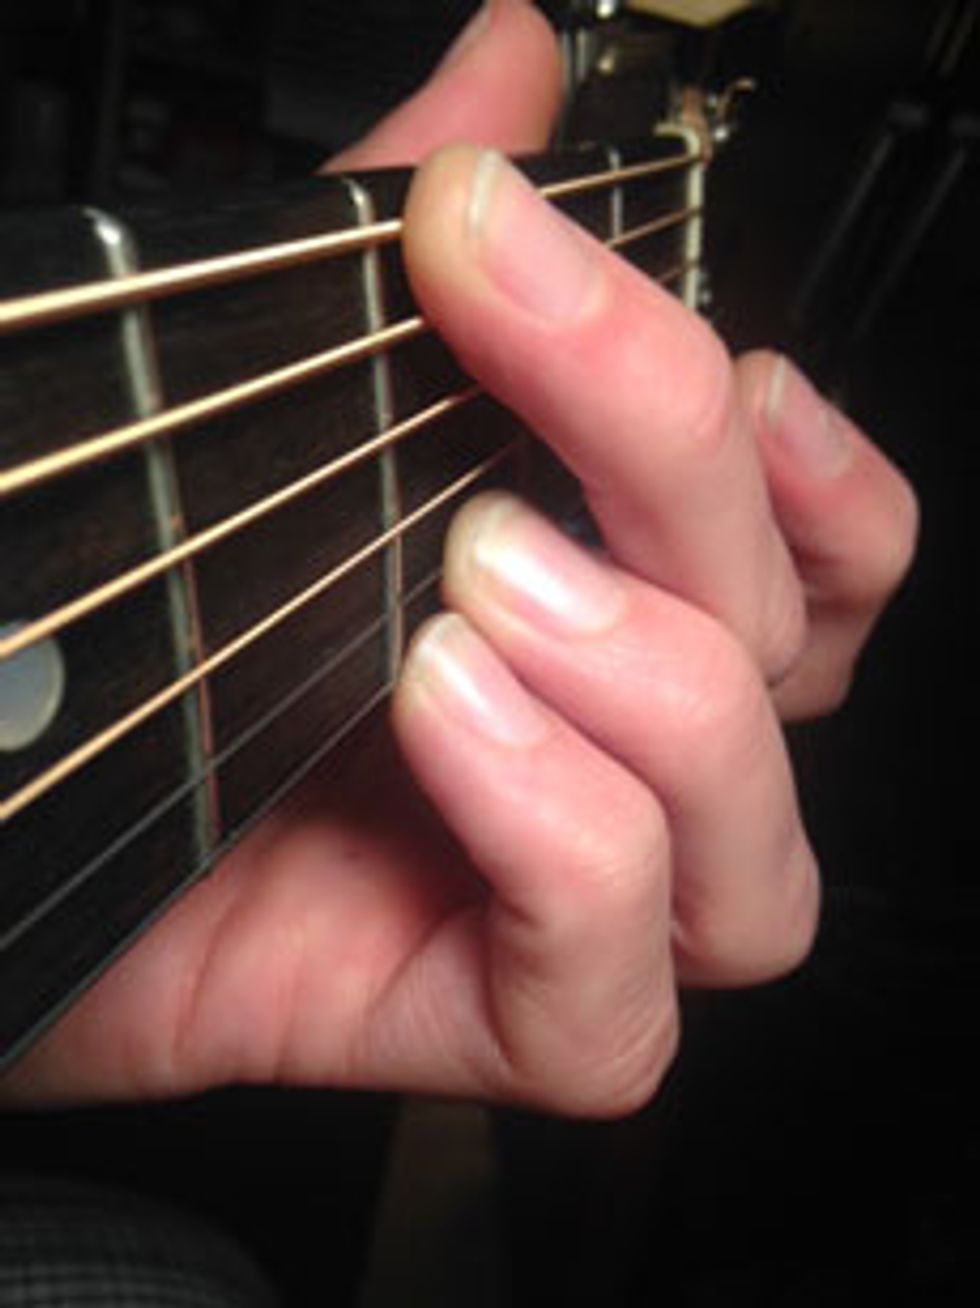
Photo 1
I like to explain the basic bluegrass rhythm I use in four stages. Practice each stage with a metronome until you get it perfect, then move to the next stage. If you feel like the rhythm isn’t sounding right as you move through the stages, revisit each one to get the strumming hand locked in.
Stage One: The Boom-Chick
Basically, it’s a bass line on the downbeats with chordal strums on the offbeats to fill it out. Here are the details: Start with a downstroke on the 6th string (G note) followed by a downstroke on the top three strings. Then, a downstroke on the open 4th string followed by another downstroke on the top strings (Ex. 1).
Click here for Ex. 1
What’s important here is to make sure you are playing the bass notes clean, and to make sure you are playing the chord strums as one simultaneous chord as much as possible. In other words: Don’t sweep the chord—strike it.
In the audio example below (Ex. 2), I demonstrate how not to handle the offbeats before morphing into how they should sound. Also, be sure to feel relaxed, and be as efficient as possible however try to get in to a flow rather than feel robotic. When you are doing it comfortably, clean, and at a reasonable tempo, move to the next stage.
Stage Two
At this stage, we will be simply adding a second chord strike immediately following the downstroke, only this time we will use an upstroke (Ex. 3). The same tips apply for the upstroke chord strike as the downstroke chord strike. Again, you want each chord strike to sound like one chord rather than three strings each, and you want the downstroke chord and upstroke chord to sound as identical as possible in volume and attack. Get it smooth and comfy, then move to the next stage.
Click here for Ex. 3
Stage Three
In this stage we’ll add a very subtle nuance that helps drive the rhythm. We are adding another upstroke just before the “and” of beat 2 (Ex. 4). When you start to feel the flow, your right hand should feel almost like a coupling rod on the wheel of a steam locomotive. Your wrist joint, elbow joint, and shoulder should all be sharing the workload to keep it as efficient as possible, and also avoid straining any one of the joints. These three stages should get your right hand ready to provide a good base for your bluegrass rhythm. The next stage is really more about fitting into an ensemble with bass.
Click here for Ex. 4
Stage Four
The bassist’s job is to cover that 1-5 bass line that we’ve used in the previous examples. To tighten things up, I’ll sort of “wash out” the bass notes in Ex. 5 so there’s not such a sharp point on them. This will let the bass player take control over this part of the groove. If there’s no bass player, keep those bass notes clear.
Click here for Ex. 5
This four-stage approach is designed to train your right hand to find the motion and groove that drives a bluegrass band. It’s important to note that this is just the basic rhythm pattern, and by no means the only way to play it. For variety, you can use each one of these stages on its own. Once you have mastered each stage, you’ll be ready to tackle more advanced rhythm techniques that include crosspicking, accents, and other variations that make a song come alive.
I recommend listening to some of the masters of the style to gain more perspective. Check out Lester Flatt, Jimmy Martin, Clarence White, and Tony Rice. Personally, my “a-ha” moment came from watching Del McCoury, as well as Bob and Danny Paisley back in the day at Grey Fox Bluegrass Festival. Check out the video below of Del’s band playing “All Aboard” a few years ago. Pay attention to how relaxed Del’s right hand is.