Three years ago PG launched our “No-Brainer Mods" concept—an annual endeavor where we take a few of the most compelling affordable instruments on the market and see what we can do to make them competitive with much pricier guitars in terms of tone and performance. Our first outing refined four inexpensive versions of classic designs—a Jaguar, a Les Paul, a P bass, and a Gretsch Jet—and the second took a similar approach with semi-hollow, extended-scale, and shred-optimized 6-strings. This year, however, we thought it would be a trip to take advantage of all the well-built, low-cost guitars on the market and, instead of just making them a bit better via electronics and hardware upgrades, use them as low-risk springboards to something truly different.
Be forewarned though: Conceptually, this year's batch of mods is kind of out there. So much so that it may strike some as a stretch to call them “no-brainer." But in our eyes what makes these projects worthy of the descriptor is that, for those of us who are decidedly not wealthy, the wealth of quality entry-level guitars on the market presents an obvious impetus to experiment. Even those on a modest gear budget can save up and use instruments like these—plus a few extra bills—to indulge what if… epiphanies previously only practical for those who can afford custom builds.
This year's trio of mods ranges from one that's easy and reversible to one that's moderate in both difficulty and invasiveness to something only experienced woodworkers are advised to undertake without help from their local guitar expert. But don't let that scare you off. These projects will stock your rig with tones you'd be hard-pressed to find elsewhere.
To execute these projects, we've enlisted ace guitar repairman Dave Helmer, a two-time Red Wing lutherie graduate who works full-time at Musician's Pro Shop in Iowa City, Iowa. Okay, let's get started. —Shawn Hammond
New to modding? Check out this DIY article for a comprehensive guide on soldering techniques and tips.
Click here to enter for a chance to win this expertly modded guitar.
Offset Optimized
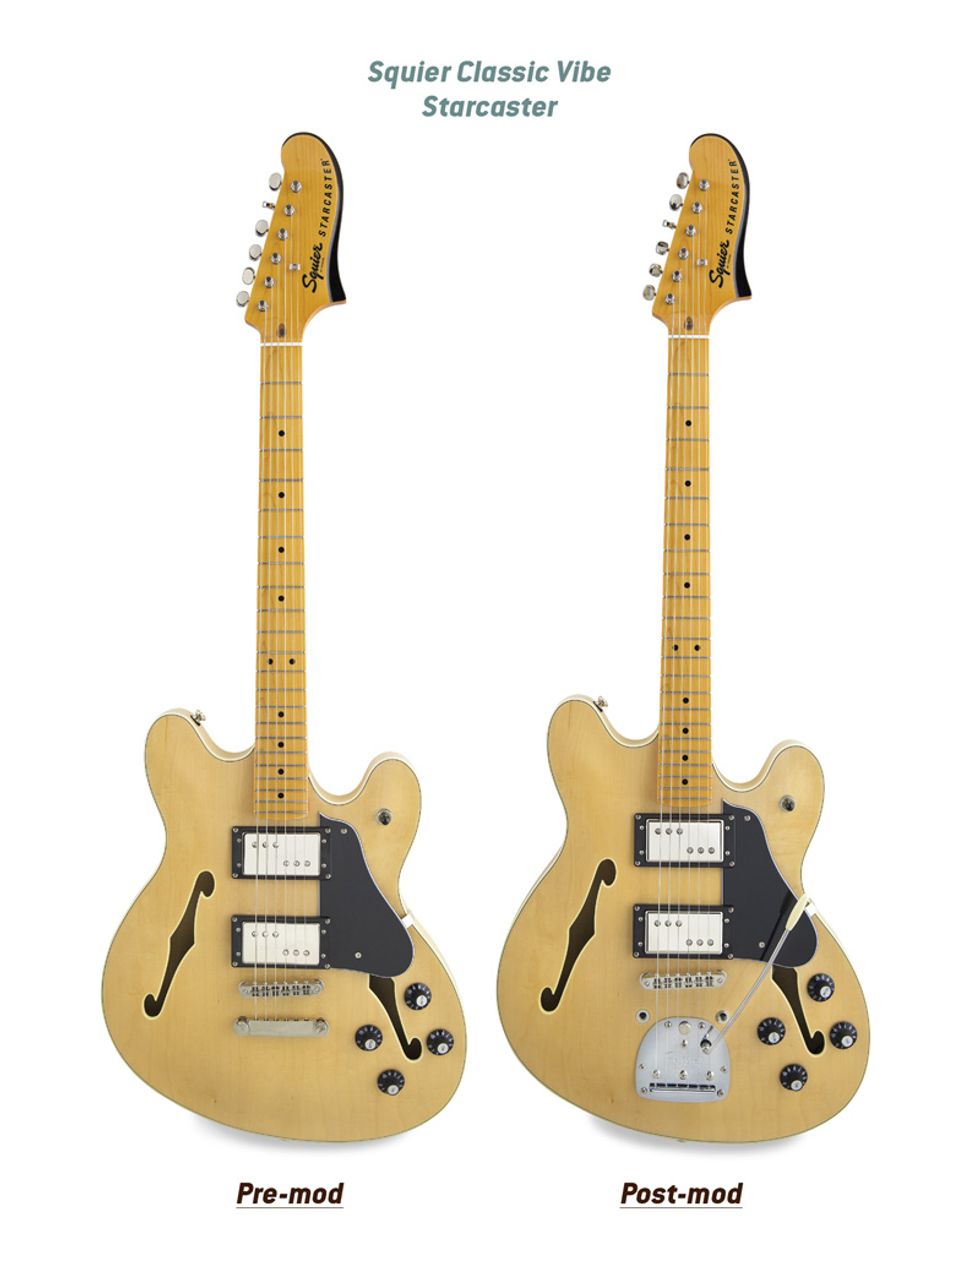
Of all Fender's “offset" 6-strings, the Starcaster is probably the rarest and least lusted after—though there's definitely resurgent interest these days, thanks in large part to the influence of longtime user Jonny Greenwood (Radiohead). Soon there's bound to be even more interest since Squier just released its Classic Vibe version—a stunningly light guitar that goes for a mere $399 street.
Originally produced for only six years (1976–1982), the semi-hollow Starcaster was likely Fender's effort to compete with bigger-bodied instruments from Guild, Gretsch, and especially Gibson. The fact that so many successful models from the latter sported humbuckers no doubt informed the Starcaster's dual-pickup array, while its 3-way selector and 5-knob control scheme—dedicated volume and tone controls for each pickup, plus a master volume—is rather Gretsch-like. But some Starcaster appointments likely left many players of the day scratching their heads; notably its large, swooping headstock and the use of such an unorthodox asymmetrical shape in a traditional-leaning market segment. It didn't stop there, though. Whereas most semi-hollow guitars of the era—and even now—used a trapeze tailpiece or else a Tune-o-matic-style bridge paired with either a stop-tail or perhaps a Bigsby vibrato, the Starcaster used an unusual new hard-tail bridge with through-body stringing somewhat akin to the brand's Telecaster models. It also featured the same pickups that debuted on the Telecaster Deluxe four years prior. For the latter two reasons especially, one can't help thinking many '70s shoppers saw these Tele-derived elements and concluded the Starcaster wouldn't conjure the fat semi-hollow tones that B.B. King, Eric Clapton, Larry Carlton, and others got from their Gibsons.
Even so, the Starcaster's distinctive “Wide Range" humbuckers sounded exceptional and became staples for high-profile players like Sonic Youth's Lee Ranaldo, Oasis' Noel Gallagher, and Franz Ferdinand's Alex Kapranos. Designed by Seth Lover (who developed the legendary PAF pickups found in so many Gibson guitars), original-spec Wide Range pickups are “wide" in two ways: First, they are physically a little larger than a standard humbucker, and second, their tones are sort of a cross between single-coil and humbucker—a gritty, articulate blend of chime and brawn. Their unique sounds derived from the fact they used both nonstandard (and now-expensive) magnetic materials and incorporated them differently from other pickup designs. So, while Fender has, for many years now, offered guitars with humbuckers that look like original Wide Range pickups (complete with metal covers and two staggered trios of visible pole pieces), the truth is that the pickups in these guitars are standard-design humbuckers whose tones aren't a whole lot like the originals'. Many companies now offer their take on the original Wide Range sound, some using pricey materials and original-spec construction, others aiming for the same tones via more readily available materials. To get our Squier closer to original Starcaster sonics, we settled on a set that takes the latter approach.
Because the Wide Range-embracing bands mentioned here also tend to play Fender's other famous offsets, particularly Jazzmasters and Jaguars, we thought it would be cool to outfit the Classic Vibe with a Jazzmaster/Jaguar vibrato system, too. We'll focus on that process here, since it's an endeavor rendered much trickier than on a regular solidbody due to the Starcaster's carved top.
Dave's Installation Tips

Photo 1
1. Cut a 7" x 16" piece of polystyrene to span the width of the guitar body in the tremolo area. Make the corners as square as possible, and mark a centerline lightly with a pocketknife (Photo 1).
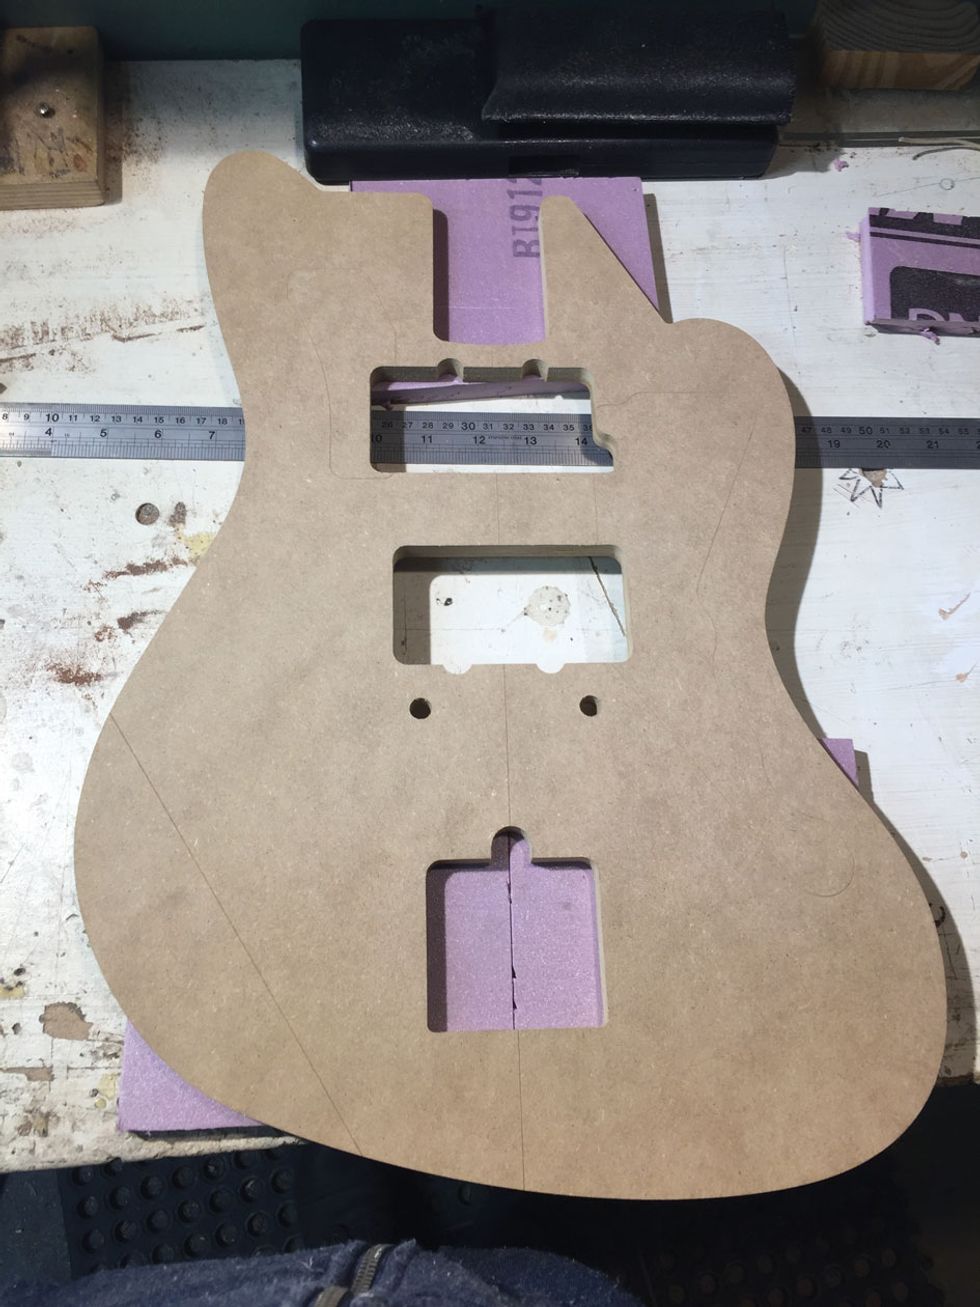
Photo 2
2. Line up the polystyrene's centerline with the Jazzmaster routing template's centerline (Photo 2).
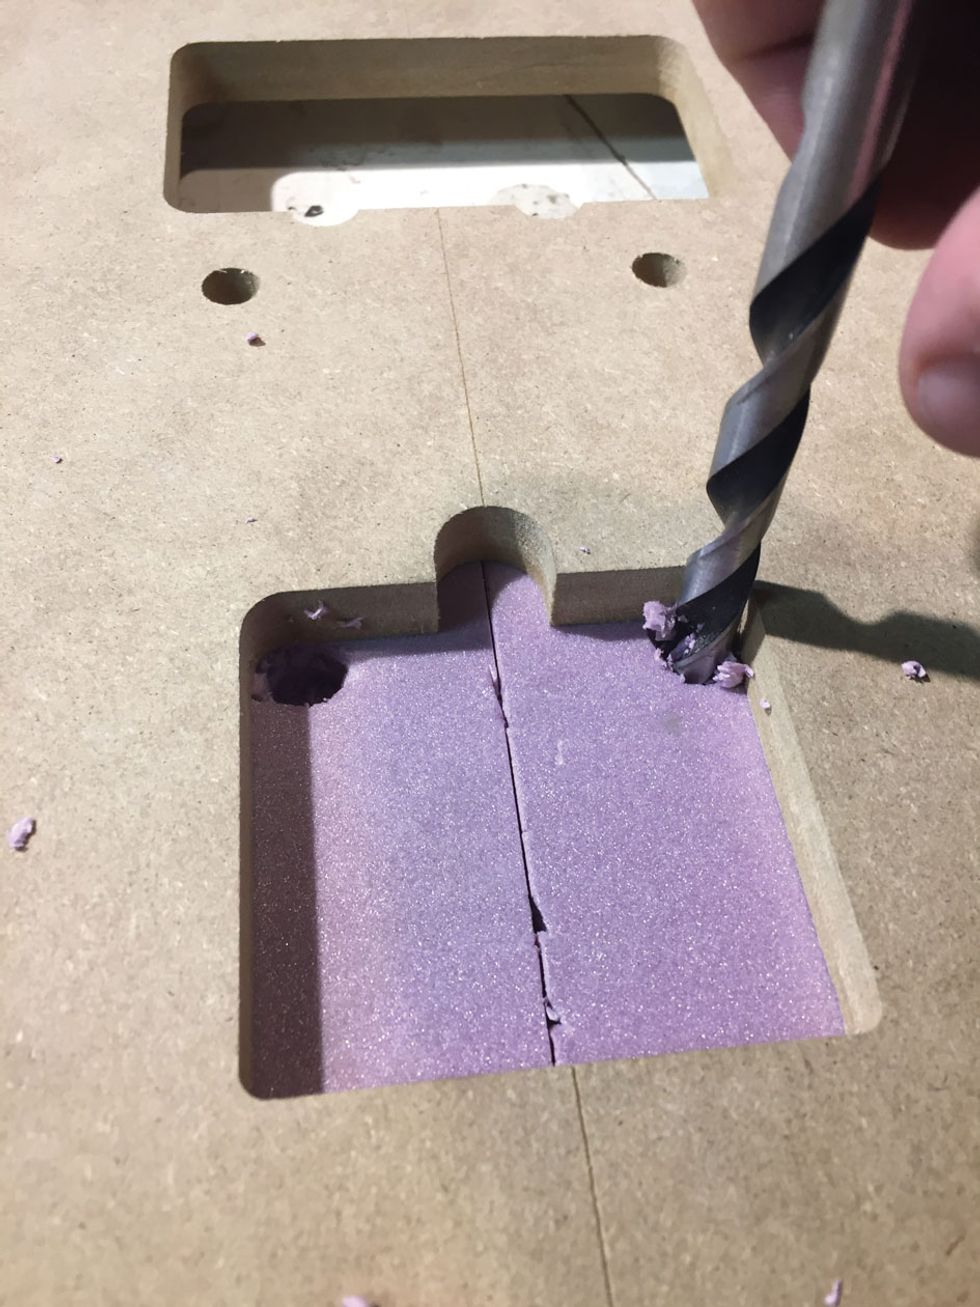
Photo 3
3. Using the 3/8" brad-point bit—sans a drill, just by hand—remove polystyrene from the four inner corners of the square tremolo-cavity section (Photo 3).
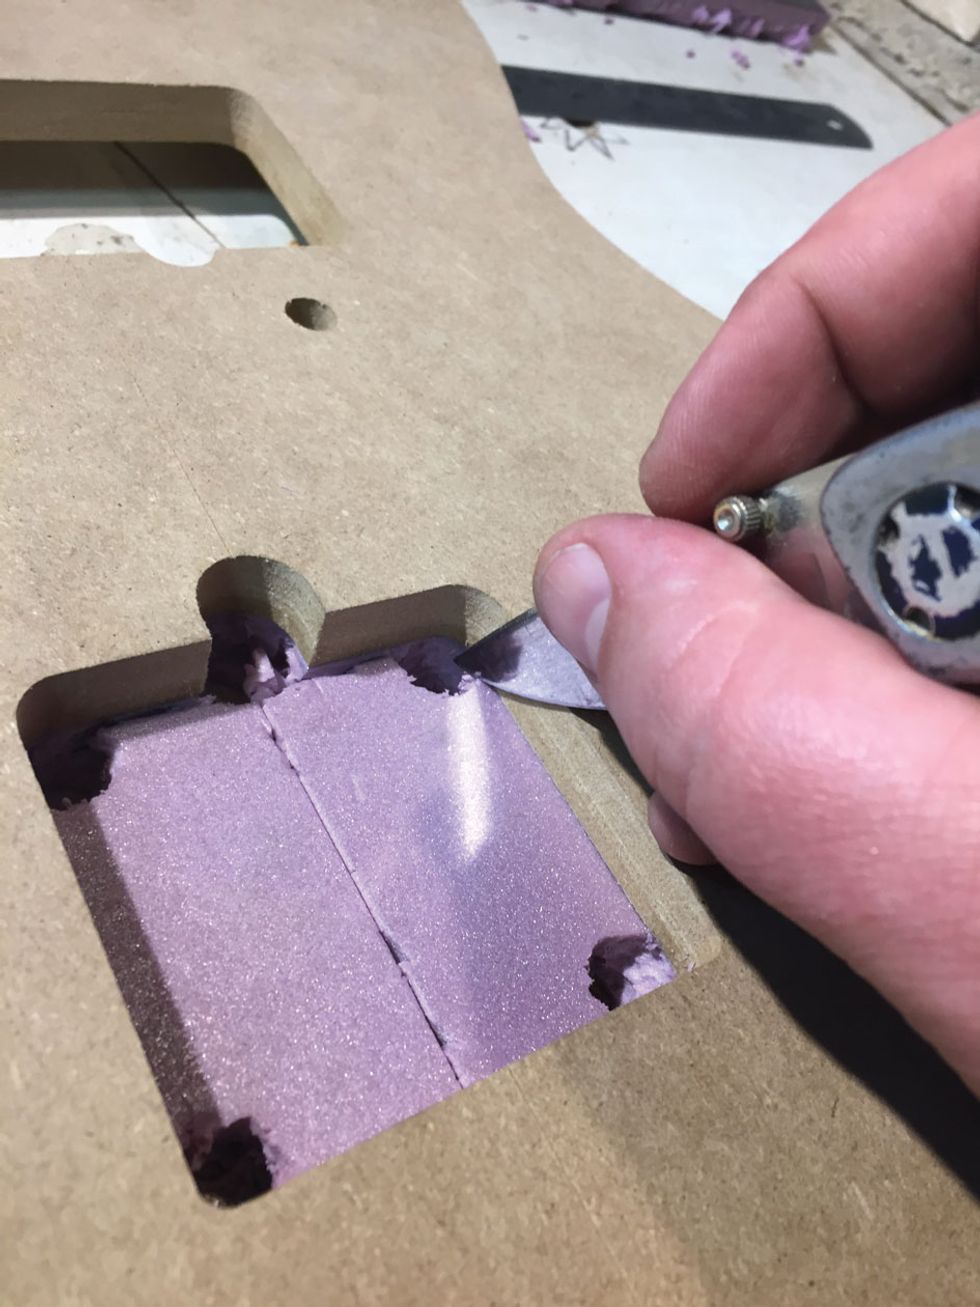
Photo 4
Next, use a 1/2" bit to remove polystyrene from the tremolo-lock section (the rounded portion at the top of the square in Photo 4). Then connect all the holes using a pocketknife blade, and cut out the template shape.
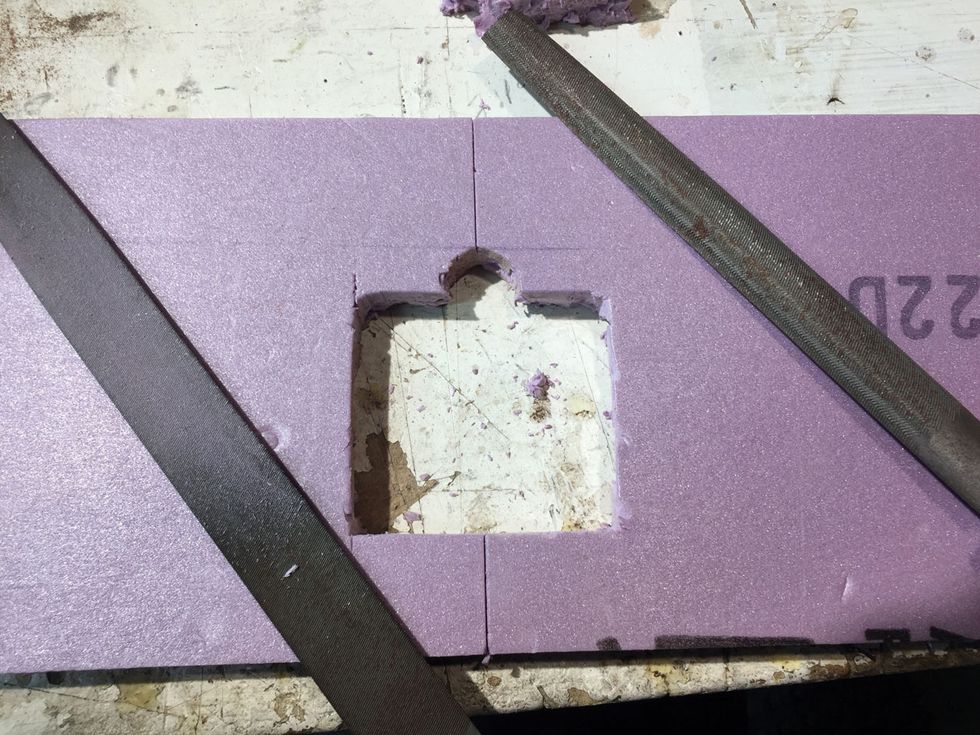
Photo 5
4. Square and clean up the template's edges with bastard mill files. Your final routing template should look like the one in Photo 5.
5. Disassemble the Starcaster and set the neck aside. Use an ESP Multi Spanner wrench to loosen the controls' hex nuts, then drop the controls into the body and remove the pickups and hardware.
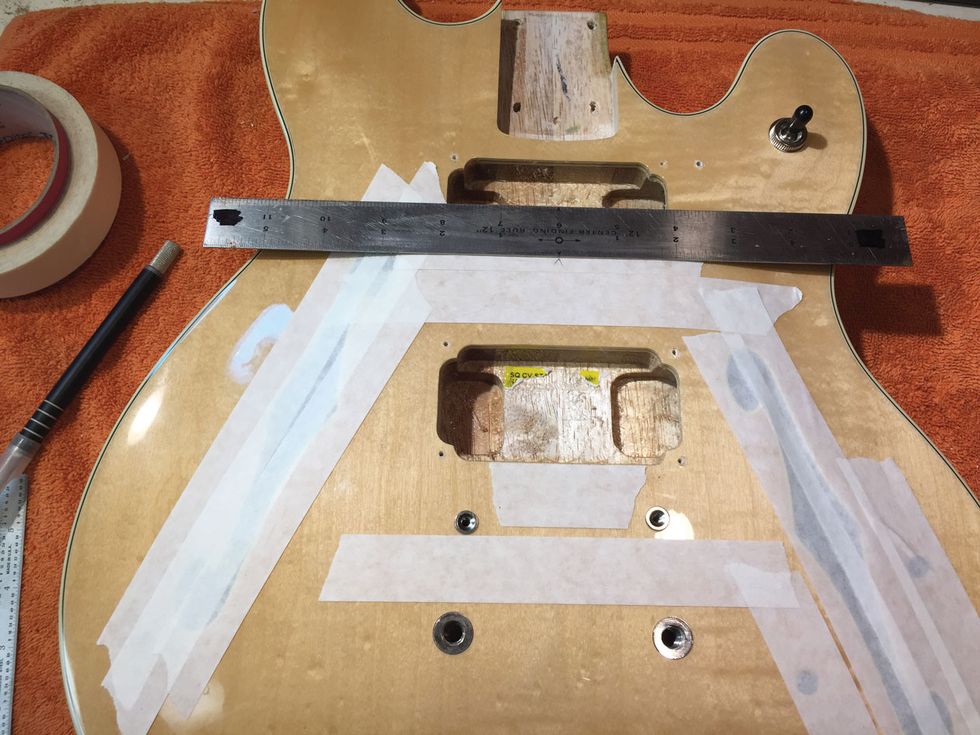
Photo 6
6. Use low-tack tape to cover the guitar's f-holes and control holes (Photo 6).
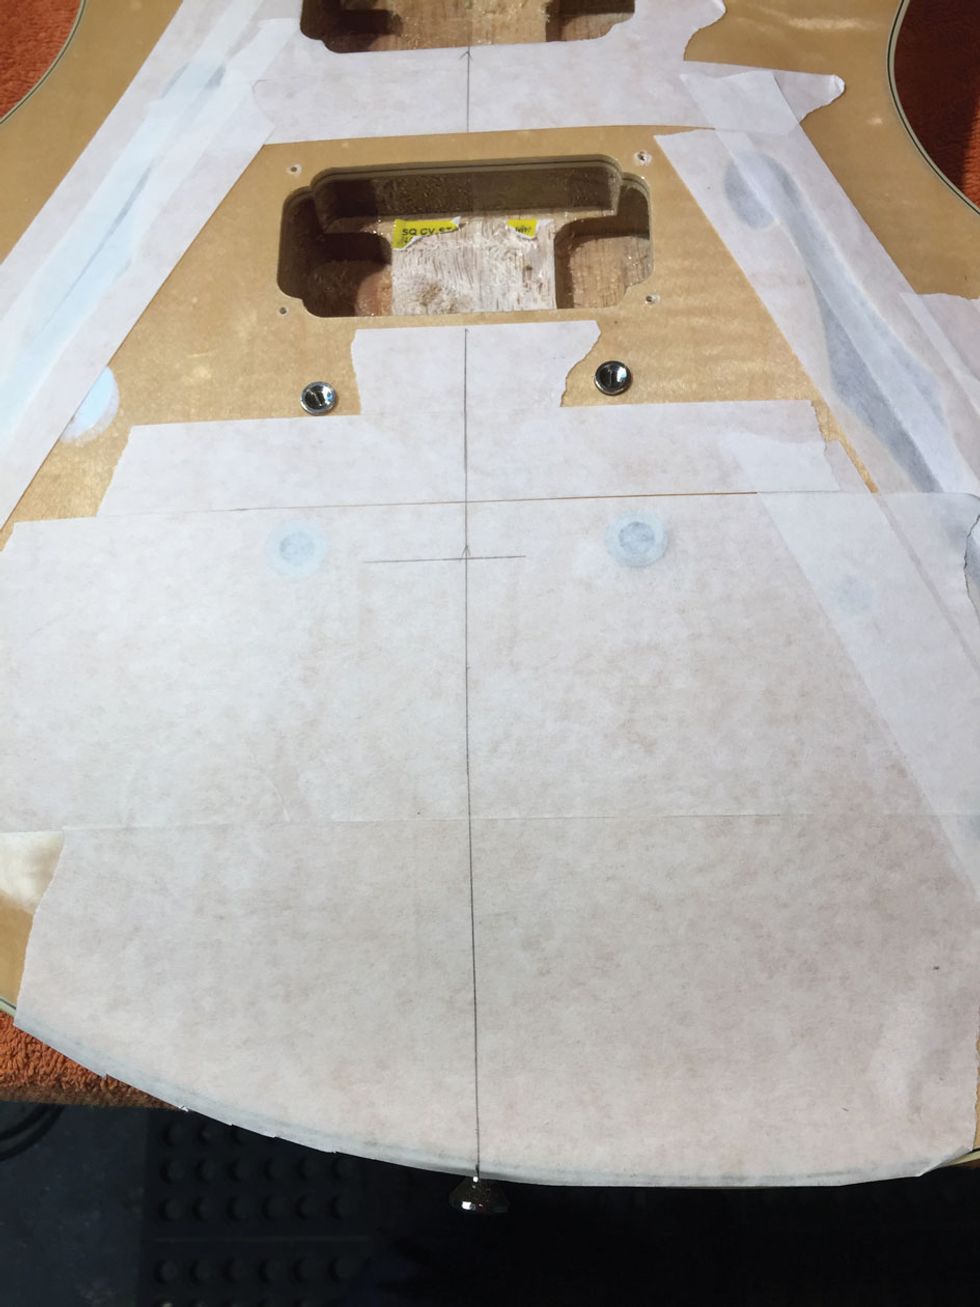
Photo 7
Tape off the guitar's face and mark the centers of the following: both pickup cavities, the bridge, the stop-bar posts, and the lower strap button (Photo 7). Connect the dots and this becomes the centerline for our tremolo-cavity work.
7. Lightly score (i.e., carve shallow, parallel slits on) the top surface of the polystyrene template created in steps 1–4 so that it will mold to the Starcaster's top more easily. Label the side that should face up.
8. Line up the centerlines on the guitar and the polystyrene. Use double-stick tape to attach the polystyrene to the guitar's top.
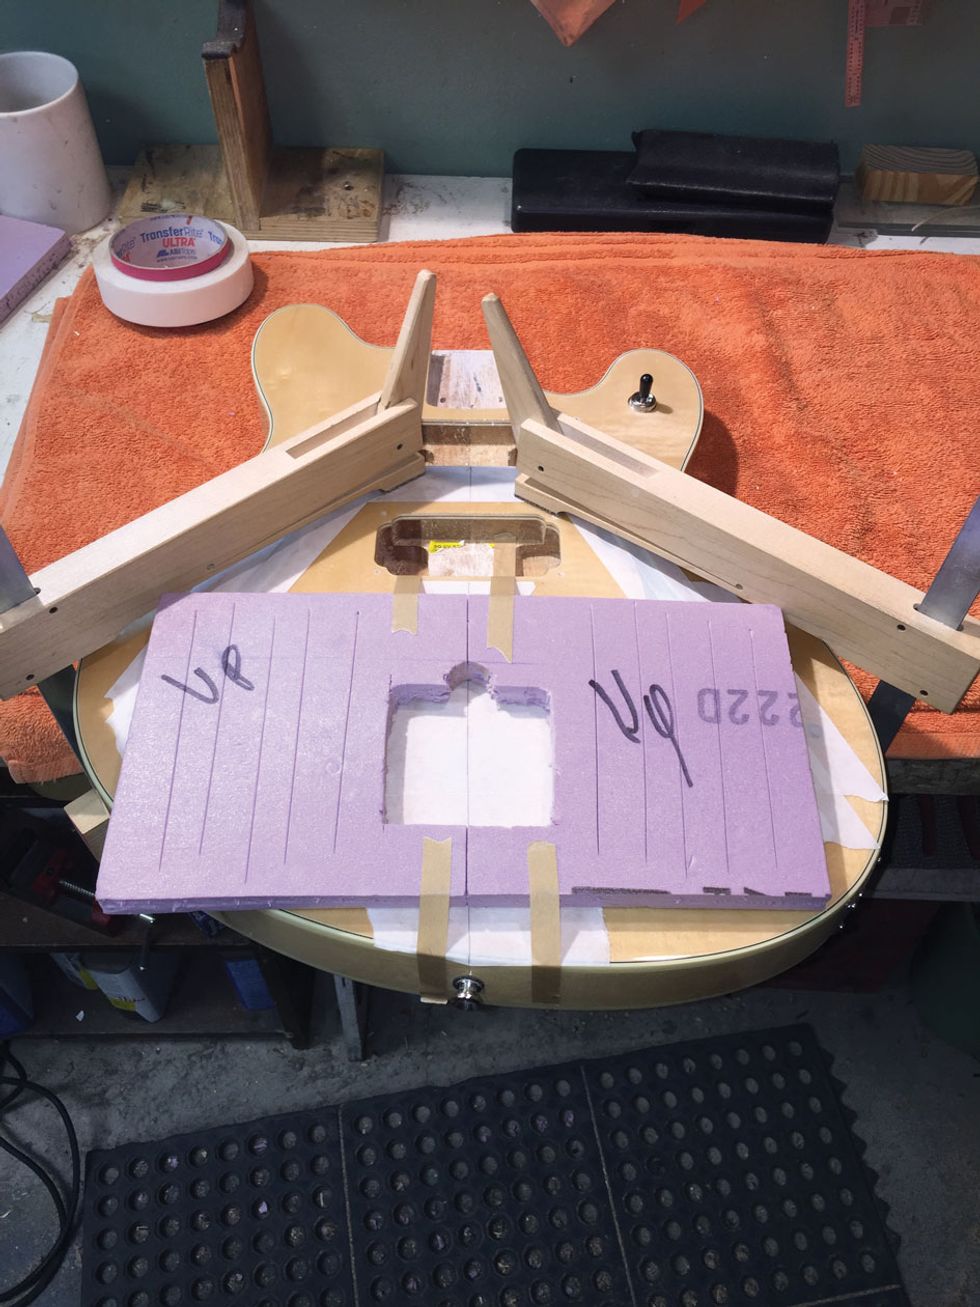
Photo 8
9. Clamp the body to your workbench with two long-cam clamps (Photo 8).
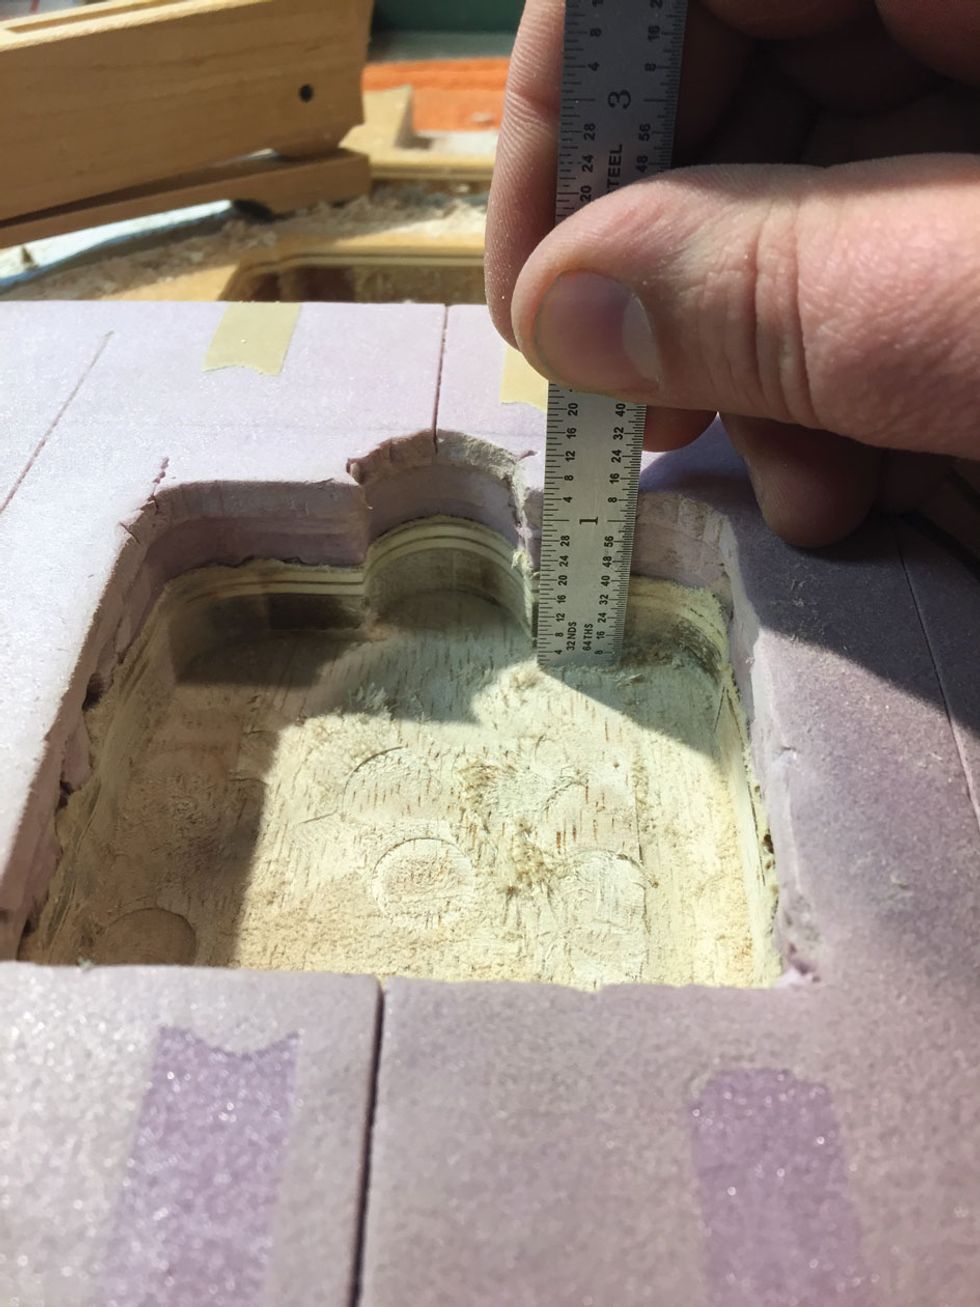
Photo 9
10. Use your palm router to carve the tremolo cavity to a depth of 1 3/8" (Photo 9).
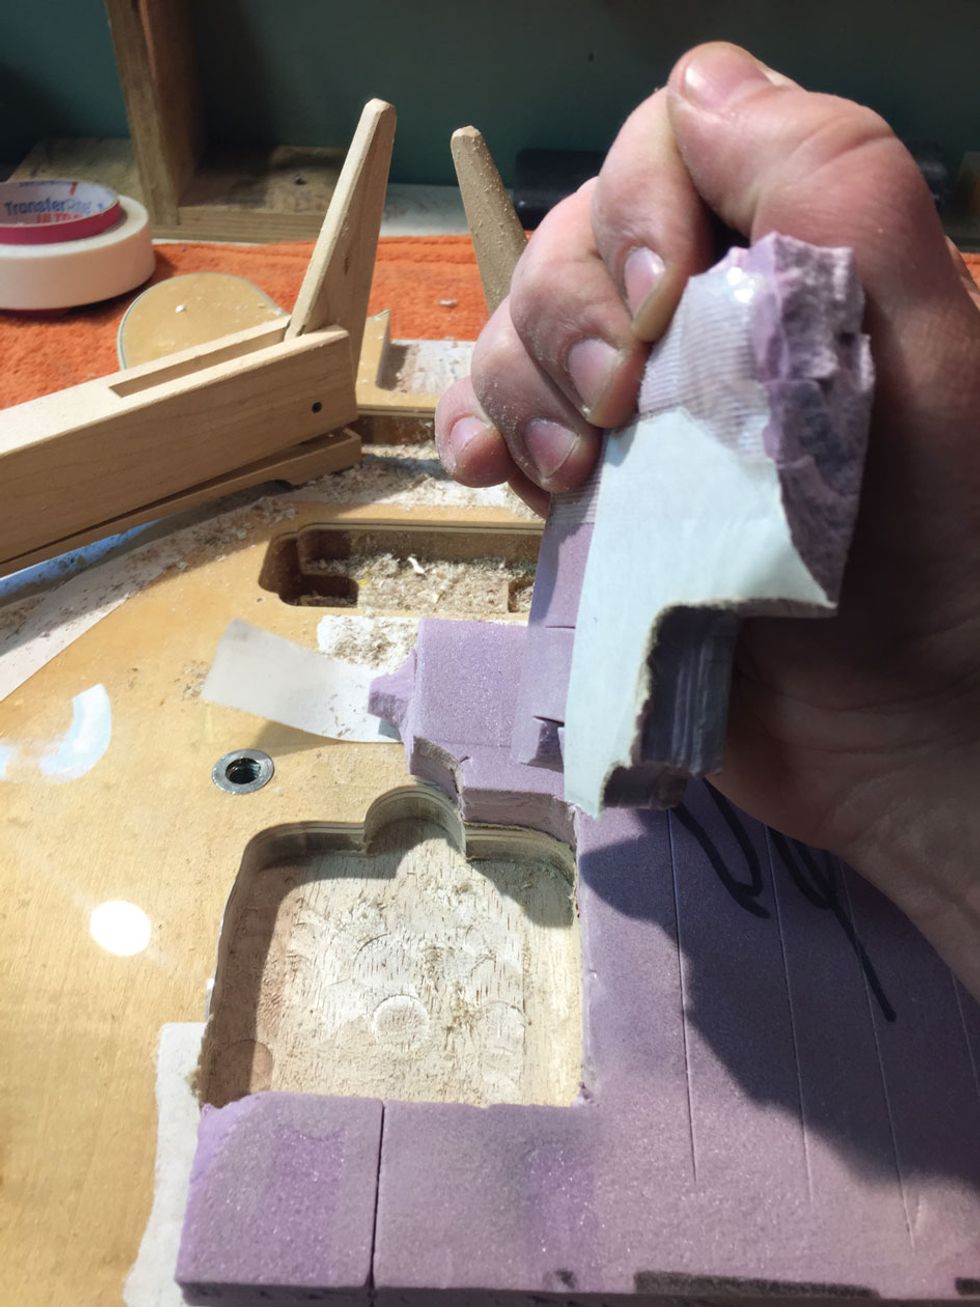
Photo 10
Halfway through the route, remove the template to get to the full depth. Because the template is intended for a single use, it will come off in pieces (Photo 10).
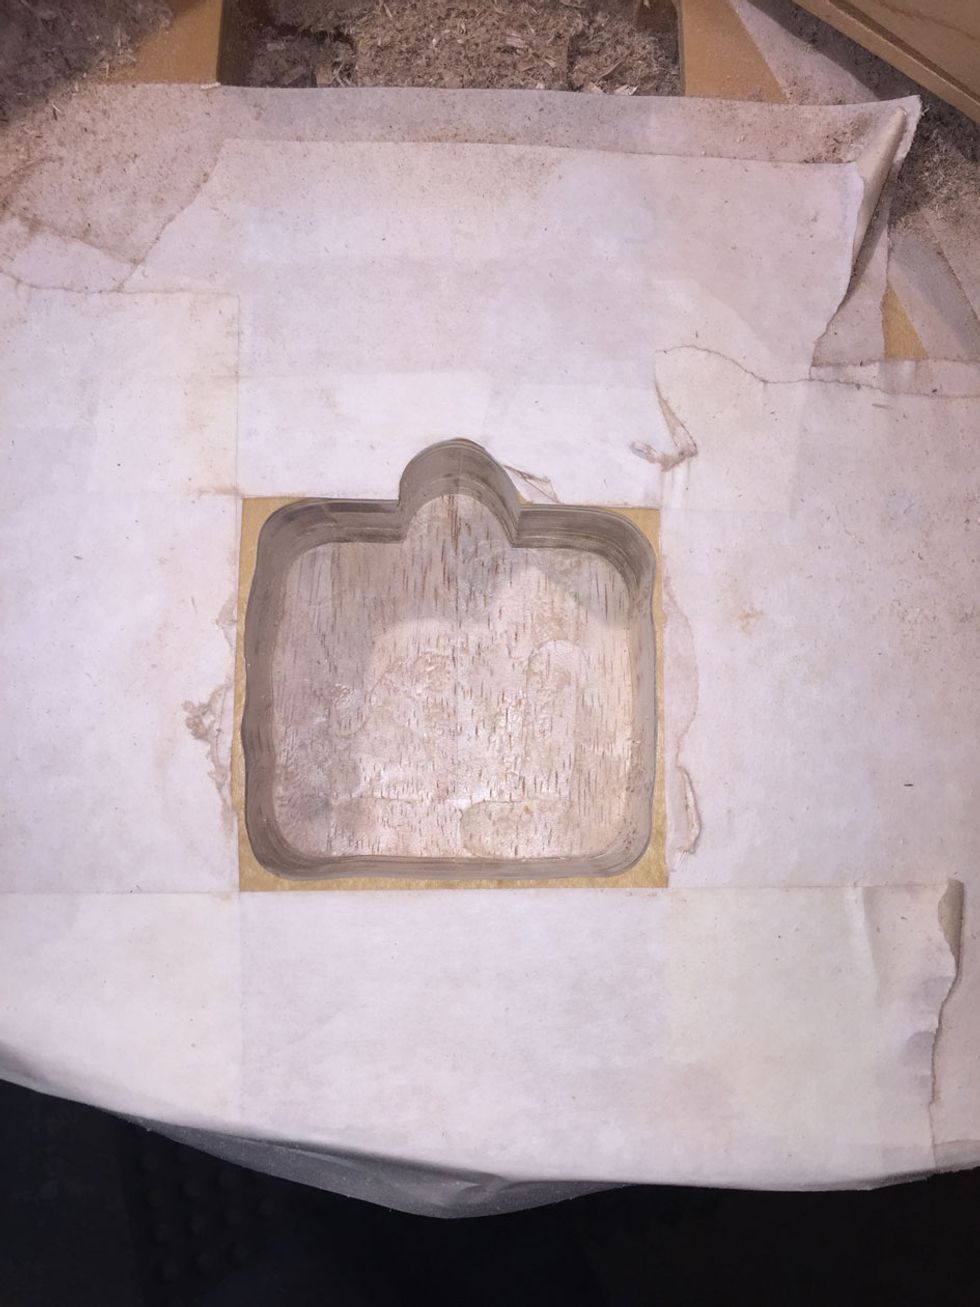
Photo 11
To protect the finish during subsequent steps, apply more low-tack tape (Photo 11).
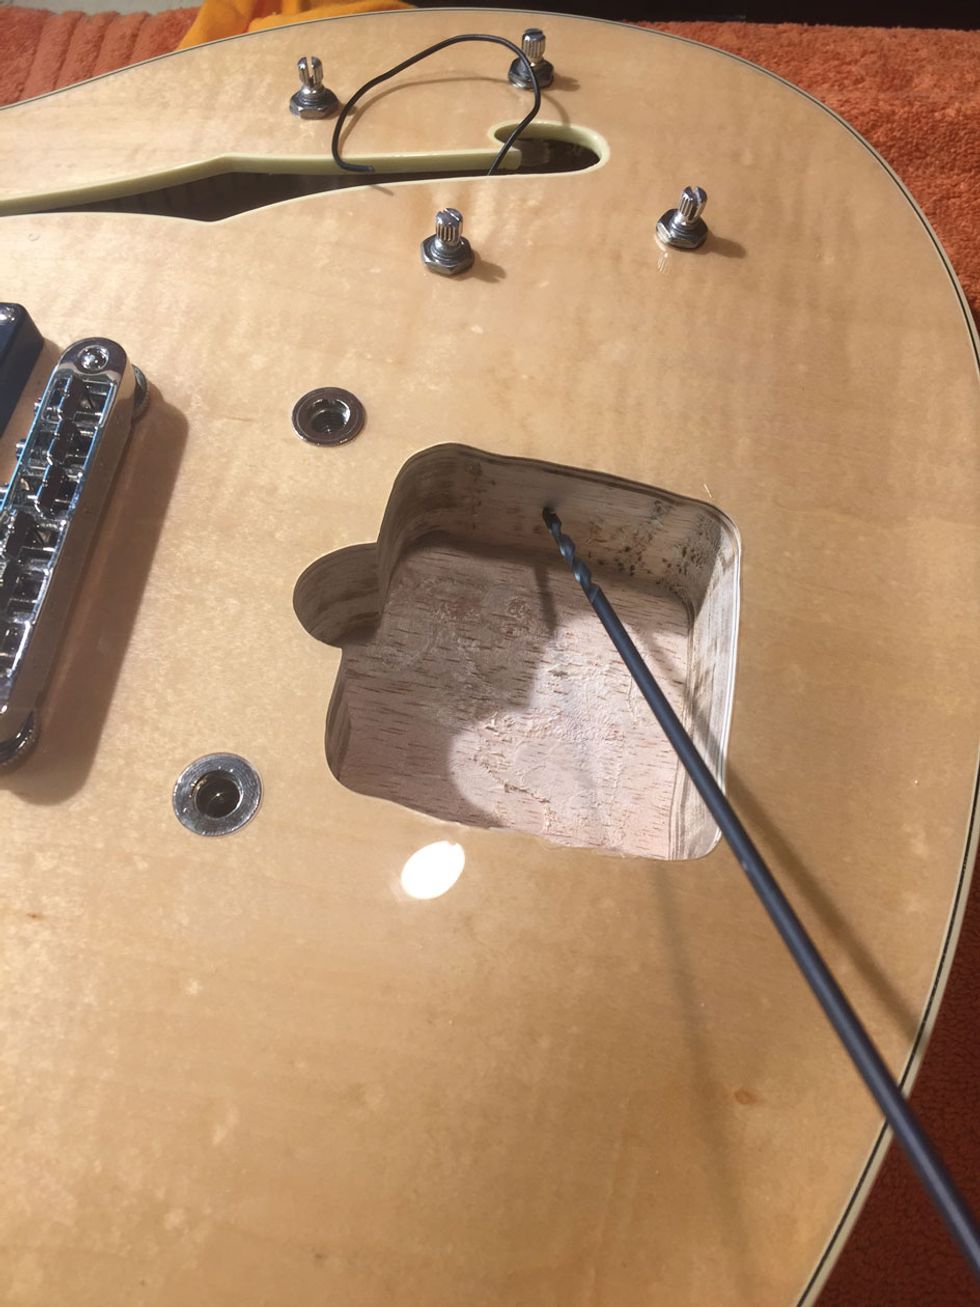
Photo 12
11. Using a 1/8" aircraft extension bit, drill a ground-wire hole for the bridge through the cavity toward the volume and tone knob area (Photos 12 and 13). The ground wire will be pinched in place by the tremolo housing upon installation.
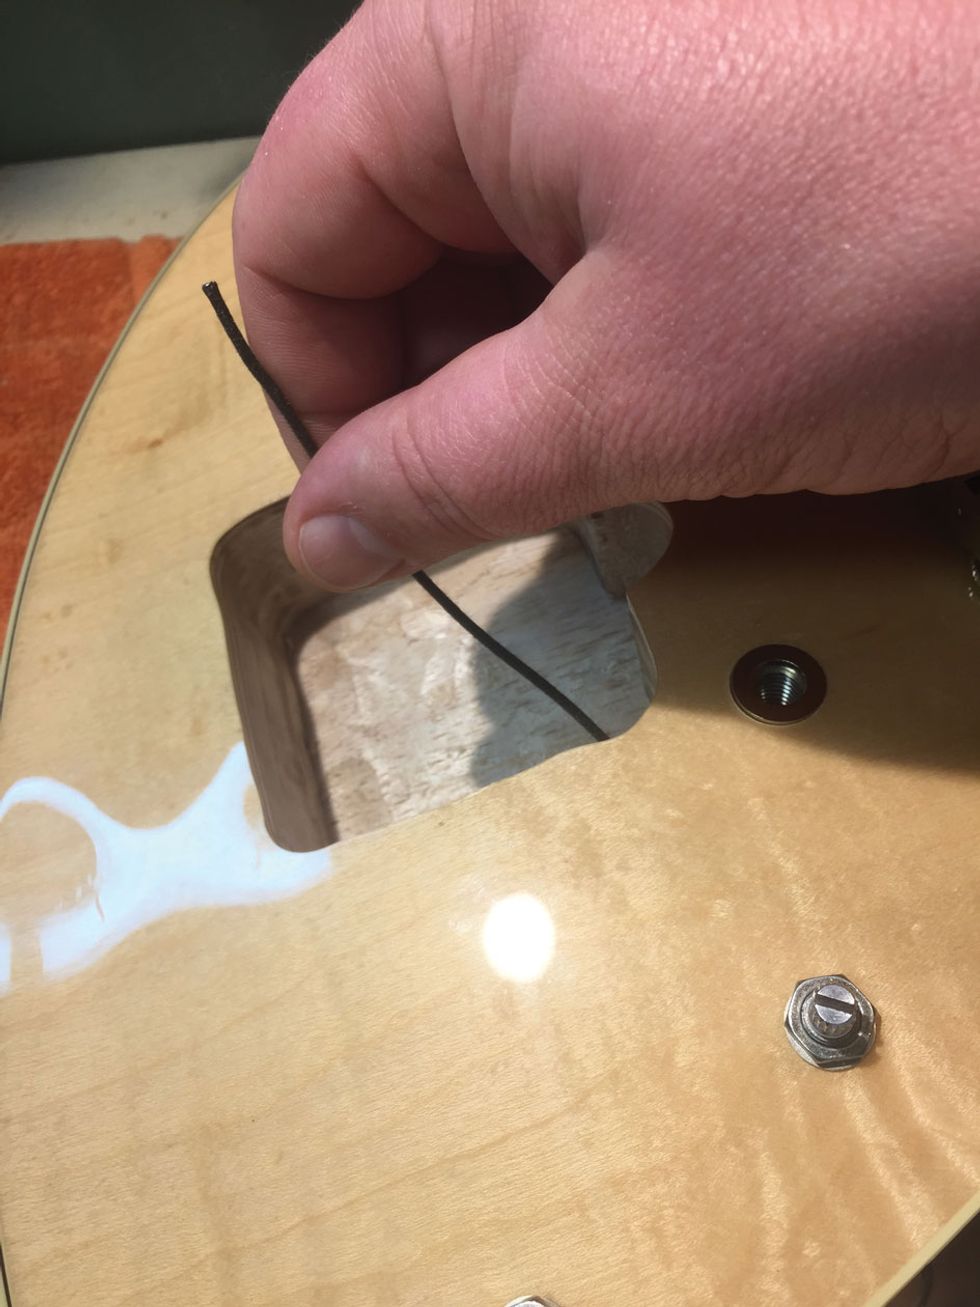
Photo 13
12. Reassemble the guitar: Install the neck, connect the new pickups in the same manner as the originals (unless you're opting for custom switching), solder the bridge's ground wire, mount the controls, and install the Tune-o-matic-style bridge. (Note: I left the original stop-bar bushings in the body, since they don't rattle and aren't hurting anything.)
13. Use spare 1st and 6th strings under light tension to line up the tremolo assembly and mark your mounting-screw holes. Drill holes using a 1/8" brad-point bit. Start with the front two and work your way back, six in total. By hand, countersink each hole using the no-chip tuner-hole countersink tool, being careful to paste-wax the mounting screws. Countersinking and paste-waxing decrease the chance of finish chipping.
14. Install the tremolo. Because the curvature of the Starcaster's top results in the back edge of the tremolo plate sitting slightly above the face of the guitar, I used two rubber spacers as washers (on the underside of the plate) for the two rear screw holes.
15. Set up the guitar and wiggle away!
Shawn's Post-Mod Observations
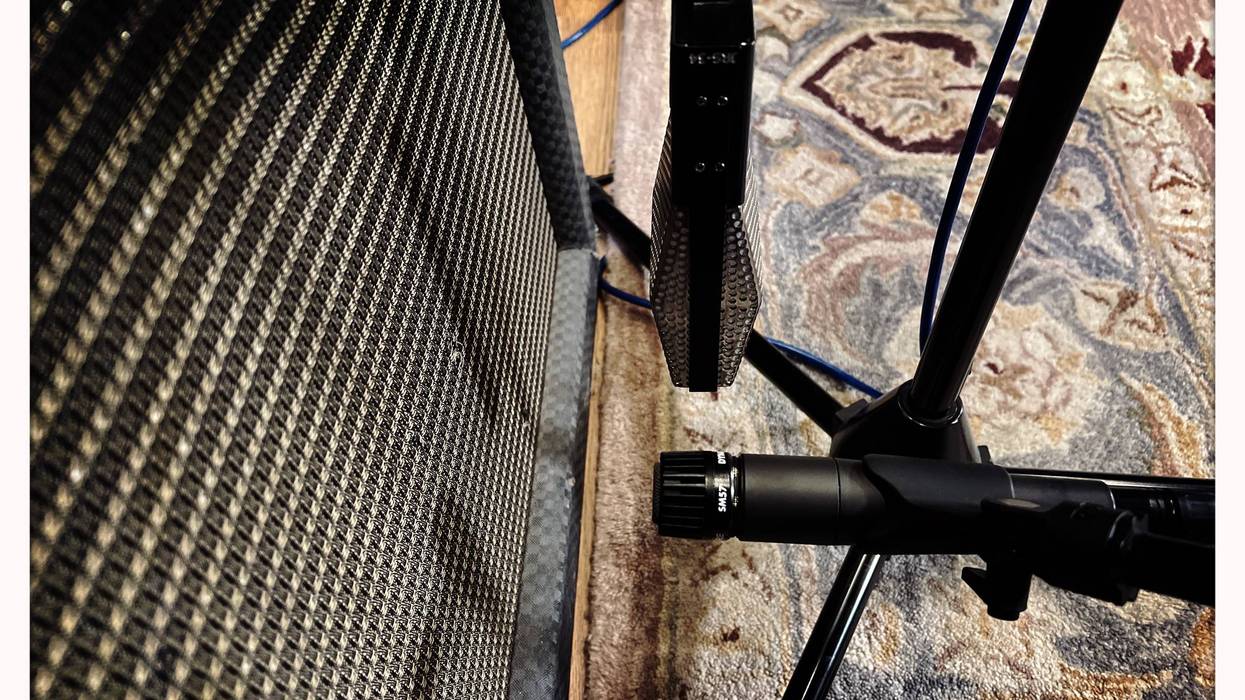
Recorded using a Ground Control Tsukuyomi boost and a Celestion Ruby-loaded Goodsell Valpreaux 21 miked with a Royer R-121 feeding an Apogee Duet going into GarageBand with no EQ-ing, compression, or effects.
I know I'm not the only one who's thought a trem-equipped Starcaster would be a blast. I've seen both Bigsby-modified Starcasters and Starcaster-style custom guitars—sans carved top—with an added JM-style vibrato, but I've never seen a JM trem added to the real McCoy. Thanks to Dave's killer work, my hunch has been confirmed. I knew the contoured top would make it impossible for the mounting plate to be perfectly flush, but Dave's genius application of rubber spacers (which are hardly visible) make it possible to enjoy incomparable Jazzmaster/Jaguar trem action that's as stable as on any other guitar. Lastly, Brian Porter's take on the storied Wide Range recipe is a lovely one, yielding a lot of the bell-like responsiveness and grit associated with the original '70s pickups. Paired with the Starcaster's stock electronics, they can yield surprisingly bright tones, but the guitar's complement of dedicated volume and tone knobs for each pickup facilitates a truly wonderful array of shades, from cutting and spanky to jangly, smoky, and myriad tones in between.
Click here to enter for a chance to win this expertly modded guitar.
Bowfinger the Brave
Guitarists have been into the idea of infinite sustain for decades. We typically try for it via a handful of methods: playing so loud (or with so much gain) that our instrument feeds back, using a battery-operated magnetic device such as the Heet Sound EBow, installing a pickup-based unit like the Fernandes Sustainer (a favorite of Radiohead guitarist Ed O'Brien) or the Sustainiac (favored by Avenged Sevenfold's Synyster Gates), or wielding a genuine violin bow.
The first of these approaches isn't great for many reasons, including the damage it can do both to your hearing and your relationship with bandmates. Waving a horsehair bow around looks and sounds cool and can make you feel like Jimmy Page at Madison Square Garden circa '73, but it's also ergonomically awkward and can require arching your bridge saddles to facilitate precise execution. Electromagnetic devices such as the EBow eliminate much of that awkwardness, yielding a sound more akin to feedback, but can only be applied to one string at a time. Meanwhile, pickup sustainers sound similar to an EBow and must be permanently installed in place of your favorite neck pickup—a pretty significant tonal sacrifice.
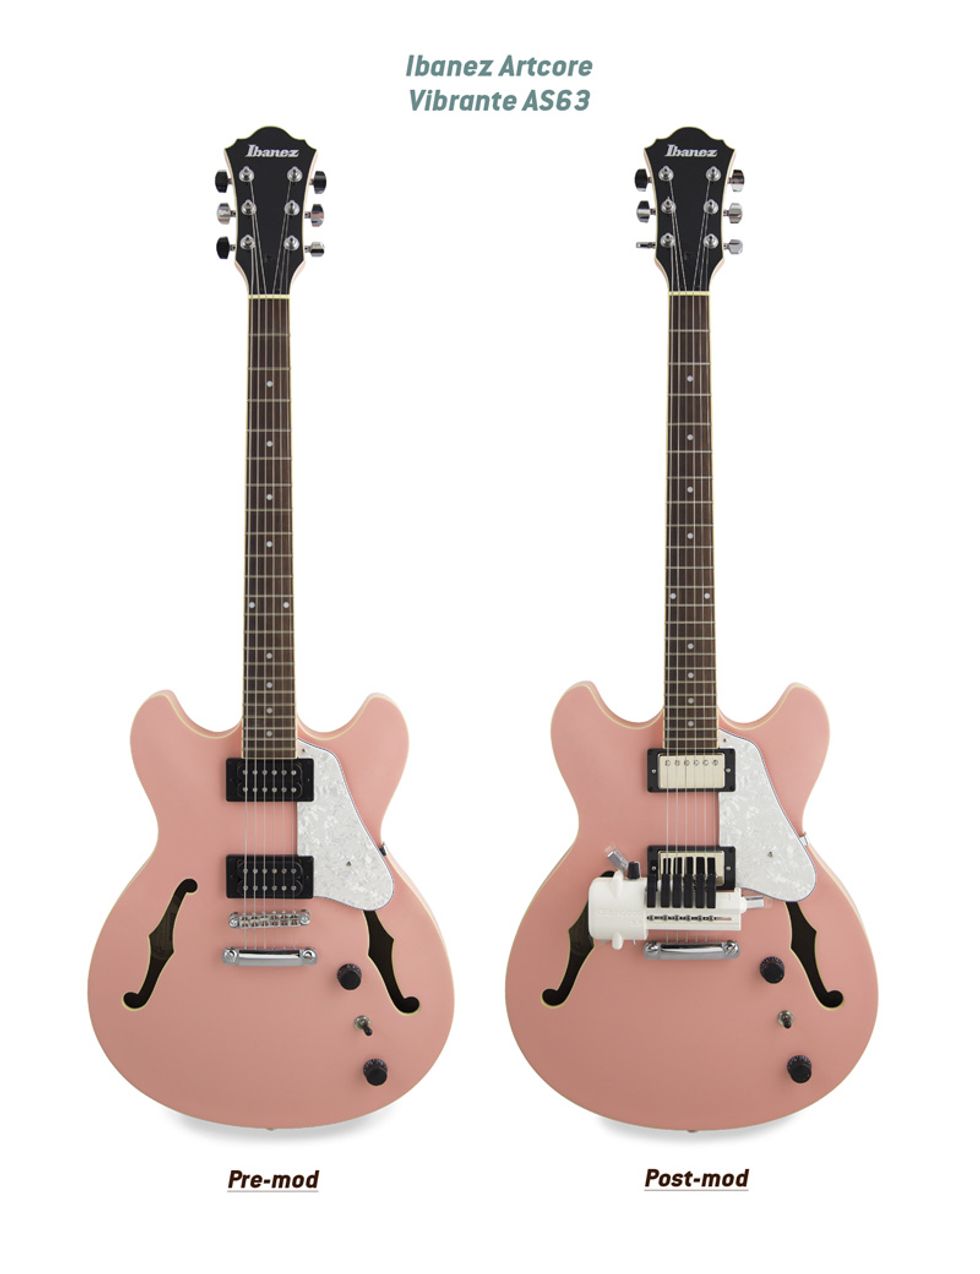
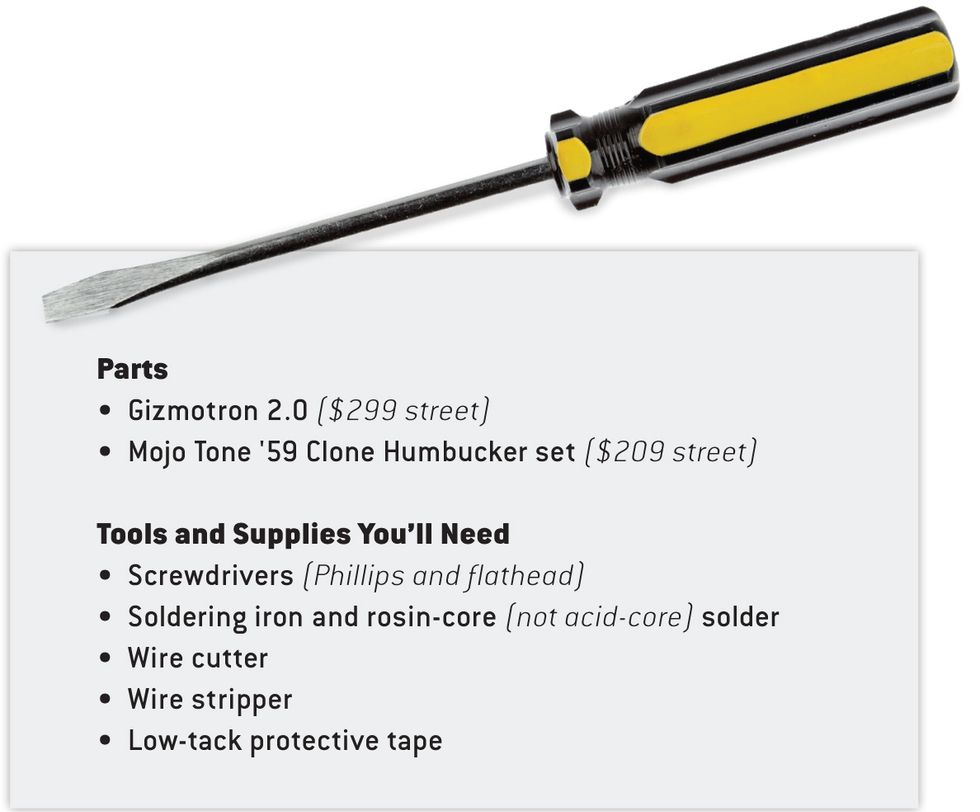
Back in 1979, a new product promised a fascinating combination of approaches: infinite, simultaneous mechanical “bowing" of one or more strings via motorized plastic wheels you activate using six buttons atop a housing semi-permanently attached to the guitar body. Gizmotron packaging declared it “The most exciting musical development since the development of the electric guitar," and that same year Page himself gave the Gizmotron cool cameos on both “In Through the Out Door" and “Carouselambra." Nevertheless, reliability and maintenance issues led to the company declaring bankruptcy within a couple of years. In 2016, however, vintage-keyboard restorer Aaron Kipness debuted a completely overhauled version that addresses the original's shortcomings with more precisely engineered parts, more resilient materials, and more consistent production methods. Gizmotron 2.0 functions on the same principles, and we've been dying to try one ever since its return to the marketplace. To heighten the experience, we've decided to install the Gizmotron on a semi-hollow Ibanez Artcore Vibrante AS63 ($349 street) whose solid but somewhat lackluster-in-the-midrange stock humbuckers we've also swapped for a set of vintage-voiced, PAF-style pickups.
Dave's Installation Tips
1. Remove the guitar's strings. Gizmotron's included directions don't explicitly address whether one should start this way, so I initially started with them on. It wasn't long before I realized the strings would be in the way when I attempted to position the string-activator wheels (step 10).
2. If you're also installing new pickups, do this first, connecting them just as the originals unless you're opting for new switching capabilities (e.g., coil-taps).
3. Use a clean cotton cloth to ensure the face of the guitar is dry, oil free, and free of any debris.
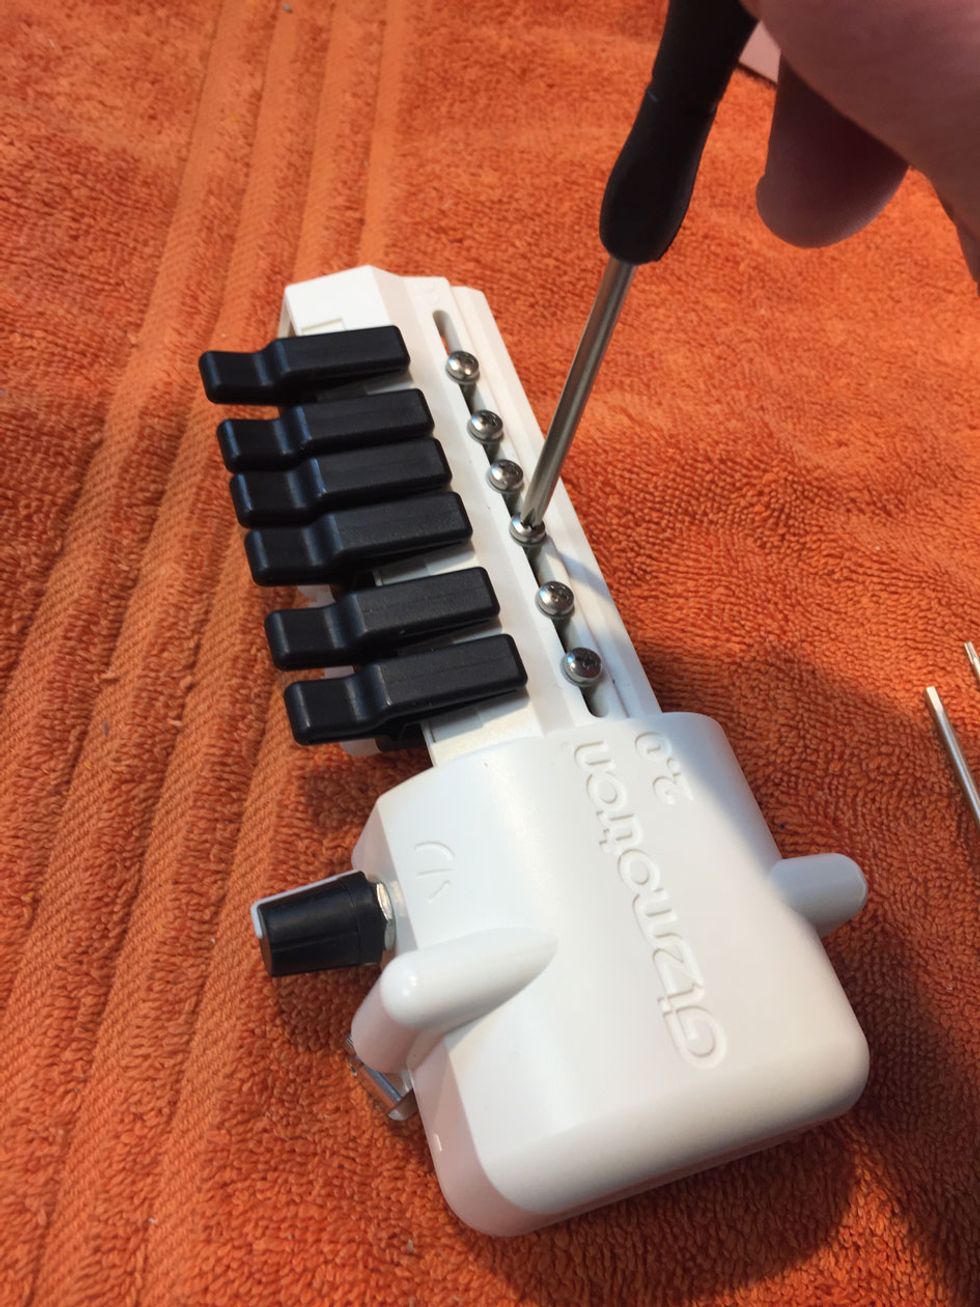
Photo 1
4. Loosen Gizmotron's keys/buttons using the Phillips screwdriver included with the kit (Photo 1). Spread the keys out for easier placement of the Gizmotron housing on the guitar.
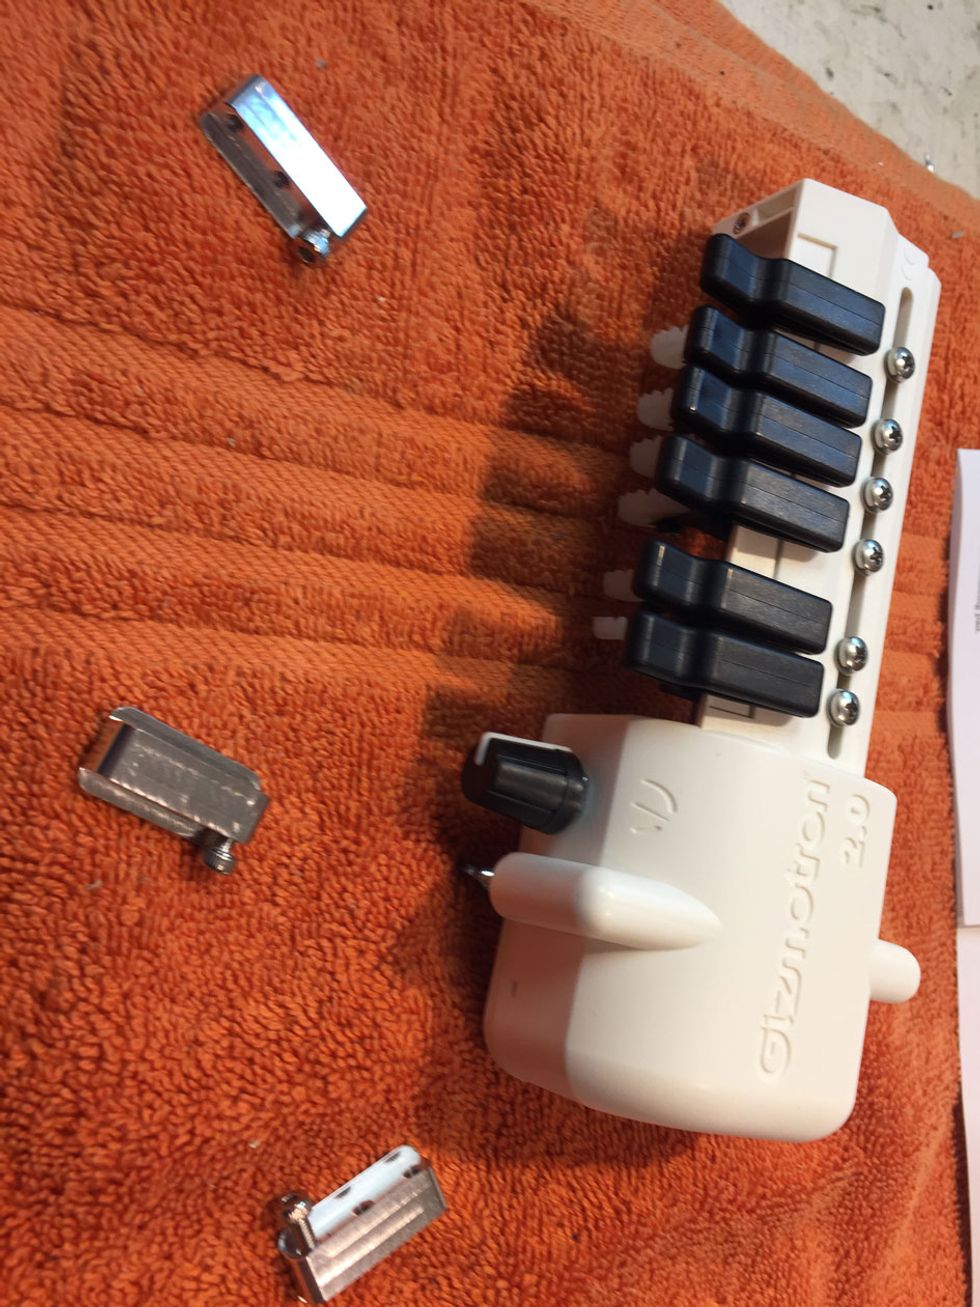
Photo 2
5. Remove Gizmotron's three mounting pads using the included hex wrench (Photo 2). The three mounting pads are each connected to forks attached to the end of a height-adjustment screw, which you'll use (in steps 8, 14, and 15) to balance the Gizmotron.
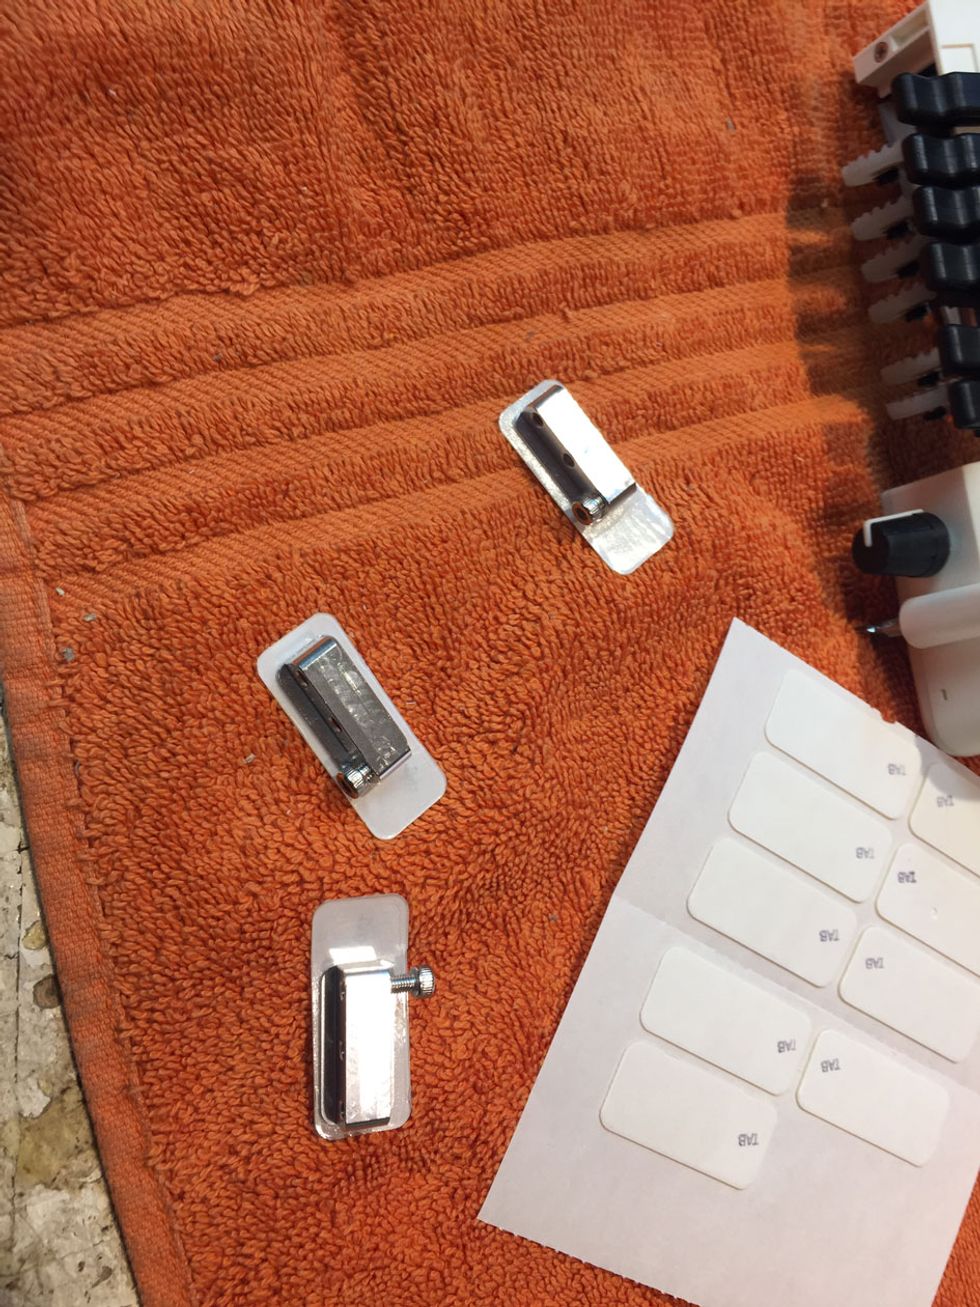
Photo 3
6. Attach each mounting pad to a mounting strip, leaving a margin of the strip on each side of the mounting pad to protect your guitar's finish (Photo 3).
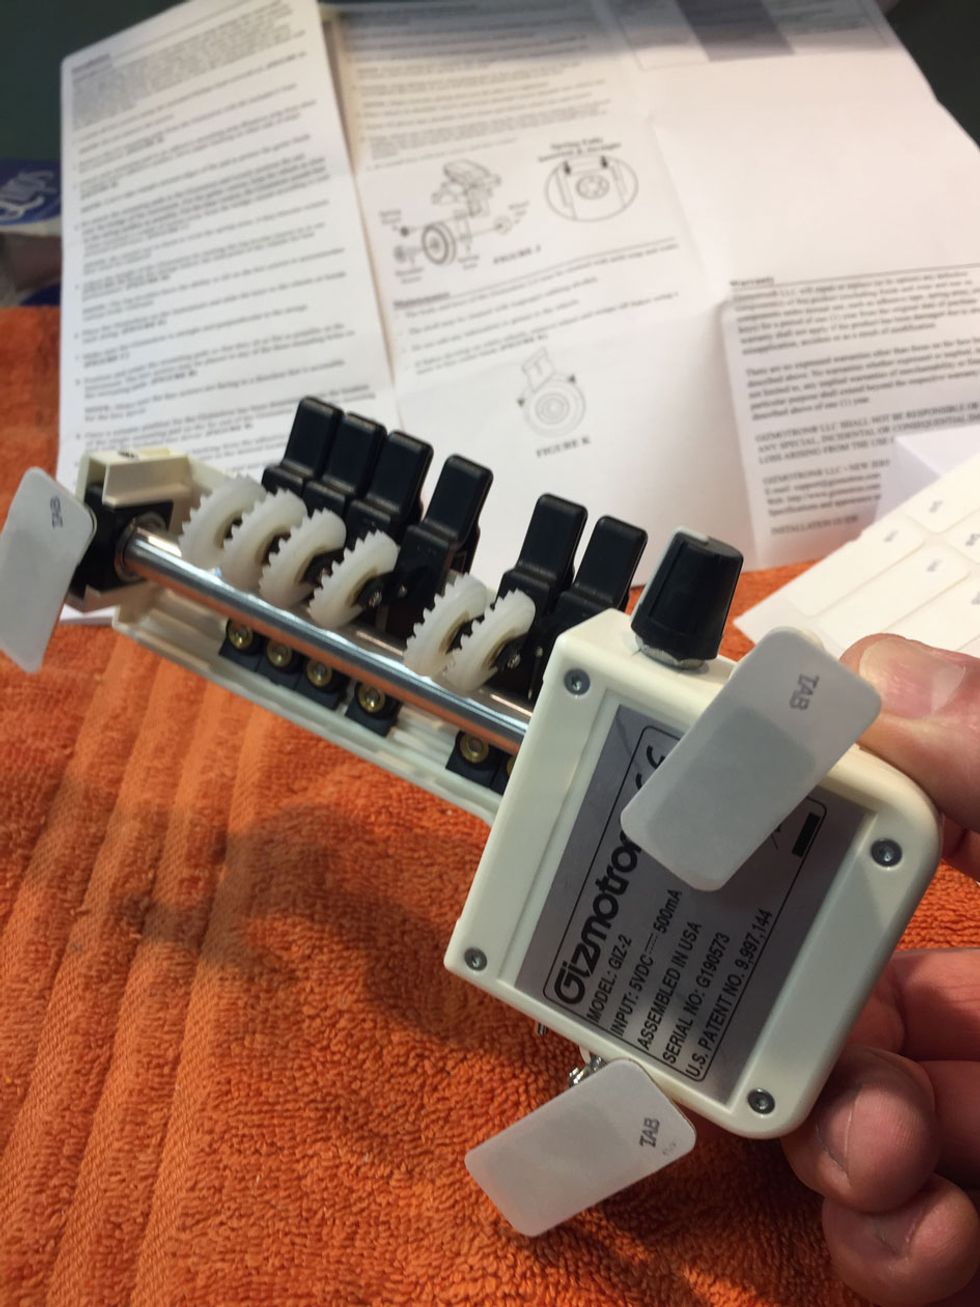
Photo 4
7. Reattach the mounting pads to the Gizmotron (Photo 4) and loosely place the whole housing over the guitar's bridge.
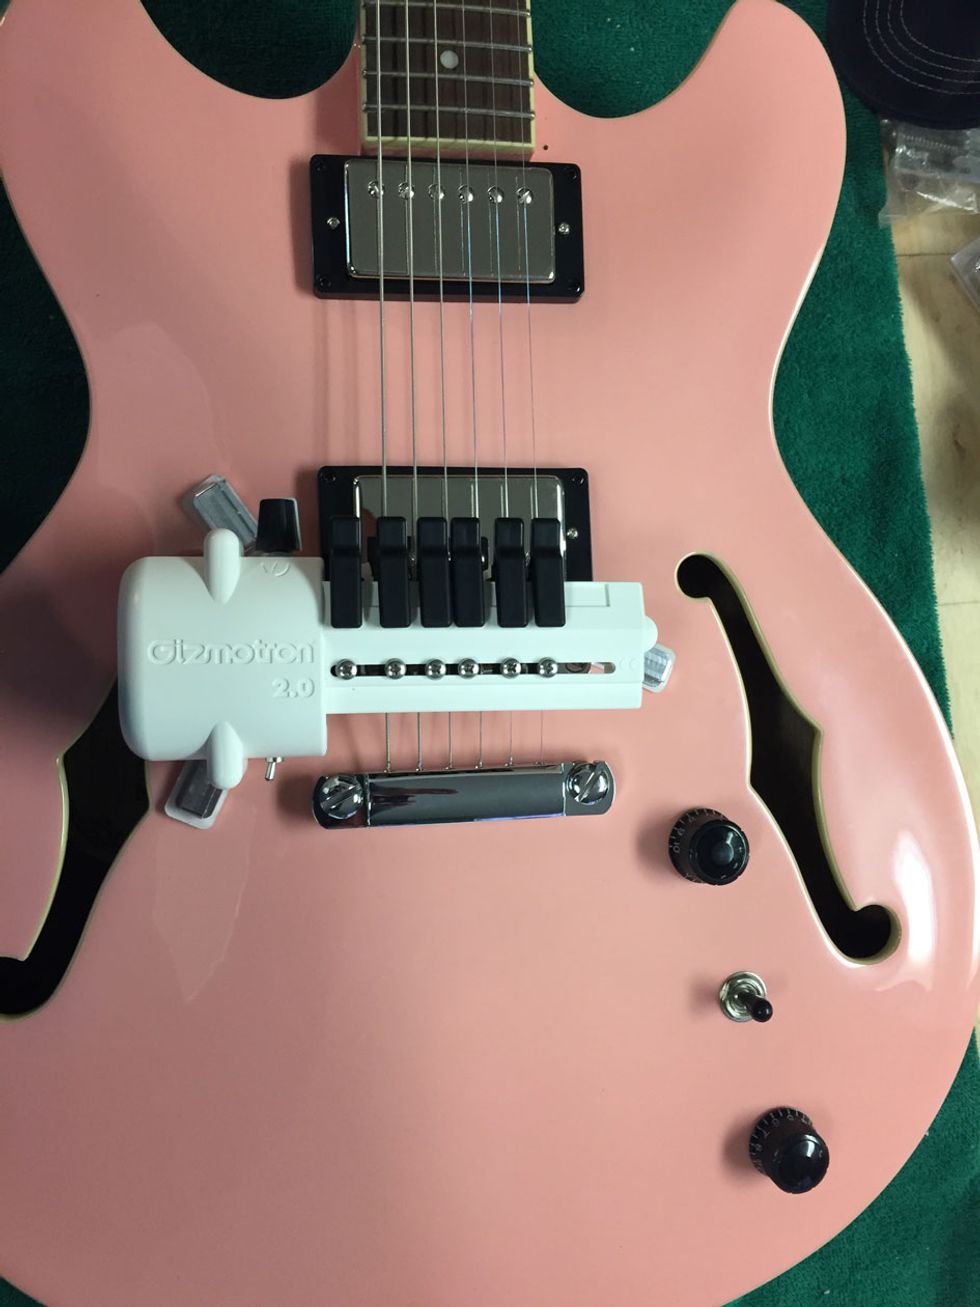
Photo 5
Leave the paper backing on the mounting strips for now (Photo 5).
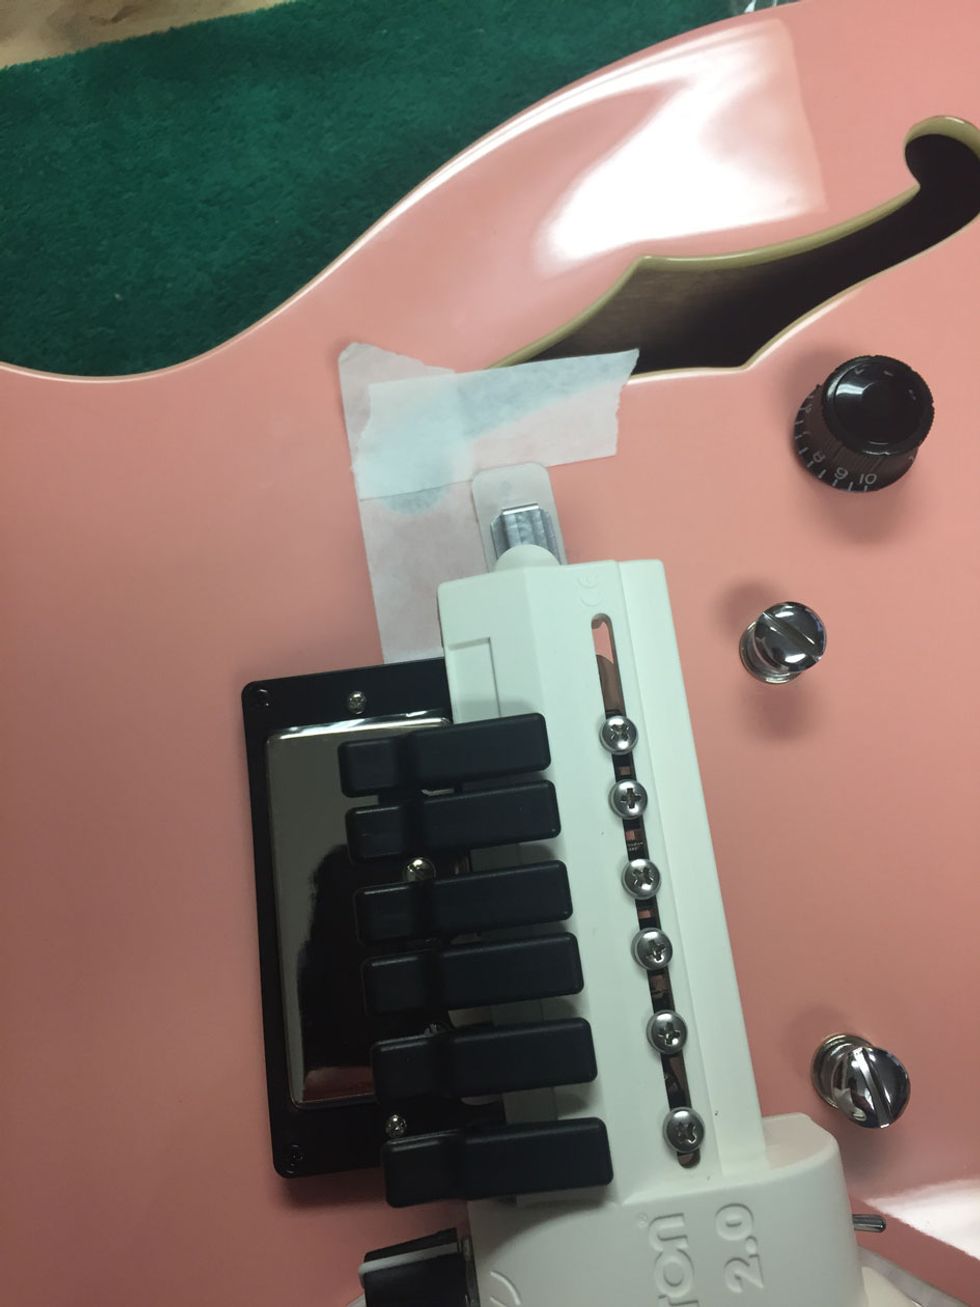
Photo 6
8. Line up the back of the Gizmotron with the back edge of the guitar bridge and ascertain where the treble-side mounting pad should be placed based on this positioning. Mark the spot with low-tack tape (Photo 6).
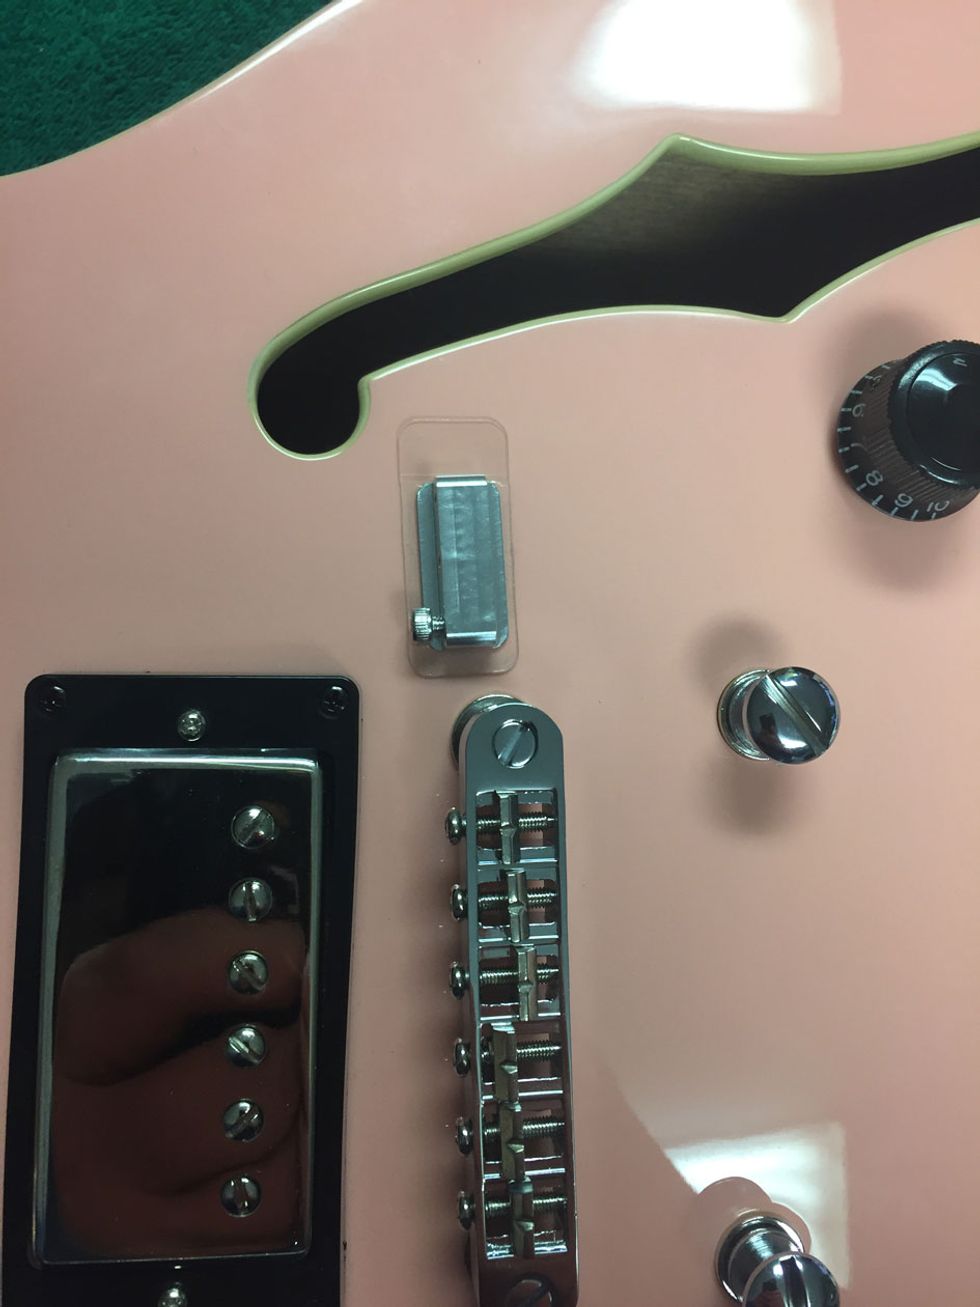
Photo 7
Detach that same mounting pad from the Gizmotron again, peel off its paper backing, and attach the pad in the spot you've just marked (Photo 7).
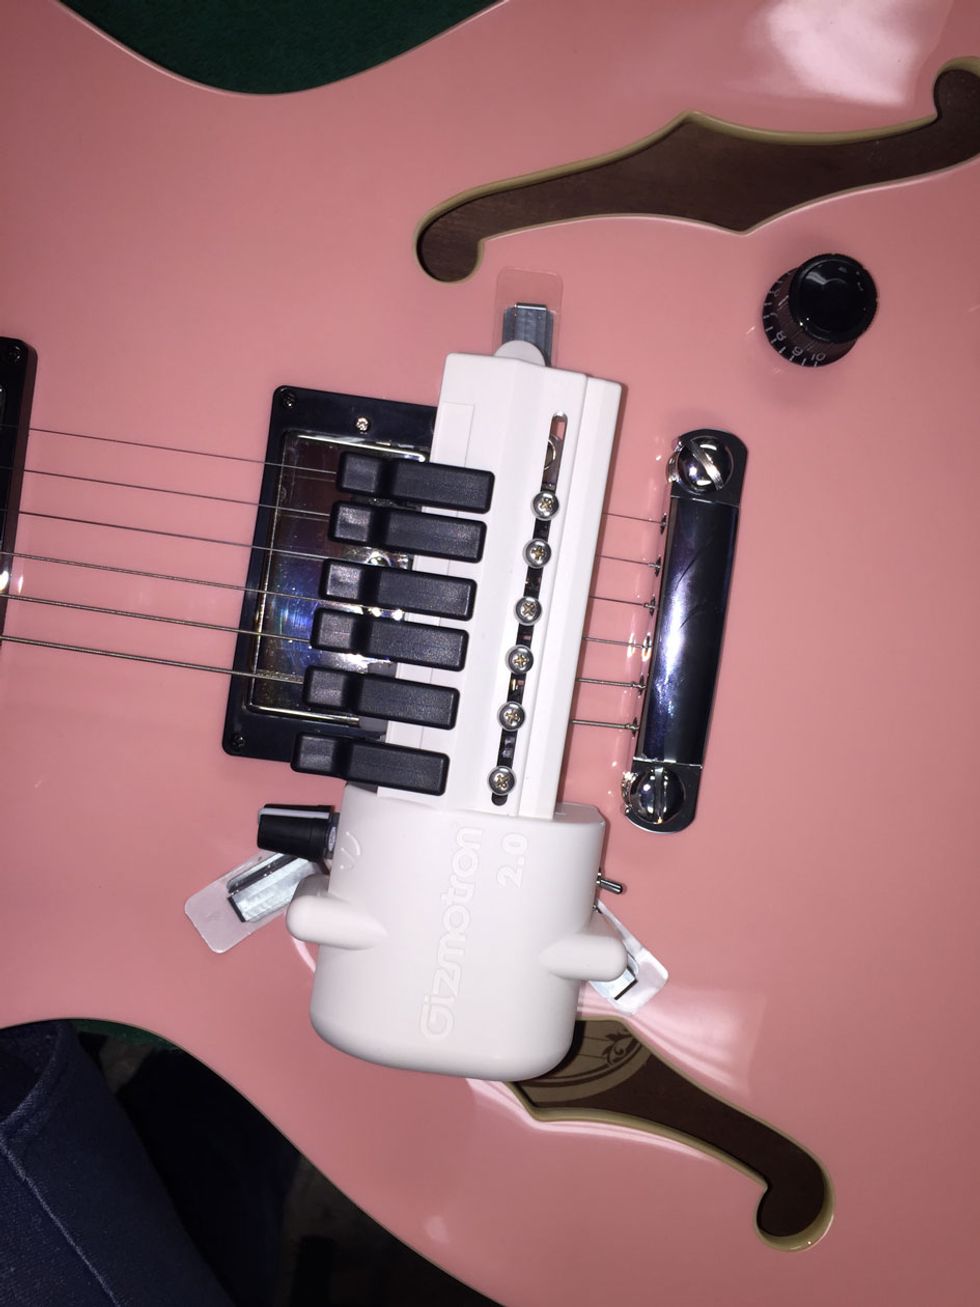
Photo 8
Attach the treble side of the Gizmotron to the newly attached mounting pad (Photo 8).
9. Experiment with positioning of the two remaining (bass-side) mounting pads to determine optimal balancing/leveling of the Gizmotron housing on the guitar's carved top. Make sure the mounting-screw hex heads are accessible for easy loosening and tightening.
10. The serrated, tooth-like side of each Gizmotron string-activator wheel should be positioned so that it angles inward toward the bass side of each string saddle. Move each wheel to the approximate position appropriate for your guitar's string spacing and tighten the keys.
11. Detach the treble-side mounting pad from the Gizmotron (i.e., leave it in place on the guitar body) and remove Gizmotron from the face of the guitar.
12. Restring and set up the guitar with the desired action.
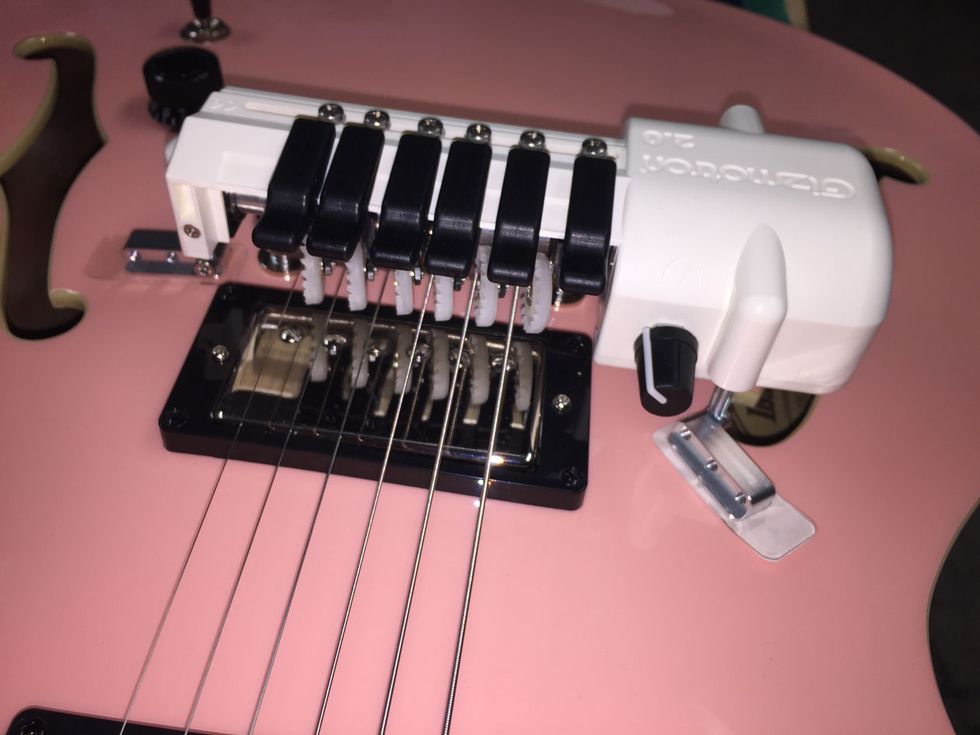
Photo 9
13. Attach Gizmotron to the treble-side mounting pad. If our approximations from step 10 were reasonably accurate, each activator wheel should be close to its corresponding string, but not touching it (Photo 9).
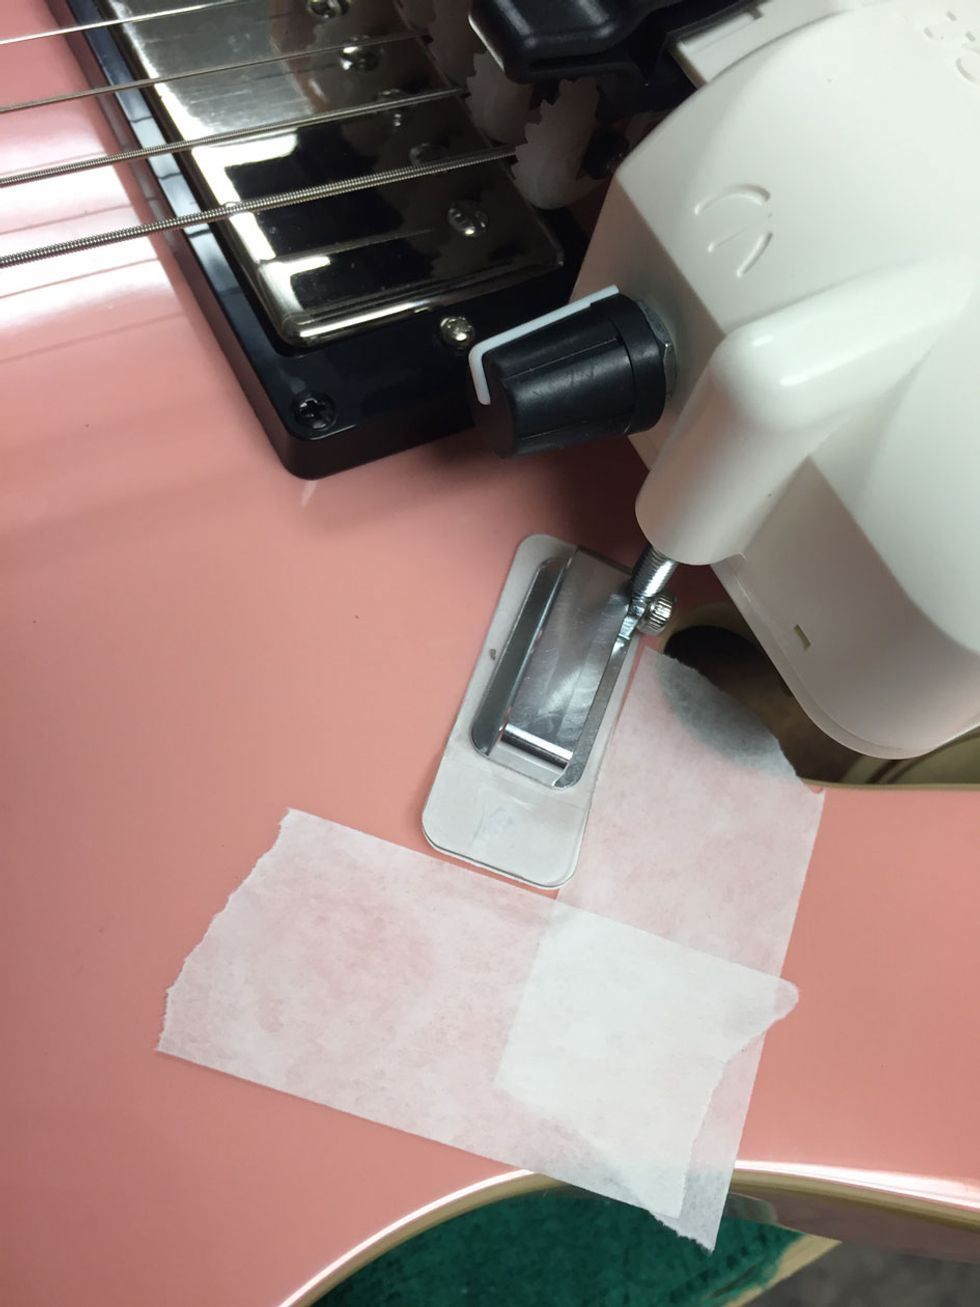
Photo 10
14. Double-check that the Gizmotron is straight and perpendicular to the strings by lining up its rear edge with the back edge of the bridge. Make sure the height-adjustment screws are adjusted so the Gizmotron is balanced and level with the plane of the strings, as well. When you've identified the proper pad positions, remove the paper backing and attach the second mounting pad, then the third (Photos 10 and 11).
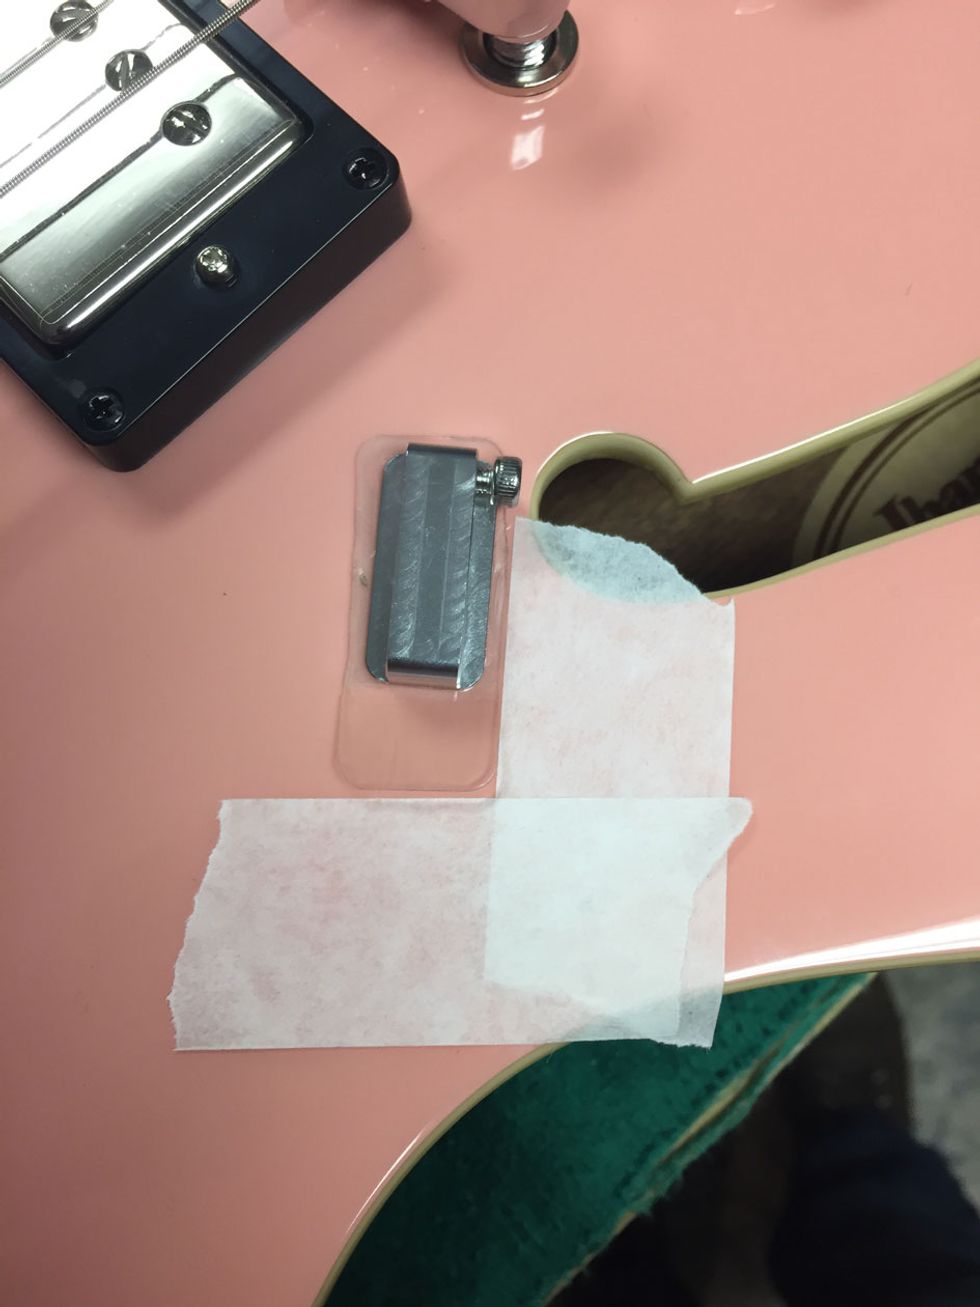
Photo 11
Be sure to leave access to the hex screw so you can tighten and loosen the Gizmotron on the mounting pads.
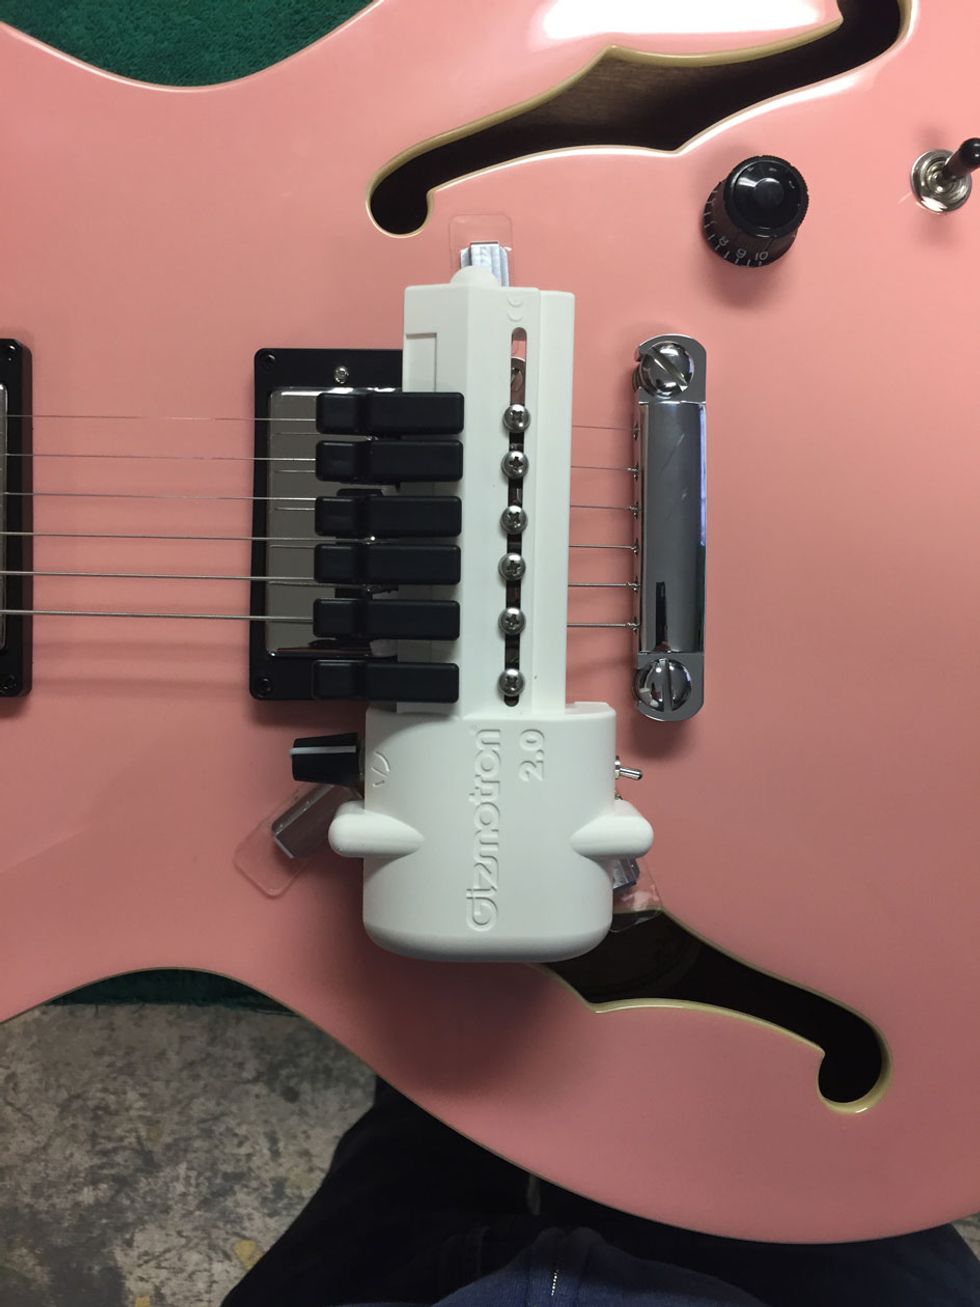
Photo 12
15. With all three mounting pads installed and the Gizmotron in place (Photo 12), balance the Gizmotron so the strings are below the midpoint of the wheels. You may need to remove the Gizmotron a few times to get this right. (Gizmotron has a handy video illustrating many of these steps.)
16. In playing position, set the Gizmotron's speed knob (on the bass side of the unit) at halfway. Fine-tune each wheel's proximity to the strings (by loosening the same Phillips screws discussed in step 4) until each rings out clear when you press its button.
Shawn's Post-Mod Observations
Recorded using an EarthQuaker Devices Hoof, ThorpyFx Heavy Water, Anasounds Element, and Ibanez ES-2 through a silverface Fender Vibrolux Reverb miked with a Royer R-121 and a Fender Rumble 200 1x15 miked with a Shure SM57, both feeding an Apogee Duet going into GarageBand with no EQ-ing, compression, or effects.
I have to admit my expectations for how the Gizmotron would sound were off quite a bit from what I experienced after Dave's expert installation—but in ways primarily positive. The idea of using it as a means of infinite sustain isn't terribly compelling for a couple of reasons: First, the activator buttons require a decent amount of acclimation to get the right attack—at first it can be difficult to not overdo it. Second, by their very nature, the activator-wheels' serrated edges yield a choppier dynamic than a real horsehair bow during extended application. Combine that form factor with the button sensitivity, and it can be difficult to get a smoothly sustaining note at a consistent dynamic. However, for me textures are the most lamentably lacking element in other electronic offerings, and in this regard the Gizmotron really shines. Two tricks: Engage a drive pedal to boost volume and add some grit (I got great results with my EarthQuaker Devices Hoof, as well as a nice helping of reverb and delay), and use a fast, staccato-ish attack with the activator buttons. Coming at it from this angle and varying both your guitar's tone control and Gizmotron's speed settings (I preferred keeping it somewhere in the first half of the knob's range) yields everything from melancholy to chipper cello sounds from the neck pickup, and resounding violin- or viola-like response from the bridge pickup. Speaking of pickups, the Artcore's stock units are pretty damn good, especially for the price, but the Mojo Tone '59 Clones brought out a lovely depth and warmth in the midrange.
Click here to enter for a chance to win this expertly modded guitar.
12-Pack T-Style
One of the strangest things about the gear-aplenty age we live in is that, despite all the iconic songs featuring chiming 12-string electric guitar—from Wrecking Crew badass Carol Kaye's on the Crystals' “Then He Kissed Me" to George Harrison's on “A Hard Day's Night," Page's on “The Song Remains the Same," Glenn Frey's on “Hotel California," half of Tom Petty's catalog, and a jillion others—there's a dearth of new models on the market. The average brick-and-mortar shop has one or two, tops, while online retailers have a few more, but only from a handful of manufacturers—typically Danelectro, Rickenbacker, Guild, D'Angelico, and PRS. And virtually all of them are semi-hollowbodies. This is a big head-scratcher given how many legendary players use/used solidbody 12s—like the Fender Electric XII (Jeff Beck, Eric Clapton, Pete Townshend, Tim Buckley, Page), Gibson EDS-1275 (Alex Lifeson, John McLaughlin, Page), and Vox Phantom XII (Petty, Dave Davies).
One can only speculate why this is, but either way our final no-brainer mod makes it spectacularly clear you don't have to be limited by new offerings or high-priced rarities. Inspired by the custom instrument that German luthier Frank Deimel built for Sonic Youth's Lee Ranaldo, we converted an old Squier Classic Vibe '50s Telecaster into a 12 as a sort of test run a couple of months before this article. It turned out fantastic! What we love most about the idea (besides the low-risk springboard thing) is that the concept can be applied to just about any 6-string while also avoiding the huge, unsightly headstock you see on so many electric 12s.
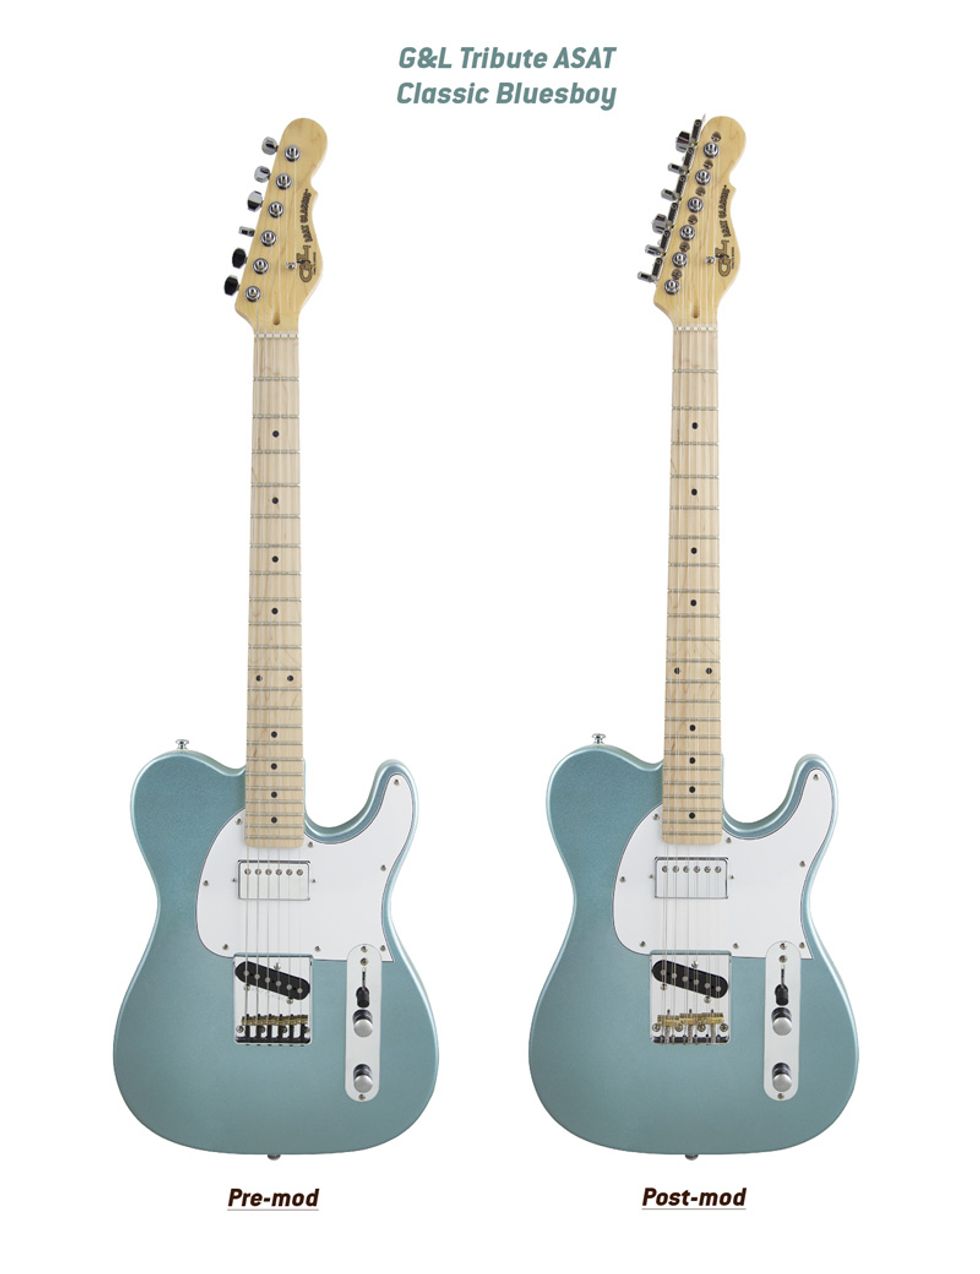
In theory, this is a pretty straightforward mod: Add six tuners (alternating at 90-degree angles, as on a Rickenbacker) to the headstock's top edge, and adapt the nut, saddles, and bridge to accommodate the extra strings. However, in execution it's a bit tricky—but not exorbitantly so for those with solid woodworking (and a little metalworking) credentials. For our no-brainer story's project, we decided to go the same basic route on a G&L Tribute ASAT Classic Bluesboy ($449 street).
Dave's Installation Tips
1. Remove tuners and neck. Set body aside.
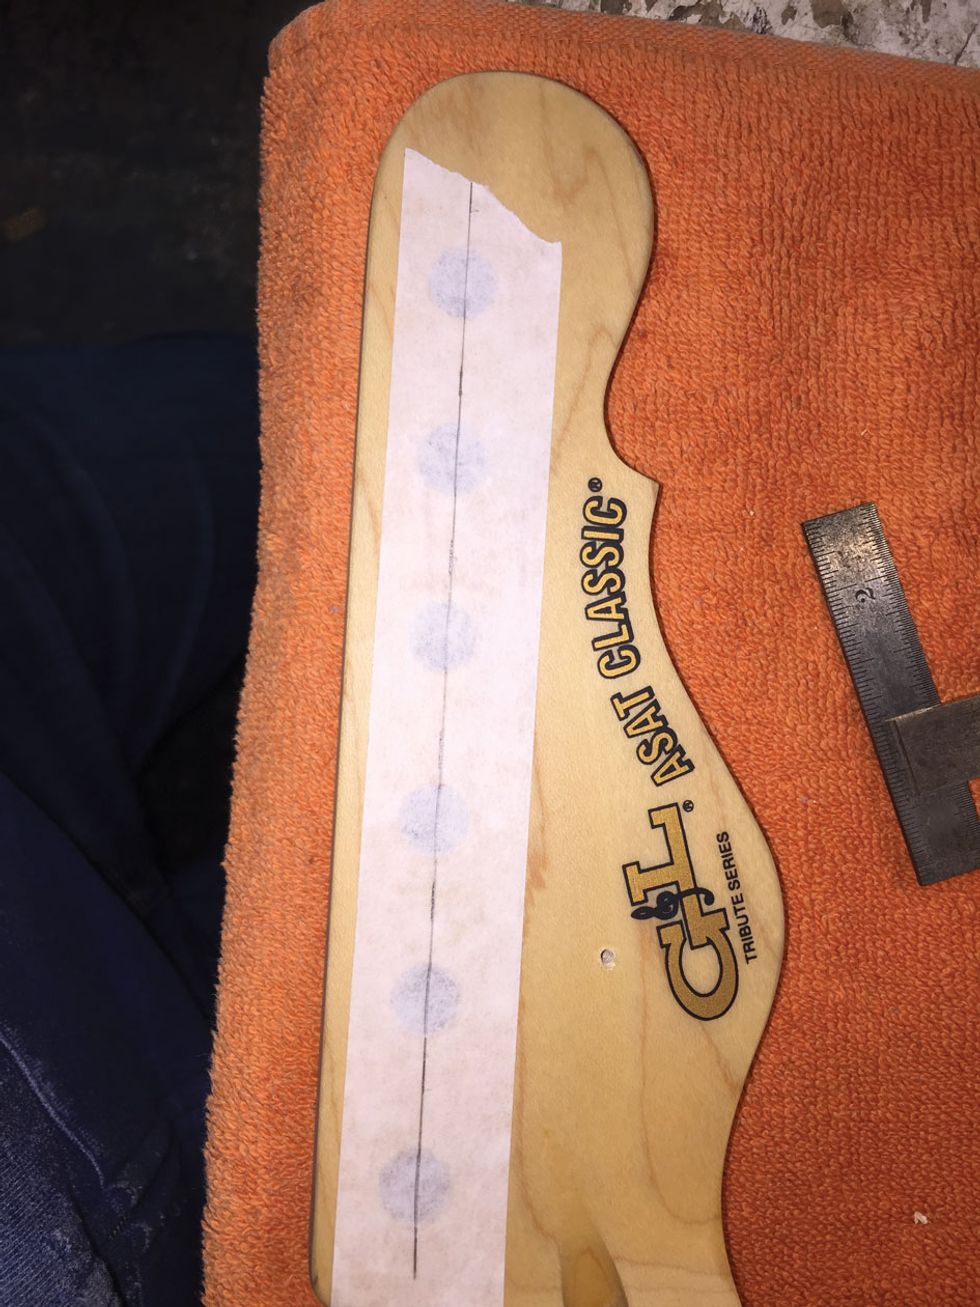
Photo 1
2. Use low-tack tape and a square to mark the centerline of the current tuner holes (Photo 1).
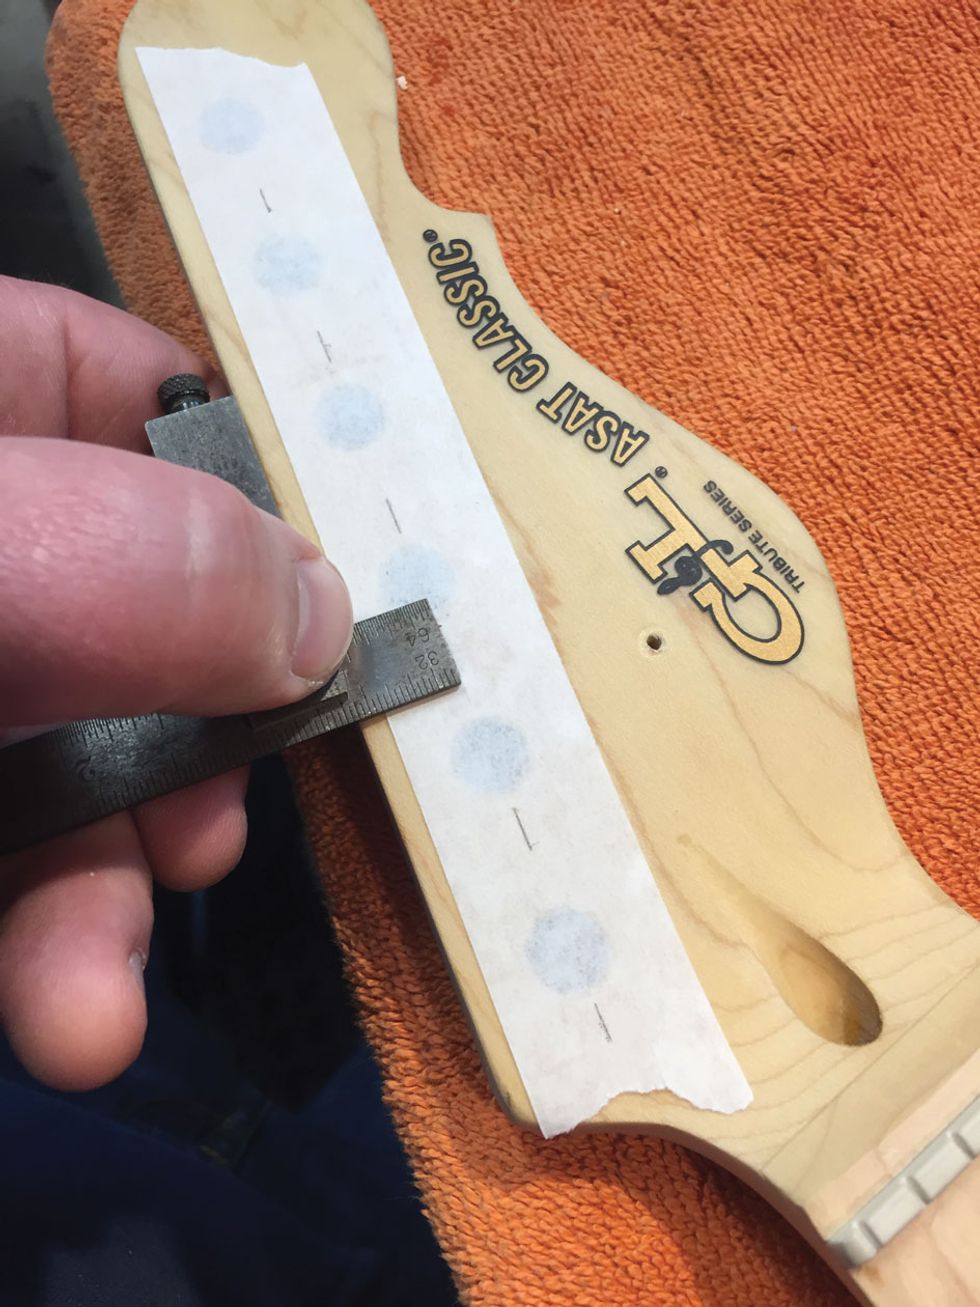
Photo 2
3. For our G&L guitar, the centers of the new tuner holes are 37/64" from the headstock's flat top edge (Photo 2). This measurement will vary for other guitar models.
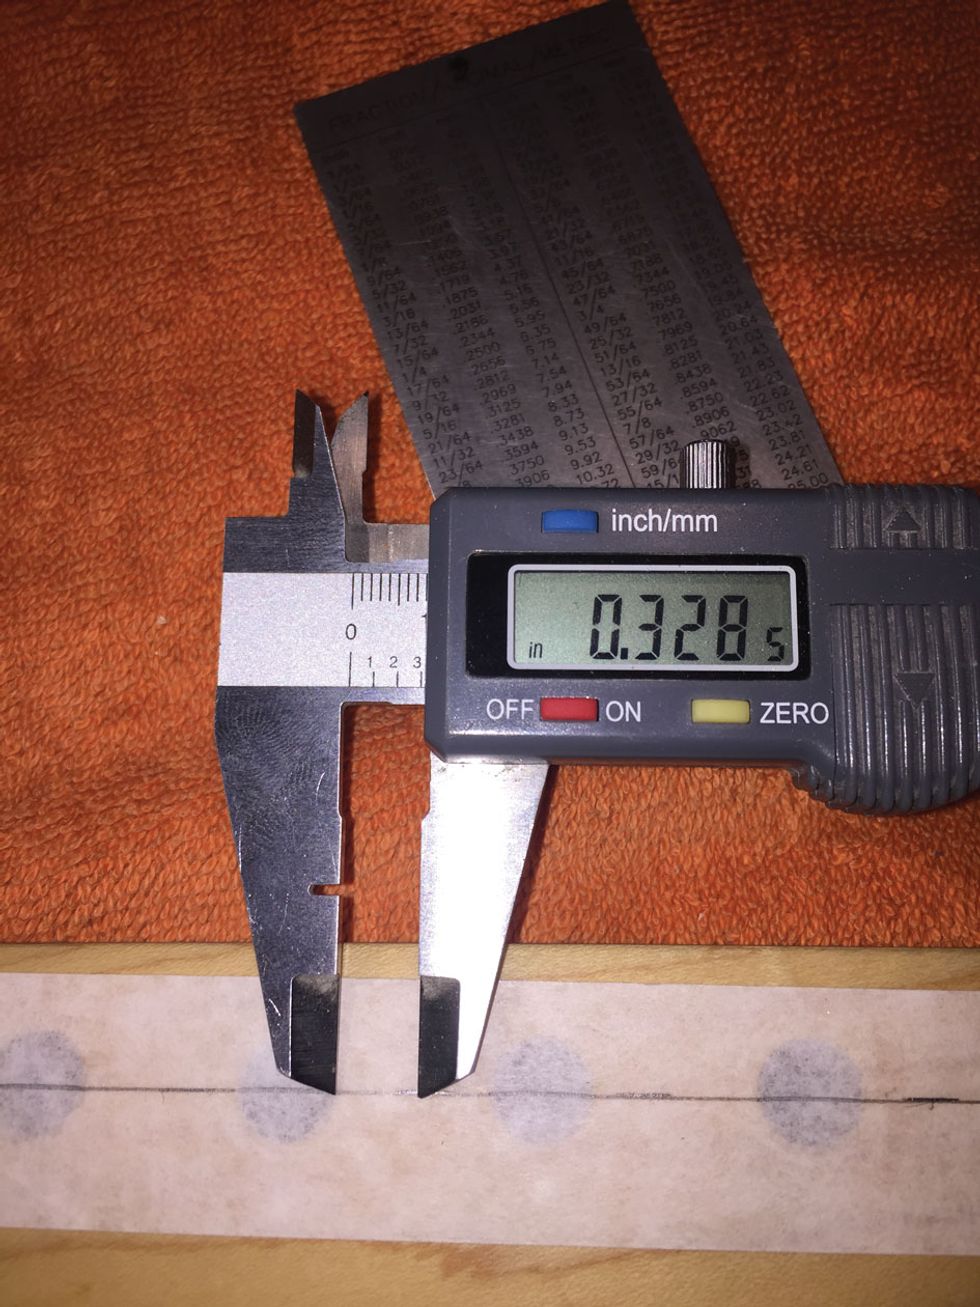
Photo 3
4. The space between the original tuner holes is 21/32". Divide this measurement in half, and you've got the distance for where the new holes will be—i.e., .328" or 21/64" (Photo 3). Again, this will vary for other guitars.
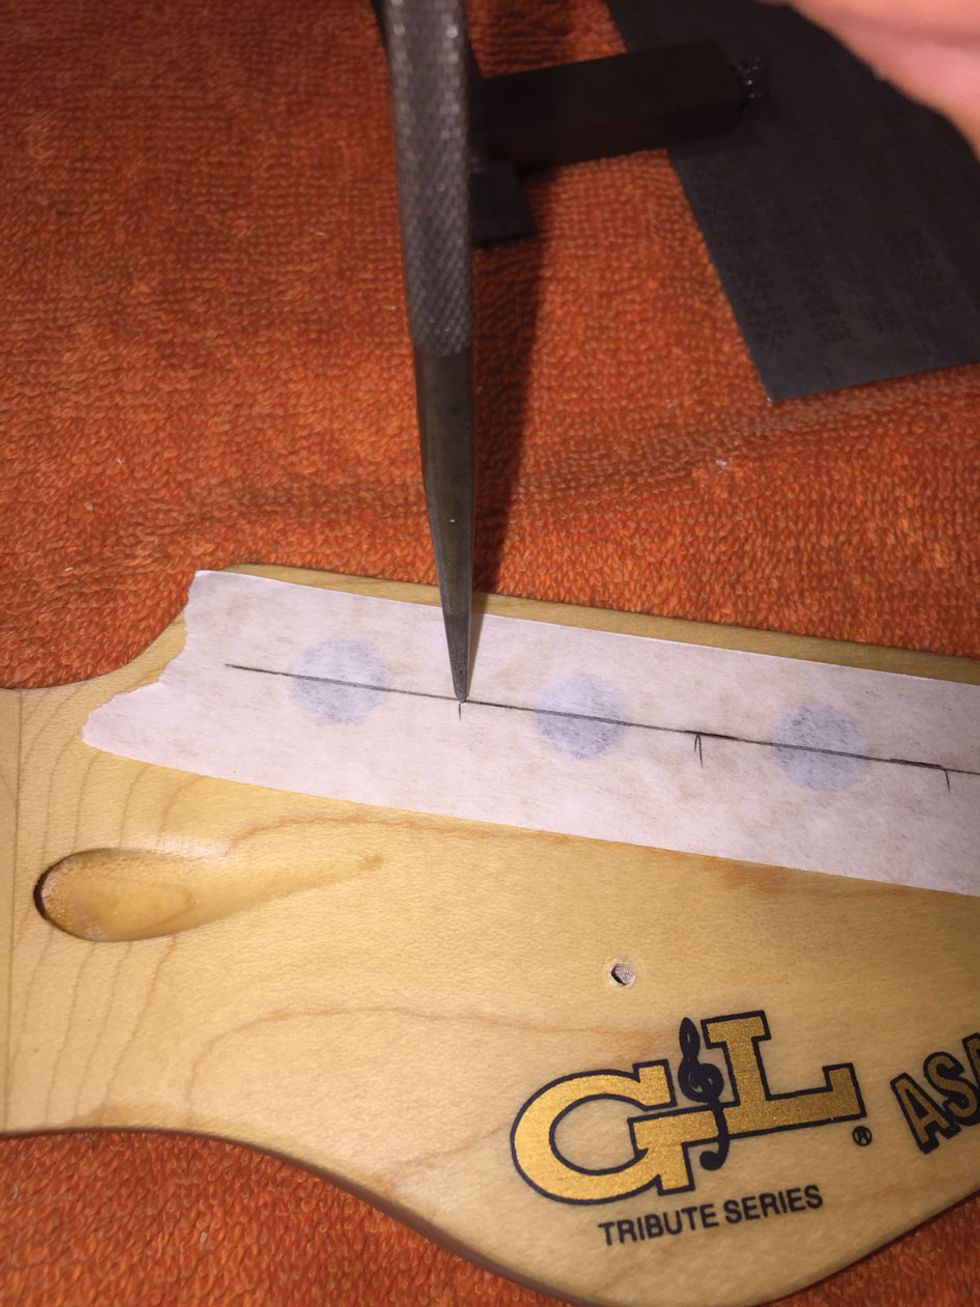
Photo 4
5. Mark the new hole locations on the tape (Photo 4), then use a punch to mark the center of the new holes.
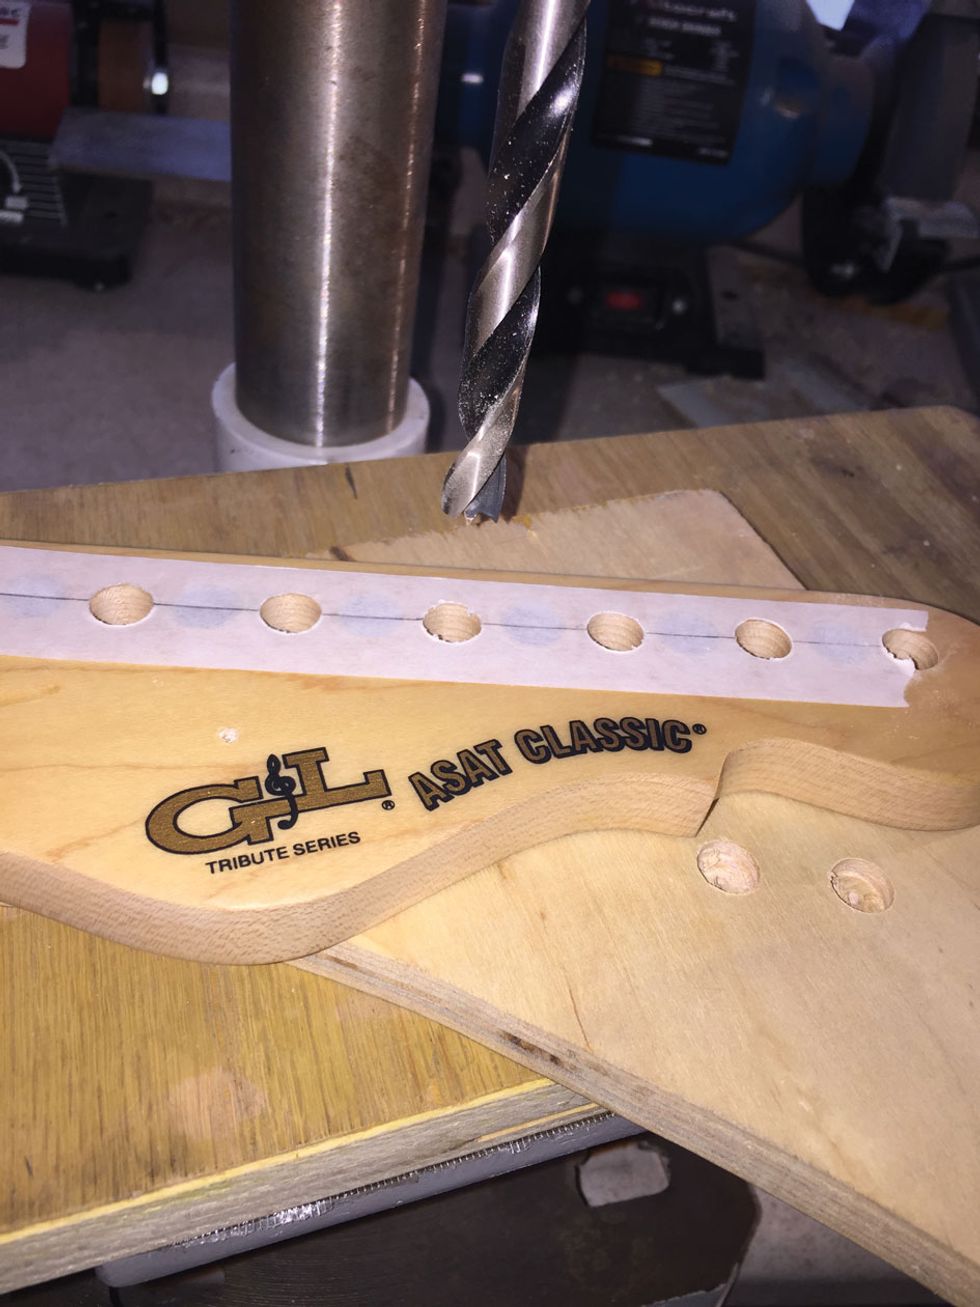
Photo 5
6. Drill the holes using a drill press with a 10 mm brad-point bit. To prevent nasty wood blowout, place a spare piece of wood under the headstock (Photos 5, 6, and 7).
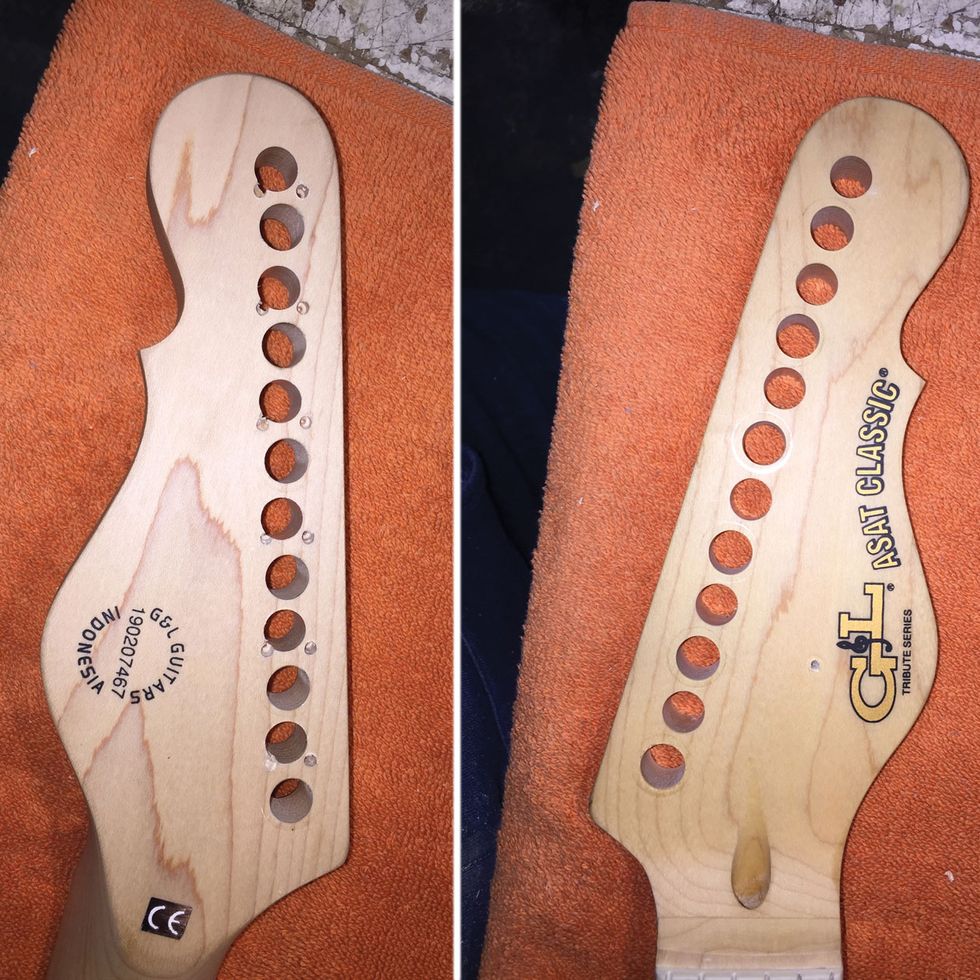
Photos 6 (left) and 7 (right)
7. Apply low-tack tape to the headstock's narrow top edge and mark the centers of the new holes, which will line up on center with the 10 mm holes drilled in step 6. Drill into the straight edge of the headstock. The G&L's headstock is .590" thick, so—from the edge of the headstock—measure half the headstock thickness (.295" in our case). That is the center of your holes on the side of the headstock.
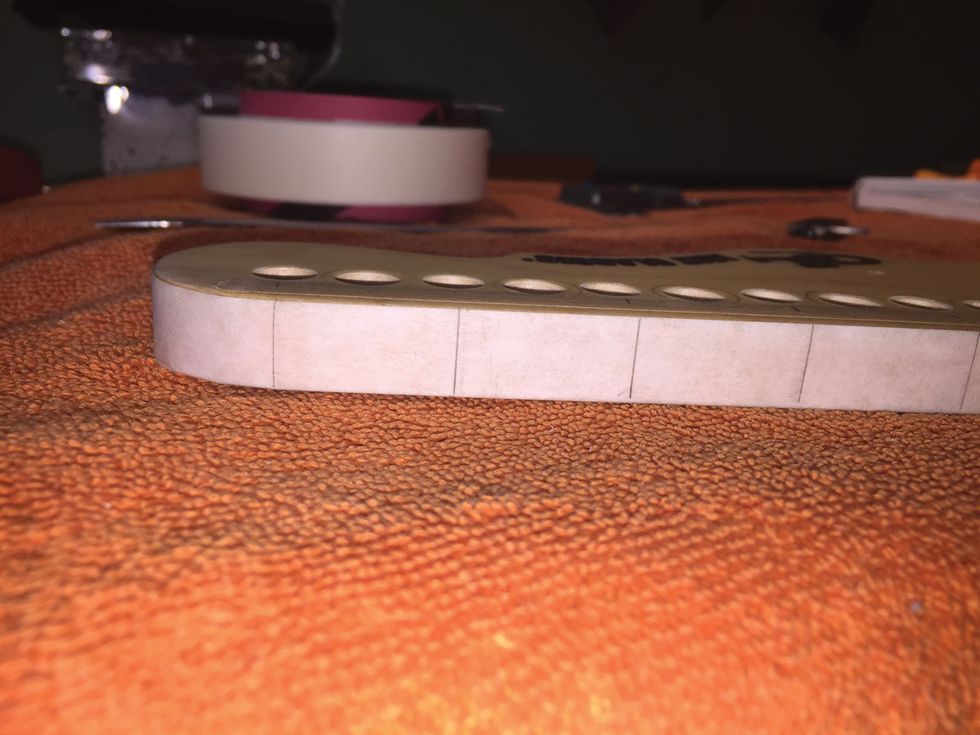
Photo 8
Use a square and pencil to mark the edge, and mark the centers of the holes using a punch (Photos 8 and 9).

Photo 9
8. Protect the headstock with a cloth and then place it in the nut-and-saddle vise with the narrow top edge level and on top.
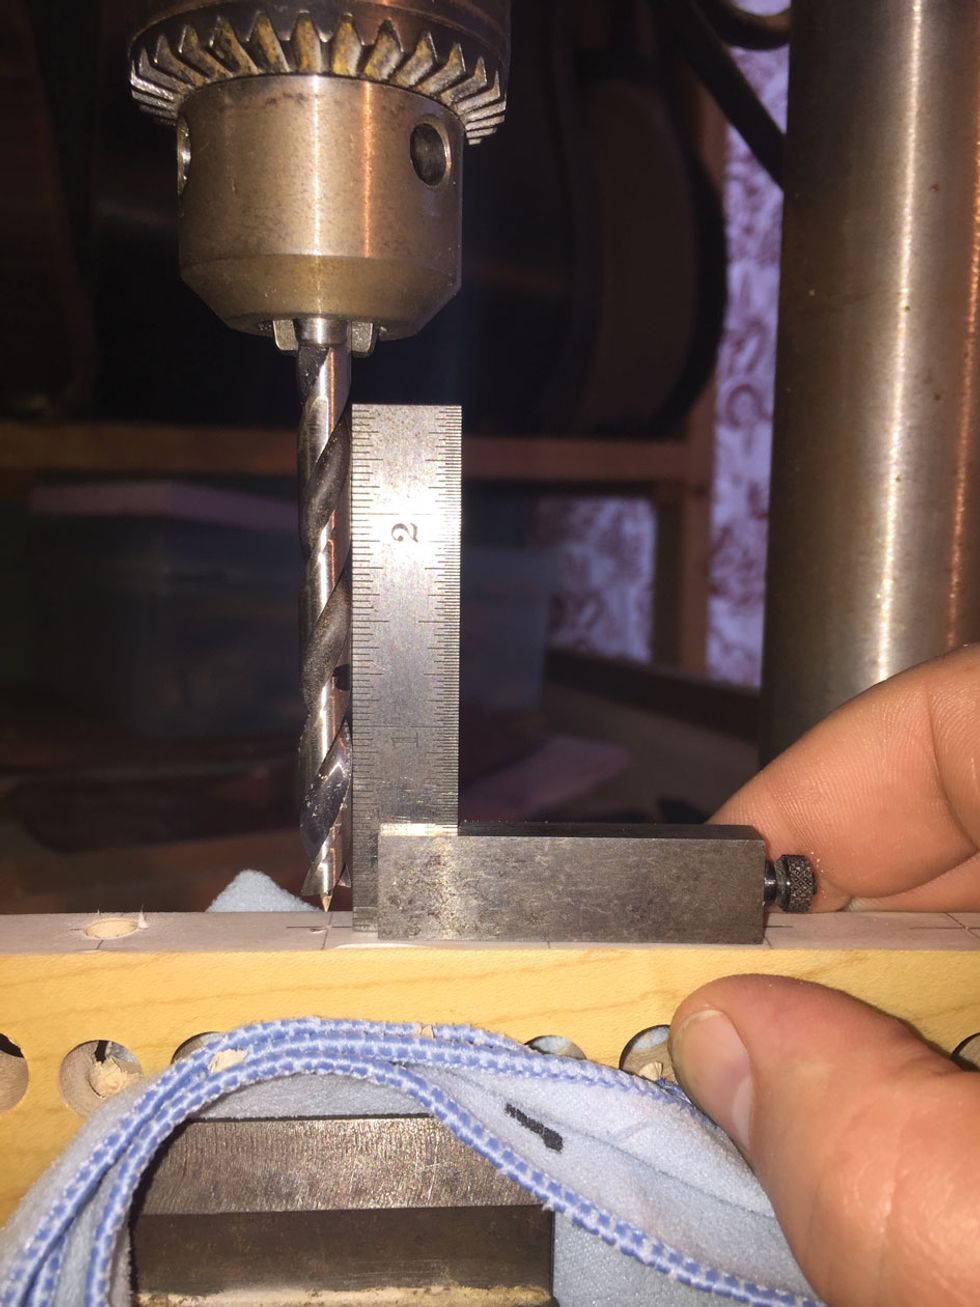
Photo 10
9. Use a drill press and 1/4" brad-point bit to create a 1"-deep hole in the top edge of the headstock, hitting the center of the 10 mm holes drilled in step 6. (Note: Make sure the drill bit is square, i.e., perfectly perpendicular, to the edge of the headstock.)
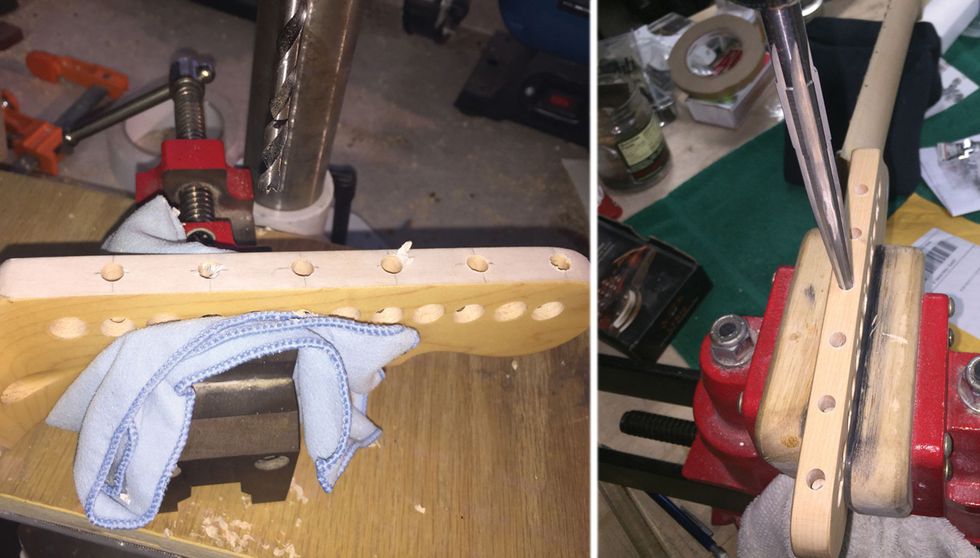
Photos 11 (left) and 12 (right)
Use the endpin jack reamer to make the 1/4" hole slightly larger so the Gotoh tuner posts can move freely (Photos 10, 11, and 12).
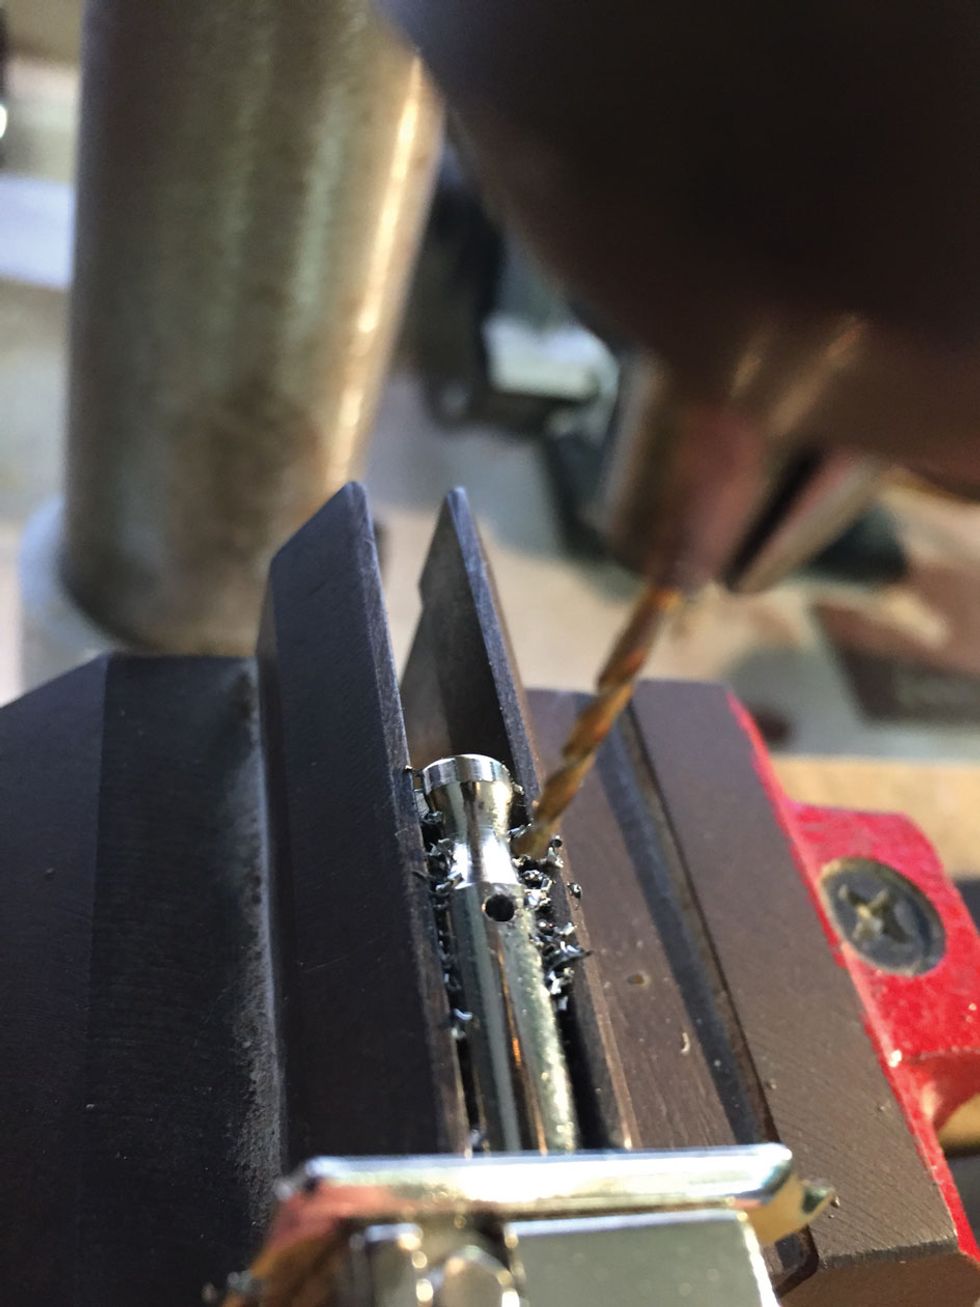
Photo 13
10. On all the new Gotoh tuners, mark 5/8" up the post with a marker. Put each post into the nut-and-saddle vise and drill a perpendicular hole through its side using your drill press and titanium 1/16" drill bit (Photo 13).
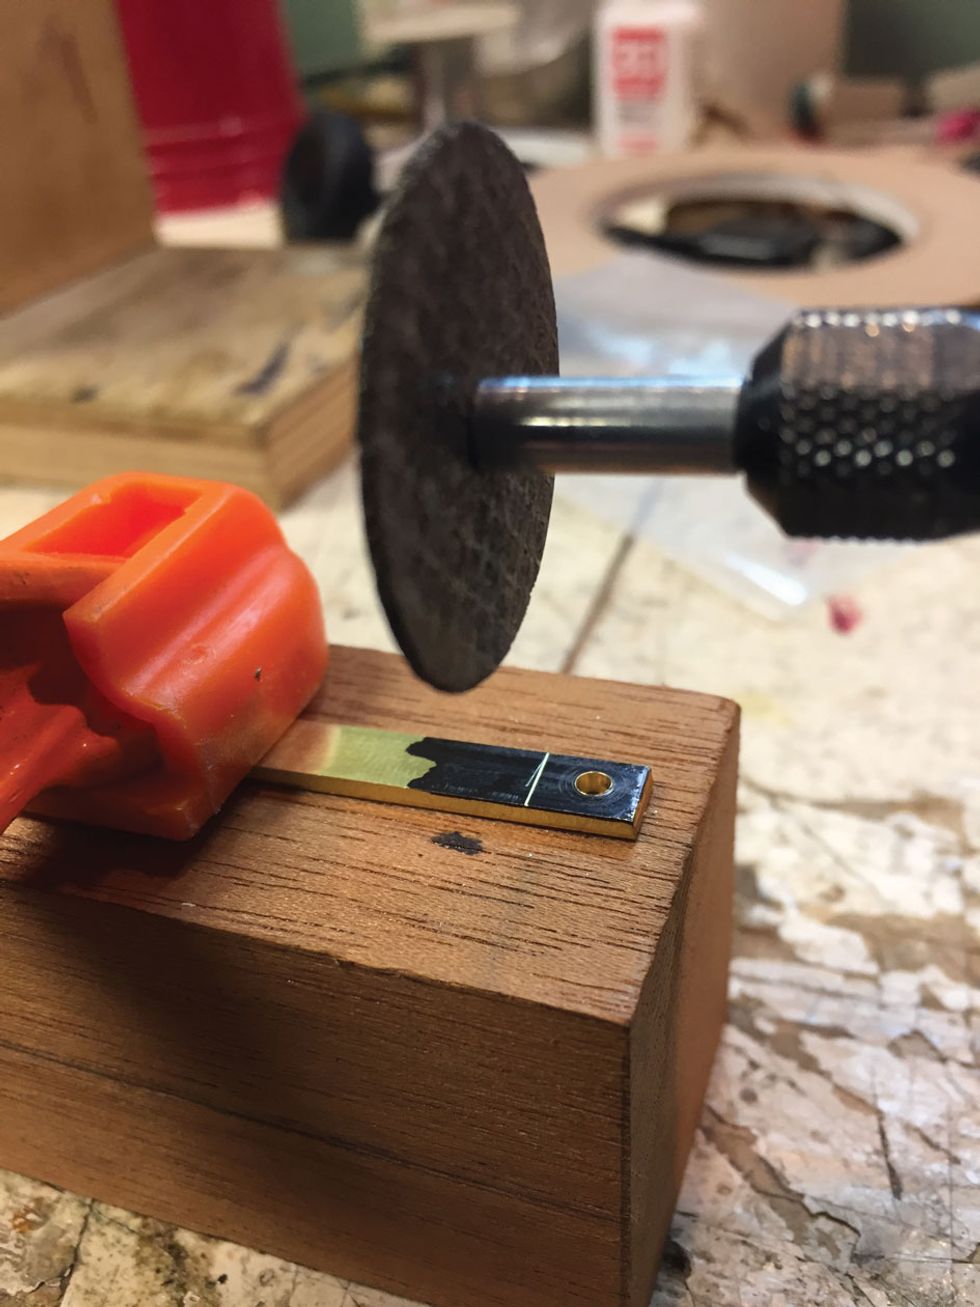
Photo 14
11. If, like we did with the G&L, you find that your guitar's original tuner spacing is such that the new top-edge Gotoh tuners must be mounted further apart than in standard applications—meaning their mounting plates won't butt up against each other and adjacent tuners won't be able to share mounting screws—then you may have to machine simple mounting brackets to bridge the gaps. While the Squier Classic Vibe Tele's 1" spacing between tuners didn't require this, the Bluesboy's 1 1/16" spacing required crafting five (5) 5/16" x 1/4" strips out of .064"-thick brass.
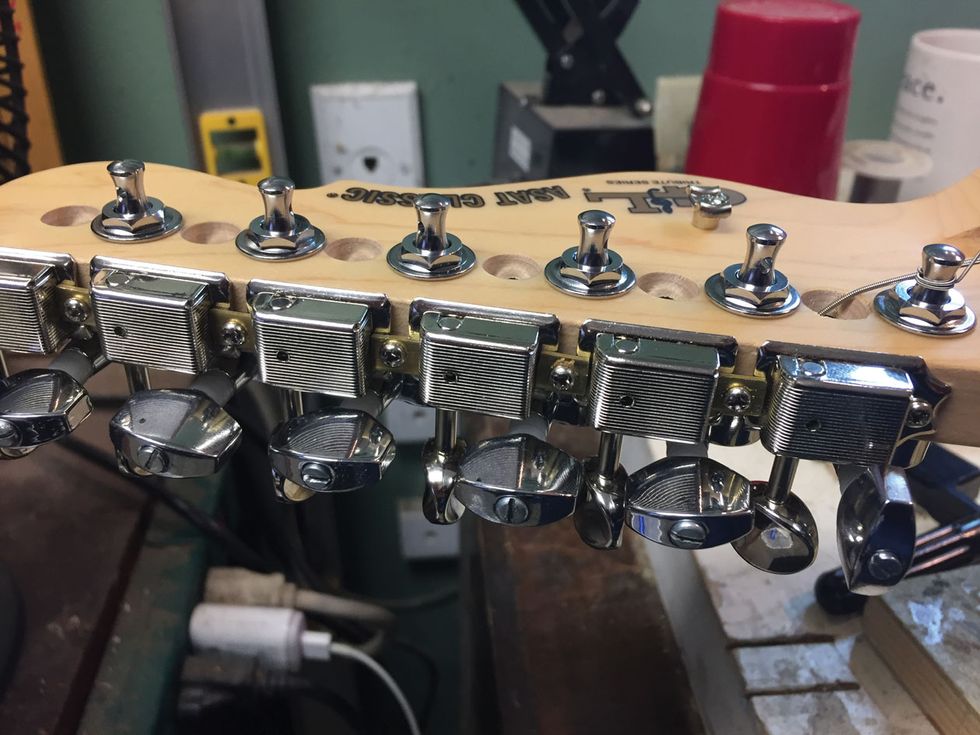
Photo 15
To do this, mark the brass with a black marker, scoring lines at 5/16" lengths. Using your drill press and a 7/64" titanium bit, drill a hole in the center of each 5/16" piece. Then use a Dremel to cut each 5/16" piece, and the nut-and-saddle vise and a bastard mill file to true the edges (Photos 14 and 15).
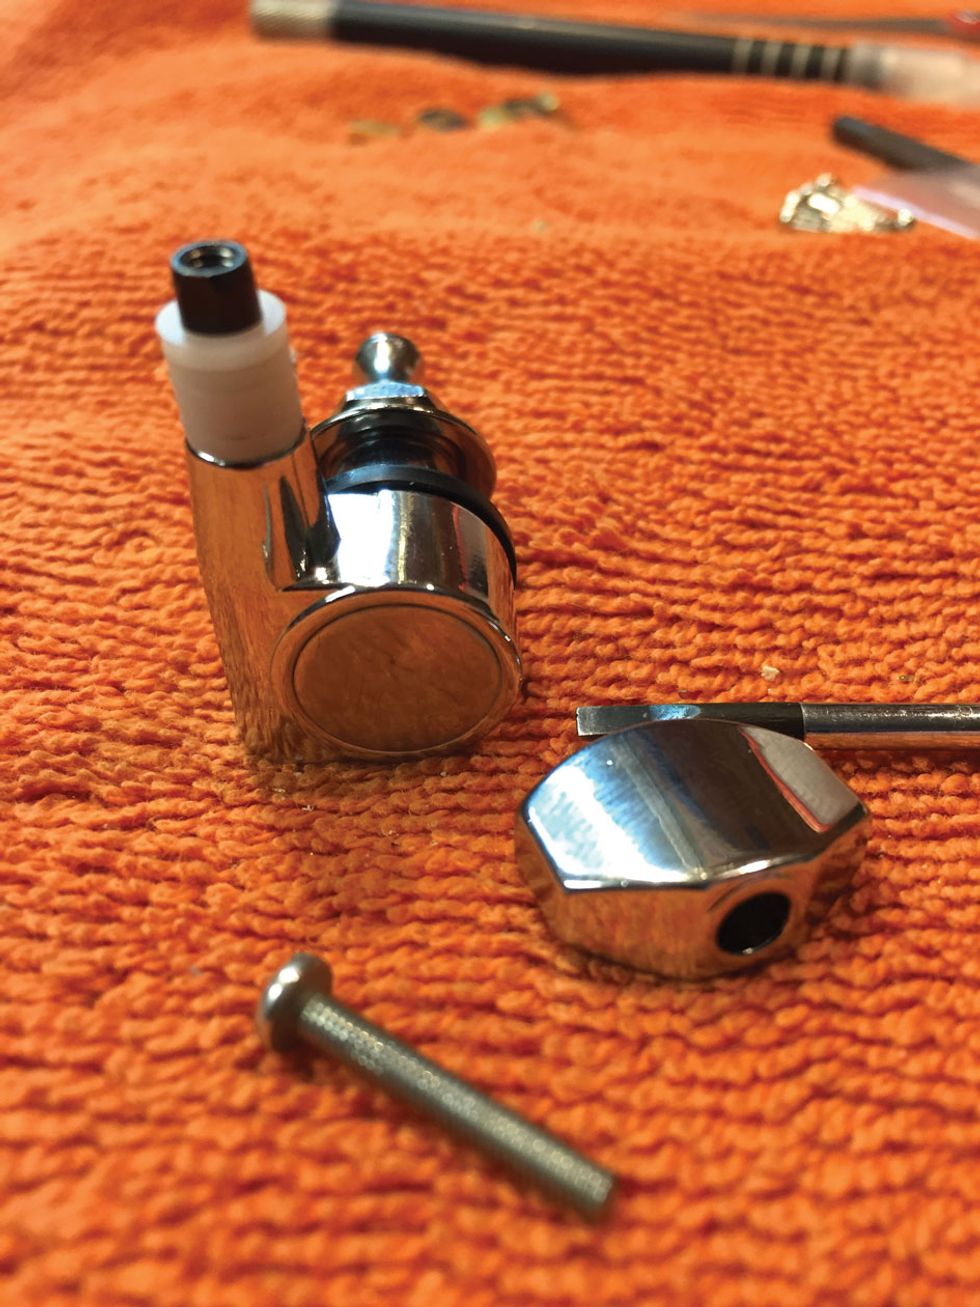
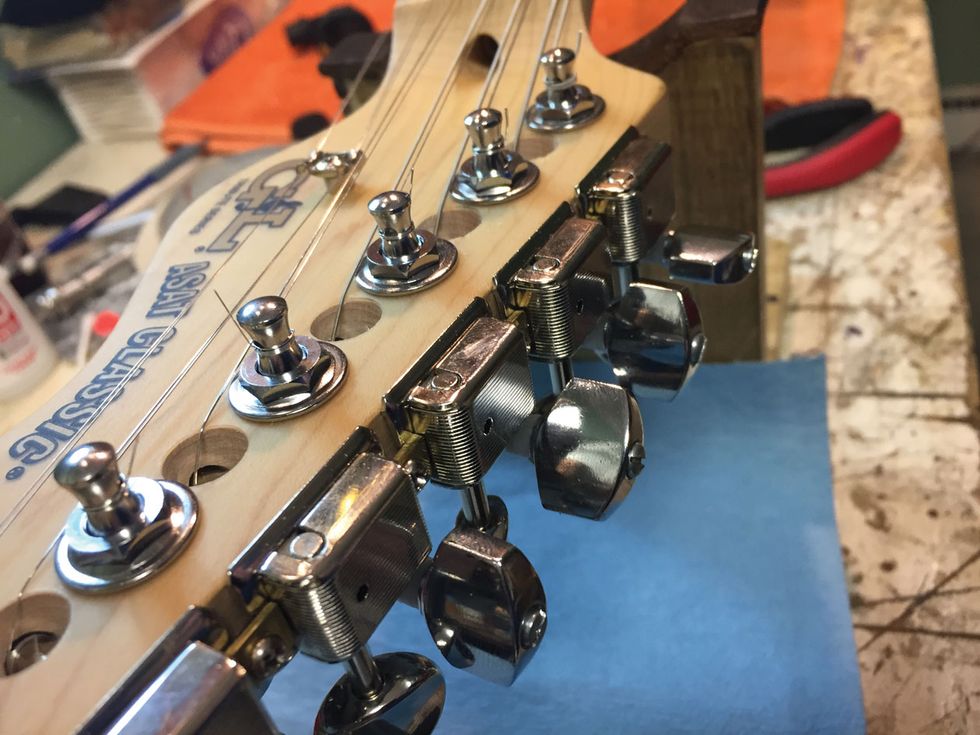
Photo 16
12. Remove the tuning buttons from the guitar's original tuners and add four (4) plastic guitar washers to every shaft (for a total of five washers on each). This will ensure the original tuning buttons don't hit the Gotohs during use. I used M2.5 x 20 pan machine screws cut to length to reattach the buttons, since the original screws weren't long enough (Photo 16).

Photo 17
13. Add one 3/8" black plastic washer flush to the gearbox assembly on each of the original tuners. This helps the tuners clear each other so everything can turn freely (Photo 17).
14. Mount all the tuners and check for free movement.

Photos 18 and 19
15. Swap the guitar's stock bridge (Photo 18) out for the Wilkinson (Photo 19)—which is a great choice because it already accommodates all 12 strings, thanks to its inclusion of both through-body and top-load stringing holes. (If you wish to use a bridge that doesn't already have top-loading holes near the saddles' intonation-adjustment screws, you'll have to drill your own. Do so by removing the saddles, marking the drill points—the through-body holes are handy reference points—putting the bridge plate in the nut-and-saddle vise, and using your press and 1/16" HSS bit to drill each hole. Smooth burrs with a Dremel's polishing attachment.)
16. Reassemble the guitar.
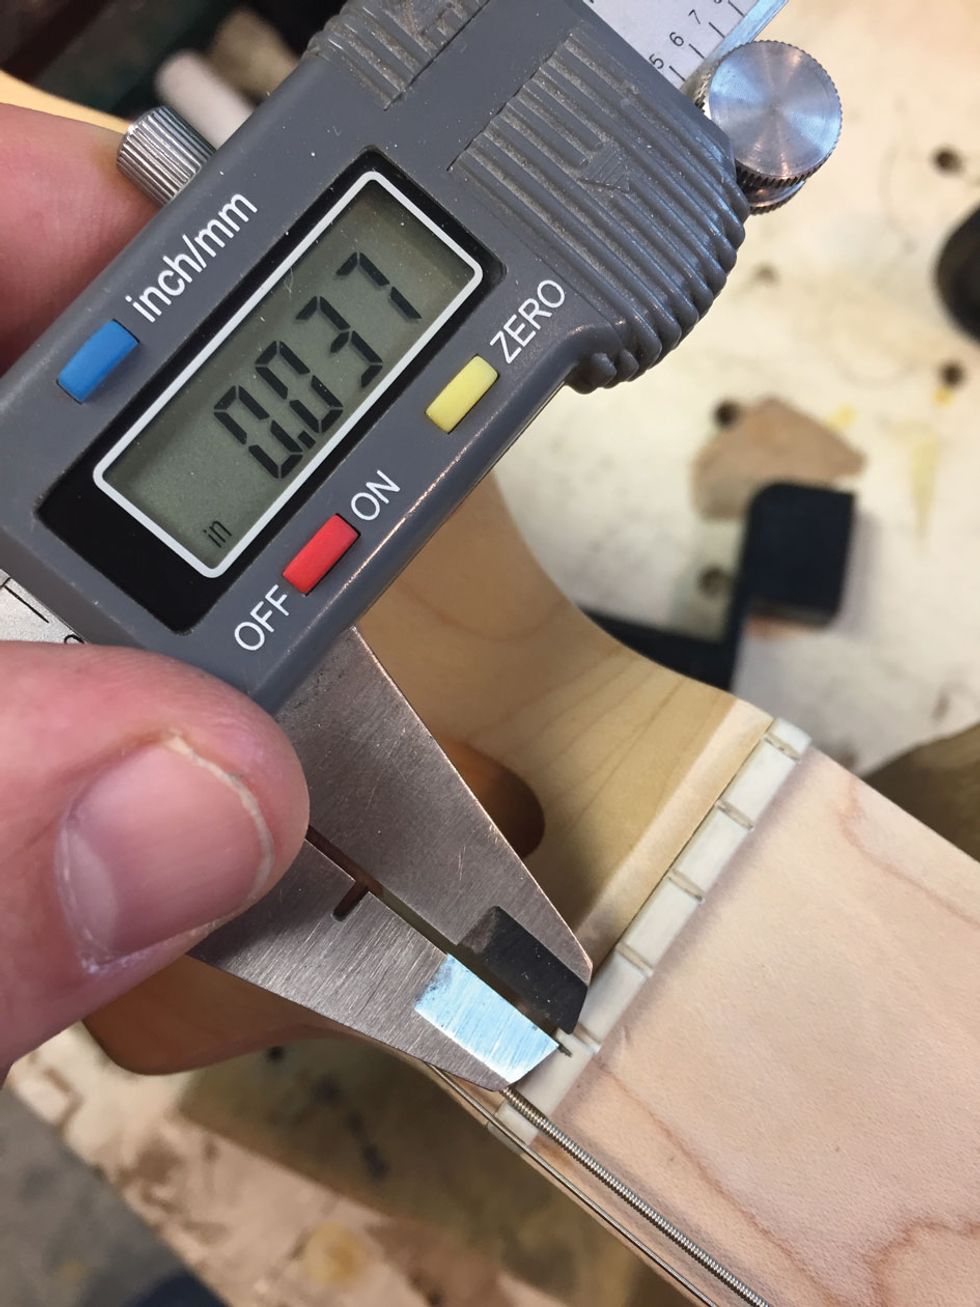
Photo 20
17. To cut nut slots for the additional strings, use digital calipers to measure .037" to the left of each original nut slot (Photo 20). Mark each spot with a pencil and score the slots with a .012" nut file, then widen each slot with the file that matches the corresponding string diameter. Carefully rough in the spacing without going to the full depth—we'll do that in the final setup.
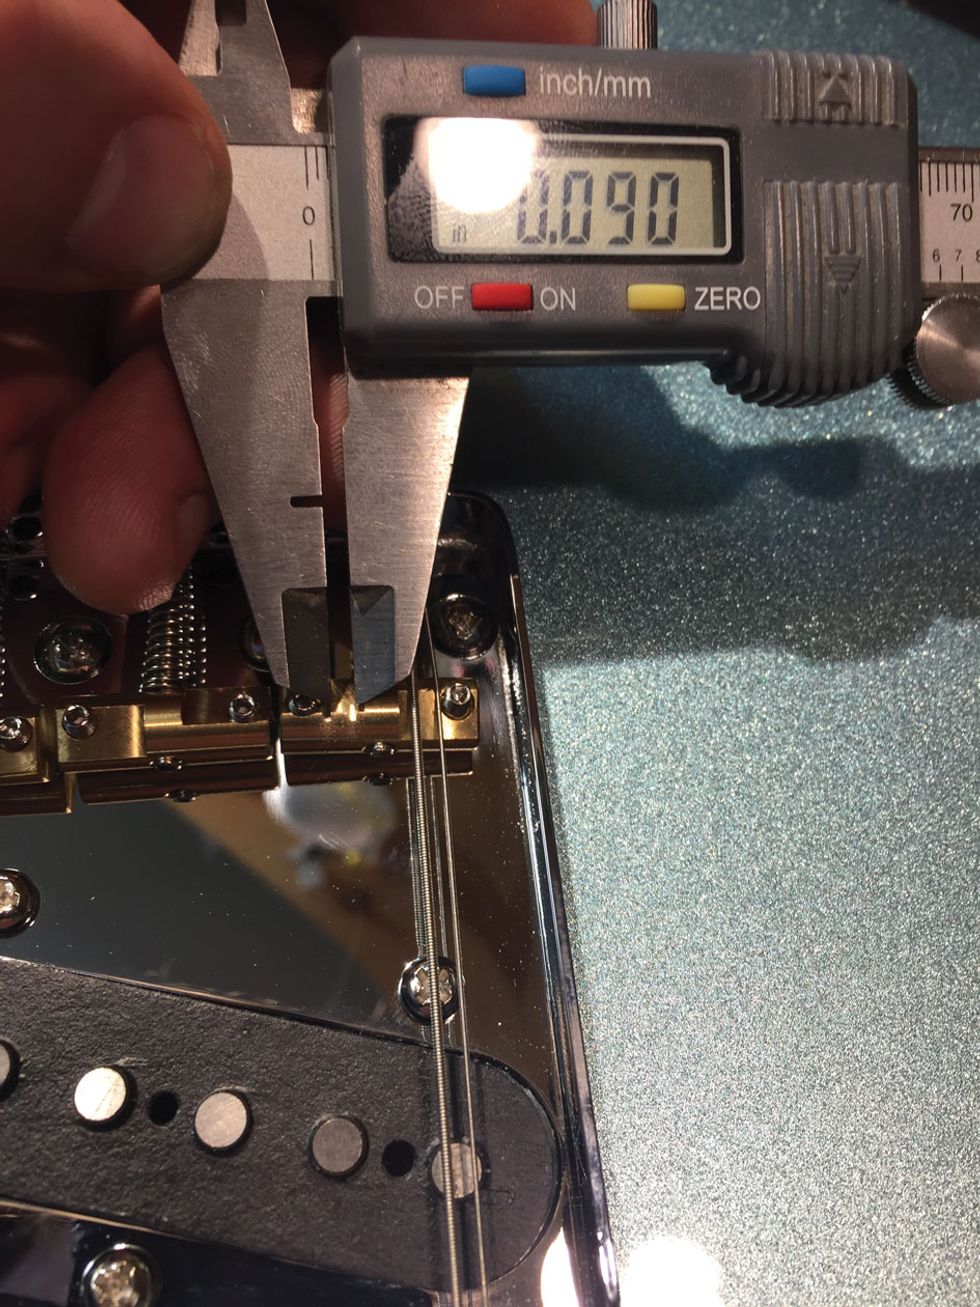
Photo 21
18. String the guitar. (Note: Due to the physical layout of the new bridge, I found that alternating which string—octave or primary—went in the top-load and through-body holes worked best. That is, the 6th, 4th, and 2nd pairs all have the octave/unison string in the rear, top-loading spot, while the 5th, 3rd, and 1st have the primary string in the top-load spot.) After stringing, measure out 3/32" spacing between each string pair at the bridge (Photo 21).
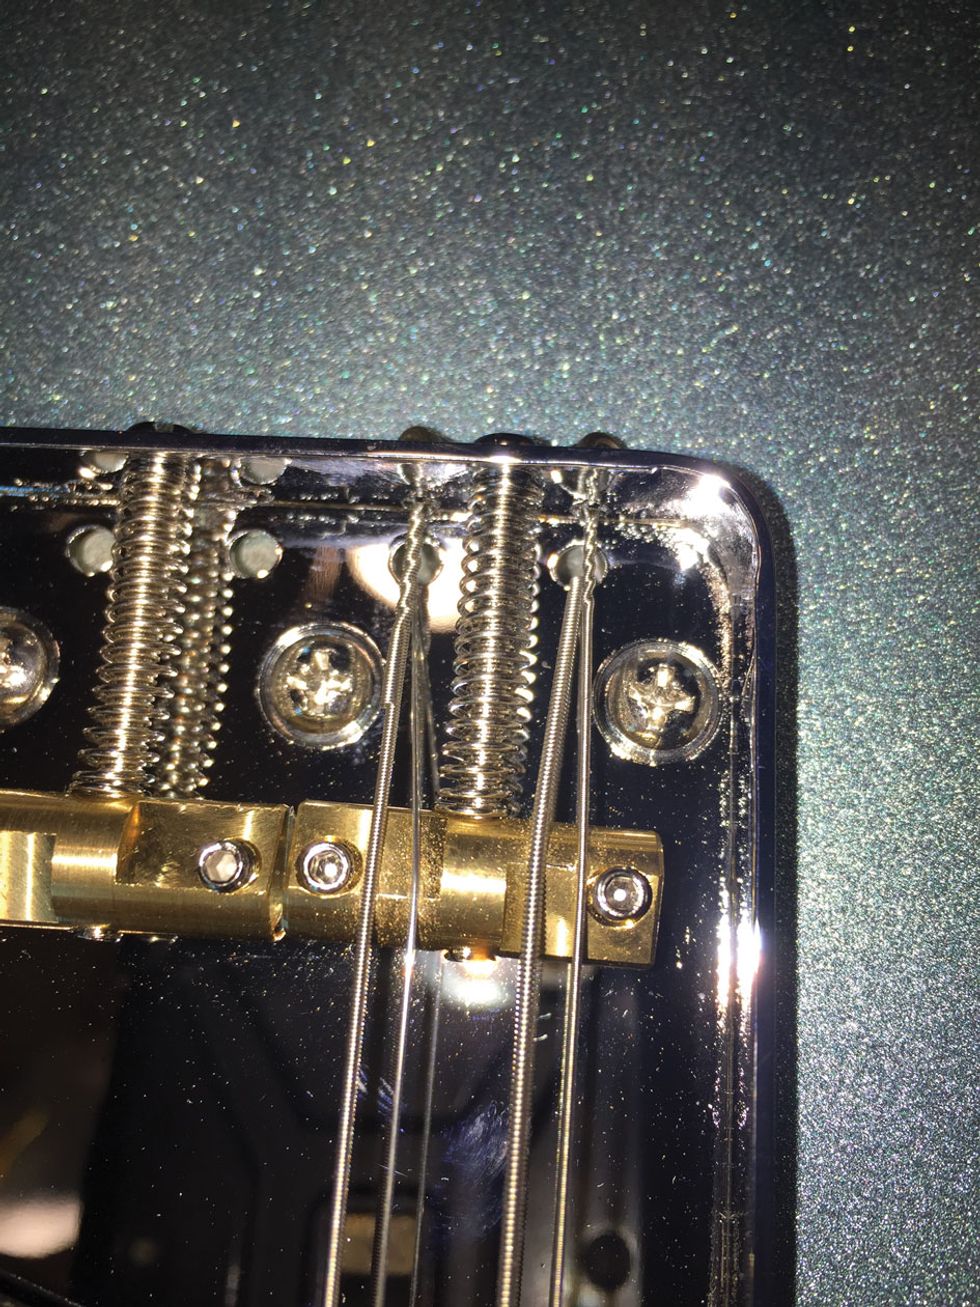
Photo 22
A little bit of tension will hold the strings in place enough to mark the string spacing on the brass saddles using nut files. Use Mitchell abrasive cord to smooth out any burrs in the new saddle slots (Photo 22).
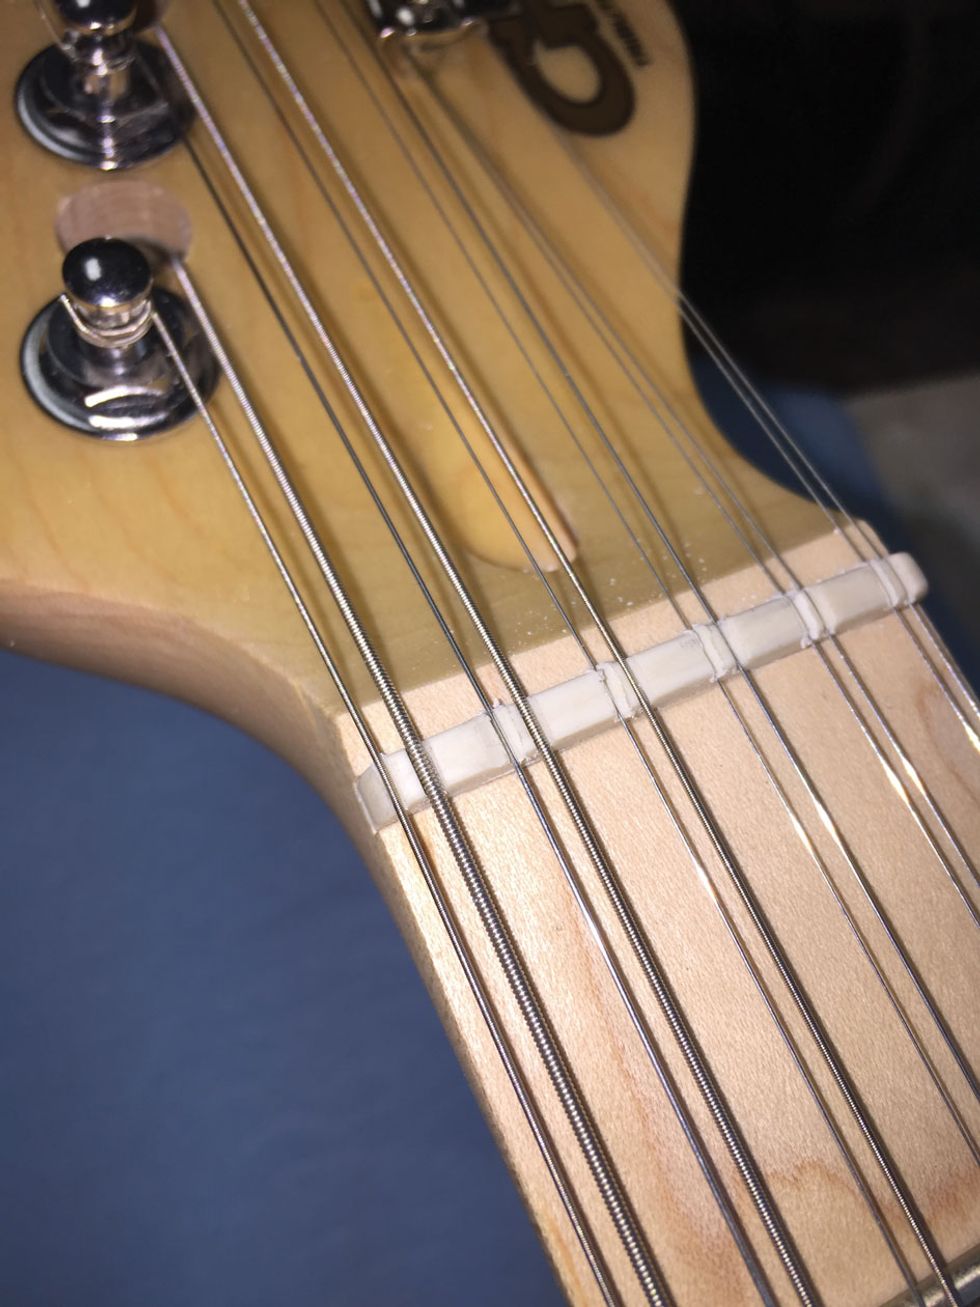
Photo 23
19. Make sure the neck is adjusted properly and finish setting the depths of the nut slots. Set the string height/radius and intonation. Finish all other setup adjustments (Photo 23).
Post-Mod Observations
Recorded using a Ground Control Tsukuyomi boost and a Celestion Ruby-loaded Goodsell Valpreaux 21 miked with a Royer R-121 feeding an Apogee Duet going into GarageBand with no EQ-ing, compression, or effects.
Glory be—this thing sounds amazing! Even though we got some great advance tips from Frank Deimel before starting this project (thanks, Frank!), Dave had to figure out a lot of intermediary tweaks along the way. He deserves huge kudos for his ingenuity. Personally, I'd never owned a 12 till Dave converted my Squier, and both the Tele and the Bluesboy open so many doors—from the usual jangle rock to all sorts of avant options (fuzz can sound so devastatingly cool!). I came up with a new song in my first sitting with the Squier, and the Bluesboy's fantastic stock pickups yield at least as many inspiring hues, particularly with deft use of the tone control. If you've got a few bucks (or a spare guitar laying around) and are looking for a kick in your creativity's pants, this mod is highly recommended.