Whether electric bass is your main instrument or you're a guitarist who doubles on 4-string, it's important to keep your axe in tip-top shape. In this handy guide, Nashville guitar tech and luthier Tony Nagy explains how the pros do a bass setup.
As you'll soon discover, it's not hard to make your bass play and sound great. In this step-by-step tutorial, Nagy walks you through the entire process. With a few tools and some patience, you'll get the job done right andābest of allāhave the satisfaction of knowing you did it yourself.
I've read many articles and repair manuals on bass setup, and I've personally set up thousands of basses as a professional. So when PG asked me to write a DIY piece on the subject, I thought, "What can I bring to this discussion that's truly helpful? Is there a little something I can describe that you don't already know?"
In this article, we'll cover the essentials with the goal of helping you decide what you can handle yourself and what you should leave to your local repair technician. Even if there are aspects of the job you're not prepared to attempt on your own, it's good to understand what's involved with a bass setup. Knowing the steps and terminology will let you communicate more confidently and effectively with your repair guy or gal.
More than likely you're thinking about setup because in some way, your instrument is not performing the way you'd like. To pinpoint any problems, we need to look at all the factors that affect your instrument's overall playability, sound, and function.
Preliminary Inspection
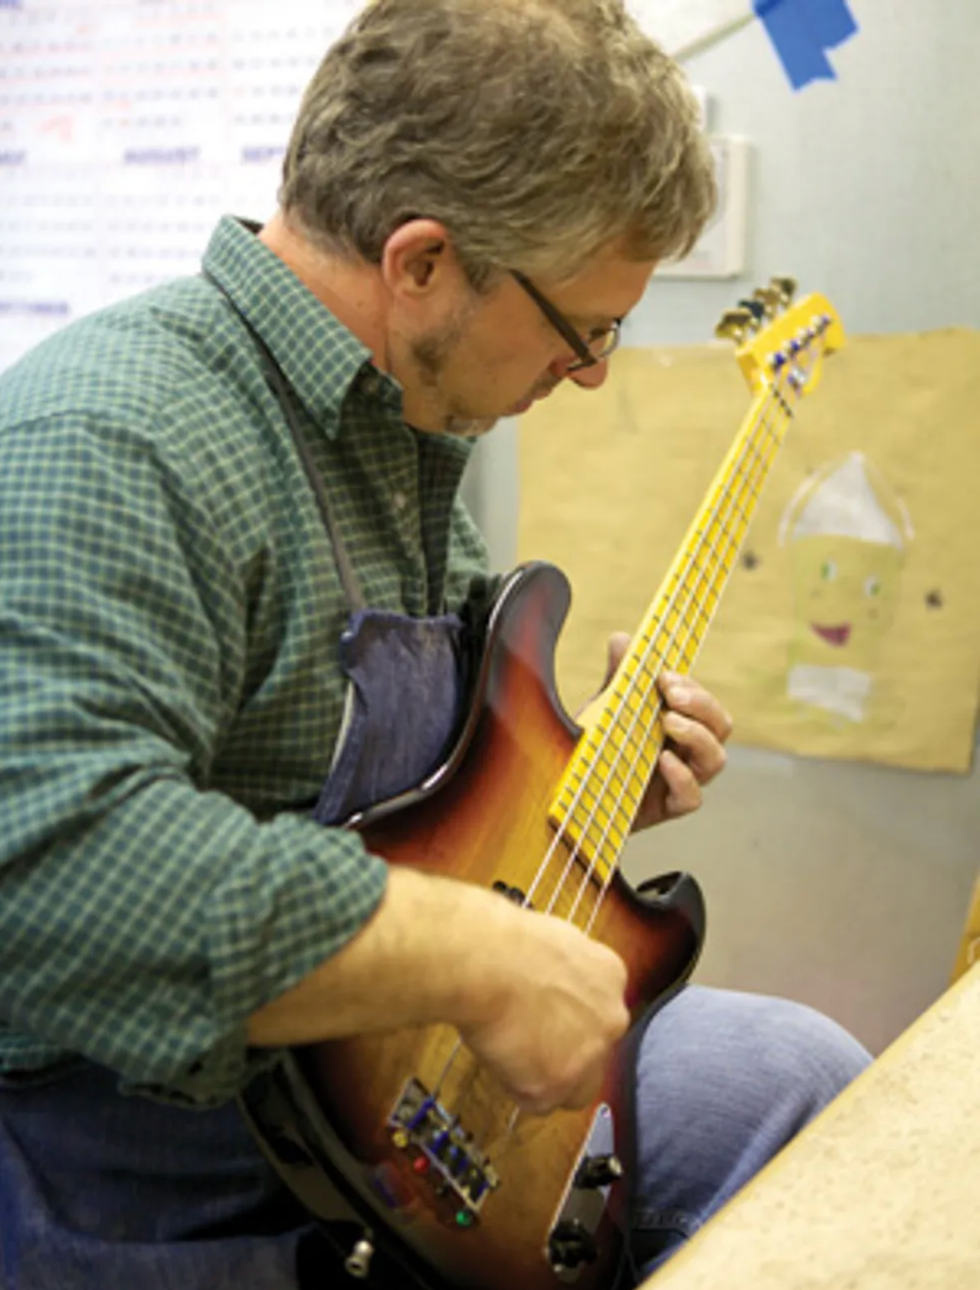
Photo 1: A setup begins with a preliminary, hands-on inspection of your bass. Check playability and listen for issues like buzzing frets and hardware rattles. List any problems you find.
Our journey begins with a general inspection (Photo 1), which consists of playing the instrument while asking yourself these questions: Is the action too high? Too low? Are there buzzing frets? If so, that indicates a need for adjustment.
While you're at it, work the volume and tone controls, checking for noise. Gently jiggle the 1/4" plug at the output jack to check it for noise. Are there any hardware-related rattles? Take notes on all your observations and list any issues you need to address.
After you've given your bass a hands-on evaluation, you're ready to get to work on the setup.
Tip: Because the adjustments that control playability are affected by string gauge and tension, be sure your bass sports the type of strings you plan to use. If you change string gauge, you'll need to do a fresh setup to accommodate the new strings.
Step 1: Measure the Neck Relief
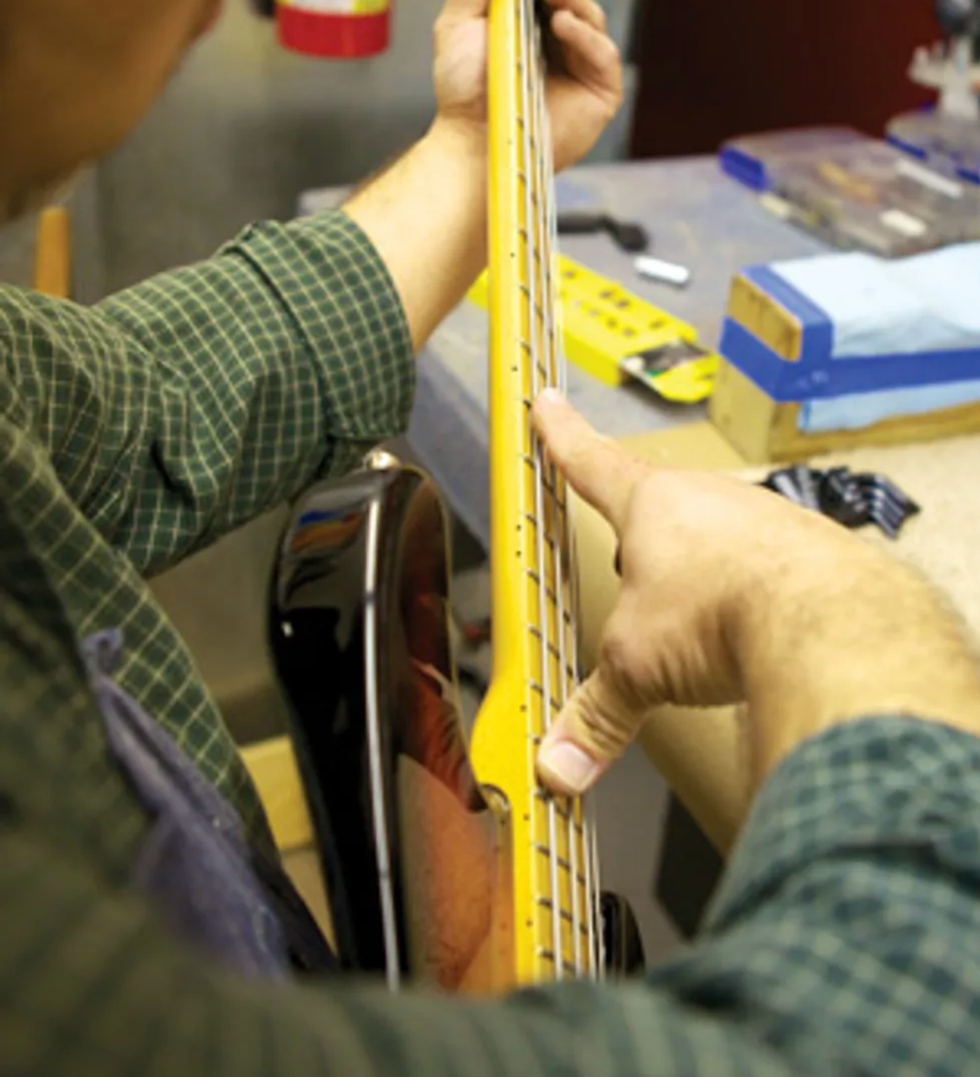
Photo 2: To gauge the amount of relief in your neck, use both hands to simultaneously fret the 4th string at the 1st fret and somewhere between the 14th and 16th frets. At the mid point between these two fretted notes, look at the gap between the bottom of the string and the top of the frets. To get another perspective on this gap, bounce the string against the frets with your picking-hand index finger.
We start with checking the "relief" or amount of bend in the neck. I often see people sighting down the neck from all angles and making some very ballpark assessments about neck relief. But the precise and accurate way to measure relief is to use the strings as a straightedge. Here's how to measure neck relief:
- Tune your bass to pitch. Use the primary tuning you put this instrument in when performing or recording.
- With your fretting hand, hold your lowest string against the 1st fret as if you were playing that note.
- Stretch your picking hand across the fretboard with your thumb aiming towards the bridge and index finger extended toward the nut (Photo 2). Open your hand as far as you can comfortably stretch and fret the lowest string with your thumb. The object is to move your thumb as close to the bridge as you can, while allowing your index finger to touch the lowest string approximately halfway between your fretting finger at the 1st fret and picking hand thumb. (Depending on the fretboard scale length, my picking hand thumb lands on the 14th, 15th, or 16th fret.) Now the lowest string is fretted at two points with two hands. With the lowest string secured at the 1st and, say, 15th fret, you can now use it as a straightedge.
- With your picking-hand index finger, tap the string against the middle frets. By repeatedly tapping and releasing, you'll be able to gauge how much space lies between the bottom of the string and the top of those frets. The gap (if any) is the amount of relief. How much of a gap you need depends very much on your playing style, but to get started, I adjust an instrument to have a gap that's equivalent to the thickness of one or two business cards.
Tip: Make sure you continually check the tuning of your bass so it stays at pitch. This is crucial for making accurate measurements and adjustments.
Step 2: Adjust the Truss Rod
This is very important: If you don't feel comfortable adjusting your truss rod or don't have the proper tool, take this to your local qualified repair technician. You can really mess up your instrument by stripping the threads on your truss rod or over tightening and breaking this critical part of the neck. Whether the truss rod is adjusted via a male hex nut, a female socket, or a Phillips nut at the neck heel, make sure your tool has a snug fit so you don't strip out this vital part.
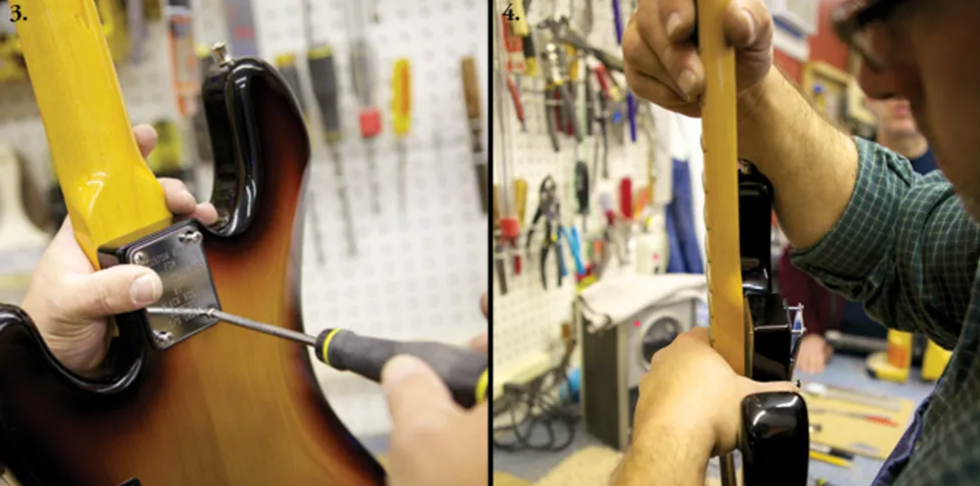
Photo 3: To remove the neck to expose a truss rod that's installed at the heel, take off the strings and back out the screws at the neck plate. Photo 4: Once the screws have released the neck, gently pull it free from the body being careful not to scratch the neck on the exposed screw tips.
The vast majority of truss rods adjust clockwise to tighten and counter-clockwise to loosen. If your truss rod is located at the headstock, look down the neck from headstock to body to determine clockwise and counter-clockwise direction. If your truss rod adjustment is at the heel of the neck, you'll need to remove it (Photos 3 and 4). The movements will be the same when you look from the heel down.
Tip: If you have any doubts about how to adjust a truss rod, get a guitar repair book or study the manual that came with your instrument. Many manufacturers offer free online instructions for adjusting the truss rods on their guitars.
If you decide you want to change the gap between the string and fret, here's the process:
- To reduce the gap between string and fret, tighten the truss rod. Conversely, to increase the space between string and fret, loosen it. Move the truss rod in quarter-turn increments.
- Retune and recheck relief each time you move the rod.
Continue the process until you get the desired gap between the string and fret. Again, unless you have a specific gap in mind, shoot for the thickness of one or two business cards.
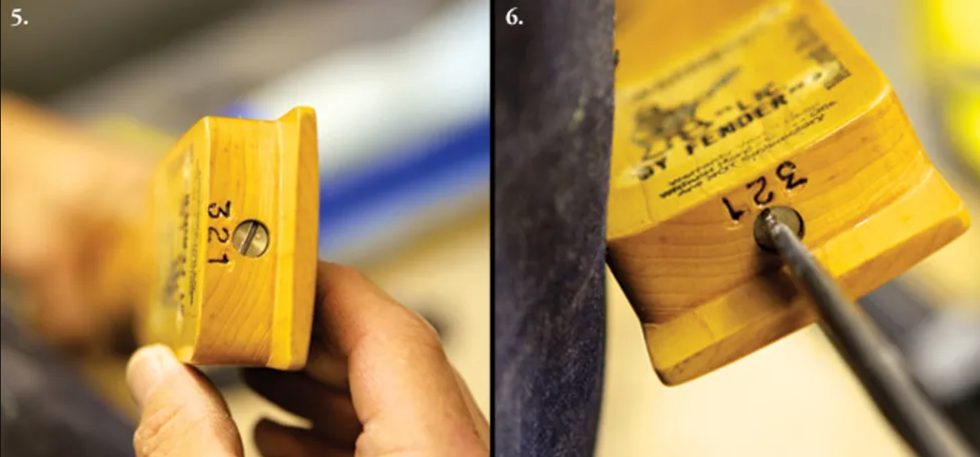
Photo 5: Truss rods accessed at the neck heel are often adjusted with a screwdriver. Photo 6: Whether the truss rod is installed at the headstock or neck heel, the vast majority adjust clockwise to tighten and counterclockwise to loosen.
If your bass requires adjustments at the neck heel (Photos 5 and 6), rather than the headstock, you'll face the tedious prospect of reinstalling the neck and restringing to check each adjustment.
Tip: If your truss rod seems very difficult to adjust, or stops moving, or makes a loud noise, see a local repair tech. Although adjusting a truss rod may be foreign to you, all qualified technicians understand how it functions. It's definitely worth paying the price to have this done right.
There are several adjustments that affect action, but they need to be done in the correct order. Because your decisions about all the other action-related adjustments are based on neck relief, it's important to deal with the truss rod first. Once you've made any necessary truss-rod adjustments, you're ready to move on to the other factors that control playability.
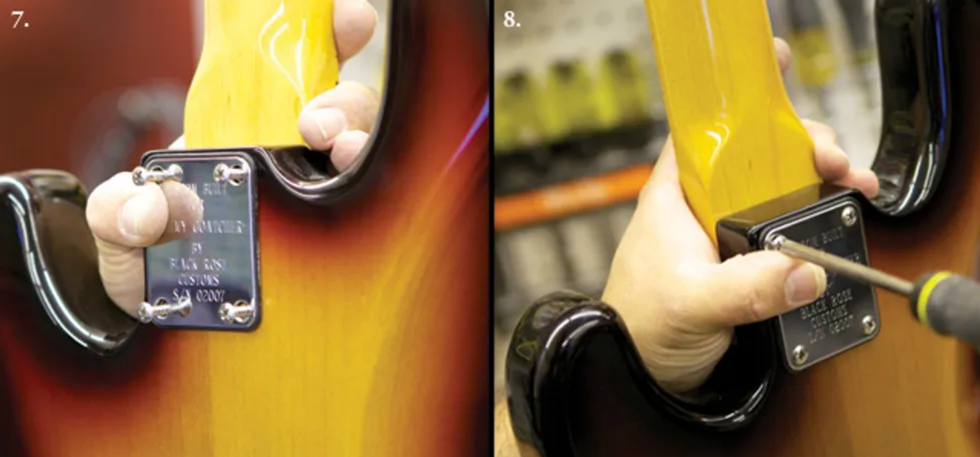
Photo 7: To reattach the neck, carefully place the heel into the neck pocket and then insert the screws by hand, slipping them through the body and seating the tips into their respective holes. Photo 8: Tighten the neck screws securely. As you do this, use your free hand to control the screwdriver tip so it doesn't slip out and mar the body.
If you've removed the neck to make truss rod adjustments, reattach it now (Photos 7 and 8), restring, and retune.
Step 3: Inspect the Nut Slots
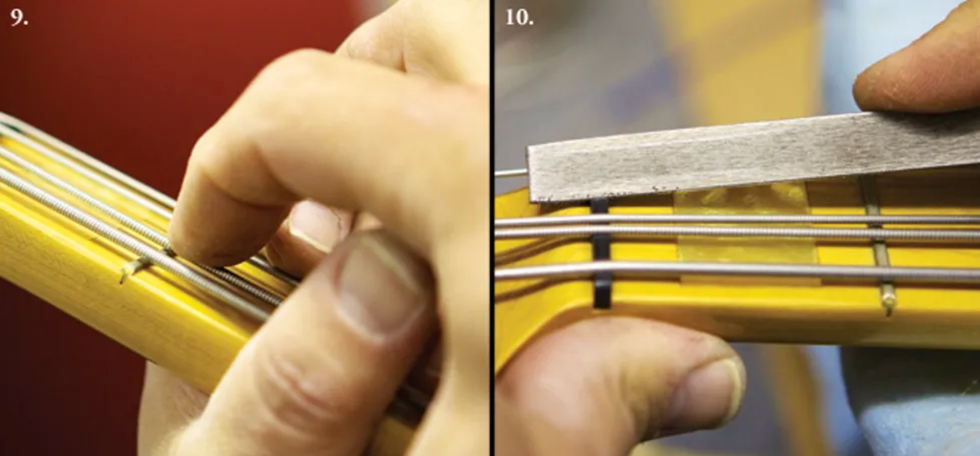
Photo 9: Checking action at the 1st fret while holding the string against the 2nd fret. In addition to eyeballing the clearance, tap the string against the fret to determine the distance between them. Photo 10: Deepening the 2nd-string nut slot.
Next, we check the nut slots and the string height at this end of the neck.
- Tune up.
- Hold each string down on the 2nd fret and look at the space between the bottom of the string and the top of the 1st fret (Photo 9). We want this clearance to be as small as possible, yet when you play the open string, you don't want to hear it buzz against the 1st fret. If the clearance is insufficient, you'll get a buzz.
For bass guitar, a good middle-of-the-road clearance over the 1st fret (with the string still pressed against the 2nd fret) would be the thickness of one business card. If the string has more than that amount of space, the respective nut slot may need to be deepened (Photo 10) so the action at the 1st and 2nd frets is low enough to play comfortably and you don't pull the strings sharp trying to press them against the frets.
Anyone can get nut files from Stewart-MacDonald (stewmac.com) or Luthiers Mercantile (lmii.com), but there is more to cutting a proper nut slot than just making a groove. It needs to be exactly the proper size for each string. The slot must hold a string firmly in place so it can't move around or sympathetically vibrate against the sides of the nut slot, but not be so tight that the string binds and hangs in the slot and then goes out of tune when it's stretched or played.
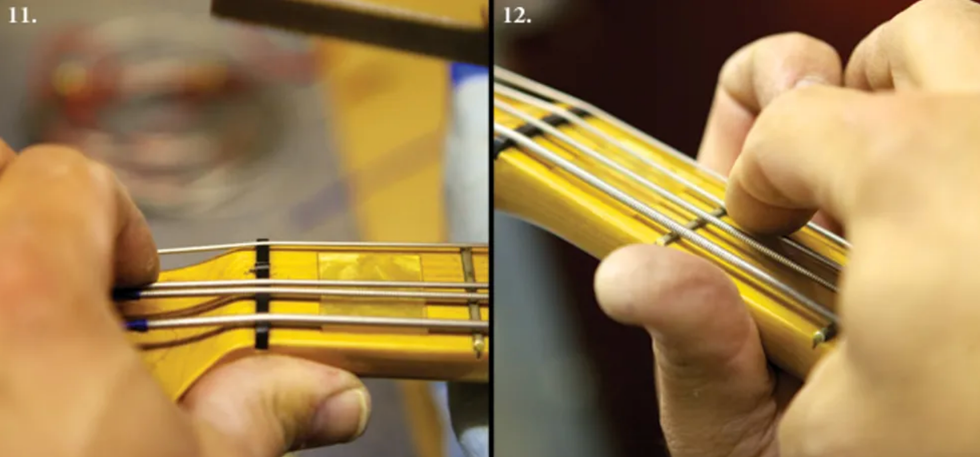
Photo 11: A slot needs to be gently angled downward as it points back toward the headstock and the string must "speak" from the nut's front edgeāright where the nut touches the fretboard. Photo 12: When deepening a nut slot, recheck the 1st-fret action after a few light strokes with the file.
Also, the slot needs to be gently angled downward as it points back toward the headstock (Photo 11). The string must "speak" from the nut's front edgeāright where the nut touches the fretboard and not somewhere inside the nut slot. (If a string rests on a point inside the slot, rather than at the leading edge, this can create a "sitar" effect or cause a string to play out-of-tune along the fretboard.)
If you deepen a nut slot, work very slowly and frequently recheck the action at the 1st fret after a stroke or two of the nut file (Photo 12).
If a string touches the 1st fret when you press it against the 2nd fret, then the nut slot is too low. The offending slot will have to be filled and then fine-tuned with a nut file, or the nut itself shimmed to gain more height, or you need to fabricate a new nut. Sonically and mechanically, the latter is the best option. If you're not comfortable tackling this project, see your repair tech. [For detailed explanations on cutting a bone nut, visit premierguitar.com and read "How to Convert Your Axe to a Baritone," "How to Intonate a Flattop Guitar," and "How to Convert a Flattop to Nashville Tuning" in the March, April, and September 2012 issues.]
Step 4: Adjust Saddle Height
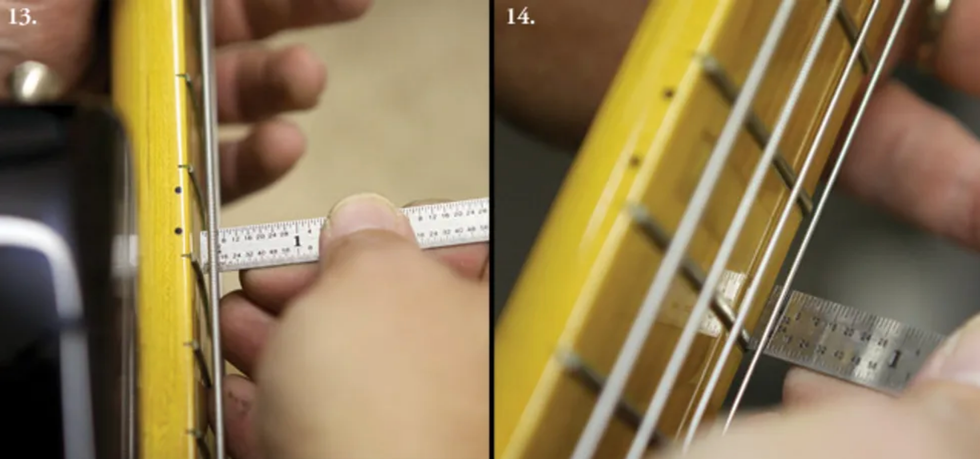
Photo 13: Measuring the distance between the 4th string and 12th fret with a precision metal ruler. Photo 14: Measuring the distance between the 1st string and 12th fret.
Now we're ready to check and adjust string height at the bridge:
- Tune up. (This is automatic by now, right?)
- At the 12th fret, measure the distance between the bottom of each string and the top of the fret (Photos 13 and 14 )
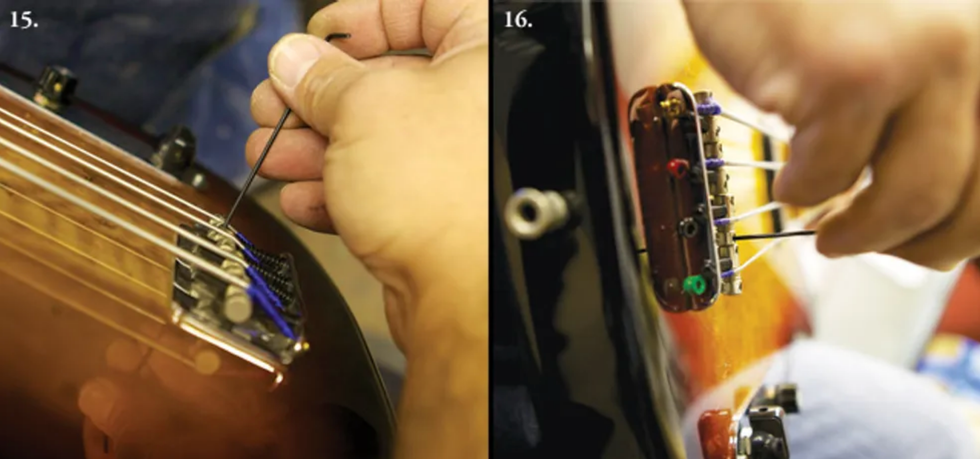
Photo 15: Adjusting saddle height for the 1st string. Photo 16: Another view of saddle-height adjustment. Here, the 2nd string is being raised.
- Using the appropriate wrench, adjust each saddle up or down to the desired height (Photos 15 and 16).
- Naturally, string action has to be adjusted for an individual's playing style. If you have a light touch and play very technically, you can get away with slightly lower action. However, you'll want a somewhat higher action if you love to dig into the strings and produce big, clear, sustaining tones. By experimenting, you'll eventually determine the ideal action for your musicāand that's the beauty of learning how to do a setup yourself.
- For a middle-of-theroad action, I set the bass side of a 4-string (the E string in standard tuning) to 7/64", and then set the treble side (G string) to 5/64". I then graduate the heights as I go across the fretboard, making it 6+/64" on the A string and 6-/64" on the D string.
The goal is to gradually make the strings go from higher to lower as they cross the fretboard from the bass to treble side. With multi-string basses (5, 6, and more), continue this concept across the strings by adding some height for lower strings and shaving a little off for higher ones.
Step 5: Evaluate Your Frets
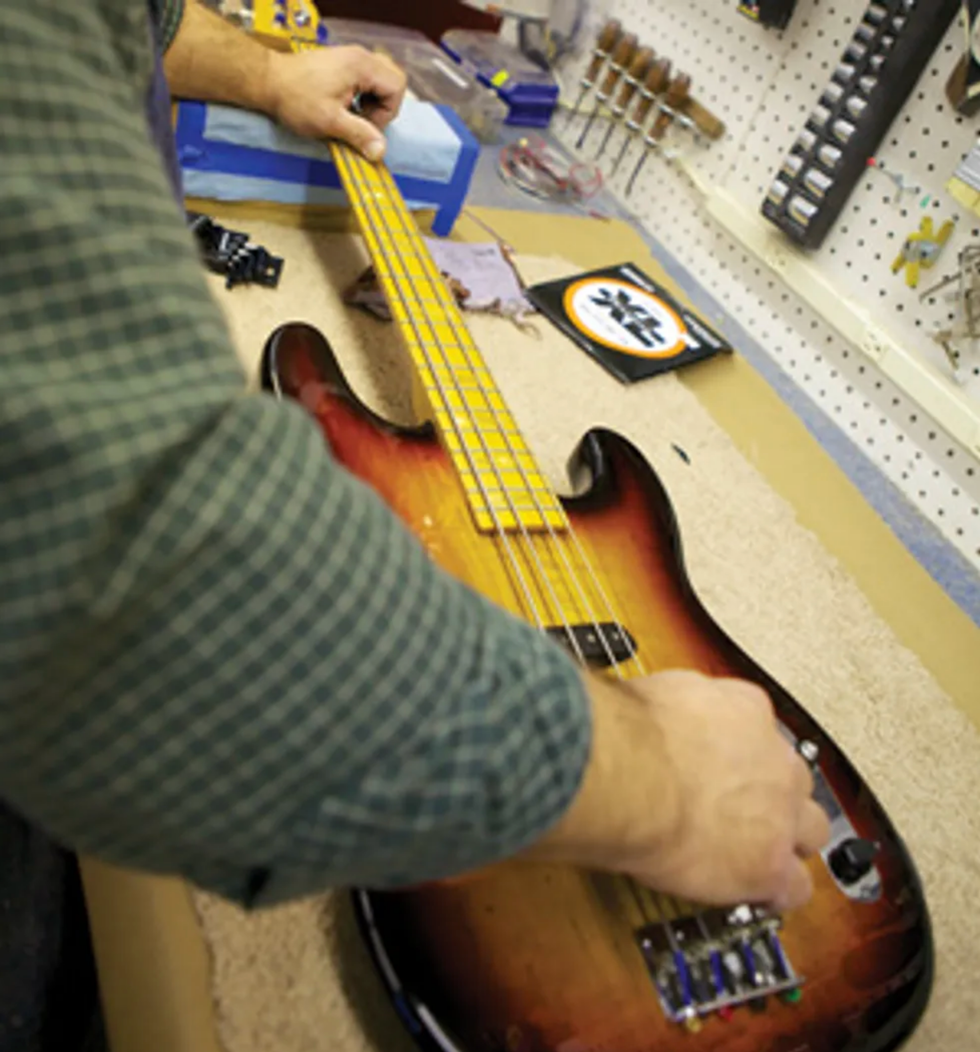
Photo 17: Once the neck relief, nut slots, and basic saddle height have all been adjusted, it's a good time to check fret condition.
Once you have the strings close to their proper height with the instrument at pitch and the previous adjustments dialed in, you can really see if the frets are level all the way along the fretboard. We're now at the stage in the setup where fret problems will be revealed (Photo 17).
High or low frets, loose frets, and even dead spots from the buildup of gunk and funk that gradually seeps between the frets and fretboard over the years can create inconsistent string vibration, so be on the lookout for these problems.
Speaking of fret condition, if you notice that even after being tuned to pitch and intonated (which we will get to in a moment), your bass does not play in tune with itself on some notes, check to see whether your frets have a nice round crown on top or if they're flat. Frets that are worn flat will allow the string to read from either the front edge of the fret and play sharp, or read from the back side of the fret and create a sitar-like sound. Having your frets in level, crowned, tip-top condition is essential for optimal playability, focused sound, and spot-on intonation. Fretwork is definitely the domain of a trusted repair technician.
Step 6: Adjust Intonation
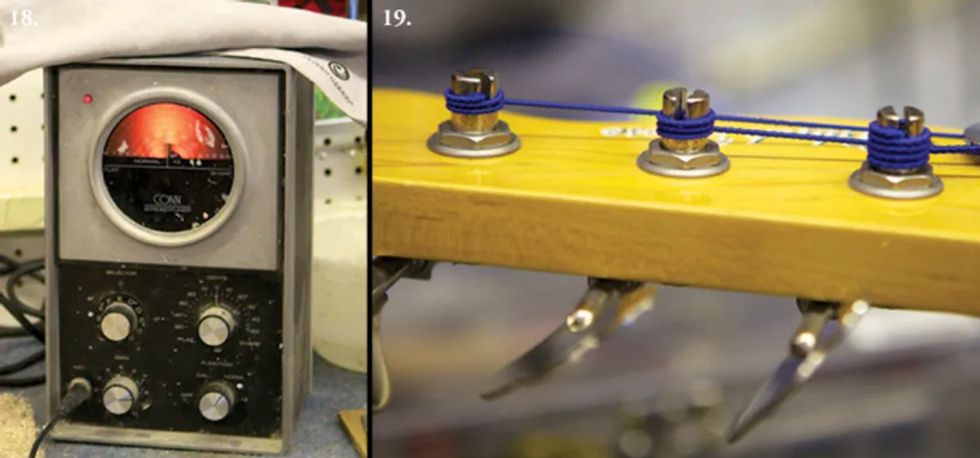
Photo 18: A strobe tuner or pedal with strobe functions provides superior visual feedback for setting intonation. Photo 19: Properly wound strings wrap from the top of the post to its bottom. The wraps should lie tight against one another and not overlap.
Now we're ready to check and adjust intonation. Unless the strings are fresh, install a new set before going any further.
Intonating your instrument involves individually adjusting the length of each string so its notes are in tune along the entire fretboard. To do this, it's best to use a strobe tuner (Photo 18) because it lets you visually track incremental pitch changes in both a note's fundamental vibration and its overtones.
Before we start, here are some tuning tips to consider. In my experience, you'll end up with a more stable tuning if you come up to pitch from below. By tuning up, you reduce the possibility of slack being in the string that could release while you're playing.
Also, be sure the windings progress around the post sequentially from top to bottomāwith no overlappingāand that these winds are snug or butted up against each other so they can't move around (Photo 19).
Stretching is important too. I spend time stretching strings when they're new. Usually tuning up to pitch and stretching a string six to eight times will get it stable. There's no need to really yankā applying a firm upward pull as you move along the string's entire playing length is sufficient.
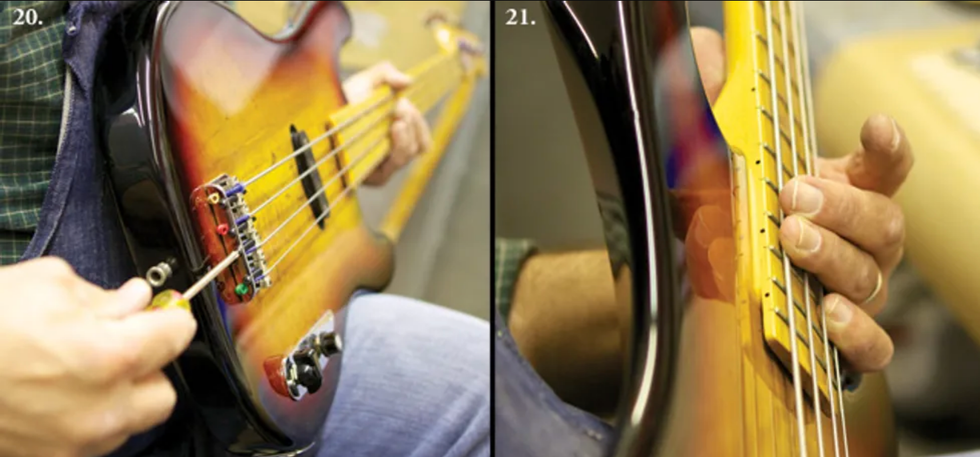
Photo 20: Using a Phillips screwdriver to shift the 2nd-string saddle backward. Photo 21: Checking the low-E's second-octave fifth intervalāthat's B at the 19th fretāwith a tuner to see how it's intonating after the octave has been adjusted.
- After your strings are properly installed, stretched, and all tuned to pitch, start with the lowest string and make sure it's in tune while you play it open. Then, on the same string, play the note at the 12th fret. The open string is your reference, and the 12th-fret noteāwhich is an octave higherāshould also be in tune without you touching the string's tuning machine. If the 12th-fret tone isn't in tune, you'll make adjustments at the saddle to raise or lower the fretted note's pitch until that note is in tune with the open string.With that in mind, also take care to play the 12th-fret note as if you were performing itānot with less or more pressure than you'd use to play the note while you're onstage.
- If the high octaveāthe fretted noteāis sharper than the open pitch, this means the speaking length of your string is too short. That is, the distance between the fretted octave and the saddle is too small. If that's the case, you need to make the string slightly longer by moving the saddle away from the neck.Conversely, if the fretted octave is flatter than the open string, the vibrating section of the string between the 12th fret and saddle is too long and needs to be shortened a tad. To do this, move the saddle toward the neck.Different basses have different processes for shifting the saddle backward or forward (Photo 20). This can include loosening setscrews to allow the saddles to have forward and backward motion. If you're not sure how your saddles operate, consult the owner's manual that came with your bass or go online to research the particular bridge.
- After the bottom string is intonated, move to the 3rd string, then the 2nd, and finally the 1st.
Tip: Make small adjustments and always retune before making another adjustment. Be patientā it's a painstaking process, but well worth the time investment.
Once I get the 12-fret octaves in tune with their respective open strings, I like to check if the fifth of each open string is in tune. For example, assuming my 4th string is tuned to Eā standard tuningāthe fifth is B, which occurs at the 7th fret and also one octave higher at the 19th fret (Photo 21).
There are articles and books that explain the math behind the 12-tone, equal-tempered tuning system that Western instrumentsāincluding the bass guitarāare designed around. It's beyond the scope of this DIY tutorial to delve into the details of equal temperament, but in a nutshell, the system presumes that your octaves are perfectly in tune. All other intervals are fudged by a few cents from their pure harmonic form to allow the octave to be evenly divided into 12 notes, or half-steps. (Each half-step consists of 100 cents.)
In practical terms, once you've intonated each string so the octave is in tune with its corresponding open string, you may find that the fifthāa crucial note for bassistsāis disagreeably out of tune. This can be a result of equal-temperament "fudging" and how it affects fret placement, but also the thickness and material of a given string can contribute to the issue. We are, after all, simply stretching wire into different vibrating lengths to make musicāa primitive scheme when you think about it.
If it happens, let's say, that the 19th-fret B on the 4th string is a little sharp, but the octave is dead on, I may fudge the intonation a little bit to favor the B note. This entails moving the saddle back slightly to reduce the sharpness of the B. It's a tricky and imperfect gameāyou don't want to put your octave noticeably out of tune because then the whole equal-tempered tuning system collapses.
If you find large discrepancies between the correctly tuned open string and its octave relative to other intervals, seek out an experienced repair technician who can help you diagnose and remedy such intonation troubles. There are a lot of techniques available to address this particular dilemma.
Step 7: Check Electronics
As a part of my setups, I also include a thorough electronics check. Dirty pots, loose pots or jacks, and loose knobs can all interrupt the seamless connection between performer and instrument. Often the scratchy sound from a dirty pot can be remedied with a squirt of contact cleaner. This requires disassembly, and depending on your instrument, you may want to have your tech handle it.
As you troubleshoot and adjust your instrument, remember that the aim is to remove everything that can distract or hinder you from playing music. Between you and an experienced repair technician, you should be able to achieve this goal. Good luck!
[Updated 11/17/21]
- Rig Rundown: Greta Van Fleet [2021] - Premier Guitar āŗ
- DIY: How to Set Up a 5-String Bass - Premier Guitar āŗ
- Top 5 Bass Rig Rundowns - Premier Guitar āŗ
- The Big 5: Adeline - Premier Guitar āŗ
- Flashy Is Fun, but the Bass Has a Deeper Function - Premier Guitar āŗ
- Squier Paranormal Rascal HH Review - Premier Guitar āŗ
- Epiphone Newport Bass Review - Premier Guitar āŗ
- Unlock Your Guitar's Potential with this Easy 4-Step Setup Guide āŗ
- Bassist Ciara Moser and Her Groundbreaking Debut Album āŗ
- How to Find Your Sound on Bass, with Thanks to P-Funk - Premier Guitar āŗ
- How Playing Bass in an Orchestra Can Improve Your Musicality - Premier Guitar āŗ
Elliott Sharp is a dapper dude. Not a dandy, mind you, but an elegant gentleman.
The outside-the-box 6-string swami pays homage to the even-further-outside-the-box musician whoās played a formative role in the downtown Manhattan scene and continues to quietlyāand almost compulsivelyāshape the worlds of experimental and roots music.
Often the most potent and iconoclastic artists generate extraordinary work for decades, yet seem to be relegated to the shadows, to a kind of perma-underground status. Certainly an artist like my friend Elliott Sharp fits this category. Yes, his work can be resolutely avant-garde. But perhaps the most challenging thing about trying to track this man is the utterly remarkable breadth of his work.
I am writing this piece for a guitar magazine, so, necessarily, I must serve up info that is guitar-centric. And I can do that, at least a little bit. But Elliott is also a noted composer, runs his own little record label, plays woodwinds proficiently, is a guitar builder/tinkerer, author, gracious supporter of other musiciansā efforts, family man, and killer blues playerāa blues scholar, in fact. So where do we, the public, conditioned to needing categories, pigeonholes, and easy assessment signals, put Elliott Sharpāan artist with a powerful work ethic and a long, illustrious career of making mind-bending sounds and conceptual works? How about putting him in the pantheon of the maverick and the multifaceted? Surely this pantheon exists somewhere! In mind, in heart. To those for whom such things resonate and inspire, I bring you Elliott Sharp.
One can obviously go to the information superhighway to find info on Elliott, and to hear his music, so I wonāt go into too many details about where he was born (Cleveland) and when (March 1, 1951; as of this writing, Elliott is 74), or what he is best known for (being a crucial figure in the downtown New York City scene from 1979 to the present). He is Berlin Prize winner and a Guggenheim Fellow (among other honors). And I have never asked him what strings and picks he uses, so maybe I have already blown it here. But I realize now, having taken on this assignment, that inherent in writing about and trying to explain Elliott Sharp is an implicit TMI factor. There is so much going on here, so much diverse information that could be imparted, that I would not be the least bit surprised if some readers eventually glaze over a bit and start thinking of their own lifeās efforts and goals as rather paltry. I get that! Although you shouldnāt.
E# @NaturalHabitat
Here, now, is my portrait of Elliott, accompanied by what I imagine is a day in the life of Elliott when heās at home in New York City.
Elliott Sharp is a dapper dude. Not a dandy, mind you, but an elegant gentleman. He, like so many in New York and in the world of music/art/guitar, favors dark-hued clothing (yeah, a preponderance of black) and is most often seen wearing a classic slouch hat of obvious quality. He relocated from Buffalo via Western Massachusetts to lower Manhattan in 1979 to a zone that was, back then, quite treacherously decrepit, in an apartment that offered only an hour or so of heat in the winter, etc., etc. It was cheap, and things were always happening, and, in fact, it was the 1950s domicile of William Burroughs, Allen Ginsberg, and Jack Kerouac.The area became the nexus of an ever-expanding circle of iconoclastic, experimental artists of many stripes.
Sharp plays what passes for a fairly staid instrument in his collection: a bass and guitar doubleneck, in 1992.
Elliott is still in that building in the East Village, though it is now only his workplace and not his living space. I am trying to remember exactly when I met Elliott, but it was probably about 25 years ago, and he still had only the one small, original apartment and a shared music space in the Garment District. I, like countless others before and after me, stayed in that East Village apartment whenever I needed a place to crash and Elliott was elsewhere, and eventually he was able to secure the next door apartment and expand his space. This is where Elliott Sharp works every day that he is not touring, pretty much 9 to 6. The place is a bit funky and dusty, and it is filled with instruments, amps (some classics, like a mid-ā60s Princeton Reverb and a tweed Champ), and other tools accumulated over many decadesāin spite of the many times that certain ones had to be sold to keep bread on the table.
When heās not composing, scoring films, recording other artists, or gigging with the bands he has been in or led for the last several decades (Mofungo, Carbon/Orchestra Carbon, SysOrk, Terraplane, The Bootstrappers, Aggragat), Elliott tinkers with guitars, pedals, mandolins. Elliott is, to me, the king of guitar transformation, and his tinkering is stunningly Frankensteinian as he guts, rebuilds, and alters all kinds of stringed instruments, both electric and acoustic. He recently told me that in the ā60s he built fuzz boxes out of tobacco tins to make money. How cool would it be to have one of those now?? If one does a search on Elliott Sharp, many photos will reveal what I'm talking about: the handcrafted doubleneck he was most often seen playing in the ā80s (there was maybe more than one), 8-string guitars, modified Strat-type guitars with completely different pickups.. He also has a fancy guitar or two, such as his Koll fanned-fret 8-string, upon which he has played many a solo recital. During Covid time,, things were a little slow in the cash-flow department and, as a family man with twins, a little extra income was needed. So Elliott started building really cool-looking guitars out of cheap
ones and parts from wherever and refinishing them in hip and attractive ways and called them Mutantu. He sold them to friends and friends of friends. Yours truly basically only changes strings on his guitars, appealing helplessly to experts to do any kind of work on his guitars and amps, afraid of costly errors. The maverick and multifaceted among us, like Elliott, possess no such fear.
Even a leader in experimental 6-string gets a little guitar face now and thenāespecially when heās playing blues.
Photo by Scott Friedlander
So, back to that promised day in the life of Elliott Sharp (as imagined, with some degree of knowledge, by me): Itās early morning, and there is family to contend with. No bohemian lollygagging! So itās feed the kids breakfast, do what parents must do. Then itās off to the office (his studio), so Elliott dons a fine gray shirt (is that silk?), dark trousers, coat, and hat, and walks north from the family apartment on nearly the lowest point of eastern Manhattan to the East Village. The traffic and endless refurbishing of the Williamsburg Bridge roars familiarly overhead, the East River flows, and eventually a river of another kind, Houston Street, is crossed. Up the stairs to the fifth floor and the studio door is unlocked. Espresso is made. (There will be more of this.) The computer is turned on. And then ... who knows? Anything could be on the docket, but some sort of work will ensue for a good eight hours. Maybe a new graphic score for a German symphony is in the works (some of these have become visual artworks, too), or maybe it's time to try another mix of that Terraplane track, the one with Elliottās friend, hero, and inspiration Hubert Sumlināthe one Elliott recorded not long before the famed Howlinā Wolf guitarist joined his ancestors in the Great Beyond. Or maybe heās recording a variation on his trio ERR Guitar (where he was originally joined by Marc Ribot and Mary Halvorson), called ERE Guitar Today, with Sally Gates and Tashi Dorji. Could happenāand it did. You can see Elliottās studio in the ERE Guitar CD booklet.
Or maybe itās guitar tinkering/building time. Whereās that delightfully chunky neck from China that would be awesome on that fake Tele body that was just refitted with no-name humbuckers (āsounded good once I removed the pickup covers,ā Elliott observes) and a resophonic guitar tailpiece? By 5 or 6 itās time to go home, maybe cook dinner tonight. And then ... my little imagined epic ends with a tasteful cinematic clichĆ©: the dissolve.
The E# Way
Elliott Sharp has techniques that, in some cases, are all his own. No stranger to open tunings, prepared guitar, and other extended techniques, he often utilizes rhythmic, two-hand tapping to create spiraling, hypnotic patterns. His composing over these many years has employed and embraced genetics, Fibonacci numbers, algorithms, and fractal geometry. Though a mathematics and physics know-nothing myself, I see and hear a relationship between these elements as he has applied them to his uncompromisingly avant-garde compositions and these tapping patterns often heard in his solo work. Once he kicks in signal processing, stand back! What one hears sounds like four people (or other species and life forms), and the sensation is exhilarating. Sure, there could also be evidence of (here it comes) skronk (I can't believe I used that word), but Elliott certainly does not reside permanently in that world. Enjoying all kinds of sounds, from the lonesome moan of a resonator guitar to the aleatoric sputterings and squeals of a tormented electric guitar, is something he and I share, after all. Take, for example, two of his latest recordings on his zOaR imprint, Mandorleand Mandocello, which document his solo work on the two instruments, respectively. Both recordings investigate the instrumentsā acoustic characteristics before, about half-way through, switching suddenly to electric, ultra-processed sounds. Itās a bracing experience that explains a few things about this man and the breadth of his aesthetic sweep. The sounds bring up images of recombinant DNA (information on which he has also imbued into his work), roiling lava, and the ever-expanding universe. Recommended!
Sharp applies his wicked two-handed-tapping technique to his 8-string, fanned-fret guitar built by Saul Koll.
Photo by Scott Friedlander
So, this might fit into the aforementioned TMI category, but Elliott Sharp puts out a staggering amount of recordings. Every time I see him (which is not often enough), he has a little pile of compact discs for me, often on zOaR. I saw somewhere recently that he has released 165 recordings, but I think there are probably more than that. Itās hard for even the data lords to keep up! But itās not always Elliott Sharp pieces or improvisation/collaborations on these albums. Other artists whom Elliott knows and respects can be represented, such as Spanish electric guitarist/conceptualizer A. L. GuillĆ©n, late bassist/producer Peter Freeman, Italian voice and guitar duo XIPE, or Hardenger fiddle player Agnese Amicoāall articulate and singular musicians whom Elliott assists by releasing their music. I am grateful for this. Itās obviously more āworkā for Elliott, and he accomplishes it, along with everything else he takes on or imagines doing, with elegant aplomb. Though obviously a nose-to-the-grindstone worker, Elliott is generally low-key and relaxed, even after those espressos.
The last thing I want to write about is Elliott's interpretations of the music of Thelonious Monk. Are you surprised, even after everything else you have just read, that something like that exists? In 2003, Elliott released a solo acoustic guitar recording called Sharp? Monk? Sharp! Monk!, and stunned the world (well, those few who pay attention to such things). However, my first exposure to Elliott's Monk interpretations was the more recent Monkulations, expertly recorded live in Vienna in 2007. (You can hear it on Bandcamp). These recordings are, justifiably I suppose, controversial in certain corners, because they do not adhere to Monk's exact written particulars note-for-note. Yet the mood, gestures, rhythmic wonders, and even the harmonic depth of Thelonious Monk often emerges, and frequently in astonishing ways. I understand why some would take issue with this approach because it departs significantly from the jazz tradition, but I find it remarkably fresh, bold, and so delightfully E#. They reveal an aspect of Elliottās thinking and playing that is surprising in some ways, but also so him. It is clear to me that Elliott has seriously examined and internalized Monkās repertoire.
Spring(s) in the garden: Sharp can use just about any tool in his improvisations.
Photo by Norman Westberg
Elliott is an artist who plays more than one instrument, plays them all in unique, startling, and often innovative ways, composes rigorous conceptual works from chamber music to operas, makes electronic music with no guitar, plays mean blues guitar like a swamp rat, authors books (I highly recommend his mostly memoir IrRational Music, and a second book is emerging this fall), builds and modifies guitars and other devices, is stunningly prolific, and is an elegant gentleman. The planet is a better place with him and his work in it. The maverick and multifaceted often have a rough road to tread, as we all know. So check out Elliott Sharp's vast world if any of this seems interesting to you. Thanks, Elliott!
YouTube
Watch Elliott Sharp and Marc Ribot deliver a masterclass in free improvisation at Manhattanās Cornelia Street CafĆ© in 2010āSharpās two-handed tapping and slide playing included.
Elliott Sharpās Favorite Gear
This doubleneck guitar accompanied Sharp on many of his ā80s performances and is one of his earlier experimental instruments, as is this 8-string.
Road
Guitars
⢠Strandberg 8-string Boden
⢠1996 Henderson-Greco 8-string
Amp
⢠Fender Deluxe Reverb or black-panel Twin Reverb (depending on size of venue)
⢠Trace-Elliot bass amp w 4x10 cabinet
(live rig uses both amps, run in stereo)
Effects
⢠Eventide H90 w/ Sonicake expression pedal
⢠Sonicake Fuzz
⢠Hotone Komp
⢠Hotone Blues
⢠TC Electronic Flashback 2
⢠VSN Twin Looper
Accessories
⢠Slides, EBows, springs, metal rods and strips, small wooden and ceramic square plates
Home
Guitars
⢠1946 Martin OO-18 acoustic guitar
⢠2006 Squier 51 (Sharp explains: āOn New Year's Day 2007, I took the twins down to the East River in their stroller. They were 15 months old and knew a few words. As we rolled along, they started shouting āguitar, guitar,ā and, sure enough, sticking out of a garbage can was a black Squier 51 that someone had attempted to ritually sacrifice. Brought it home and cleaned it, and itās become a favorite couch guitar.ā)
Obviously, any sound that emerges from the Triple-Course Bass Pantar is likelly to be interesting.
Studio
Guitars and stringed instruments
⢠Fender 1994 ā50s Telecaster built from a Fender-offered kit
⢠Mutantum lime green metalflake Strat w/Seymour Duncan Little ā59 pickups
⢠Mutantum solidbody āmanoucheā Strat w/classical neck
⢠Saul Koll custom 8-string
⢠Rick Turner Renaissance Baritone
⢠1973 Gibson Les Paul Custom
⢠1966 Epiphone Howard Roberts
⢠1965 Harmony Bobkat
⢠1984/ā96 Heer-Henderson Doubleneck
⢠1956 Gibson CF-100 acoustic guitar
⢠1968 Hagstrom H8 8-string bass
⢠Mutantum Norma fretless electric
⢠Godin Multiac Steel Duet
⢠2001 DellāArte Grande Bouche
⢠1958 Fender Stringmaster 8-string console steel guitar
⢠1936 Rickenbacker B6 lap steel
⢠1950s Framus Nevada Mandolinetto
⢠Mutantum Electric Mandocello
⢠Arches H-Line
⢠Triple-Course Bass Pantar
Amps
⢠1966 Fender black-panel Princeton Reverb
⢠1980 Fender 75 (Per Sharp: āCut down to a head and modded by Matt Wells into a Dumble-ish monster! For recording, it plugs into a 1x10 cab with a Jensen speaker or a Hartke Transporter 2x10 cab
⢠1970 Fender Bronco
⢠1960 Fender tweed Champ modded by Matt Wells
Effects and Electronics
⢠Vintage EHX 16-Second Delay w/foot controller
⢠Eventide H3000
⢠Eventide PitchFactor
⢠Lexicon PCM42
⢠ZVEX Fuzz Factory
⢠Summit DCL-200 Compressor Limiter
⢠SSL SiX desktop
⢠Prescription Electronics Experience
⢠Zoom Ultra Fuzz
⢠Korg MS-20 analog synthesizer
⢠Korg Volca Modular synthesizer
⢠Make Noise 0-Coast synthesizer
⢠Moog Moogerfooger Ring Modulator
⢠Moog Moogerfooger Low-Pass Filter
⢠Softscience Optical Compressor (for DI recording, custom made by Kevin Hilbiber)
Strings
⢠Ernie Ball Regular Slinky (.010ā.046) or Power Slinky (.011ā.048), for conventional guitar.
Do you overuse vibrato? Could you survive without it?
Vibrato is a powerful tool, but it should be used intentionally. Different players have different stylesāB.B. Kingās shake, Claptonās subtle touchābut the key is control. Tom Butwin suggests a few exercises to build awareness, tone, and touch.
The goal? Find a balanceādonāt overdo it, but donāt avoid it completely. Try it out and see how it changes your playing!
An ode, and historical snapshot, to the tone-bar played, many-stringed thing in the room, and its place in the national musical firmament.
Blues, jazz, rock, country, bluegrass, rap.⦠When it comes to inventing musical genres, the U.S. totally nailed it. But how about inventing instruments?
Googling āAmerican musical instrumentsā yields three.
⢠Banjo, which is erroneously listed since Africa is its continent of origin.
⢠Benjamin Franklinās Glass Armonica, which was 37 glass bowls mounted horizontally on an iron spindle that was turned by means of a foot pedal. Sound was produced by touching the rims of the bowls with water-moistened fingers. The instrumentās popularity did not last due to the inability to amplify the volume combined with rumors that using the instrument caused both musicians and their listeners to go mad.
⢠Calliope, which was patented in 1855 by Joshua Stoddard. Often the size of a truck, it produces sound by sending steam through large locomotive-style whistles. Calliopes have no volume or tone control and can be heard for miles.
But Google left out the pedal steel. While there may not be a historical consensus, I was talking to fellow pedal-steel player Dave Maniscalco, and we share the theory that pedal steel is the most American instrument.
Think about it. The United States started as a DIY, letās-try-anything country. Our culture encourages the endless pursuit of improvement on whatās come before. Curious, whimsical, impractical, explorativeāthatās our DNA. And just as our music is always evolving, so are our instruments. Guitar was not invented in the U.S., but one could argue itās being perfected here, as players from Les Paul to Van Halen kept tweaking the earlier designs, helping this one-time parlor instrument evolve into the awesome rock machine it is today.
Pedal steel evolved from lap steel, which began in Hawaii when a teenage Joseph Kekuku was walking down a road with his guitar in hand and bent over to pick up a railroad spike. When the spike inadvertently brushed the guitarās neck and his instrument sang, Kekuku knew he had something. He worked out a tuning and technique, and then took his act to the mainland, where it exploded in popularity. Since the 1930s, artists as diverse as Jimmie Rodgers and Louis Armstrong and Pink Floyd have been using steel on their records.āThe pedal steel guitar was born out of the curiosity and persistence of problem solvers, on the bandstand and on the workbench.ā
Immigrants drove new innovations and opportunities for the steel guitar by amplifying the instrument to help it compete for listenersā ears as part of louder ensembles. Swiss-American Adolph Rickenbacker, along with George Beauchamp, developed the first electric guitarāthe Rickenbacker Electro A-22 lap steel, nicknamed the Frying Panāand a pair of Slovak-American brothers, John and Rudy Dopyera, added aluminum cones in the body of a more traditional acoustic guitar design and created resophonic axes. The pedal steel guitar was born out of the curiosity and persistence of problem solvers, on the bandstand and on the workbench.
As the 20th century progressed and popular music reflected the more advanced harmonies of big-band jazz, the steel guitarās tuning evolved from open A to a myriad of others, including E7, C6, and B11. Steel guitarists began playing double-, triple-, and even quadruple-necked guitars so they could incorporate different tunings.
In Indianapolis, the Harlan Brothers came up with an elegant solution to multiple tunings when they developed their Multi-Kord steel guitar, which used pedals to change the tuning of the instrumentās open strings to create chords that were previously not possible, earning a U.S. patent on August 21, 1947. In California, equipped with knowledge from building motorcycles, Paul Bigsby revolutionized the instrument with his Bigsby steel guitars. It was on one of these guitars that, in early 1954, Bud Isaacs sustained a chord and then pushed a pedal down to bend his strings up in pitch for the intro of Webb Pierceās āSlowly.ā This IāIV movement became synonymous with the pedal-steel guitar and provided a template for the role of the pedal steel in country music. Across town, church musicians in the congregation of the House of God Keith Dominion were already using the pedal steel guitar in Pentecostal services that transcended the homogeneity of Nashvilleās country and Western clichĆ©s.
Pedal steels are most commonly tuned in an E9 (low to high: BāDāEāF#āG#āBāEāG#āD#āF#), which can be disorienting, with its own idiosyncratic logic containing both a b7 and major 7. Itās difficult to learn compared to other string instruments tuned to regular intervals, such as fourths and fifths, or an open chord.
Dave Maniscalco puts it like this: āThe more time one sits behind it and assimilates its quirks and peculiarities, the more obvious it becomes that much like the country that birthed it, the pedal steel is better because of its contradictions. An amalgamation of wood and metal, doubling as both a musical instrument and mechanical device, the pedal steel is often complicated, confusing, and messy. Despite these contradictions, the pedal-steel guitar is a far more interesting and affecting because of its disparate influences and its complex journey to becoming Americaās quintessential musical instrument.āBy refining an already amazing homage to low-wattage 1960s Fenders, Carr flirts with perfectionāand adds a Hiwatt-flavored twist.
Killer low end for a low-wattage amp. Mid and presence controls extend range beyond Princeton or tweed tone templates. Hiwatt-styled voice expands vocabulary. Built like heirloom furniture.
Two-hundred-eighty-two bucks per watt.
$3,390
Carr Skylark Special
carramps.com
Steve Carr could probably build fantastic Fender amp clones while cooking up a crĆØme brulee. But the beauty of Carr Amps is that they are never simply a copy of something else. Carr has a knack for taking Fender tone and circuit design elementsāand, to a lesser extent, highlights from the Vox and Marshall playbookāand reimagining them as something new.
Those that playedCarrās dazzling original Skylark know it didnāt go begging for much in the way of improvement. But Carr tends to tinker to very constructive ends. In the case of the Skylark Special, the headline news is the addition of the Hiwatt-inspired tone section from theCarr Bel-Ray, a switch from a solid-state rectifier to an EZ81 tube rectifier that enhances the ampās sense of touch and dynamics, and an even deeper reverb.
Spanning Space Ages
With high-profile siblings like the Deluxe, Bassman, Tremolux, and Twin, Fenderās original Harvard is, comparatively, a footnote in Fenderās wide-panel tweed era (the inclusion of Steve Cropperās Harvard in the Smithsonian notwithstanding). But the Harvard is somewhat distinctive among tweed Fenders for using fixed bias, which, given its power, makes it a bridge that links in both circuit and sound to the Princeton Reverb. The Skylark Specialās similar capacity for straddling tweed and black-panel touch and tone is fundamental to its magic.
Like the Harvard and the Princeton, the Skylark Specialās engine runs on two 6V6 power tubes and a single 12AX7 in the preamp section. A 12AX7 and 12AT7 drive the reverb and the reverb recovery section, respectively, and a second 12AT7 is assigned to the phase inverter. (The little EZ81 between the two 6V6 power tubes is dedicated to the rectifier). Apart from the power tubes and the 12AX7 in the preamp, however, the Skylark Special deviates from Harvard and Princeton reverb templates in many important ways. Instead of a 10" Jensen or Oxford, it uses a 50-watt 12" Celestion A-Type ceramic speaker, and it includes midrange and presence controls that a Harvard or Princeton do not. It also features a boost switch that manages to lend body and brawn without obliterating the core tone. There is also, as is Carrās style, a very useful attenuator that spans zero to 1.2 watts. Alas, there is no tremolo.
āIād wager the Skylark Special will be around every bit as long as a tweed Harvard when most of your printed-circuit amps have shoved off for the recycler.ā
It goes without saying, perhaps, that the North Carolina-built Skylark Special is made to standards of craft that befit its $3K-plus price. Even still, Carr upgraded nine of the coupling capacitors to U.S.-made Jupiters. They also managed to shave six pounds from the Baltic birch cabinet weightāreducing total weight to 35 pounds and, in Steve Carrās estimation, improving resonance. Say what you will about the high price, but Iād wager the Skylark Special will be around every bit as long as a tweed Harvard when most of your printed-circuit amps have shoved off for the recycler.
Sweet Soulful Bird
Fundamentally, the Skylark Special launches from a Fender space. But this is a very refined Fender space. The bass is rich, deep, and massive in ways you wonāt encounter in many 12-watt combos, and the warm contours at the toneās edges lend ballast and attitude to both clean tones and the ultra-smooth distorted ones at the volumeās higher reaches. All of these sounds dovetail with the clear top end you imagine when you close your eyes and picture quintessential black-panel Fender-ness. The presence and midrange controls, along with the 50-watt speaker, lend a lot in terms of scalpel-sharp tone shapingāproviding a dimension beyond classical Fender-nessāespecially when you bump the midrange and turn up your guitar volume.
The tube rectifier, meanwhile, shifts the Skylark Specialās touch dynamics from the super-immediate reactivity of a solid-state rectifier to a softer, more-compressed, more sunset-hued kind of tactile sensitivity. But donāt let that lead you to worry about the ampās more explosive capabilities. There is more than enough high-midrange and treble to make the Skylark Special go bang.
Anglo and Attenuated Alter Egos
The Hiwatt-inspired setting is still dynamic, but itās a little tighter than the Fullerton-voiced setting. Thereās air and mass enough for power jangling or weighty leads. The differences in the Bel-Rayās tube selection (EL84 power tubes as well as an EF86 in the preamp) means the Skylark Specialās version of the Hiwatt-style voice isālike the amp in generalāwarm and round in the low-mid zone and softer around the edges, where the Bel-Ray version has more high-end ceiling and less mellow glow in the bass. It definitely gives the Skylark Special a transatlantic reach that enhances its vocabulary and utility.
Attenuated settings are not just practical for suiting the amps to circumstances and size of space youāre in; they also offer an extra range of colors. The maximum 1.2 watt attenuated setting still churns up thick, filthy overdrive that rings with harmonics.
The Skylark Specialās richness and variation means youāll spend a lot of time with guitar and amp alone. Anything more often feels like an intrusion. But the Skylark Special is a friend to effects. Strength in the low-end and speaker means it humors the gnarliest fuzzes with grace. And with as many shades of clean-to-just-dirty tones as there are here, the personalities of gain devices and other effects shine.
The Verdict
Skylark Special. Itās fun to sayāin a hep-cat kind of way. The name is trĆØs cool, but the amp itself sounds fabulous, creating a sort of dream union of the Princetonās and Harvardās low-volume character, a black-panel Deluxeās more stage-suited loudness and mass, and a zingier, more focused English cousin. It can be sweet, subdued, surfy, rowdy, and massive. And it works happily with pedalsāmost notably with fuzzes that can make lesser low-mid-wattage amps cough up hairballs. The price tag smarts. But this is a 12-watt combo that goes, sonically speaking, where few such amps will, and represents a first-class specimen of design and craft.