Here, ace Nashville repairman John LeVan walks you step-by-step through the setup process and shows you how to make your Strat play like a dream and ring like a bell.
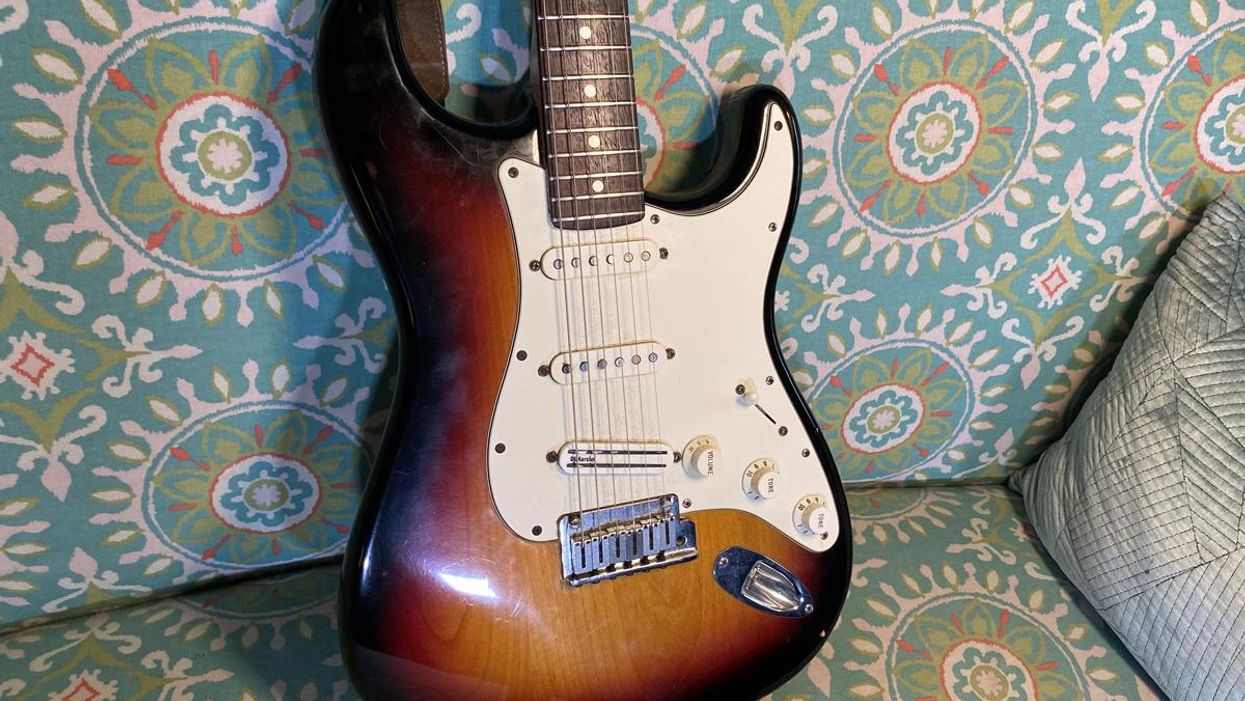
Recently, one of my clients brought in an American-made 1990 Fender Strat hot-rodded with a custom pickguard, Fender-branded Schaller locking tuners, a set of Lindy Fralin single-coils, and a passive, 16-step ToneStyler tone pot. It was a workhorse guitar—and it was in desperate need of a custom setup.
Most guitars come from the store with a generic factory setup. Many players are satisfied with this, but the key to having a great guitar is to personalize the setup for your specific needs. This includes a number of details, including optimizing the instrument for your preferred string gauges, tweaking the action for your fretting and picking style, and if the guitar has a tremolo system, getting it to respond correctly to your wang-bar technique.
Strats can be tricky to set up, because many of the adjustments are interactive. In other words, when you change one element, it can affect others. In large part, this is due to the tremolo system. The trick is to approach the steps in a logical sequence, and in this article I'll explain exactly how to do this. Although your string gauges, action, and trem response may differ from those described here, the step-by-step process and the tools and techniques apply to virtually all Strat-style guitars equipped with a standard, nonlocking tremolo system and three single-coils.
So settle in for a good read as I take you through the process of setting up a Strat to play like a dream—your dream.
Project Overview
Structurally, the Corona-built Strat on my bench was in excellent condition, but my client had several special requests. First, he wanted to tune the guitar down a whole-step. Low to high, that's D–G–C–F–A–D. [This is often referred to as "D standard."]
To accommodate this dropped tuning, the owner specified a hybrid string set gauged .012, .016, .019, .032, .044, and .056. As with a typical .010 set, the bottom three strings are wound and the top three are plain. He arrived at these particular gauges by studying Ernie Ball, D'Addario, and GHS sets that were either considered jazz medium gauge or designed for dropped tunings. So, if you're considering tuning one of your solidbody electrics to D standard, these gauges are a good starting point.
He also asked for a floating tremolo, meaning he wanted to lower and raise the pitch of his strings to add gentle vibrato to chords, intervals, and single notes. He wasn't concerned about raising the pitch any more than, say, a quarter-tone—just enough to create a "shimmer." But in his initial attempts to set up this guitar himself, he ran into tuning issues caused by the trem not returning to pitch. As we'll discover in a moment, there was a reason for this. Fortunately, I was able to fix the problem, but it required some ingenuity.
Preliminary Survey
Before I grab any tools, I always ask my clients several questions about their technique. After I've completed repairs or modifications, this background info helps me dial-in the custom setup. For example, I'll ask: What tuning do you use? What styles of music do you play? What gauge strings do you use? How hard do you pick and strum, and do you play with a light, medium, or heavy fretting-hand touch? Do you use a flatpick? If so, what size and thickness? If you play fingerstyle, do you attack the strings with your nails, fingerpicks, or fingertips? Do you use a capo?
In this case, the owner had already answered the tuning and string questions, but the answers he gave to the other questions helped guide me through each stage of the setup process.
Evaluate the Guitar
The owner had already installed fresh strings, so after my initial survey I tuned it to D–G–C–F–A–D and began taking measurements. This information serves as a baseline for subsequent adjustments and also helps pinpoint any problems.
Here are the four primary measurements you want to take. Write these measurements down, so you can refer to them at any time during the setup process:
- Action at the 12th fret
- Neck relief
- Action at the 1st fret
- Intonation
Step 1: Measure the Action
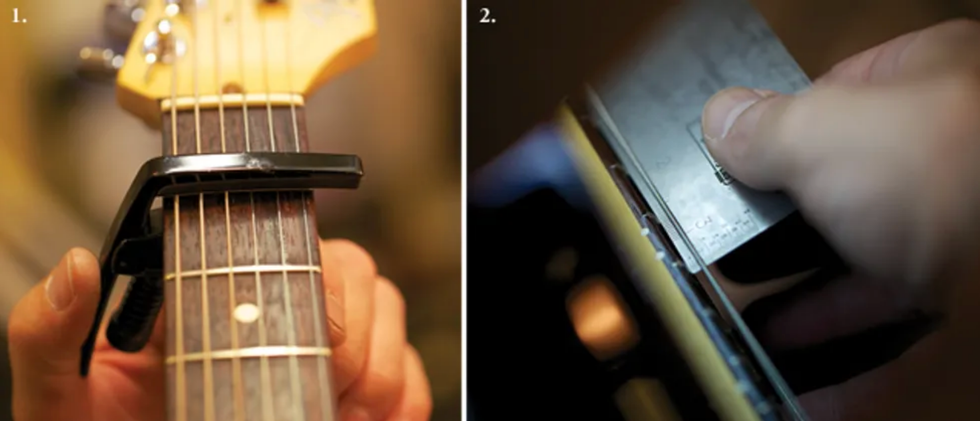
1. Before measuring action and neck relief, clamp a capo over the 1st fret. This temporarily removes the nut from the action equation. 2. Using a string action gauge to measure the action at the 12th fret.
1. Tune the guitar. Usually that's standard E tuning, but as we've discussed, for this setup it was a whole-step below that.
2. Clamp a capo on top of—not behind—the 1st fret (Photo 1). This creates a "zero" fret and temporarily removes the nut from the action equation, allowing you to initially focus on neck relief (the amount of forward or backward bowing in the neck itself ) and bridge and saddle height.
3. Use a string action gauge (available from stewmac.com) or precision metal ruler to individually measure the string height at the 12th fret (Photo 2) for all six strings. The distance you're measuring lies between the bottom of the string and top of the fret.
On this Strat, the distance from the 1st string to the 12th fret was 6/64", and the 6th-string gap was also 6/64". This is very high action!
Step 2: Measure Neck Relief
It's important to determine if the neck has forward (concave) or backward (convex) bow. Along with saddle height, neck relief also affects the guitar's action. Here's the process:
1. With the capo still clamped on top of the 1st fret, hold down the 6th string at the last fret.
2. Using your action gauge or metal ruler, measure the greatest distance between the bottom of the 6th string and the top of the frets. The largest gap typically occurs somewhere between the 7th and 9th frets—essentially in the middle of the neck.
3. Measure the relief at the 1st string.
On this Strat, the relief was .022"—a little more than necessary.
Step 3: Measure Action at the 1st Fret
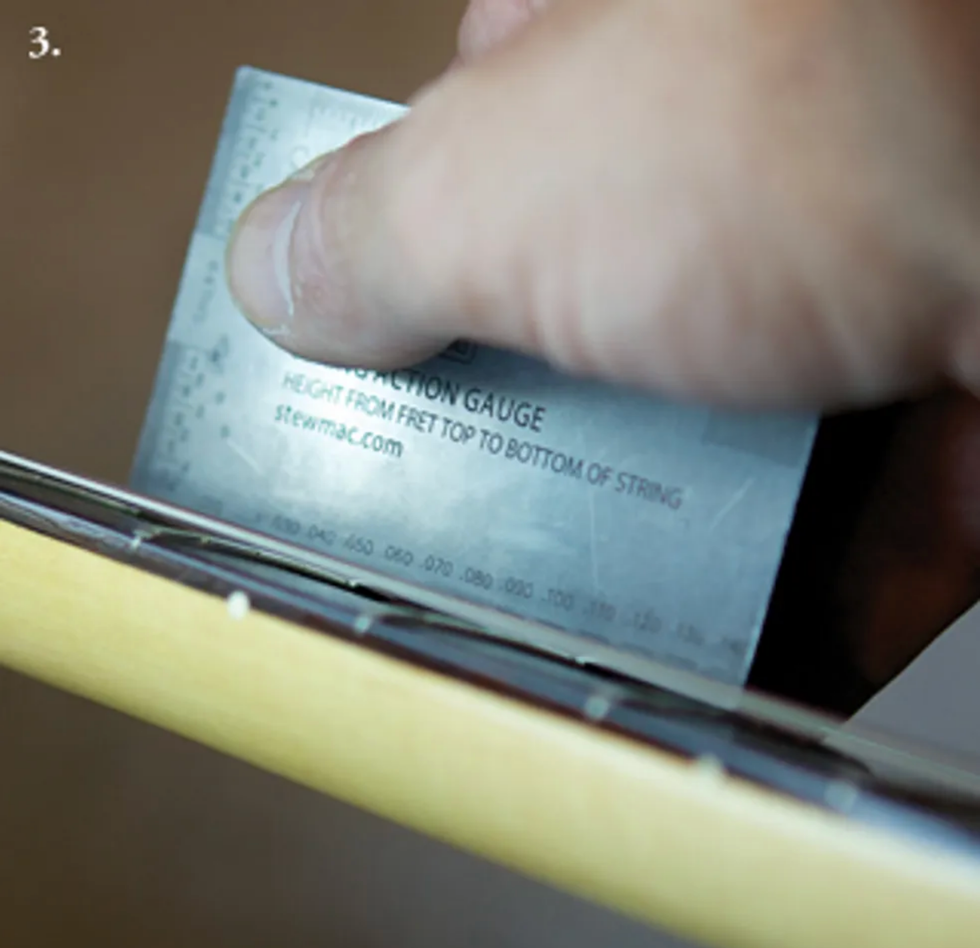
Photo 3 — Measuring the distance between the bottom of the 1st string and the top of the 1st fret.
Playability is also affected by how high the strings sit in their nut slots. The guitar feels stiff when the strings are too high. Conversely, if they sit too low, you'll get a buzz when you play the open strings.
1. Remove the capo and measure the distance between the bottom of the 1st string and the top of the 1st fret (Photo 3).
2. Repeat the process for all six strings. When the guitar is set up properly, the gap should incrementally increase from the 1st to the 6th string to accommodate their progressively thicker gauges.
At the 1st fret, I measured a 2/64" gap between the fret and string, and for the 6th string, the gap was just over 2/64". Again, this is rather high, especially on the treble strings. Overall, this meant I needed to slightly tighten the truss rod (i.e., turn it clockwise) to reduce neck relief, lower the bridge saddles, and re-cut the slots in the string nut.
While taking these preliminary measurements, I noticed that the custom pickguard butted up against the tremolo base plate. This prevented the tremolo from moving smoothly when tipping forward to slacken the strings. When the trem arm was depressed, the base plate would get hung up on the pickguard—that's what was causing the tuning issues the client was having with the trem! Before proceeding, I made a note that I'd have to trim the pickguard before completing the setup.
Armed with the information gathered in the previous steps, now we're ready to begin the process of adjusting the action.
Step 4: Adjust the Truss Rod
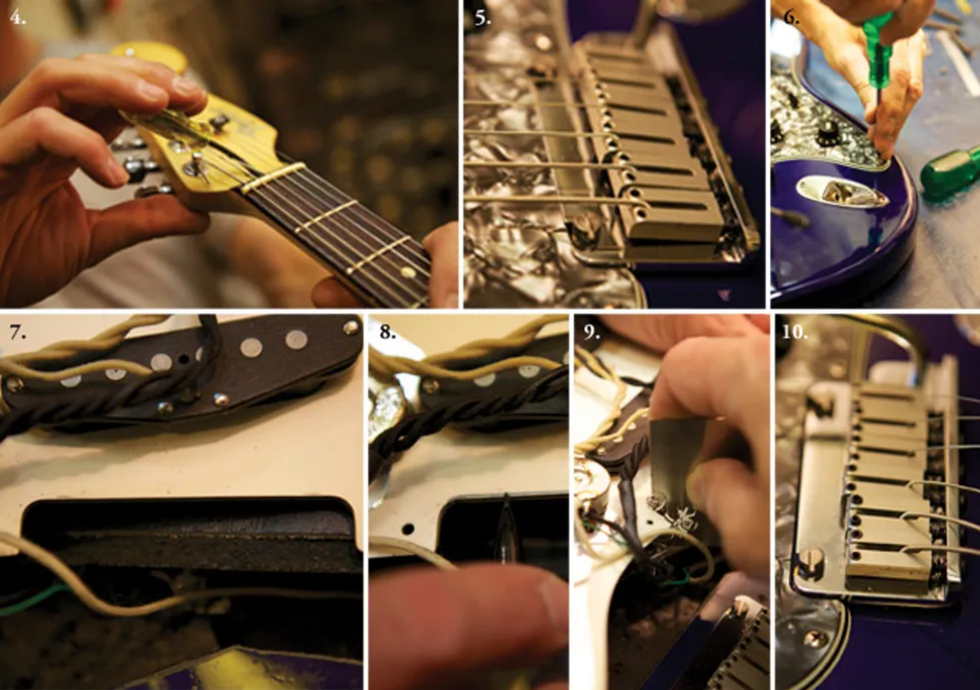
4. When tightening or loosening the truss rod to control neck relief, go slowly and make very small adjustments. 5. Because it's butting up against the tremolo base plate, the custom pickguard is obstructing trem action and needs to be removed and trimmed. 6. To prevent a screwdriver from slipping out of the screw head and scratching the finish, use your free hand to guide and secure its tip. 7. If you look closely, you'll see two indentations at the edge of the pickguard where it was pressing against the trem posts. 8. Using a mechanical pencil to mark about 1/8" of material to remove from the pickguard. 9. Scraping the pickguard to create a space between it and the trem assembly. 10. Now the trem can tilt forward without hitting the pickguard.
With the guitar strung to the client's specs and tuned to D standard, I was ready to tackle the neck relief.
1. Locate the correct tool for your guitar's truss rod (the size and type of nut can vary according to Strat model, year, and manufacturing origin) and insert it into the truss-rod nut (Photo 4).
2. Adjust the truss rod. Turn the wrench clockwise to tighten the rod and reduce forward bowing, or counterclockwise to loosen the rod and reduce back bow. Go slowly, making very small adjustments (1/8 to 1/4 a turn at a time). Check the results each time you move the rod—and be patient.
By tightening the truss rod, I reduced relief from .022" to .015". This was the proper amount of relief for the owner's playing style. Any less relief and the strings would be likely to rattle against the frets.
Earlier, I mentioned that the custom pickguard was obstructing the tremolo (Photo 5). This is one of those little "surprises" that can and will occur with any guitar. To allow the trem to tilt forward, there needs to be a small space between the trem base plate and pickguard. To create this clearance, I determined that the guard had to be trimmed by about 1/8".
The process involved removing the pickguard (Photo 6), examining the plastic to see where it was contacting the trem (Photo 7), using a mechanical pencil to mark the material I wanted to remove (Photo 8), and carefully scraping away the unwanted plastic with a precision tool (Photo 9).
For this type of job, I use stainless-steel scraper blades (available from stewmac.com) that are designed to smooth plastic bindings and contour wood surfaces. Scraping takes time and a lot of patience. If you're not confident in your ability to do this, consult an expert. Even with more than 25 years of experience, it still took me three tries to get it right. Ultimately, I was satisfied that there was sufficient space between the base plate and guard to allow the trem to tilt forward freely (Photo 10).
Step 5: Adjust the Tremolo Spring Tension
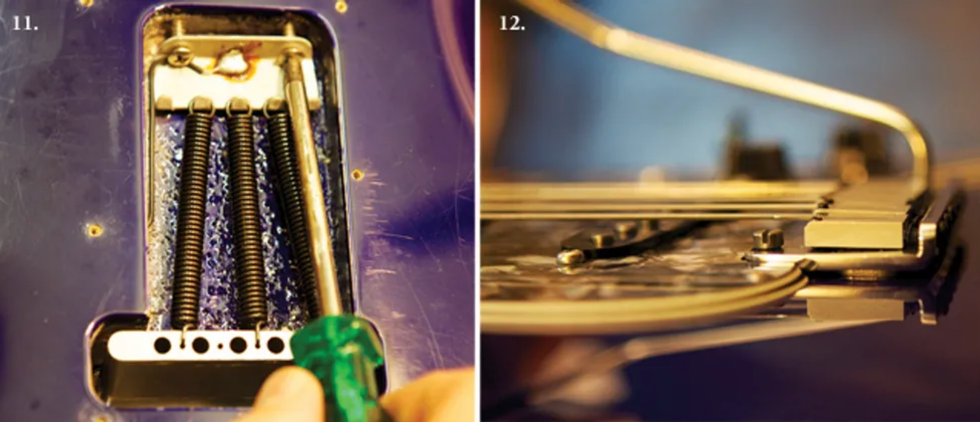
11. Adjusting the spring tension to allow the tremolo to float parallel to the body. 12. A floating trem has sufficient clearance from the body to both lower and slightly raise string pitch.
Now it's time to adjust the trem unit. I noticed the tremolo claw held five springs, and their tension was holding the bridge base flush to the body. Before going any further, I needed to adjust the springs and claw to allow the trem assembly to float. Here's the process:
1. Tune the guitar to pitch, then check the tremolo base plate to see if it's floating, flush against the body, or lifting up too much at the rear.
2. Turn the guitar over and rest it on a soft surface, such as a towel. Remove the trem cavity cover.
3. Using a medium Phillips screwdriver, equally adjust the two screws holding the claw to the guitar body (Photo 11). Loosen the claw to create more "float" on the tremolo. Tighten the screws to pull the tremolo closer to the body.
Always retune after every adjustment and check your progress frequently. This process is very painstaking and will require at least several attempts to get the trem adjusted parallel to the body with the tension the way you like it.
I removed two springs from the claw and re-aligned the two outside springs to attach toward the center of the claw. After adjusting the claw several times—and always retuning whenever I tightened or loosened the springs—I finally got the tremolo floating parallel to the body with just enough clearance to pull the tremolo up a bit and raise the pitch slightly, as the owner requested (Photo 12).
Step 6: Adjust Basic Bridge Height
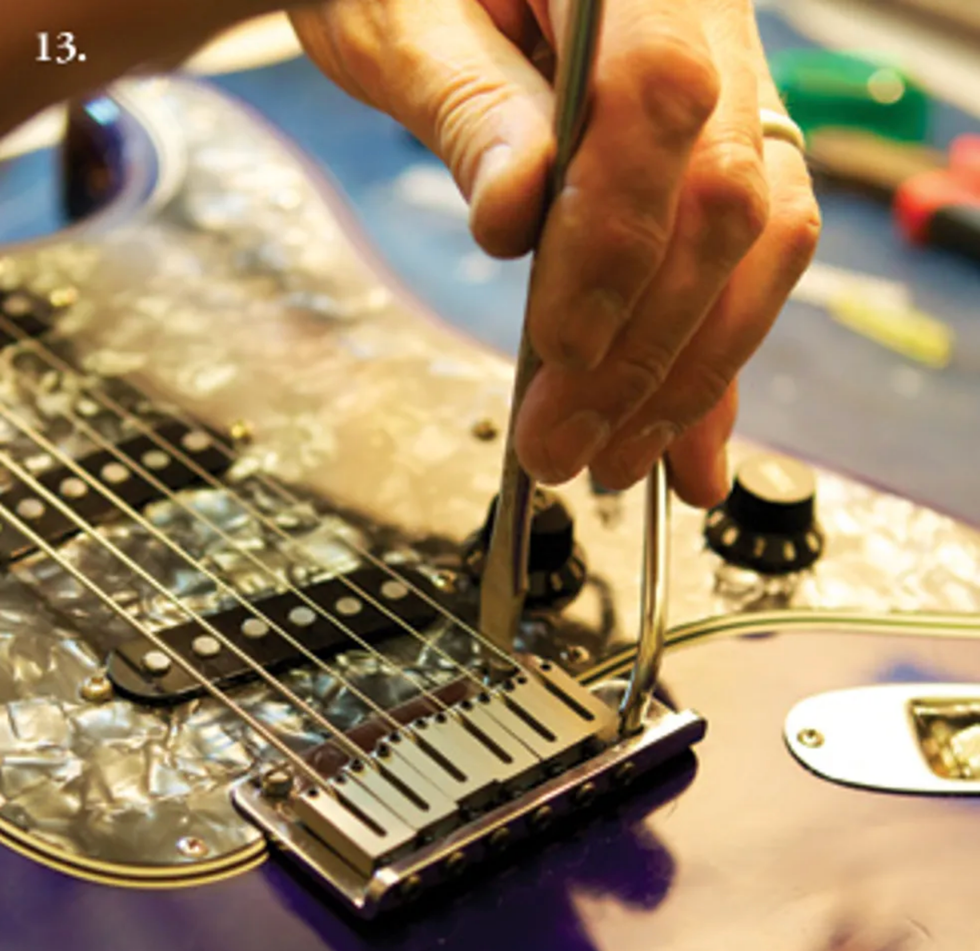
13. Adjusting the overall height of the bridge to allow the trem to move up and down, while also providing enough leeway to fine-tune string action by raising or lowering the individual saddles.
Once the trem base plate was parallel to the body, my next task was to adjust the overall bridge height by raising or lowering the two screws located on either side of the bridge (Photo 13). Note: Vintage Strats or vintage-style reissues use six screws, rather than the modern two-post system, but the principle of adjusting the bridge height remains the same.
1. Tune the guitar to pitch. Then using the appropriate screwdriver (this will be a Phillips or flathead, depending on the model), adjust the bridge plate to provide enough clearance to operate the tremolo.
This is a balancing act: In the next step, you'll adjust the six saddles to set the action. But if you raise the bridge too high at this point, even with the saddles set flush against the plate, the Strat won't be playable. But if the plate is too low, the trem will hit the body as you gently raise the strings' pitch. The trick is to find the sweet spot that allows a floating trem and gives you ample room to raise or lower the saddles to get the action the way you like it.
2. After adjusting the bridge height, retune the guitar and inspect the tremolo to determine if it needs more adjustment—it probably will. Again, the goal is to keep the trem parallel to the body. Tightening the springs pulls the trem tail down toward the body, loosening them allows the tail to lift up.
Step 7: Adjust Saddle Height
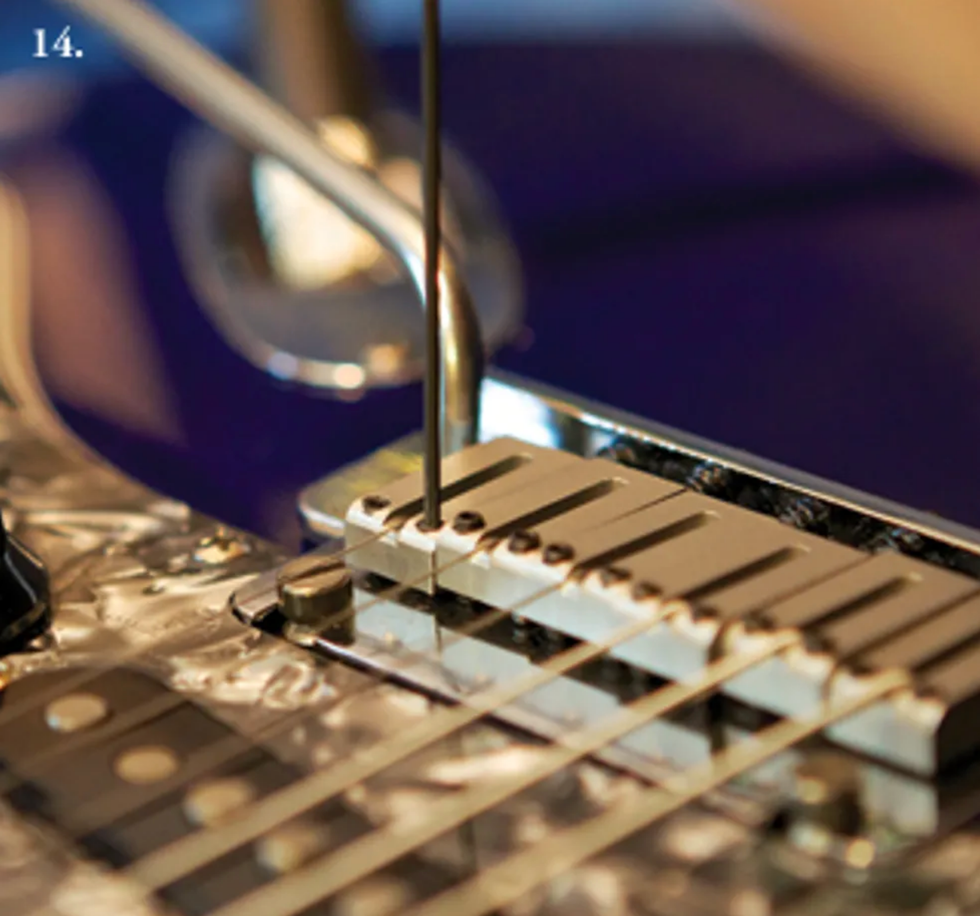
14. Setting individual string height by adjusting the saddles.
Next, set the action by adjusting the height of the saddles. Saddle screws can vary, so use the wrench that came with your guitar. For this Strat, I used a .050" hex key.
1. Tune the guitar to pitch.
2. Place a capo on top of the 1st fret.
3. Measure the action at the 12th fret using an action gauge or precision metal ruler as described in Step 1.
4. Beginning with the 1st string, turn the height adjustment screws located on either side of the saddle to raise or lower the string to your preferred height (Photo 14).
For a modern Strat fretboard with a radius of 9.5"–12", such as on this guitar, official Fender specs are 4/64" for both the 1st and 6th strings. However, string height is personal, so this measurement will vary according to your technique and string gauge. After each adjustment, retune the string you're working on and re-measure the action at the 12th fret.
5. Repeat this process for each string until you have the action where you want it. The goal is to keep an even arc across all six strings that matches the radius of your particular fretboard. (Many repairmen and players eyeball this, but if you want to be precise about matching the fretboard radius, stewmac.com sells metal radius gauges designed for this purpose.)
For this guitar, I set the action at the 12th fret to 3/64" for the 1st string, graduating to 4/64" for the 6th string. These measurements are a little higher than I typically use, but the action felt comfortable to the owner and worked perfectly for his beefy .012 gauge set.
Step 8: Adjust Action at the Nut
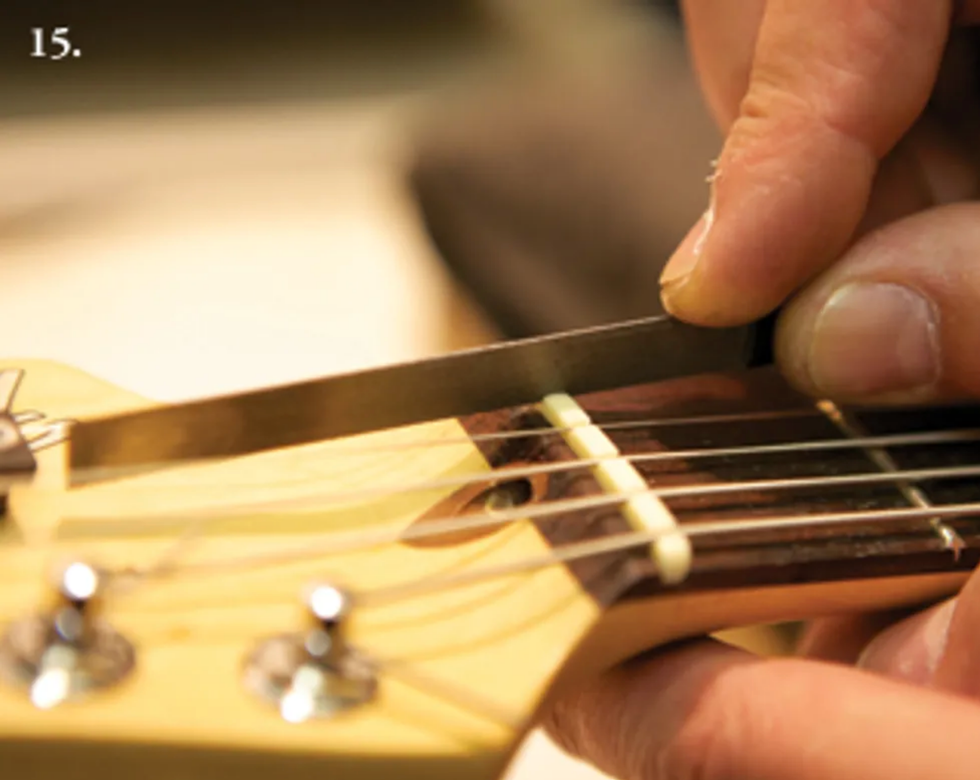
15. Deepening the 2nd-string nut slot with a properly gauged nut file. Notice how the file angle matches the string's descending angle toward the tuner post.
Okay—we're making progress! After setting the saddle height across all six strings, we shift our attention to the nut. It's important that the string height is correct here too. When the action is too high at the nut, the strings will go sharp when you fret them and the guitar will be hard to play.
1. Remove the capo.
2. Tune the guitar.
3. Beginning with the 1st string, measure the distance between the bottom of the string and the top of the 1st fret. The height should measure 1/64" for the 1st string and graduate to 2/64" for the 6th string. Each thicker string should be slightly higher than the one before it.
4. To lower a string, you'll need to cut its slot deeper in the nut (Photo 15). For this job, use a correctly sized nut file. (Nut-slotting files are available from online suppliers, including Luthiers Mercantile, Stewart-MacDonald, and even eBay.)
Slowly cut the slot, paying very close attention to the angle of the nut file. It should match the descending angle of the string, from the face of the nut to the post where the string attaches. If you cut too shallow or too steep of an angle, the string won't seat properly in the nut, causing both tuning and sonic problems.
Make sure the string doesn't stick in the slot. It should move in and out freely without binding. If it sticks, gently roll your file from side to side in the slot to open it up. After a few passes with the file, place the string back into the slot, retune, and again measure the action at the 1st fret.
5. Repeat this process for each string with the proper nut file for each gauge.
Because our bench Strat was now equipped with heavier strings than before, I needed to widen several nuts slots, but it didn't take long to get the strings to sit where I wanted them.
Step 9: Adjust Pickup Height
Pickup height is commonly overlooked during a setup. If the pickups are adjusted too close to the strings, they can cause string rattle and intonation problems. If the pickups are too low, you'll end up with a weak signal.
Here are the measurements I use for each pickup on a Strat:
And here's my system for proper pickup adjustment:
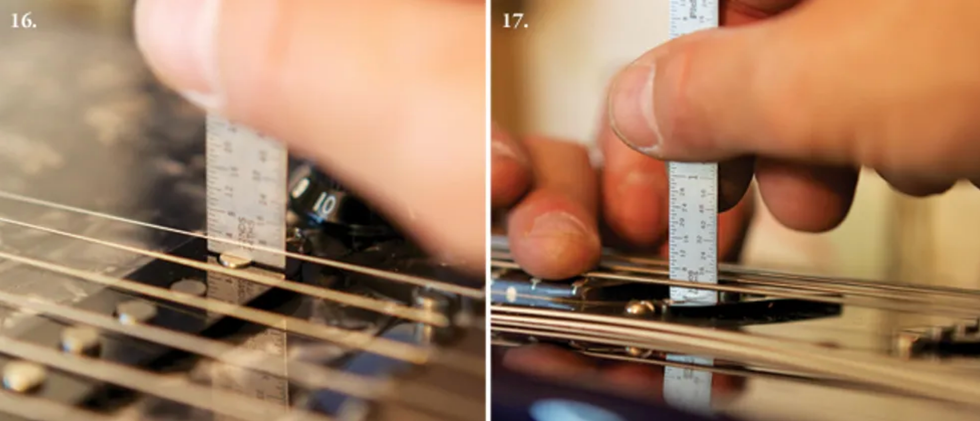
16. Measuring the distance between the pole piece and 1st string to determine the correct height for the bridge pickup. 17. Measuring neck pickup height.
1. Fret the 1st string at the last fret. Using a 6" machinist rule, measure from the top of the corresponding pole piece on the bridge pickup to the bottom of the string (Photo 16). Adjust the pickup height by turning the screw on the treble side of the pickup.
2. Fret the 6th string at the last fret, measure, and adjust the screw on the bass side of the pickup.
3. Repeat the process for the middle and neck pickups (Photo 17).
Step 10: Adjust Intonation
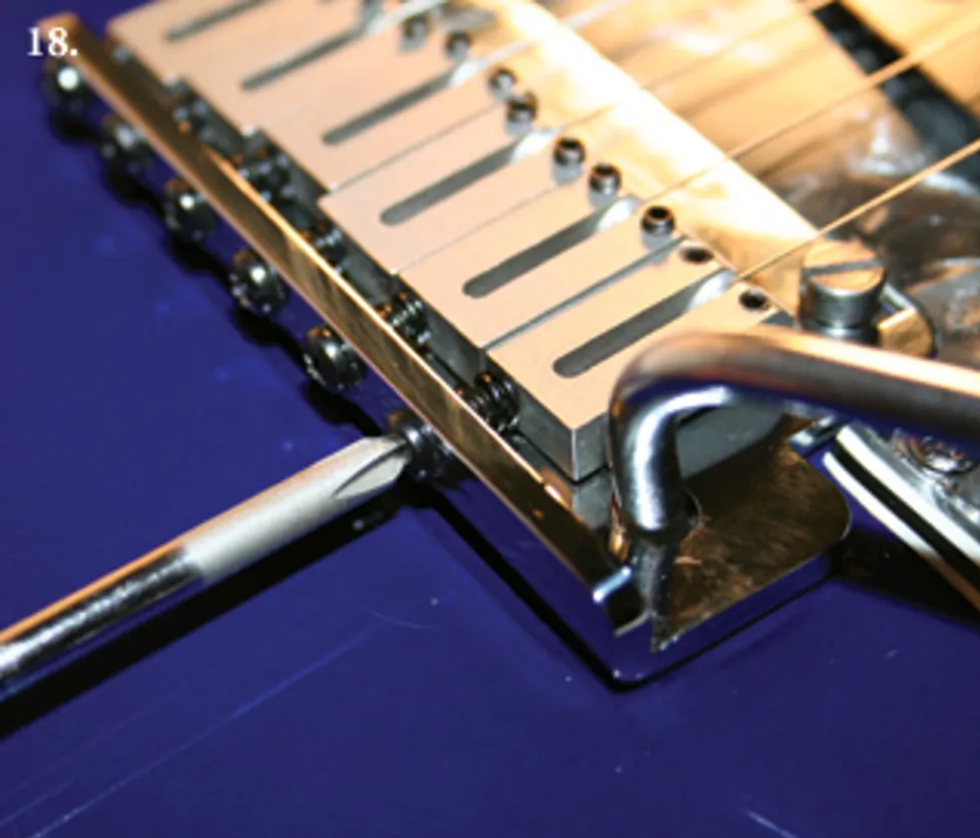
18. Moving the saddle to adjust the 1st string's intonation.
Once the pickups are at proper height, it's time to adjust intonation. Note: Unless the strings are fresh—as they were on this guitar when it arrived at the shop—install a new set before going any further.
This final setup step involves moving the saddles closer to or further away from the nut. The saddle-intonation adjustment screw is located at the rear of the trem assembly. Using a small Phillips screwdriver, move each saddle forward (by turning the screw counterclockwise) or backward (clockwise) to shorten or lengthen the vibrating portion of the string (Photo 18).
1. Armed with a high-quality electronic tuner, bring each string to pitch. But this time, instead of playing an open string and tuning it, strike the 12th-fret harmonic and tune it to pitch.
2. Starting with the 1st string, play the 12th-fret harmonic and then fret and pluck the same note. If the fretted note is sharp compared to the harmonic, move the saddle away from the neck. Conversely, if the fretted note is flat, move the saddle toward the neck. Make small adjustments— and retune the harmonic each time you make an adjustment . Continue comparing the 12th-fret note to its reference harmonic until the former matches the latter.
3. Repeat this process until all the 12th-fret notes on all six strings match their corresponding 12th-fret harmonics.
Rock Out!
At this point, the setup is complete and it's time to take your Strat for a test drive. After a few days, you may find you want to adjust something, such as the trem-spring tension, pickup height, neck relief, or saddle height. And that's great—the Strat is a supremely mechanical beast that will accommodate your tweaker's urges.
But as you dive into any re-adjustments, remember that changing one thing can affect something else in the setup equation. If you find yourself chasing an adjustment or discover that you've caused your Strat to drift out of whack, put it down, take a deep breath, and review the 10-step setup process outlined in this article. You can always start back at the beginning and confirm each adjustment as you move through the list.
In time, you'll develop a sixth sense for how all the elements interact, and this knowledge will allow you to continue to fine-tune your Strat for ultimate playability and tone. It's a skill worth developing!
[Updated 8/23/21]
- Mod Garage: The Strat-o-Tele Crossover - Premier Guitar ›
- DIY: How to Set up Jazzmasters & Jaguars - Premier Guitar ›
- Adjusting Stratocaster Pickup Height, Pt.1 - Premier Guitar ›
- Guitar Shop 101: How to Shim a Bolt-On Neck - Premier Guitar ›
- Rig Rundown: Tinsley Ellis - Premier Guitar ›
- 12-String Setup Secrets - Premier Guitar ›
- 7 ways to upgrade your guitar - Premier Guitar ›
- Foxing Guitarist Eric Hudson's Guitar Rig Rundown Tour - Premier Guitar ›
- 8 Steps to Float Your Fender Stratocaster Trem - Premier Guitar ›
- Fender Player Plus Meteora HH Electric Guitar Review - Premier Guitar ›
- DIY: How to Adjust Your Guitar's Neck Relief & Truss Rod—Plus, Fix Your Action | Helmer’s How-Tos - Premier Guitar ›
- DIY: Replacing Strat Single-Coils with Stacked Humbuckers - Premier Guitar ›
- Unlock Your Guitar's Potential with this Easy 4-Step Setup Guide ›
- Blues Guitarist Tinsley Ellis’ Acoustic Debut, Naked Truth ›
With the release of his latest solo EP, Vertiginous Canyons, the former Police guitarist shares in-depth on his personal journey from Romani caravan to becoming a peer of Eric Clapton’s to shaping a modern dialect of jazz-rock innovation.
This past June, onstage at a handsomely restored vaudeville theater in Washington, D.C., the guitarist and composer Andy Summers made a small but spirited crowd laugh. Hard.
Summers, who rose to fame in the late 1970s as one third of the new-wave phenomenon the Police, told many stories and landed many punchlines. There was the episode in which he and John Belushi partook of psychedelics in Bali, and the time he got kind of hustled by a striking, guitar-playing Long Neck Karen villager in Thailand. He recounted a gut-busting tale of taking a few too many sleeping pills on a trip to South America. With perfectly British dryness and timing, he improvised an aside about living near Arnold Schwarzenegger in Los Angeles, and how he just had to kick the Terminator’s ass.
Out of the Shadows
“I think it’s turning into a standup routine, basically,” Summers said recently over Zoom. He was being self-effacing. Mostly, this one-man multimedia show, entitled “The Cracked Lens + A Missing String,” allows Summers to reflect on enduring passions with sincerity, by “integrating these two media I’ve been working on for so long”: music, of course, and art photography, where his work combines painterly composition with street-level intimacy and the global-citizen mission of Nat Geo.
Behind projections of his photos, and between the storytelling and odd video clip, he gave a two-hour recital of solo guitar music. Summers played a new yellow Powers Electric A-Type guitar, and began his show by telling his audience how thrilled he was with it. (Summers has accrued around 200 guitars, many of them given to him, and maintains that he’s “definitely a player,” not a collector.)
Summers spent a significant part of his 20s studying classical music, originally inspired by Julian Bream. Now, onstage in his one-man show, it's clearly time to reflect on his past.
Summers began touring “The Cracked Lens” before the pandemic—the final show prior to shutdown took place at the Metropolitan Museum of Art in New York, in 2019—and picked it up last year. It’s evolved, he says, through improvisation and trial and error, following a process much like one he’d put into motion for any band or project.
In D.C., the setlist was both surprising and deeply satisfying. Newer solo music like “Metal Dog” came off as delightfully arch and abstract, a reminder that Summers hit the Billboard albums chart with Robert Fripp, with 1982’s I Advance Masked. A sterling chord-melody arrangement of Thelonious Monk’s “’Round Midnight” spoke to the lifelong impact American jazz has had on the guitarist. A winsome mini-set of bossa nova, including “Manhã de Carnaval,” Luiz Bonfá’s theme to the film Black Orpheus, illustrated Summers’ devotion to both the cinema and the music of Brazil.
And yes, there was Police material, too, which Summers reharmonized and rearranged and used as vessels for longform improvisation. Atop programmed backing tracks, he treated songs like “Tea in the Sahara,” “Roxanne,” “Spirits in the Material World,” and “Message in a Bottle” as if they were his beloved jazz standards, drawing agile lines in and around the harmony, using pop hits as a launch pad for wending single-note narratives. In a small theater, it felt as if you were eavesdropping on Summers, whiling away an afternoon in his home studio. An excitable woman behind me couldn’t help but try and banter with him as he stalked the stage; the guy to my right played air drums. This was thrilling—especially if you were a Police fan whose context for these songs was sold-out arenas.
A New Installment
To combine music and imagery was also the impetus for Vertiginous Canyons, Summers’ recent solo EP. Commissioned as an accent to the guitarist’s fifth photo book, A Series of Glances, the project features eight spontaneously composed instrumental pieces of pop-song length. Its sparkling, layered, and looped soundscapes serve as Zen-like mood music for viewing the photographs. By design, Summers improvised Vertiginous Canyons in a single afternoon without too much fuss, using mostly his early ’60s Strat. “This was drone-like, ambient, atmosphere stuff that I thought was enough,” Summers explains. “Because I suppose you could get into a place, let’s say, where the photography and the music are fighting each other.
“One of the cardinal rules of scoring films, which I’ve done many,” he adds, “is don’t get in the way of the movie.”
On Vertiginous Canyons, listeners will hear influences from Eno to Hendrix to Bill Frisell.
As with Summers’ solo show, the music can stand alone. In many ways, Vertiginous Canyons also comes off like Eno or classical minimalism or the edgiest strain of what can be called “new age”—an engaging yet accessible entryway to experimental music. And as with any effective musical abstraction, what you’ve heard in your life is what you’ll hear in Vertiginous Canyons. The twinkling, fluttering phrases of “Blossom” bring to mind Bill Frisell. “Translucent” and “Village” summon up Glenn Branca’s guitar armies in their quietest moments, ramping up toward euphoria. “Blur” is a far-out exercise in Hendrix-style backwards soloing; “Into the Blue” is Pink Floyd meets Popol Vuh.
Greatly moved by Julian Bream as a young man, Summers spent a sizable chunk of his 20s immersed in classical guitar in California, as hard rock and the singer-songwriters ascended. When I ask him if those studies informed Vertiginous Canyons, his response is rapid-fire. “Definitely. I mean, I spent years doing nothing but classical music, classical guitar,” he says. “It’s very important information that I took in … and it stayed with me the rest of my life.
“So my ears are wide open.... I’m a sophisticated harmonic player, and it’s also informed by classical music. I’m sort of all-’round educated in the ways you can do music.”
Summer Reflections
To let an artist’s age guide your judgment of them is unfair. But in Summers’ case, it’s essential to understanding how and why he became such a fascinating guitarist, one whose whip-smart, cross-cultural approach overhauled the prevailing notion of what rock-guitar heroics could be in the late 1970s and early ’80s.
He was born on the last day of 1942, “a kid from the English countryside,” he says. His father was in the Royal Air Force; his mother supported the war effort working in a bomb factory. Alongside Django Reinhardt, he’s on the short list of guitar idols who spent their earliest days in a Romani caravan, which his father bought in the face of a housing shortage. In terms of rock generations, think about it: Jimi Hendrix was born in November of ’42, Keith Richards in ’43, Jeff Beck and Jimmy Page in ’44, Pete Townshend and Eric Clapton in ’45. Summers debuted the cinematic, reggae-soaked sound that made him famous on the Police’s Outlandos d’Amour, in 1978, as the punk explosion gave way to post-punk and new wave. But his contemporaries are the British bluesmen who were architects of the psychedelic era and won over the baby boomers.
Andy Summers' Gear
When Summers, pictured here performing with the Police in 1982, began developing his blues chops, he blended in complex chords and jazz phrasing.
Photo by Frank White
Guitars
For touring:
- Fender Custom Shop Stratocaster
- Powers Electric A-Type
Amps
- Fender Twin with Fender Special Design Speakers
- Fractal Axe-Fx III
- Bob Bradshaw 100-watt head
- Roland JC-120
- Various Mesa/Boogie heads, cabinets and power amps
Effects
Current Pedaltrain pedalboard includes these effects, among many others:
- TC Electronic SCF Gold
- Electro-Harmonix Micro POG
- DigiTech Whammy
- Klon Centaur
- TC Electronic Brainwaves
- MXR Carbon Copy
- Electro-Harmonix Freeze
- Paul Trombetta Design Rotobone
- TC Electronic Dark Matter
- Mad Professor Golden Cello
Picks & Strings
- Dunlop Andy Summers Custom 2.0 mm Picks
- D’Addario Strings, mostly .010–.046
The electric-blues revivalism that his peers favored was a scene with which Summers engaged mostly by circumstance. In some capacity he was immersed in it, gigging and recording with hot R&B acts of Swinging Sixties London. But as a developing guitarist, he also transcended its stylistic boundaries, and he ultimately missed out on the wildly lucrative parts of it, after it’d evolved from nightclub entertainment to chart-topping, festival-headlining pop.
“[We’re talking about] real modern electric-guitar history,” Summers says, “because I was really pretty close with Clapton. We all knew each other. There were about five or six of us, and we all played at one club [the Flamingo, in London].
“I watched Eric develop, and he had this mission to play the blues … and he ripped off some great blues solos,” Summers adds, with a mischievous chuckle. “I had grown up with different kinds of music in those formative [teenage] years, when you’re taking it all in and trying to be able to do it.”
So much has been written about how the ’60s British-guitar titans tapped into early rock ’n’ roll influences and Chicago blues, rescuing the latter from obscurity in its country of origin. But it’s important to remember the profound impact that midcentury modern jazz had on culturally curious young Brits; in fact, the moniker “mods”—that clothes-obsessed cult that gave us the Who—began as “modernists,” as in devotees of modern jazz, R&B, soul, and ska.
Before meeting Sting (left) and forming the Police, Andy Summers (right) was close friends with Eric Clapton and once jammed with Jimi Hendrix.
Photo by Ebet Roberts
Summers was hooked. Guitarists Wes Montgomery, Jimmy Raney, Kenny Burrell and Grant Green ranked among his favorites, alongside Sonny Rollins. Rather than sticking to 12-bar patterns, Summers shedded on complex chord sequences and jazz phrasing, logging “thousands of hours of listening, trying to get it. But that’s where the feel of the time comes from, which is the most important element.”
“Eric and I talked about it,” he continues, “and I was in a different place. I don’t think we really had arguments about it, but he was absolutely a disciple of the blues, where I was more into other things.” Summers loved the fleet, chromatic lines of bop, and classical guitar, and African and Indian music. He recalls transcribing Ravi Shankar.
“So I felt like I very much had my own path, and it wasn’t the Eric Clapton path. I was aware of all that, but Eric was deeply into B.B. King — gave me his B.B. King record, actually—Live at the Regal, told me to check it out. So I did listen to it, and yeah, okay, I get it. But my head was elsewhere.” (During that period, Summers also sold Clapton a ’58 Les Paul, after Slowhand’s 1960 model was stolen. “It was guitar craziness,” Summers says. “I really anguished over selling my Les Paul, but I just wasn’t into it. I think there was something wrong with the pickup—at least I thought there was, in my sort of naivety at that time.”)
Nor was Summers’ path the Hendrix path. Because of his friendship with the Jimi Hendrix Experience’s drummer Mitch Mitchell, Summers once jammed in the late ’60s with Jimi. “A quiet guy with a very loud guitar. And he could play the shit out of the guitar,” Summers laughs. “He was definitely sort of a force of nature. You’d feel it.” At an L.A. studio where the Jimi Hendrix Experience was in session, Summers began playing with Mitchell on a break. But “Jimi just couldn’t stay away from the music,” Summers recalls. So Hendrix picked up a bass to anchor Summers’ guitar, until Jimi asked to trade.
“I think of it almost as a sort of a comic moment,” Summers reflects today. “Jimi had come into the scene and … didn’t really play like anyone else. I mean, he played Jimi Hendrix … incredible, but I didn’t really want to play like that. I’ve got to find my own thing. It was very imperative to me not to be yet another Hendrix copier. And I think it’s what he would have appreciated, too.”
Although the first album by the Police was released in late 1978, Summers already had an extensive catalog of recordings with Eric Burdon, Kevin Ayers, Kevin Coyne, Zoot Money’s Big Roll Band, and Joan Armatrading before “Roxanne” alerted the world that a new kind of pop group was arriving.
To hear Summers on pre-Police recordings is intriguing; even on straightforward forms, his good taste and sense of harmony present a shrewd, knowing alternative to his peers. Seek out the 1965 LP It Should’ve Been Me, by Zoot Money’s Big Roll Band: On a take of Jimmy Reed’s “Bright Lights, Big City,” Summers applies the single-note harmonic finesse of Grant Green to barroom British R&B. (It was Green’s Gibson ES-330, a surprising instrument for a jazz picker at the time, that inspired Summers to pick up an ES-335 after his ES-175 was stolen.) A few years later, as part of Eric Burdon’s New Animals, Summers covered Traffic’s “Coloured Rain,” going long on a fuzztone solo that fits the psychedelic bill while also telling a story with precision and patience.
Summers’ ship came in nearly a decade later, after he’d returned to England from California and met drummer Stewart Copeland and a singer and bass player, Gordon Sumner, who went by “Sting.” They were bright, dexterous, and culturally well-versed, with backgrounds in prog and jazz. “I think we had a credo,” Summers says, “and it was spoken out loud: We don’t want to sound like anybody else.
“I found I could talk to Sting and say, ‘I want to play this kind of altered chord here. What do you think?’ He could sing right through anything. He had the ears to be able to sing it like a jazz singer. Not that we were trying to lay ‘We’re really jazzers’ on the public. We were trying to present ourselves as a rock band with songs. But the information that we were putting into those rock-song arrangements was different.”
Summers in a late ’80s promo photo, near the start of his solo-recording career.
For Summers, that meant matching the musicianship he’d started earning as a teenager on jazz bandstands with the au courant sounds of post-punk and reggae, filtered through emergent sonic technology. With his heavily modded 1961 Tele and custom Pete Cornish pedalboard, he offered chord sequences and lines that have challenged and educated generations of practicing guitarists brought up on blues-rock technique. Alongside his deft use of open space, he was that rarest rock guitarist who paid serious mind to chord voicings. “My job was to turn the chords into something more unusual,” Summers says, “to have more unusual guitar parts. For instance, something like ‘Walking on the Moon,’ I put in a Dm11 chord, with reverb and a beautiful chorus sound. So it’s got the 11th on top, and immediately it grasps your ear. It’s like the signature of the song was that chord.”
“So my ears are wide open.... I’m a sophisticated harmonic player, and it’s also informed by classical music. I’m sort of all-’round educated in the ways you can do music.”
Of course, no other Summers guitar part or Police song made bigger waves than 1983’s “Every Breath You Take.” Influenced by Bartók’s “44 Duos for Two Violins,” Summers crafted a repeating figure that underlined Sting’s standard pop-song structure while avoiding conventional triadic harmony. (Losing the third from tired rock chords was Summers’ not-so-secret weapon.) “It gave it that haunting quality that made the whole track come to life,” Summers says, “because otherwise, I think we would have dumped the song. It wasn’t one of our favorites at all.”
The Police last performed on their historic reunion tour of 2007 to ’08, and their relationship today is mostly business. “We’re not hanging out with each other,” Summers says. “We’re all in touch through headquarters.” One thing they’ve had to agree on this year is a Super Deluxe reissue, toasting the 40th anniversary of the Synchronicity album, which provides new context that might safely be called revelatory. Among the new box set’s many previously unreleased goodies is Sting’s original demo for “Every Breath You Take,” weighed down with synth keyboards that pile on the sentimentality and pin the track squarely to the 1980s. (Unlike so much ’80s pop-rock, the Police’s music has aged well.) “You can see the transformation,” says Summers.
“Every Breath You Take” became a global smash that ranks among pop’s most successful songs, a feather in the cap of the band that owned the late ’70s and ’80s. Consider this: At a time when his psych-era peers were considered middle-aged Flower Power relics, Summers was leaping around onstage like a bleached-blond atom and representing pop rock’s bleeding edge on MTV. Now, at 81, he’s found a way to forge ahead and, in some fashion, improve on the past.
Call The Police (Andy Summers / João Barone / Rodrigo Santos) - Synchronicity II (ensaio/rehearsal)
With bandmates João Barone and Rodrigo Santos, of Police tribute band Call the Police, Summers displays the adept riffage that brought him to the big stages and helped solidify his rock legacy.
Leveling Up
When we connect on a followup call in mid July, Summers is in Brazil, about to embark on a South American tour with his trio, Call the Police. This tribute project of a sort features two celebrated Brazilian rockers, bassist-vocalist Rodrigo Santos and drummer João Barone, and plays hits-filled live sets to packed houses. “It’s sort of enhanced, because it gets looser. It’s a bit uptight with those other guys I play with,” says Summers.
With regard to those other guys, that uptightness had much to do with the punk and new-wave era that bore the Police. The relationship between punk and the band was complicated. Somehow, they managed to use the movement’s greatest lessons—in energy, creative bravery, and concise songcraft—without pandering to its musical primitivism. Summers’ reputation amongst guitarists rested in the minimalist intelligence of his decision-making; you kind of understood he could play anything, but he was mature enough not to. “I didn’t feel the need to crush everybody with every guitar part,” he says.
“It was more like a guitar solo is supposed to be a mark of the old guard. You weren’t supposed to be able to play; it was really that dumb.”
Nevertheless, he believes that punk’s principle of non-musicianship kept him from exploring the songs to their fullest. “I think I should have played more solos than I was given the space to do,” he says. “It pisses me off actually, because this came more from Stewart. When we started the band in the thick of the hardcore-punk scene, it was more like a guitar solo is supposed to be a mark of the old guard. You weren’t supposed to be able to play; it was really that dumb.”
“I was a virtuoso player,” he adds, “so it was very frustrating for me. Later, when we did sort of open it up, it really got more exciting. The fact that I could play as well as I did, I found it was a bit threatening. Because the highlight in a performance of a song … would be the guitar solo.”
As in “The Cracked Lens + A Missing String,” Summers can stretch out in Call the Police to his heart’s content. At long last. “It’s very improvised,” he says, “and they’re up to the level where they can do that. They go with me. It’s how it should always have been.”
Dark, enveloping, and mysterious tape-echo-style repeats on the cheap in an enclosure that fits in the smallest spaces.
Dark, enveloping repeats that rival more expensive tape-echo emulations and offer an alternative to click-prone BBD echoes. Cool chorus and flanger effects at fastest repeat times.
Small knobs make it tough to take advantage of real-time tweaking.
$137
Electro-Harmonix Pico Rerun
ehx.com
My most treasured effect is an old Echoplex. Nothing feels like it, and though I’ve tried many top-flight digital emulations, most of which sounded fantastic, nothing sounds quite like it either. If the best digital “tape” delays do one thing well, it’s approximating the darkness and unpredictable variations in tape-echo repeats.
Electro-Harmonix’s Pico Rerun plays the character of tape echo very convincingly in this respect. It hangs with more expensive digital tape echoes at a $137 price tag that’s easy to stomach. Better still, this Pico version is petite and offers unexpected surprises and flexibility.
Beyond the Pico Rerun’s essential enveloping voice, the pedal enables a lot of fairly authentic tape-echo functionality. Manipulating the feedback, blend, and echo rate controls together (which is tricky given their small size) yields flying-saucer liftoff and “Dazed and Confused” time/space-mangling textures in copious measure. These tweaks betray some digital artifacts—mainly trebly peaks that don’t have the benefit of real tape-compression softening, but they hardly get in the way of the fun. Saturation lends welcome drive and haze. And the flutter button adds faux tape wobble in three degrees of intensity. At the most intense setting, long repeats take on a woozy sense of drift. At the fastest rates, however, the flutter function will generate chorus and flange effects that neither my Echoplex, nor my best tape echo simulators, can manufacture.
The three bassists—whose collective work spans Vulfpeck, D’Angelo, Rage Against the Machine, and much more—cast a wide musical net with their StingRay basses.
The story of the Ernie Ball Music Man StingRay is a deep journey through the history of the electric guitar business, going way back to connections made in Leo Fender’s early days. When the StingRay was introduced in 1976, it changed the electric-bass game, and it’s still the instrument of choice for some of the most cutting-edge bass players around. Here’s what a few of them have to say about their StingRays:
Joe Dart (Vulfpeck)
“My first glimpse of a StingRay was watching early videos of Flea, who had a black StingRay that he played in an early instructional video, as well as on the Funky Monks tape, showing the making of Blood Sugar Sex Magik. After that, I discovered Bernard Edwards and his playing with Chic, where he developed such an iconic funk and disco sound. From there, I discovered Pino Palladino’s brilliant fretless StingRay playing. Luckily, one day in the studio, someone handed me an old StingRay, and I used it on a couple of Vulfpeck recordings. I love the punchy, growly, bright tone. The StingRay cuts through the mix. It’s the perfect funk and disco bass.
Pino Palladino
“I played guitar in bands until 1976, when I decided to start playing bass, and that coincided with the StingRay coming out. I actually tried one in a store in Cardiff in Wales, where I come from. I remember plugging it in, and I didn’t really know much about preamps. I don’t think anybody knew much about preamps back then, because it wasn’t even a thing in a bass guitar. So, I turned everything up and it was too trebly for me. I didn’t know you could tweak the controls. I didn’t gravitate towards the instrument at first, to be honest.
Fast forward a few years and I was in my early twenties on my first trip to America with Jools Holland in 1981. I stumbled into Sam Ash Music on 48th Street in New York one day, and I saw a fretless Music Man StingRay on the wall. It sounded amazing straight away. I hadn’t played much fretless bass up until that point, but for some reason I could just play that instrument in tune. I was playing it and thinking, ‘Wow, this is not so hard.’ I backed off the treble a little bit and found a nice, little happy position where it felt really good. And it just had such a great punchy sound. I played it with Jools Holland on the first night I bought it, and I pretty much never put it down for 10 or 15 years after that.”
Tim Commerford (Rage Against the Machine)
“I got a blonde StingRay when I was about 19 years old, and that was the bass that I played for the first Rage record. At that time in my life, as a musician, I was kind of clueless to the nuances of the sound of an instrument. If it worked, it worked; if it didn’t work for me, it didn’t. I was just a knucklehead. I can’t even remember the reason why I went away from it. I think it’s because I wanted to get a real edgy sound, and I didn’t really know how to shape things in the way that I do now through experimenting. I’ve been very lucky, and I’ve had a lot of opportunities to experiment, so I’ve learned a lot over the years. And the StingRay could have done it all. I really could have done it all with the StingRay. Long story short, the preamp is arguably the best one, still. It took me a minute to realize just how powerful that preamp is—it’s a banger. Listening back, sometimes I hear [Rage Against the Machine] songs on the radio, and I’m just like, ‘Wow.’ It’s such a clean, pristine sound that comes from a StingRay.”
Our columnist breaks down why Leo’s original designs are still the benchmark for pristine guitar sounds.
It’s time to discuss a favorite topic of mine: the Fender clean tone. I’m a big fan of pristine guitar tones, and I think it might be the reason why I got into Fender amps in the first place. So, in this column, I’ll break down and explain what creates the beautiful, crystalline tone in vintage Fender amps, and share which amps are best for capturing these huge, squeaky-clean sounds.
Among my music friends, I am known for advocating these tones. Sometimes my bandmates want more distortion and growl from my guitar, but I proudly resist and argue that the music we create profits from a clearer guitar tone. It’s not about volume and distortion; it’s about melody, rhythm, and dynamics. Personally, I find it more interesting to hear guitarists with clarity, where I can identify single notes and what they are doing. It’s much harder to play clean, and the transparency forces us guitarists to consider more carefully what we play.
Tone and music are definitely matters of personal taste. What someone finds naked and thin, others will find clear and articulate. Let me therefore explain my definition of “clean tone.” A good, clean tone means clarity and little distortion. Clarity is achieved when there is a certain balance between the frequencies. There must be enough sparkle and brightness together with a firm low end. In my definition, you can also have some distortion as long as you have enough clarity to hear single strings in a chord, which some define as a “bell-like” tone. Muddy or overwhelming mid and bass frequencies will spoil this clarity. I like punchy guitar sounds, and for that we need muscle and power from large power-amp sections and larger speaker cabinets. But again, there must be enough sparkle and treble attack to balance that big low end.
The black- and silver-panel Fender amps excel in this area. Fender designed these amps specifically to support the music style of the 1950s and ’60s: Whether it was folk, country, rock, or surf, the guitars were supposed to be bright and clean. The amps therefore had to produce a sound that was both clean and loud, often without PA systems.
There are several reasons why these Fender amps sound the way they do. Let’s dive into the most important factors. Firstly, the tone stack and EQ section play a significant role in creating a scooped tone with few mids. Most AB763 Fender amps have 250 pF, 0.1 μF, and 0.022 μF caps (treble, mid, and bass, respectively), controlled by 250k bass and treble pots and a 10k mid pot (or a fixed 6.8k resistor in amps without the mid pot). If you alter the value of the mid resistor or insert a larger coupling cap after the preamp section, you will get more, and earlier, breakup. If we look at the preamp sections of the AB763 amps, there is no tube gain stage, whose purpose is to introduce distortion. There are only the necessary tube gain stages to mix and lead the signal to the power amp section.
“Fender designed these amps specifically to support the music style of the 1950 and ’60s: The guitars were supposed to be bright and clean.”
The power amp section is equally important. The AB763-style amps have dual power tubes in a Class AB push-pull configuration which has significant clean headroom—more than single-end Class A amps. The fixed-bias design provides more headroom than cathode bias, which creates sag and less headroom. The efficient long-tail phase inverter and the negative feedback loop are also used to minimize clipping. Finally, using American-style speakers in the open-back cabinet design of the black- and silver-panel combo amps will enhance bright frequencies and tame the mids and low end. All these details point to one conclusion: Fender designed the AB763 amps to achieve the cleanest possible tone.
For me, the cleans of a Super Reverb are especially fantastic. The four, lightly driven 10″ speakers produce a scooped sound with great dynamics and touch sensitivity. The full set of EQ controls, robust power amp, and large transformers work together to give you both sparkle and a firm low end, even at high volumes. The Pro Reverb and Princeton Reverb, however, will struggle to stay clean when pushed. The relatively small-output transformers are a bottleneck in these amps, and they both lack the important mid control to tame the bass and mids. The Pro Reverb’s boomy 2x12 cabinet gives a flabby bass response, and the Princeton Reverb has a cheaper and inefficient phase inverter. This means that these amps can play clean only at lower volumes. If you read my previous articles on these amps, you will find easy instructions for how to improve the clean headroom, if that’s what you want.
If it’s natural distortion you’re after, the best black- or silver-panel Fender amp is the AB165 Bassman. But that’s a different story we’ll come back to later.