Photo 1
Let’s build one of my favorite DIY guitar tools that I use daily in my shop. I’ll show you two versions and then explain how to put them into action.
Welcome back to Mod Garage. After receiving numerous requests to show more DIY tools for guitarists, today we’ll explore one of my favorites. For years I’ve used this one in the shop daily and I’m sure you’ll love it. It’s cheap and easy to build, but very effective for analyzing circuits of electric guitars and basses without opening the electronic compartment or lifting the pickguard. It’s a kind of adaptor or extension to measure a pickup’s DC resistance (DCR) from outside the guitar. After building one, we’ll discuss how to interpret the measurements.
The DCR of a pickup is by far the most common parameter you can read when reading pickup descriptions and often it’s used as an indicator of the output. The reason for this is that it’s easy to measure, but, sadly, it doesn’t tell us anything about a pickup’s output nor its tone. To quote pickup designer Bill Lawrence: “DC resistance tells you as much about a pickup’s tone and output as the shoe size tells you about a person’s intelligence.”
I’ve written about DCR as a pickup parameter in detail and you can read about it in “Mod Garage: Demystifying DCR.”
DCR is not a primary parameter in pickup design. It’s simply the result of the type and gauge of the pickup’s wire, the number of turns, and other parameters like the winding pattern, etc. But it isn’t completely useless, and we can use it as a good reference point for analyzing pickups both inside and outside a guitar or bass circuit. All you need for this is a digital multimeter (DMM). You don’t need an expensive calibrated precision DMM—any entry level DMM will work. You can get a simple digital DMM for $10, but if you want to invest in a better device, it can’t harm.
The easiest way to analyze a pickup is outside a circuit. Simply set your DMM to ohm and connect the two pickup leads to your DMM. If your DMM doesn’t have an auto-range function, set it to 20k ohm. Now you’ll get the DCR reading for your pickup. You can compare it to the factory specs of your pickup and it should be close. If your DMM shows “infinite” or “overload,” you know the pickup wire is broken. Let’s say your pickup should read 7k ohm, but yours reads around 2-3k ohm. Your pickup likely has a short circuit somewhere in the winding. Used this way, the DCR is always good to quickly check if a pickup is alive or not.
To quickly analyze a guitar or bass circuit with one or more pickups, you first need to build the DIY adaptor tool this column is about. There are two different versions, and you don’t need much for this:
- Version #1: This is the quick and dirty version. You need a standard 6.3 mm straight mono plug (the same type on all your guitar cables), some wire of your choice (preferably in two different colors), and two insulated alligator clips.
- Version #2: A more elegant version that you can also use with a scope if you have one. You need the same parts as for version #1, but instead of two alligator clips, you need two 4 mm banana plugs, and the two wires need to be longer than what you’d use for Version #1.
So, heat up your soldering iron and let’s get to building version #1.
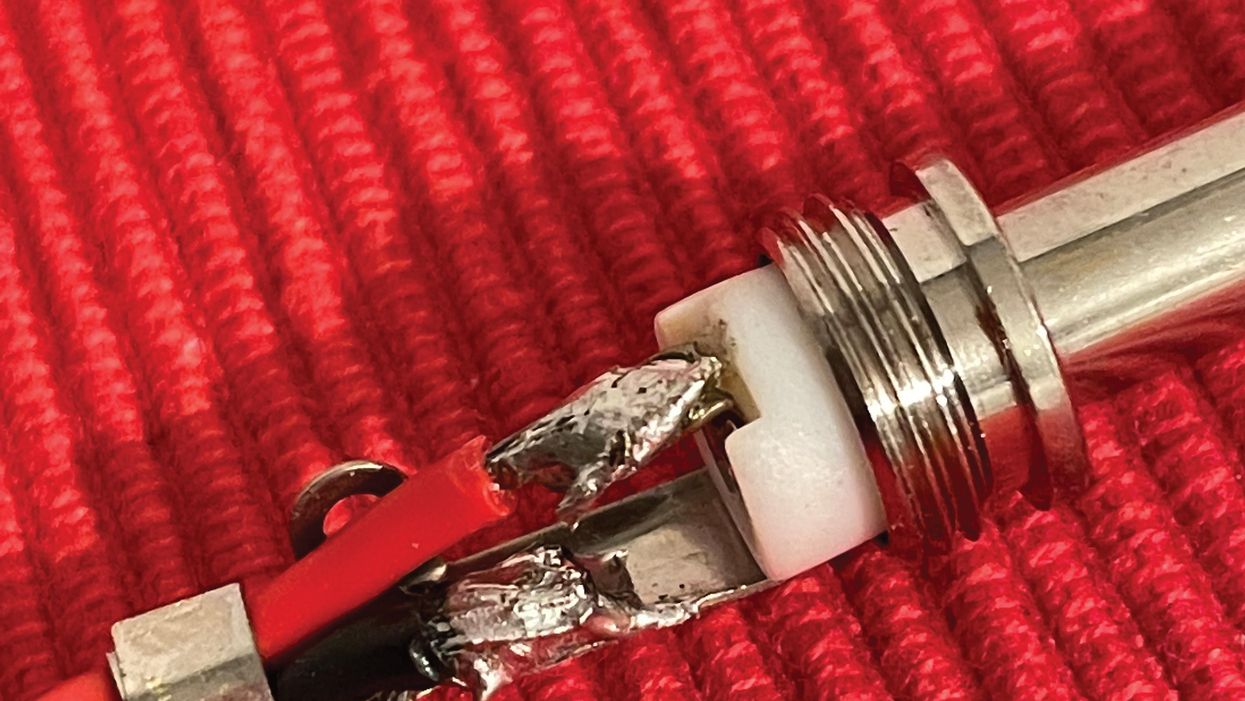
- Solder one piece of wire to the HOT terminal of the mono plug and another one to the GROUND terminal. I prefer a red wire for the HOT and a black wire for the GROUND terminal (Photo 1).
- Solder an insulated alligator-clip to each end of the two wires, preferably a black one to the black wire and a red one to the red wire. Ready!
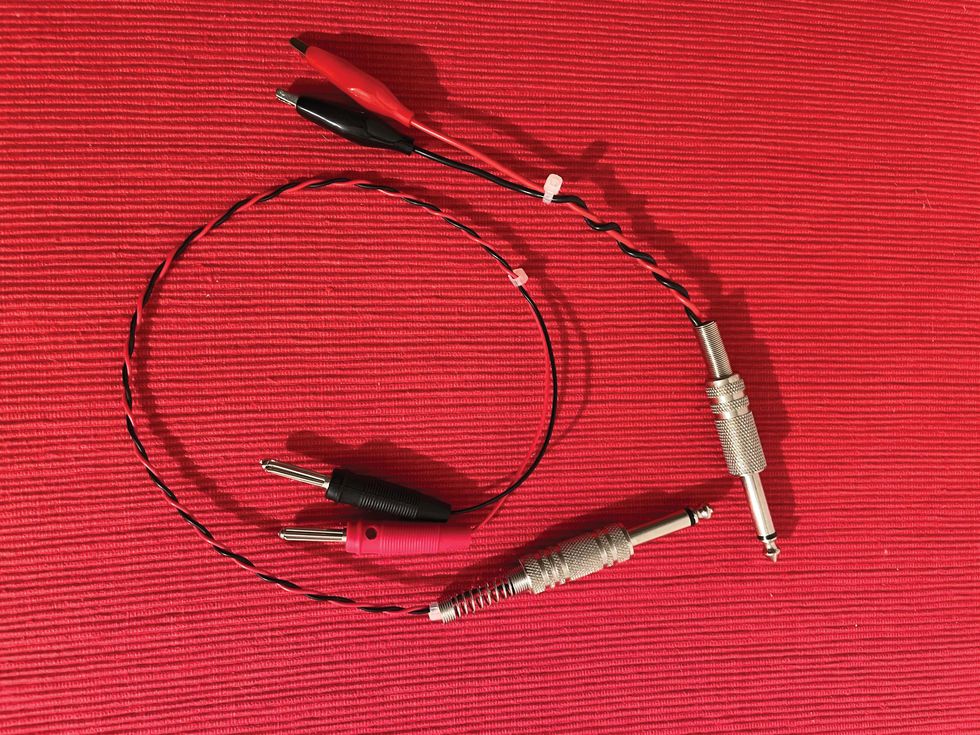
Version #2 is built the same way, but, instead of alligator clips, you solder a 4 mm banana plug to each end of the two wires, if possible, also in black and red. The two wires should be long enough that can place your DMM and/or scope at some distance from the guitar. In Photo 2, you can see version #1 on the top and version #2 on the bottom.
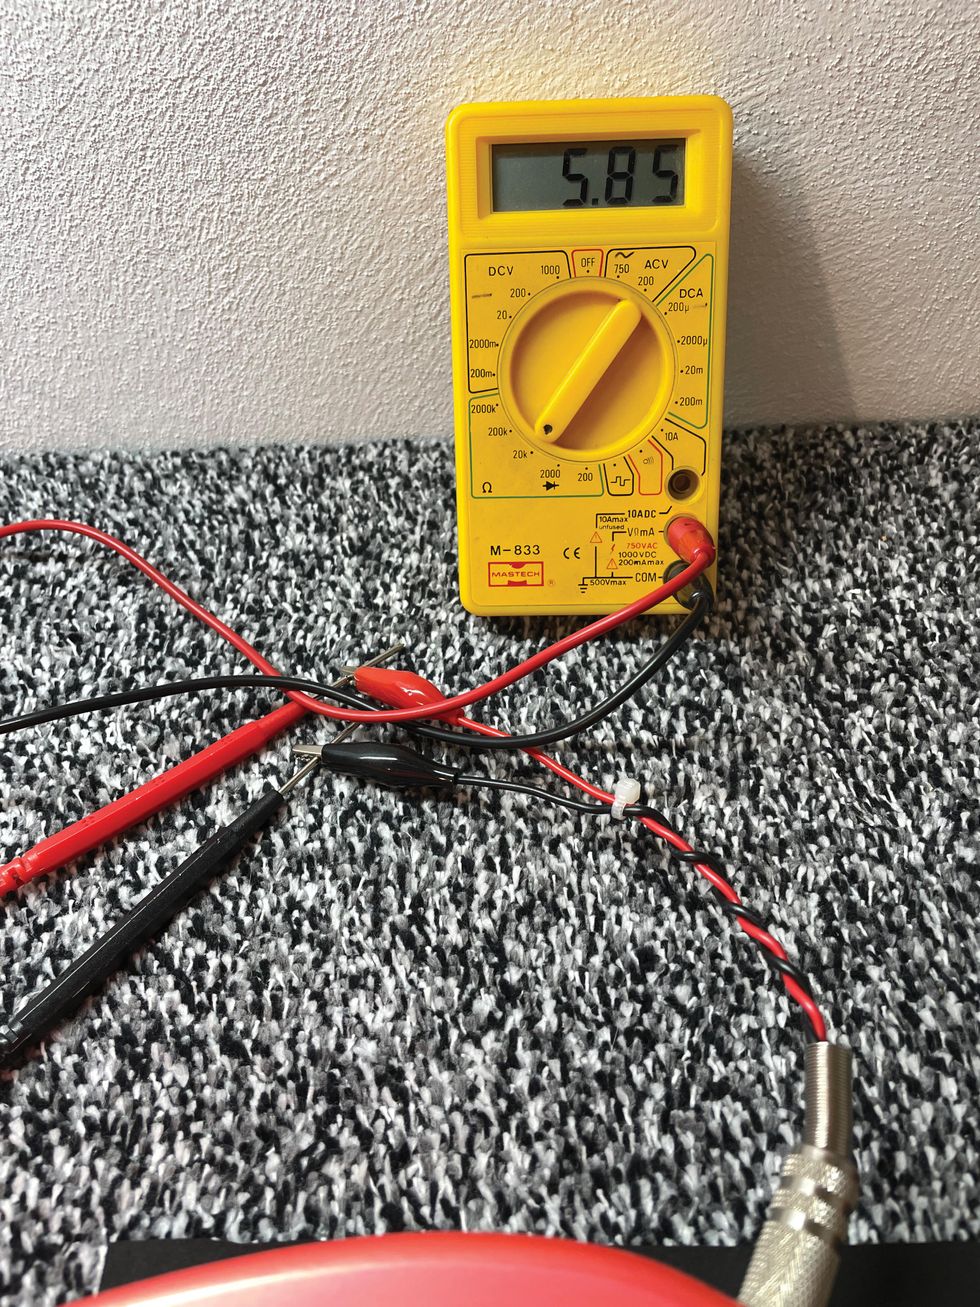
The difference between the two versions is that with version #1 you put the plug into the output jack of the guitar, connecting the two probes of your DMM to the alligator clips: the black probe of the DMM goes to ground (black wire) and the red probe goes to hot (red wire) as seen in Photo 3. With version #2, you need to remove the two probes from your DMM, plugging the two banana plugs directly into your DMM or your scope, also seen in Photo 3.
Both versions work equally well. Version #2 is just easier to operate when you also want to use the adaptor for a scope.
For a quick check, you can also directly touch the hot and ground terminals with the probes of your DMM, but you need both hands or a second person for this if you want to play around with the controls or the pickup-selector switch.
Now we can easily check four things with this tool, assuming everything is connected the way it should be and your DMM is set to ohm and auto-range or the 20k ohm scale if your DMM doesn’t have an auto-range mode:
- Do you receive a reading on your connected DMM? If not, check if the volume pot is fully opened. Do you receive a reading now? If so, close the volume pot completely and see if you still receive a reading. No? Perfect, you just proved that the volume pot is alive and well.
- With a fully opened volume pot and a reading on your DMM, slowly turn down the volume and watch the reading on the DMM. If you receive some crazy reading, chances are good there is a treble bleed network on your volume pot. If the reading slowly goes down to zero, you know that there is no treble bleed network on the volume pot, and you can check if it’s an audio or linear volume pot (plus the taper it has, if it’s an audio pot). Let’s say we have a 500k volume pot. When you close the volume pot halfway and receive a reading around 250k, you know it’s a linear pot. An audio pot, depending on its taper, will result in a much higher reading on the first 50 percent of the volume pot. If you read 500k until the volume pot is almost fully closed, this means the pot has a 90:10 audio taper—exactly the kind of volume pot you don’t want to have. If you read something around 300k in the middle of the volume pot, you know it’s a 60:40 audio taper.
- If the volume pot is fully opened and you don’t receive a reading on your DMM, chances are good that your output jack is broken, not connected, or connected incorrectly. Please make sure there is no activated kill-switch in the circuit that can also cause this “problem.”
- Turning the tone knob(s) will make no difference in the reading you receive. If you receive a slightly higher reading with a tone pot fully opened compared to when it’s closed, you know it’s a no-load tone pot.
There is a lot to discover from just the outside of any guitar or bass. So, now let’s see what we can measure from outside the instrument starting with a Telecaster with a 4-way switch. The readings in all examples are the readings I received with guitars I had in the shop, but they can be different in your instruments:
- Bridge pickup only: 5.85k ohm
- Neck pickup only: 6.76k ohm
- Both pickups together: 3.18k ohm
- Pickup selector switch in position #4: 12.30k ohm
The readings for both pickups are within the factory specs and are in a typical range for a vintage-flavored Telecaster pickup set. With a reading of 3.18k ohm for both pickups together, you know that both pickups are in parallel. With the reading of 12.30k ohm, you know that both pickups are in series with each other.
Here is the simplified math behind these readings:
- Series connection: DCR pickup #1 + DCR pickup #2
- In our example, it’s 5.85k + 6.76k = 12.61k ohm, which is very close to the reading of 12.30k we received. The missing 0.31k ohm are eaten up by the resistance of the pots and the tolerance of your DMM. For this test, I chose the cheapest DMM I could find in the shop. A calibrated high-quality DMM will have much less tolerance.
- Parallel connection: (DCR pickup #1 + DCR pickup #2) divided by four
- In our example, it’s 5.85k + 6.76k = 12.61k ohm divided by four = 3.15k ohm, which is very close to the reading of 3.18k ohm we received.
Now let’s repeat this with a standard Stratocaster:
- Bridge pickup only: 7.07k ohm
- Middle pickup only: 5.88k ohm
- Neck pickup only: 5.70k ohm
- Bridge + Middle pickups together: 3.26k ohm
- Neck + Middle pickups together: 2.94k ohm
All three pickups are within the factory specs of this Strat. We have a slightly hotter bridge and two vintage-flavored pickups. The two in-between positions are in parallel.
Lastly, let’s try a vintage PAF-loaded Les Paul:
- Bridge pickup only: 7.77k ohm
- Neck pickup only: 7.09k ohm
- Both pickups together: 3.74k ohm
Both PAFs have the typical vintage DCR and are in parallel in the middle position.
That’s it. Next month we’ll take a deeper look at changing wires on pickups, which is something I’ve been asked about a lot, so stay tuned!
Until then ... keep on modding!- Mod Garage: The Infamous Telecaster Neck Pickup - Premier Guitar ›
- Cult Coils: Lesser-Known Vintage Pickups - Premier Guitar ›
- 5-Way Frenzy: Vintage-Style Strat Pickup Review Roundup ... ›
In this episode of 100 Guitarists, we’re talking all things surf rock, from reverb to tremolo picking and much more. And while “Misrlou” is undisputedly his most influential work, maybe Dale’s best records didn’t come until a few decades later.
“All the kids in all L.A. / Come to hear Dick Dale play,” or so goes the title track from Dick Dale’s Wrecking Crew-heavy 1963 album, King of the Surf Guitar. Immodest though it might seem to proclaim such a status, he was indeed at the top of the heap.
For many, Dale’s legend precedes him. His sound, first heard in a So Cal beach ballroom, created the surf guitar vocabulary and transformed the guitar universe, starting with the 1962 release of his take on the traditional song “Misrlou.” Ever the showman, he worked closely with Leo Fender developing the right gear for the gig as he played his ripping instrumentals to larger and larger audiences. He also inspired a Hendrix lyric and had a late-career renaissance thanks to Quentin Tarantino.
In this episode of 100 Guitarists, we’re talking all things surf rock, from reverb to tremolo picking and much more. And while “Misrlou” is undisputedly his most influential work, maybe Dale’s best records didn’t come until a few decades later.
This episode is sponsored byTraveler Guitar.
Advanced
Intermediate
- Learn how to incorporate open strings all the way up the fretboard.
- Build velocity in your playing without practicing speed exercises.
- Discover an easy way to steal licks from the pros using YouTube.
It’s universally known in the guitar community that Brad Paisley isn’t just some guy that strums a guitar and sings country songs. He’s widely respected as one of the best players in the country music scene and takes an unusual approach to achieve the sonic insanity that spills out of his guitar. From Telecasters, G-benders, and cranked Dr. Z amps to instrumental records and wild guitar solos getting mainstream country radio airtime, Paisley has solidified his place in the discussion of all-time greats, and not just in the country world. In this lesson, we’ll dive into one of the cornerstones of Brad’s playing that makes him so unique: open strings.
A couple of prefaces:
Most of the licks in this lesson are exponentially easier when hybrid picked.
And in case you didn’t know, YouTube allows you to alter the speed of videos. This is a massive tool to take advantage of when learning licks, practicing them, and getting them up to speed. Simply click the Settings button in the bottom right corner of the video player and select Playback Speed. This will allow you to speed up or slow down the video to your liking without any changes to pitch. Transients will become an issue the farther away from the original speed you go, but not enough to keep you from slowing a solo down 50 percent to really learn and nail the nuances.
We’ll start by just dipping a toe in the water for Ex. 1, looking at a small part of the solo from Brad’s song “Ticks.” This section is found at the 3:06 mark of the video below. Brad really likes to use open strings to provide color to licks, usually with the note falling outside of the established scale. This little nugget is entirely in the E major scale (E–F#–G#–A–B–C#–D#) with exception of the open 3rd string. The use of the open string throws a b3 into the mix, while making it feel faster with little added effort. If you were to play this lick at half speed, the open G string does not sound great—but that’s the whole idea behind what Brad is able to do with open string licks. At tempo, the open string sounds like a natural inflection and the lick has more velocity than if it were omitted.
Ex. 1
Ticks
In Ex. 2 we’re still looking at the “Ticks” solo but focusing on the back half. This entire section of the solo is a smorgasbord of open strings. The first phrase uses sliding and open strings to create an almost bouncy and circus feel. The use of the open G string allows Brad to travel up the fretboard with some very interesting flair. Then he uses the open 1st string in measure 2 to create momentum again, but in this instance, the open-string pull-offs fall inside the E major scale rather than acting as color tones. It’s much easier to connect this section of the lick to the previous by using the third finger to execute the bend and the fourth finger to start the new descending phrase. Lastly, Brad takes the solo home with a simple descending three-note-per-string pull-off lick that combines inside and outside notes.
Ex. 2
If you’ve ever listened to Paisley’s “Time Warp,” you know that it’s a gold mine of licks to steal. In Ex. 3, I’m focusing on a lick Brad plays on the “Live on Letterman” version, which occurs after the piano solo at the 1:23 mark in the video below. It’s worth noting that this is not the same line featured on the album version from Time Well Wasted. This lick is a perfect example of how Brad uses open strings to create velocity and really get going downhill at breakneck speeds. The lick is not overly complicated, but it is extremely fast, especially if you are new to hybrid picking. I’m playing it at roughly 75 percent speed so that the notes are intelligible and not just a blur. The lick is mostly based in the A Aeolian mode (A–B–C–D–E–F–G), with flatted second being the exception.
Ex. 3
Brad Paisley - Time Warp (Live on Letterman)
In this example (Ex. 4), we tackle a fantastic phrase from the solo to “Water.” The lick I’m breaking down falls around the 1:43 mark in the YouTube video. What’s so interesting is that while the song is in F major, Brad utilizes the open A, D, and G strings to navigate the fretboard vertically and create energy. My favorite thing about the descending pull-off section of this lick is that it’s a tame bluegrass-style lick in G, but it’s the placement of the lick over the chord changes that makes it sound interesting.
Ex. 4
Brad Paisley - Water
Ex. 5 is where things get really exciting. It’s from a live performance of “Water” during the 2010 ACM awards. At the 3:40 mark Brad uses an open-string lick to build tension and work his way up the fretboard that caught my attention. As before, it sounds monstrous at tempo but really doesn’t make a ton of sense when slowed down. It’s a fairly simple pull-off lick that isn’t too difficult if you’re already used to hybrid picking, but it creates a ton of movement and excitement when sped up. I’m guilty of stealing both this lick and the idea behind it for “wow” moments in solos.
Ex. 5
Brad Paisley - Water (live ACM Awards 2010)
It’s undeniable how freakishly good of a guitar player Brad Paisley is (try grabbing some of the monster licks from the outro of “Water”). Because of how many tricks he has up his sleeve, he’s nearly impossible to replicate, but that doesn’t mean there isn’t something that everyone can take from Paisley’s bag of tricks. Use this concept of using open strings in unconventional places to add spice, speed, and mystique to your playing.
An easy guide to re-anchoring a loose tuning machine, restoring a “lost” input jack, refinishing dinged frets, and staunching a dinged surface. Result: no repair fees!
Unleash your inner metal icon with the Jackson Lee Malia LM-87, a high-performance shred-ready axe designed in collaboration with Bring Me The Horizon guitarist Lee Malia. Featuring custom Jackson signature pickups, a fast D-profile neck, and a TOM-style bridge for rock-solid stability, this signature model is a must-have for commanding metal tone and smooth playability.
British metal icon and Bring Me The Horizon guitarist Lee Malia has partnered with Jackson to create his signature LM-87, a shred-ready axe built for heavy riffing and alternative modern metal. As a founding member and lead guitarist of the Grammy-nominated band, Malia is renowned for his aggressive playing style and intricate solos. This high-performance guitar matches his demanding musicality.
With its offset Surfcaster™ body shape and vintage appeal, the LM-87 melds classic design with modern appointments. The thin open pore finish on the bound Okoume body and neck exudes organic style, while the unique 3-ply pickguard and chrome hardware add striking accents. The fast D-profile 3- piece okoume neck allows smooth riffing across the bound amaranth fingerboard.
Custom Jackson signature pickups, including a bridge humbucker with push-pull coil-split, equip the LM-87 with versatile tone-shaping options to fulfill Malia's sonic vision. The TOM-style bridge with anchored tailpiece and fine tuners provides rock-solid stability for low tunings and heavy picking.
Designed in close collaboration with the legendary guitarist, the Jackson Lee Malia LM-87 is built for shredding. Its blend of vintage vibe and high-performance features make this signature model a must-have for players who value commanding metal tone and smooth playability.
The Tune-o-matic bridge with an anchored tailpiece and fine tuners offers enhanced tuning stability and precise, incremental adjustments. This setup ensures consistent pitch control, improved sustain, and easier fine-tuning without affecting overall string tension.
The guitar’s three-piece set-neck guitar with graphite reinforcement offers exceptional strength, stability, and resistance to warping. The multi-piece construction enhances sustain and tonal clarity, while the graphite reinforcement adds extra durability and prevents neck shifting due to humidity or temperature changes. This design ensures a solid, reliable performance with improved resonance and longevity.
Features Include:
- Okoume body
- Three-piece okoume set neck construction with graphite reinforcement
- 12"-16" compound radius amaranth fingerboard
- 3-ply pickguard
- Chrome hardware
- Custom wound Jackson LM-87 pickups
- Volume with push-pull coil-split and tone control
- TOM-style bridge with anchored tailpiece and fine tuners
- Gig bag included
The Jackson LM-87 carries a street price of $899.99.
For more information, please visit jacksonguitars.com.