Unravel the mysteries of series, parallel, and coil-splitting wiring schemes.
This month we're going to explore four ways to configure any humbucker that has 4-conductor wiring. (Note: These wiring schemes are not intended for an old-school humbucker with 2-conductor wiring, but rather the modern humbucker that allows coil-splitting and other wiring mods.)
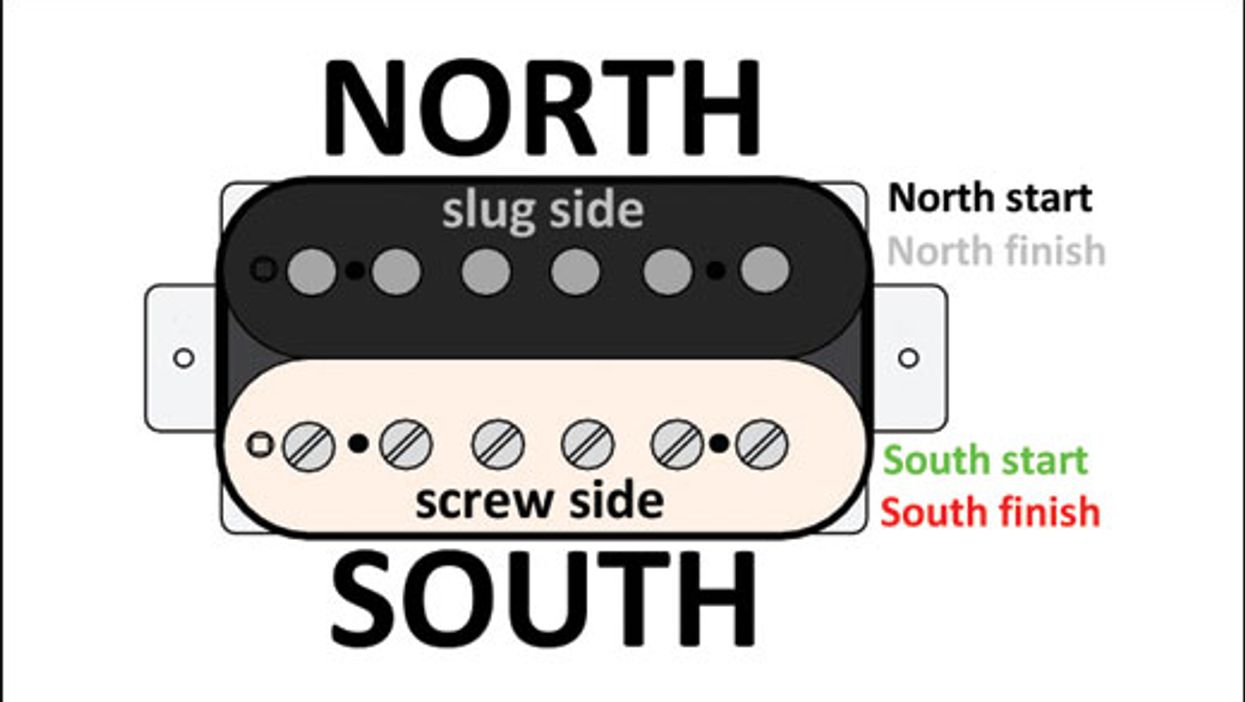
For starters, let's review our terminology. Looking at a humbucker from the front, we call the lower coil "south" and the upper coil "north." The south coil is always the "screw side," while the north coil is the "slug side." The latter is named for the type of magnetic material used on this coil. Each coil is wrapped with very fine wire, and this wire has a start and a finish. This results in a total of five wires coming from the humbucker:
- North coil start plus north coil finish.
- South coil start plus south coil finish.
- Ground.
The bare wire or braided shield always goes to ground—there's no exception—so that leaves us with four wires to play with. Having access to the start and finish of each coil wire not only makes it easy to solve potential out-of-phase issues (a subject we'll cover in another column), but it also gives you the option to wire up your humbucker in one of four different ways. If you're ambitious, you can use a switch to put several options at your fingertips.
The south coil is always the "screw side," while the north coil is the "slug side."
Every pickup company uses its own color-code scheme for these four wires. This makes discussing humbucker wiring a little more confusing than necessary, but that's the way it is. As usual, I'll use the Seymour Duncan color code as a quasi-standard. You should be able to get color-code information for your pickups from their maker, and there are several charts available on the internet that let you compare color-code schemes from different manufacturers. You can use such charts to translate the following wirings into whatever color code corresponds to your particular brand of humbucker. Fortunately that's not too hard—you only need to know which color wire on your pickup indicates the start or finish of which coil. Once you have that info, you can draw up a reference chart to decode this column's wirings.
Here's the Seymour Duncan 4-conductor humbucker color code:
- North coil start is black; north coil finish is white.
- South coil start is green; south coil finish is red.
- Ground is bare wire.
Fig. 1 sums up what we've covered so far in the Seymour Duncan format. Now let's walk through the four ways you can wire up a humbucker. Ready?
Standard humbucker wiring: both coils connected in series.
This is the default wiring in almost every guitar loaded with one or more humbuckers because it produces a warm, fat tone with maximum output while offering hum-cancelling capability. (It's also the factory standard for all humbuckers with 2-conductor wiring consisting of only hot and ground.)
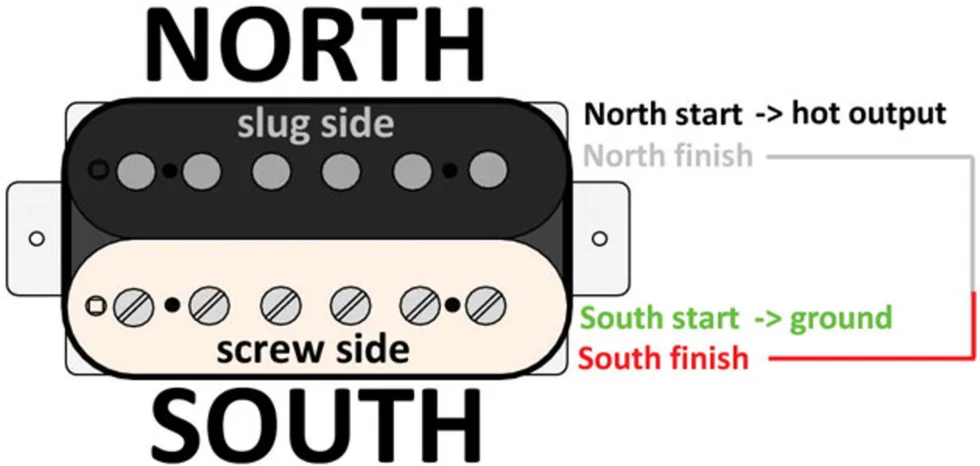
Fig. 2
illustration courtesy of singlecoil.com
Here are the connections for series wiring (Fig. 2):
- North coil start is the hot output.
- North coil finish and south coil finish are soldered together and taped off (this is the series link).
- South coil start is soldered together with the bare wire going to ground.
“Single-coil" humbucker wiring: both coils connected in parallel.
This option gives you a single-coil-like tone, but still retains hum-cancelling capability. It doesn't deliver a crystal-clear Strat or Tele tone, but to my ears it at least resembles a single-coil pickup—maybe closer to a P-90 than to a standard single-coil. Every type of humbucker sounds a little different when wired this way, so it's simply a matter of giving it a try to determine if you like the sound.
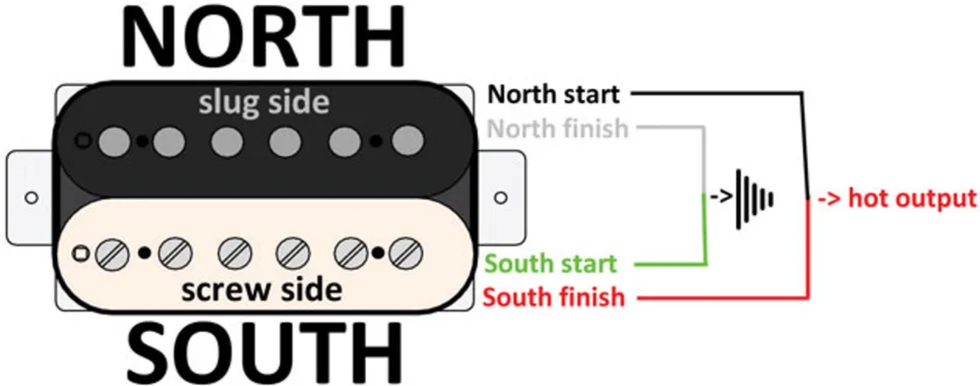
Fig. 3
illustration courtesy of singlecoil.com
Parallel wiring (Fig. 3) requires the following connections:
- North coil start and south coil finish are soldered together as the hot output.
- North coil finish and south coil start are soldered together with the bare ground wire.
Coil-splitting humbucker wiring #1: splitting to the south coil.
This wiring splits the humbucker in half, shunting one coil to ground and leaving the other coil engaged like a true single-coil pickup. In this mode, the hum-cancelling function is no longer active, so you'll get the hum and noise of any single-coil pickup. But don't expect a true Strat or Tele tone: If that's your goal, investigate the special breed of humbuckers that are made out of two real single-coil pickups. The downside of this type of pickup is that it doesn't sound great in full humbucker mode, so, as we're so often reminded, it's about compromise.
Splitting to the humbucker's south coil, which is the screw side, is only recommended for neck pickups. (You'll learn why we're excluding the bridge pickup when we get to our fourth wiring scheme.) Let's also remember that in most guitars with neck humbuckers, the south, screw-side coil lies closest to the neck.
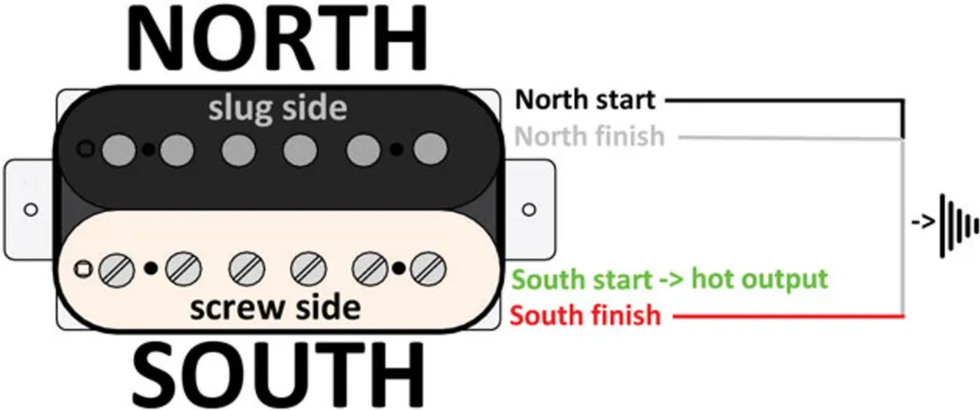
Fig. 4
illustration courtesy of singlecoil.com
For this coil-splitting wiring (Fig. 4), you need the following connections:
- South coil start is the hot output.
- North coil start, north coil finish, and south coil finish are soldered together with the bare ground wire.
Coil-splitting humbucker wiring #2: splitting to the north coil.
This wiring follows the same concept as our previous coil-splitting recipe, but leaves the north coil active—that's the slug side. This version is recommended for a bridge humbucker because pole-piece slugs deliver a fuller sound than pole-piece screws.
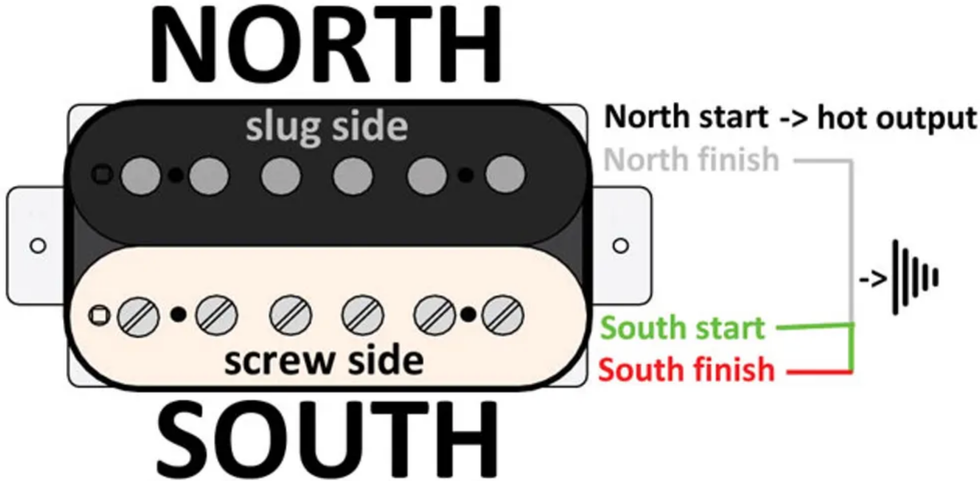
Fig. 5
illustration courtesy of singlecoil.com
Here are the connections for our second coil-splitting wiring (Fig. 5):
- North coil start is the hot output.
- North coil finish, south coil start, and south coil finish are soldered together with the bare ground wire.
Well, that's it. In a future column we'll explore how to integrate and control all these options with the help of a switching device. And, of course, we'll learn how to compensate for possible out-of-phase issues that can occur when you combine several humbuckers or a humbucker with a single-coil. But next month, we'll dig into a project designed to make a Telecaster more sonically flexible. Until then ... keep on modding!
[Updated 9/15/21]
- How to Get the Most out of Hum-Sing-Hum Wiring - Premier Guitar ›
- Mod Garage: Three Ways to Wire a Tone Pot - Premier Guitar ›
- Mod Garage: “Jimmy Page” Les Paul Wiring - Premier Guitar ›
- Adding Series Switching To Your Strat - Premier Guitar ›
- How to Change Pickup Wires (& Why) - Premier Guitar ›
This convenient, easy-to-use controller can open up an entire world of sonic shape-shifting. Here are some tips to either inspire you to try one or expand how you’re currently using this flexible, creative device.
If you’re not yet using expression pedals, you should consider them. They have the power to expand and control your sonic universe. For the uninitiated, expression pedals are controllers that typically look like volume or wah pedals. Of course, traditional volume and wah pedals are expression pedals, too, but they are dedicated to controlling only those two effects.
Modern expression pedals allow you to assign and control parameters of your stomps or modelers by moving the expression pedal as you would a volume or wah. Dunlop, Boss, Ernie Ball, Yamaha, Behringer, Mission Engineering, and other manufacturers make these handy devices.
Many, but not all, of today’s stompboxes and modelers have expression pedal inputs that allow for manipulation of one or more parameters of those devices. In the past, this required bending over and turning a knob, or trying to turn a small knob with your foot—both of which can hamper your playing. The freedom of an expression pedal is the control you have over more aspects of your sound, especially in a live setting.
Although some of the uses for expression pedals below can also be accomplished by creating multiple presets, that will not allow real-time control over the parameters like an expression pedal will. Here are some notes about expression pedal use that might get you thinking about how one could help you.
Delay Repeats: Controlling the timing of a delay with tap tempo is very common, but how about controlling the number of repeats? With an expression pedal, by setting the expression control on your delay to control the number of repeats, you can easily go from a few for your rhythm sound to more for your lead sound, and then back off again.
Reverb and Delay Mix: The mix control on reverb and delay pedals allows you to balance the amount of wet to dry signal that you hear. There is often a delicate line to having just the right amount of wet signal with these two effects. If you have too much, your sound can be washed out and undefined. Too little and it can be dry and lack space. The part you are playing, and the venue you are in, can also change the amount of mix you need for these effects. By using an expression pedal for the mix control on reverb or delay, you can alter the sound on the fly to compensate for the part and the room, including turning down the mix for busy parts and up for parts with fewer notes.“Some uses for expression pedals can also be accomplished by creating multiple presets, but that will not allow real-time control over the parameters like an expression pedal will.”
Modulation Depth: The depth of a modulation effect, like a phaser, can drastically alter your guitar sound. A light amount can create a feeling of subtle movement, while a heavy amount can give a thick, underwater-type sound. An expression pedal can help you create a constant feeling of change throughout a song, allowing you to build up and break down the depth for different sections as you see fit.
Tremolo Speed: While the speed of tremolo can often be controlled by tap tempo, using an expression pedal for the same parameter offers other creative uses of the effect. With an expression pedal, you can easily speed the tremolo up to make subtle increases to the energy of a part or slow it down to decrease the energy. You can also create drastic changes in the speed that sound like a fan accelerating or slowing down. Or you can abruptly turn the tremolo off. This last option can be an exciting way to end a song or part.
EQ Change: Every guitar player uses EQ to sculpt their sound—whether via the tone controls on your instrument or amp (modelers included), or a dedicated equalizer used as part of your rig. Subtle tweaks can help you do things like balance out different guitars, cut through the mix more, or compensate for a boomy stage. Real-time control of EQ with an expression pedal is more common in the modeler world than the amp and pedal world, but it does exist in both. For example, increasing the midrange can give you more clarity and cut for solos. Decreasing it can create a flatter sound that can help you stay in the mix with the rest of the band. An expression pedal allows you to have one setting and alter it for multiple situations or guitars as opposed to having separate presets.
While this is a very short list of options for expression-pedal use, it should give you a good place to start. The most important thing is to always be creative, have fun, and find your own voice. An expression pedal can help you do all three.
Voltage Cable Company's new Voltage Vintage Coil 30-foot guitar cable is now protected with ISO-COAT technology to provide unsurpassed reliability.
The new coiled cables are available in four eye-grabbing retro colors – Surf Green, Electric Blue, Orange and Caramel – as well as three standard colors: Black, White and Red. There is also a CME exclusive “Chicago Cream” color on the way.
Guitarists can choose between three different connector configurations: straight/straight plugs, right angle/straight and right angle/right angle options.
The Voltage Vintage Coil offers superior sound quality and durability thanks to ISO-COAT treatment, a patent-pending hermetic seal applied to solder terminations. This first-of-its-kind airtight seal prevents corrosion and oxidization, a known factor in cable failure and degradation. ISO-COAT protected cables are for guitarists who value genuine lifetime durability and consistent tone throughout their career on stage and in the studio.
Voltage cables are hand made by qualified technical engineers using the finest components available and come with a lifetime warranty.
Voltage Vintage Coil features include:
- Lifetime guarantee, 1000+ gig durability
- ISO-COAT treatment - corrosion & oxidization resistant cable internals
- Strengthened structural integrity of solder terminations
Voltage Vintage Coils carry $89.00 USD pricing each and are available online at voltagecableco.com, as well as in select guitar stores in North America, Australia, Thailand, UK, Belgium and China.
About Voltage Cable: Established in 2021, Voltage Cable Co. is a family owned and operated guitar cable company based in Sydney, Australia. All their cables are designed to be played, and built for a lifetime. The company’s ISO-COAT is a patent pending hermetic seal applied to solder terminations.
Featuring dual-engine processing, dynamic room modeling, and classic mic/speaker pairings, this pedal delivers complete album-ready tones for rock and metal players.
Built on powerful dual‑engine processing and world‑class UAD modeling, ANTI 1992 High Gain Amp gives guitarists the unmistakable sound of an original "block letter" Peavey 5150 amplifier* – the notorious 120‑watt tube amp monster that fueled more than three decades of modern metal music, from Thrash and Death Metal, to Grunge, Black Metal, and more.
"With UAFX Dream, Ruby, Woodrow, and Lion amp emulators, we recreated four of the most famous guitar amps ever made," says UA Sr. Product Manager Tore Mogensen. "Now with ANTI, we're giving rock and metal players an authentic emulation of this punishing high gain amp – with the exact mic/speaker pairings and boost/noise gate effects that were responsible for some of the most groundbreaking modern metal tones ever captured."
Key Features:
- A complete emulation of the early '90s 120‑watt tone monster that defined new genres of modern metal
- Powerful UAFX dual-engine delivers the most authentic emulation of the amp ever placed in a stompbox
- Complete album‑ready sounds with built‑in noise gate, TS‑style overdrive, and TC‑style preamp boost
- Groundbreaking Dynamic Room Modeling derived from UA's award-winning OX Amp Top Box
- Six classic mic/speaker pairings used on decades of iconic metal and hard rock records
- Professional presets designed by the guitarists of Tetrarch, Jeff Loomis, and The Black Dahlia Murder
- UAFX mobile app lets you access hidden amp tweaks and mods, choose overdrive/boost, tweak noise gate, recall and archive your presets, download artist presets, and more
- Timeless UA design and craftsmanship, built to last decades
For more information, please visit uaudio.com.
- YouTube
The Memphis-born avant-funk bassist keeps it simple on the road with a signature 5-string, a tried-and-true stack, and just four stomps.
MonoNeon, aka Dywane Thomas Jr., came up learning the bass from his father in Memphis, Tennessee, but for some reason, he decided to flip his dad’s 4-string bass around and play it with the string order inverted—E string closest to the ground and the G on top. That’s how MonoNeon still plays today, coming up through a rich, inspiring gauntlet of family and community traditions. “I guess my whole style came from just being around my grandma at an early age,” says Thomas.His path has led him to collaborate with dozens of artists, including Nas, Ne-Yo, Mac Miller, and even Prince, and MonoNeon’s solo output is dizzying—trying to count up his solo releases isn’t an easy feat. Premier Guitar’s Chris Kies caught up with the bassist before his show at Nashville’s Exit/In, where he got the scoop on his signature 5-string, Ampeg rig, and simple stomp layout, as well as some choice stories about influences, his brain-melting playing style, and how Prince changed his rig.
Brought to you by D’Addario.
Orange You Glad to See Me?
This Fender MonoNeon Jazz Bass V was created after a rep messaged Thomas on Instagram to set up the signature model, over which Thomas had complete creative control. Naturally, the bass is finished in neon yellow urethane with a neon orange headstock and pickguard, and the roasted maple neck has a 10"–14" compound radius. It’s loaded with custom-wound Fireball 5-string Bass humbuckers and an active, 18V preamp complete with 3-band EQ controls. Thomas’ own has been spruced up with some custom tape jobs, too. All of MonoNeon's connections are handled by Sorry Cables.
Fade to Black
MonoNeon’s Ampeg SVT stack isn’t a choice of passion. “That’s what they had for me, so I just plugged in,” he says. “That’s what I have on my rider. As long as it has good headroom and the cones don’t break up, I’m cool.”
Box Art
MonoNeon’s bass isn’t the only piece of kit treated to custom color jobs. Almost all of his stomps have been zhuzhed up with his eye-popping palette.
Thomas had used a pitch-shifting DigiTech Whammy for a while, but after working with Paisley Park royalty, the pedal became a bigger part of his playing. “When I started playing with Prince, he put the Whammy on my pedalboard,” Thomas explains. “After he passed, I realized how special that moment was.”
Alongside the Whammy, MonoNeon runs a Fairfield Circuitry Randy’s Revenge (for any time he wants to “feel weird”), a literal Fart Pedal (in case the ring mod isn’t weird enough, we guess), and a JAM Pedals Red Muck covers fuzz and dirt needs. A CIOKS SOL powers the whole affair.
Shop MonoNeon's Rig
Fender MonoNeon Jazz Bass V
Ampeg SVT
DigiTech Whammy
CIOKS SOL