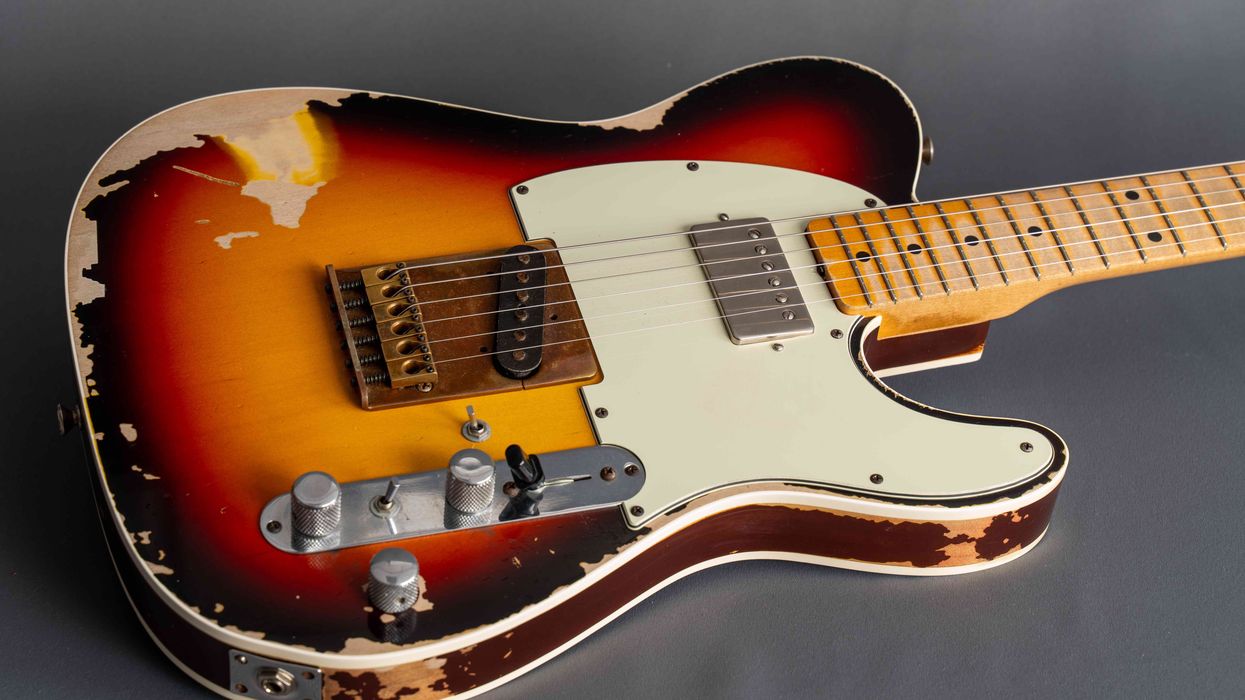
Unravel the mysteries of series, parallel, and coil-splitting wiring schemes.
This month we're going to explore four ways to configure any humbucker that has 4-conductor wiring. (Note: These wiring schemes are not intended for an old-school humbucker with 2-conductor wiring, but rather the modern humbucker that allows coil-splitting and other wiring mods.)
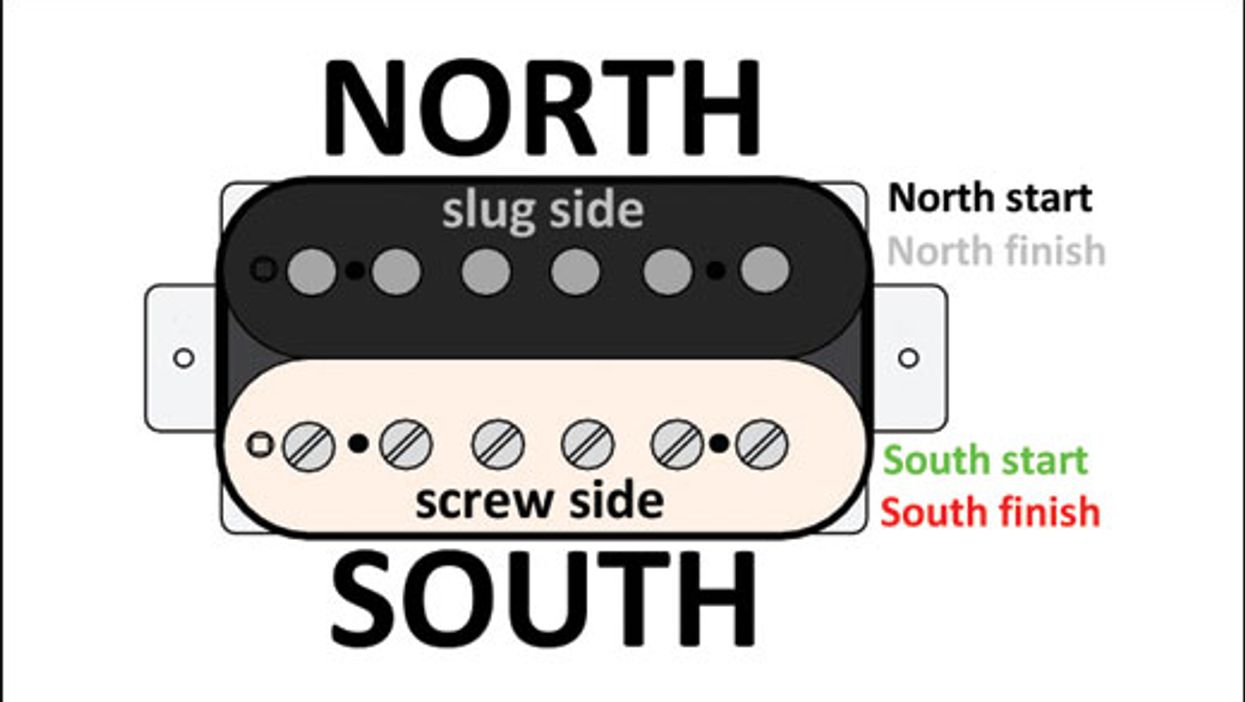
For starters, let's review our terminology. Looking at a humbucker from the front, we call the lower coil "south" and the upper coil "north." The south coil is always the "screw side," while the north coil is the "slug side." The latter is named for the type of magnetic material used on this coil. Each coil is wrapped with very fine wire, and this wire has a start and a finish. This results in a total of five wires coming from the humbucker:
- North coil start plus north coil finish.
- South coil start plus south coil finish.
- Ground.
The bare wire or braided shield always goes to ground—there's no exception—so that leaves us with four wires to play with. Having access to the start and finish of each coil wire not only makes it easy to solve potential out-of-phase issues (a subject we'll cover in another column), but it also gives you the option to wire up your humbucker in one of four different ways. If you're ambitious, you can use a switch to put several options at your fingertips.
The south coil is always the "screw side," while the north coil is the "slug side."
Every pickup company uses its own color-code scheme for these four wires. This makes discussing humbucker wiring a little more confusing than necessary, but that's the way it is. As usual, I'll use the Seymour Duncan color code as a quasi-standard. You should be able to get color-code information for your pickups from their maker, and there are several charts available on the internet that let you compare color-code schemes from different manufacturers. You can use such charts to translate the following wirings into whatever color code corresponds to your particular brand of humbucker. Fortunately that's not too hard—you only need to know which color wire on your pickup indicates the start or finish of which coil. Once you have that info, you can draw up a reference chart to decode this column's wirings.
Here's the Seymour Duncan 4-conductor humbucker color code:
- North coil start is black; north coil finish is white.
- South coil start is green; south coil finish is red.
- Ground is bare wire.
Fig. 1 sums up what we've covered so far in the Seymour Duncan format. Now let's walk through the four ways you can wire up a humbucker. Ready?
Standard humbucker wiring: both coils connected in series.
This is the default wiring in almost every guitar loaded with one or more humbuckers because it produces a warm, fat tone with maximum output while offering hum-cancelling capability. (It's also the factory standard for all humbuckers with 2-conductor wiring consisting of only hot and ground.)
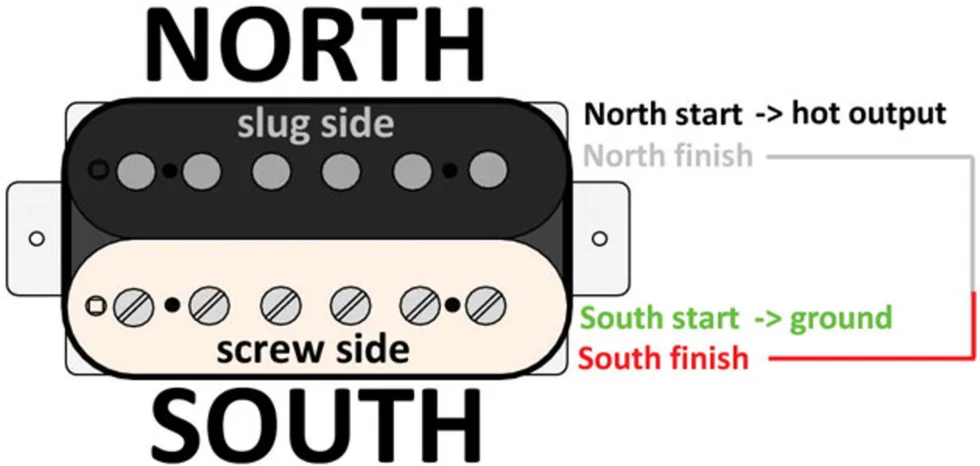
Fig. 2
illustration courtesy of singlecoil.com
Here are the connections for series wiring (Fig. 2):
- North coil start is the hot output.
- North coil finish and south coil finish are soldered together and taped off (this is the series link).
- South coil start is soldered together with the bare wire going to ground.
“Single-coil" humbucker wiring: both coils connected in parallel.
This option gives you a single-coil-like tone, but still retains hum-cancelling capability. It doesn't deliver a crystal-clear Strat or Tele tone, but to my ears it at least resembles a single-coil pickup—maybe closer to a P-90 than to a standard single-coil. Every type of humbucker sounds a little different when wired this way, so it's simply a matter of giving it a try to determine if you like the sound.
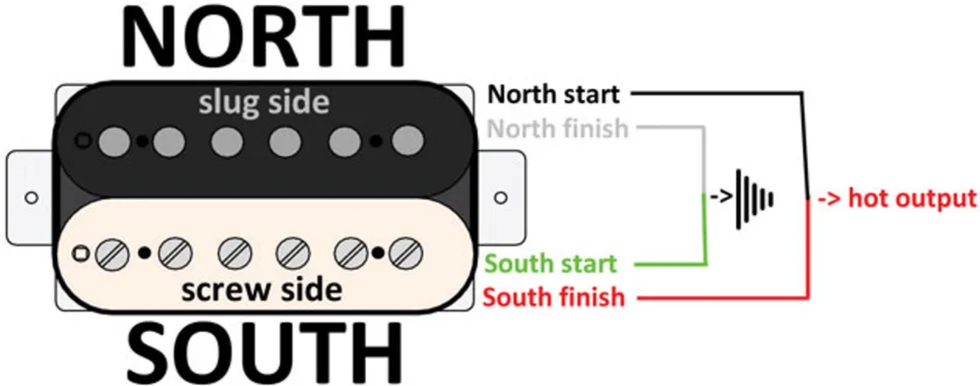
Fig. 3
illustration courtesy of singlecoil.com
Parallel wiring (Fig. 3) requires the following connections:
- North coil start and south coil finish are soldered together as the hot output.
- North coil finish and south coil start are soldered together with the bare ground wire.
Coil-splitting humbucker wiring #1: splitting to the south coil.
This wiring splits the humbucker in half, shunting one coil to ground and leaving the other coil engaged like a true single-coil pickup. In this mode, the hum-cancelling function is no longer active, so you'll get the hum and noise of any single-coil pickup. But don't expect a true Strat or Tele tone: If that's your goal, investigate the special breed of humbuckers that are made out of two real single-coil pickups. The downside of this type of pickup is that it doesn't sound great in full humbucker mode, so, as we're so often reminded, it's about compromise.
Splitting to the humbucker's south coil, which is the screw side, is only recommended for neck pickups. (You'll learn why we're excluding the bridge pickup when we get to our fourth wiring scheme.) Let's also remember that in most guitars with neck humbuckers, the south, screw-side coil lies closest to the neck.
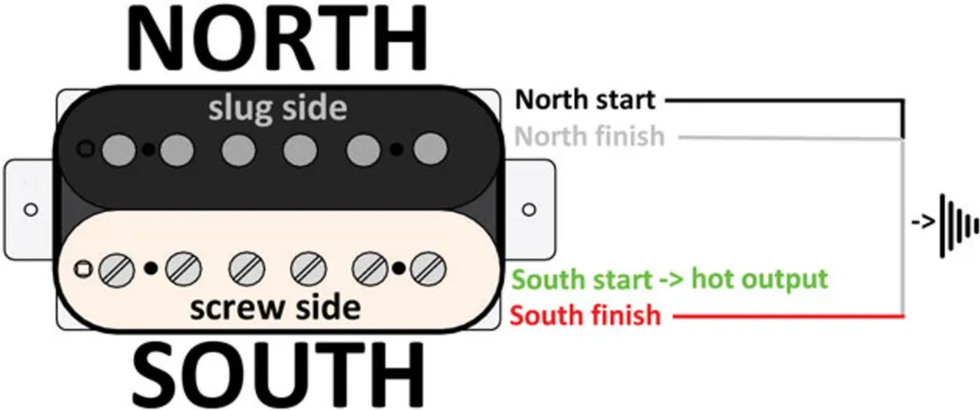
Fig. 4
illustration courtesy of singlecoil.com
For this coil-splitting wiring (Fig. 4), you need the following connections:
- South coil start is the hot output.
- North coil start, north coil finish, and south coil finish are soldered together with the bare ground wire.
Coil-splitting humbucker wiring #2: splitting to the north coil.
This wiring follows the same concept as our previous coil-splitting recipe, but leaves the north coil active—that's the slug side. This version is recommended for a bridge humbucker because pole-piece slugs deliver a fuller sound than pole-piece screws.
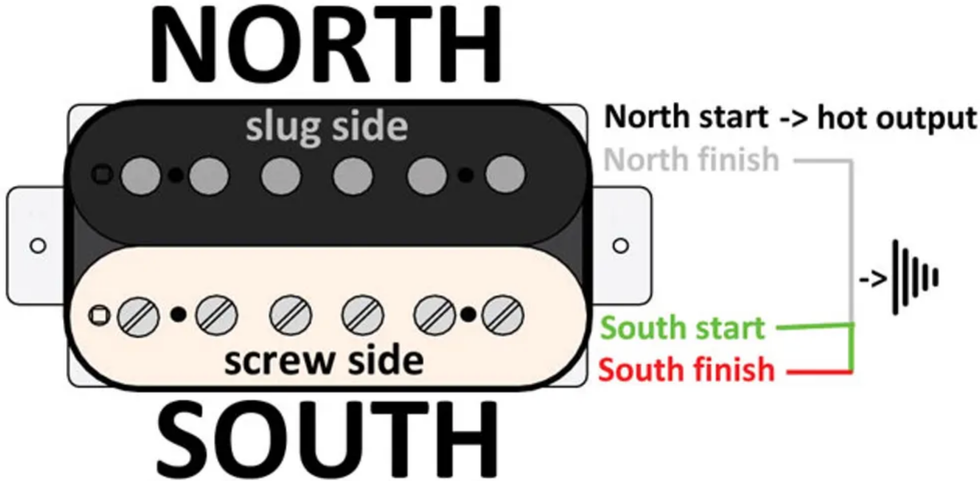
Fig. 5
illustration courtesy of singlecoil.com
Here are the connections for our second coil-splitting wiring (Fig. 5):
- North coil start is the hot output.
- North coil finish, south coil start, and south coil finish are soldered together with the bare ground wire.
Well, that's it. In a future column we'll explore how to integrate and control all these options with the help of a switching device. And, of course, we'll learn how to compensate for possible out-of-phase issues that can occur when you combine several humbuckers or a humbucker with a single-coil. But next month, we'll dig into a project designed to make a Telecaster more sonically flexible. Until then ... keep on modding!
[Updated 9/15/21]
- How to Get the Most out of Hum-Sing-Hum Wiring - Premier Guitar ›
- Mod Garage: Three Ways to Wire a Tone Pot - Premier Guitar ›
- Mod Garage: “Jimmy Page” Les Paul Wiring - Premier Guitar ›
- Adding Series Switching To Your Strat - Premier Guitar ›
- How to Change Pickup Wires (& Why) - Premier Guitar ›
The majestic Roland Space Echo is having a bit of a resurgence. Here’s a breakdown on what makes it tick, and whether or not it’s right for you.
In this article, we delve into one of the most cherished gadgets in my guitar collection, the Roland Space Echo RE-201. This iconic piece of equipment has been used by legendary musicians like Jonny Greenwood, Brian Setzer, and Wata from Boris, which only heightened my desire to own one. A few years ago, I was fortunate to acquire a vintage RE-201 in good condition and at a reasonable price.
Using the RE-201 today has its advantages and disadvantages, particularly due to its size, which is comparable to an amplifier head. When compared to modern equivalents like delay pedals or software plugins that closely emulate the original, the vintage RE-201 can seem inefficient. Here, I share my personal and subjective experience with it.
The RE-201 is a tape echo/delay effect that gained popularity in the 1970s and ’80s. Unlike the more complex analog BBD delays or digital delays, tape delays use magnetic tape to simultaneously record and play back sound via a magnetic tape head (similar to a guitar or bass pickup). Because the recording head and playback head are in different physical locations, there is a time gap during the recording and playback process, creating the “delay” effect. This concept was first discovered by Les Paul in the 1950s using two tape machines simultaneously.
However, this method has a drawback: The magnetic tape used as a storage medium has a limited lifespan. Over time, the quality of the tape degrades, especially with continuous use. This degradation is marked by muddy, wavy sounds and unavoidable noise. Yet, this is precisely where the magic of real tape echo lies! New tapes produce clearer, hi-fi sounds, while older tapes tend to produce wavy sounds known as “modulated delay.” Additionally, increasing the number of tape-head readers extends the gap time/delay time of the output, and activating multiple tape-head readers simultaneously creates unique echo/delay patterns.
“This degradation is marked by muddy, wavy sounds and unavoidable noise. Yet, this is precisely where the magic of real tape echo/delay lies!”
Just as how fuzz and distortion effects were discovered, the “imperfections” of tape also represent a historical fact about how the creative process in music follows an absurd, non-linear, and unique pattern. In everyday practical life, signal delay is something typically avoided; however, in a musical context, delay adds a deeper dimension. Today, it’s hard to imagine a pedalboard without a delay effect at the end of the chain.
This uniqueness inspired me to create Masjidil Echo, embracing the “imperfection” of a vintage tape echo/delay with magnetic tape that hasn’t been replaced for years. Many newer pedals, such as the Boss RE-20, Strymon El Capistan, and the Catalinbread Echorec and Belle Epoch, draw inspiration from vintage tape repeat machines. Each has its unique interpretation of emulating tape echo, all in a more compact and maintenance-free format. Real tape delay requires periodic maintenance and has mostly been discontinued since the mid 1980s, with Roland ceasing production of the Space Echo entirely in 1985.
However, in recent years, interest in real tape echo has surged, perhaps due to nostalgia for past technology. As a result, many vintage delay units have appeared on marketplaces at increasingly gargantuan prices! If you’re considering acquiring one, I recommend thinking it over carefully. Are you prepared for the maintenance? Will you use it for regular performances? Are you ready for the fact that magnetic tape will become increasingly difficult to find, potentially turning your machine into a mere display piece? I don’t mean to instill fear, but the real deal, in my opinion, still can’t be fully emulated into a more practical and future-proof digital format.
So, I’ll leave you with one final question for consideration: What if the genealogy of technology were reversed chronologically, with multihead/multitap delay discovered digitally in the 1950s, and in the 2000s, a technological disruption led to the invention of mechanical tape echo to replace digital technology? Which would you choose?
In collaboration with Cory Wong, the Wong Press is a 4-in-1 Press pedal features Cory’s personal specs: blue & white color combination, customized volume control curve, fine-tuned wah Q range, and a dual-color STATUS LED strip indicating current mode/pedal position simultaneously.
In collaboration with Cory Wong, this Wong Press is a 4-in-1 Press pedal features Cory’s personal specs: Iconic blue & white color combination, customized volume control curve, fine-tuned wah Q range, and a dual-color STATUS LED strip indicating current mode/pedal position simultaneously.
Renowned international funk guitar maestro and 63rd Grammy nominee Cory Wong is celebrated for his unique playing style and unmistakable crisp tone. Known for his expressive technique, he’s been acclaimed across the globe by all audiences for his unique blend of energy and soul. In 2022, Cory discovered the multi-functional Soul Press II pedal from Hotone and instantly fell in love. Since then, it has become his go-to pedal for live performances.Now, two years later, the Hotone team has meticulously crafted the Wong Press, a pedal tailored specifically for Cory Wong. Building on the multi-functional design philosophy of the Soul Press series, this new pedal includes Cory’s custom requests: a signature blue and white color scheme, a customized volume pedal curve, an adjustable wah Q value range, and travel lights that indicate both pedal position and working mode.
Cory’s near-perfect pursuit of tone and pedal feel presented a significant challenge for our development team. After countless adjustments to the Q value range, Hotone engineers achieved the precise WAH tone Cory desired while minimizing the risk of accidental Q value changes affecting the sound. Additionally, based on Cory’s feedback, the volume control was fine-tuned for a smoother, more musical transition, enhancing the overall feel of volume swells. The team also upgraded the iconic travel lights of the Soul Press II to dual-color travel lights—blue for Wah mode and green for Volume mode—making live performances more intuitive and visually striking.
Features
- True Bypass
- 4 in 1 functionality (volume, expression, wah, volume/wah)
- New dual-color STATUS LED strip indicating pedal mode and position in real time
- Cory’s custom volume curve and wah Q control
- Classic-voiced wah tone with flexible tonal range
- Active volume design for keeping lossless tone
- Separate tuner and expression outputs for more connection possibilities
- 9V DC or 9V battery power supply
Introducing the Hotone Wong Press - Cory Wong's signature Volume/Wah/Expression Pedal - YouTube
Check the product page at hotone.com
“The Player II Series represents our continued evolution in design and functionality,” said Justin Norvell, EVP of Product, FMIC. “We listened to the feedback from musicians around the world and incorporated their insights to refine and innovate our instruments. The re-introduction of rosewood fingerboards is a restoration of the ‘original Fender recipe’ and will no doubt be a fan favorite - but we didn’t want to stop there. We’ve also incorporated our rolled fingerboard edges for a broken-in feel, upgraded hardware, and have some new body options as well- which underscores our commitment to providing players and creators with the tools they need to express their unique sound and style. The Player II Series is not just an upgrade, it's a detailed re-imagining of our core silhouettes, highlighting our dedication to quality and the continuous refinement of our instruments.”
Additionally, Player II offers new options for chambered ash and chambered mahogany bodies for the Player II Stratocaster and Telecaster models, which will be available in October. Designed for musicians ready to elevate their craft, the Player II Series sets a new standard for quality and performance in the mid-price range.
Fender Player II Stratocaster HSS Electric Guitar - Coral Red
Player II Strat HSS RW, Coral RedFender Player II Jaguar Electric Guitar - Aquatone Blue
Player II Jaguar RF, Aquatone BlueThis reader solicited the help of his friend, luthier Dale Nielsen, to design the perfect guitar as a 40th-birthday gift to himself.
This is really about a guy in northern Minnesota named Dale Nielsen, who I met when I moved up there in 2008 and needed somebody to reglue the bridge on my beloved first guitar (a 1992 Charvel 625c, plywood special). Dale is a luthier in his spare time—a Fender certified, maker of jazz boxes.
Anyway, we became friends and I started working on him pretty early—my 40th birthday was approaching, and that meant it was time for us to start designing his first solidbody build. If you stopped on this page, it’s because the photo of the finished product caught your eye. Beautiful, right? The 2018 CCL Deco Custom: Never shall there be another.
Old National Glenwood guitars were my design inspiration, but I wanted a slim waist like a PRS and the like. We used a solid block of korina to start, routed like MacGyver to get the knobs and switches where I wanted them. Dale builds all his own lathes and machines (usually out of lumber, y’all), as the task requires. This beast took some creativity—it’s tight wiring under that custom-steel pickguard. Many were the preliminary sketches. Four coats of Pelham blue, 11 coats of nitro. Honduran mahogany neck, Madagascar ebony fretboard with Dale’s signature not-quite-Super-400 inlays. He designed the logo; I just said, “Make it art deco.”
We sourced all the bits and bobs from StewMac and Allparts and Reverb and the like, mostly to get that chrome look I so adore. Graph Tech Ratio tuners, Duesenberg Radiator trem (had to order that one from Germany), TonePros TP6R-C roller bridge. The pickups were a genius suggestion from the builder, Guitarfetish plug ’n’ play 1/8" solderless swappable, which means I have about 10 pickups in the case to choose from: rockabilly to metal. And both slots are tapped, with the tone knobs serving as single- to double-coil switches. I put the selector on the lower horn to accommodate my tendency to accidentally flip the thing on Les Pauls—definite lifesaver.
Reader and guitar enthusiast, Cody Lindsey.
Dale offered to chamber this monster, but I said what doesn’t kill you makes you stronger. It weighs in at 11 pounds, if it’s an ounce. We carved the neck to match a ’60s SG, so it’s like the mini bat you get at the ballpark on little kids’ day. Easy peasy. 1 11/16" nut, 25" scale, jumbo frets, just 2 1/8" at the 12th fret.
Delivery in its lovely, hygrometer-equipped Cedar Creek case actually happened a month or two shy of my 41st, but hey, you can’t rush these things. We ended up with a studio Swiss Army knife; it does a bit of everything and does it effortlessly. A looker, too. Dale didn’t spend his career doing this kind of thing—he was in IT or some such—and I imagine he’s winding this “hobby” of his down these days, enjoying retirement with a bottle of Killian’s and a lawn chair at Duluth Blues Fest. But this guitar will live on as a marker of his skill and otherworldly patience. It sits at the head of the class in my practice room, welcoming any visitors and bringing a smile to my face every day. And Dale, my friend, I’ll be 50 before you know it....
Cody requested that Dale design an art deco logo for the guitar’s headstock.