Click here to enter for a chance to win these expertly modded guitar.
Sometimes you don’t want to throw down a couple thousand dollars on a guitar. Hell, for the large majority of players, that never has been nor ever will be an option. Once upon a time, that was a pretty big conundrum for hardcore guitarists—an existential crisis, really. Thankfully, well-dialed CNC machines and a whole host of production and OEM-parts refinements over the past few years have been obliterating those old worries about not being able to sound and look good (or play comfortably) without decimating your savings account or making credit-card bandits giggle with glee.
PG has long celebrated this fortunate new reality. For years now we’ve invested a lot of time, effort, and money in cooking up DIY mod projects that show you how to get more out of your existing guitars. And May 2018 marked our first foray into an annual feature that ups the ante considerably by helping you suss out inexpensive new guitars that are hiding in plain sight, just waiting for anyone who can wield a soldering iron without burning down the house to turn them into killer gigging and recording machines.
For many players—whether relative newcomers or mod-savvy mad scientists prowling for the victim of their next tonal heresy—the realm of worthwhile entry-level instruments rarely extends beyond brands such as Squier, Epiphone, and perhaps lower-priced Gretsch or Ibanez guitars. And with good reason: These companies have a long, laudable track record of serving up instruments that look like what our heroes play, and sound and play fairly close, too. All for just a couple hundred bucks and some change.
But there are many other solid contenders for the hard-earned dollars of the DIY addicted, too. For this year’s no-brainer mods installment, we’ve assembled a diverse trio of guitars that make stellar “canvases” for upgrades that take them to a whole new level. The instruments and parts were purchased online, which means they were subject to the same rigors and dice rolls as most web buys—particularly those that aren’t from the handful of retailers notable for their pre-purchase guitar setups. (Plus, you never know what havoc will be wrought going through a half-dozen climes and the hands of at least a couple of careless delivery people.) Given this, it should come as no surprise that a few performance tweaks were necessary here and there, too.
New to modding? Check out this DIY article for a comprehensive guide on soldering techniques and tips.
Click here to enter for a chance to win this expertly modded guitar.

Agile
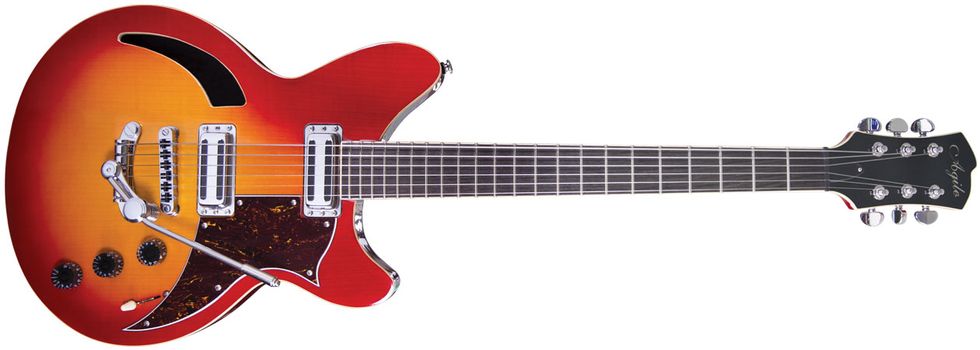
Harm 1 Toast FG$399 — rondomusic.com
The first guitar up for some cool mods is the Agile Harm 1 Toast, a Rickenbacker-esque design made in South Korea and available in North America and western Europe direct from Rondo Music, an American-owned importer of various overseas-made guitars and basses. It features a semi-hollow mahogany body, an ebony fretboard with 22 jumbo frets, “toaster”-style pickups controlled by two volumes and one tone control, and Grover Rotomatic tuners.
Immediate impressions of the Harm 1 out of the box? It seems like a great foundation for anyone looking for the Rick vibe at a fraction of a real Rickenbacker’s lofty price. With its 18:1-ratio Grover tuners and a Tusq nut, the Agile’s tuning stability was already set for success. That said, I did immediately notice splatty, choked notes on the fretboard and could tell that a fret level would be necessary to achieve perfect intonation and full playability.
In my experience with most sub-$500 guitars, you usually end up with cheaper components under the hood. In the Harm’s case, the stock pickups were a bit dark and muddy, lacking the clarity most players prefer in this sort of instrument. To instill the Harm with the bright, jangly tone that made Rickenbackers legendary, we went with a set of Creamery Mid-63 toaster-top single-coils. Website specs put the bridge unit’s output at 7.5k, and the neck’s at 7k, but, once they arrived, I measured them with a meter and found the bridge to be at 9k, while the neck was 7.7k—a bit hotter than expected, but that’s okay. Once I removed the old strings and set aside the bridge and tailpiece (the latter of which can easily slip off and damage your finish if you’re not careful), swapping the Creamery pickups into the Agile was painless. It didn’t require any additional drilling, mounting, or routing (Photo 1). That means I got to the next step, wiring, very quickly.
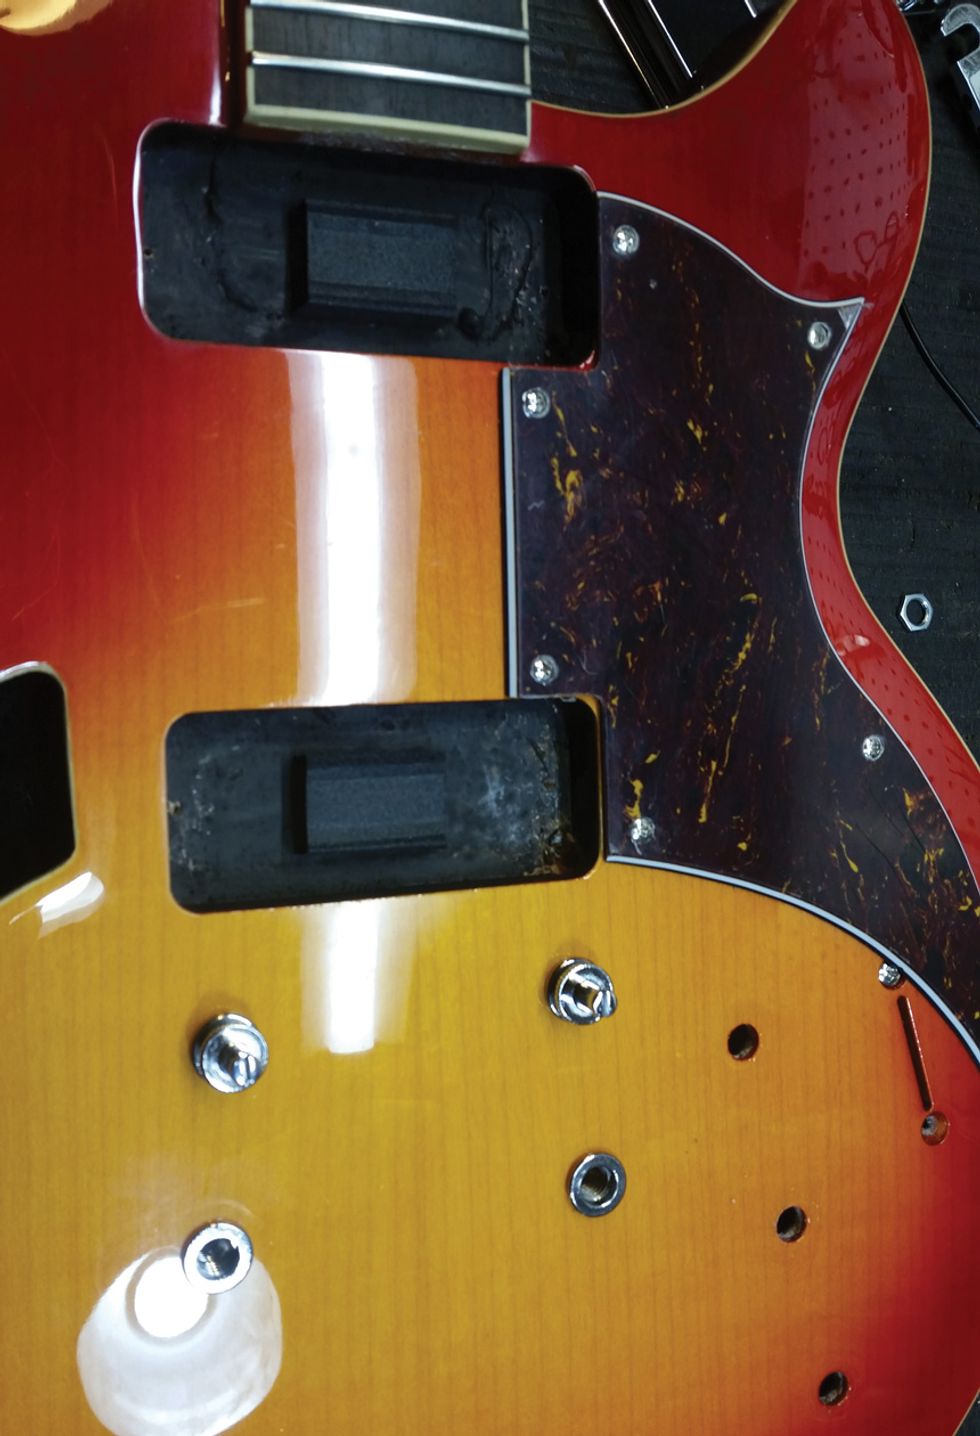
Photo 1 — Once I removed the strings and stock pickups, I was stoked to find that we didn’t need to widen the existing pickup routes to fit our new Creamery units. Just be sure to remove the bridge and tailpiece during this process so they don’t slip off and ding your finish.
Next up for the electronics was replacing the volume and tone knobs’ cheap potentiometers and 3-way pickup selector with premium components. I love what Emerson Custom offers in this department, and these replacements are always a “no-brainer” for anyone who wants a road-tested, practically bulletproof setup. In my opinion, these pots really are the best option currently available. With a proprietary custom audio taper, they offer a balanced swell through the whole rotation of the shaft. This takes away that annoying on/off shutoff point found in most economy pots.
The first step in installing the new pots is, of course, to remove the old ones. Once I did so, I realized the Emersons wouldn’t fit the original mounting holes. The Harm’s stock pots have a smaller shaft, so the mounting holes needed to be slightly enlarged to accommodate the upgrades. To do so, I used a tapered endpin-jack reamer bit (item #4323 on StewMac.com, Photo 2). If you don't have one of these, you can also use graduated drill bit sizes up to 3/8". Caution: Make sure your drill is in reverse mode during this widening work, as this reduces the risk of chipping the guitar’s finish.
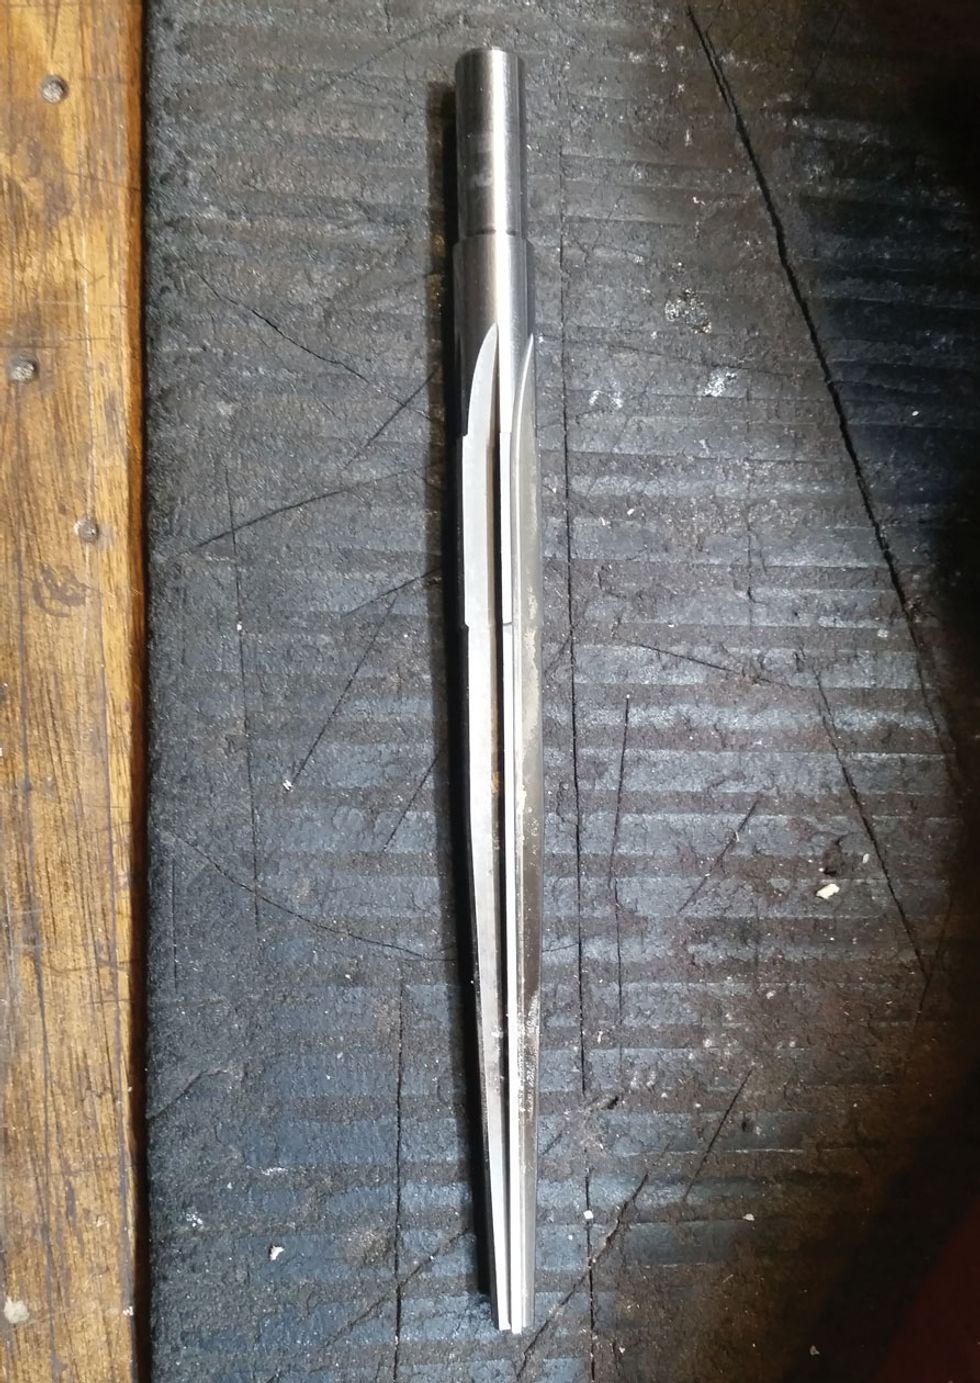
Photo 2 — The shafts of the new Emerson Custom potentiometers we added to the Agile wouldn’t fit in the original pots’ mounting holes, so I used a tapered endpin jack reamer to widen the holes.
Now you’re ready to mount the new components and get this baby all wired up! However, rather than install the Emersons exactly as before, our next step was to install a “treble bleed” on our volume circuit (Photo 3). This modification lets you retain the high-end frequencies of your guitar’s overall tone even when you turn down its volume controls. (This step is optional, as some players like how lowering their guitar’s volume knob “darkens” or “warms up” the sound.)
The bleed circuit itself is pretty simple: Just wire a resistor and a capacitor (I used a 150k ohm resistor and a .001µf capacitor.) in parallel between the input and output pins of the volume pot (normally lugs 1 and 2). (Note: When grounding pin 3, use a short length of tinned wire to connect the pin to the back of the pot casing. I see a lot of guitars where this pin is just bent backwards and soldered directly to the casing to make the ground connection. This is not a good practice because, while technically it can work, it can also damage the pot internally.)
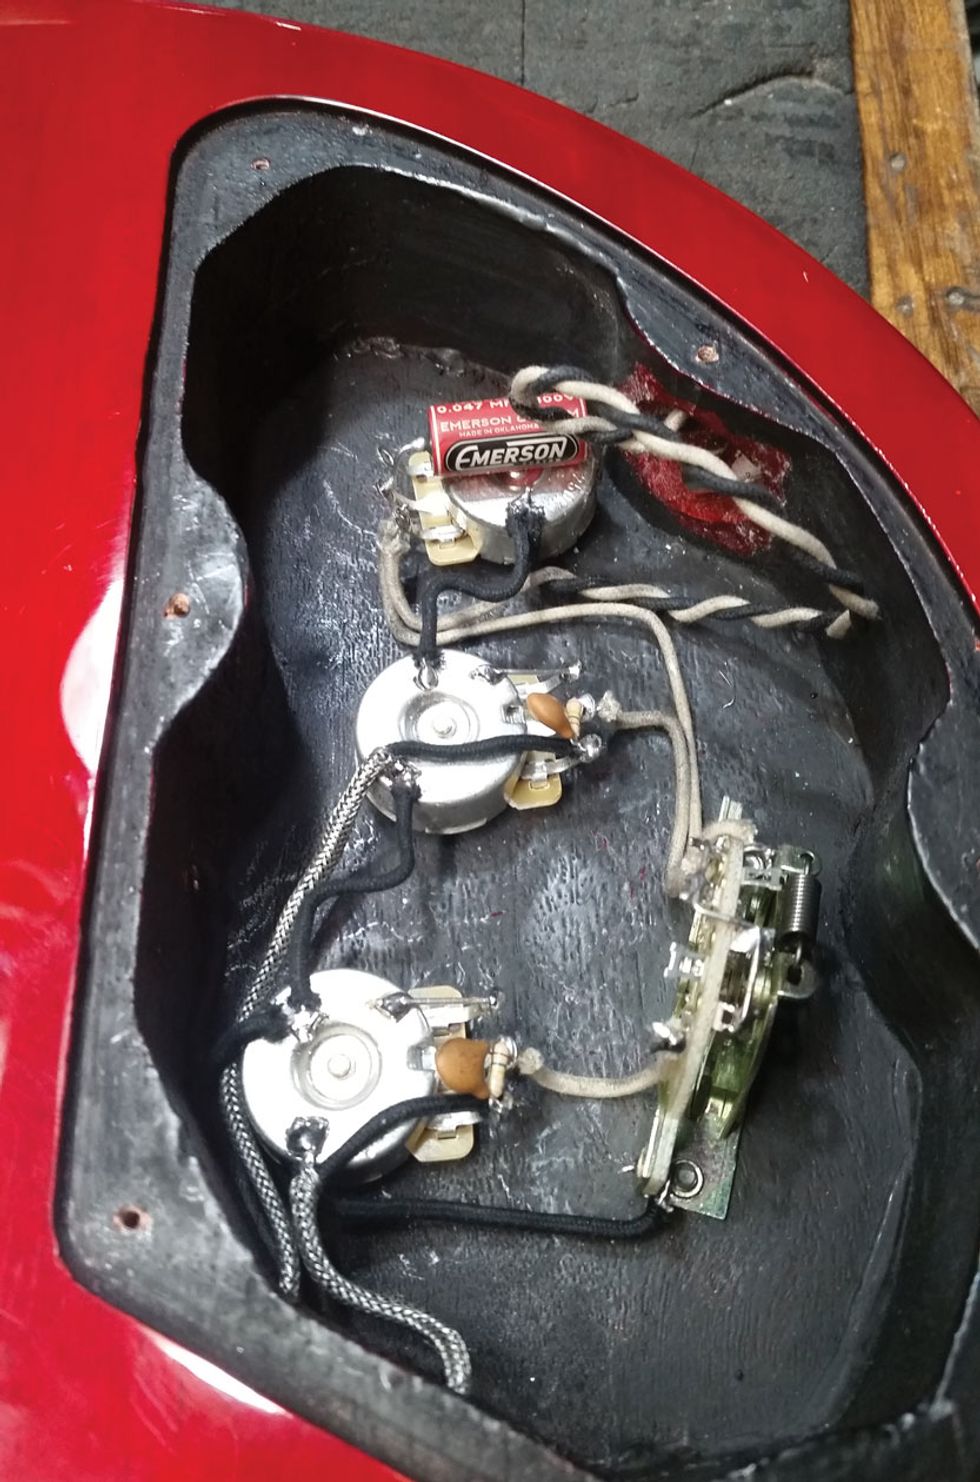
Photo 3 — The Agile Harm 1’s modded electronics cavity features new Emerson Custom pots and a CRL pickup selector. Each of the two volume controls (middle and bottom) has a resistor and capacitor between lugs 1 and 2 to create a “treble bleed” circuit, while the tone pot (top) has an Emerson paper-in-oil capacitor to enable the guitar to go from Rickenbacker-style jangle to much more subdued tones than the original wiring allowed.
As I mentioned previously, this particular guitar has a volume-volume-tone control configuration, so I repeated the steps above to have the treble-bleed benefits on both pickups. I also felt like a paper-in-oil capacitor on the tone circuit would help roll off the guitar’s high frequencies more smoothly than the stock configuration. The larger the capacitor value, the more “blankets” you throw on the amp as you roll the tone knob back. I used a .047µf cap, the largest-value paper-in-oil cap offered by Emerson Custom, and I chose it in order to make it possible to tame the guitar’s jangle when wanted, thus making the instrument even more versatile.
After the pots got their wire-up treatment, I felt it was important to replace the original plastic pickup selector—which will inevitably have issues down the road—to a higher-quality unit. I went with a CRL model because CRLs are the Cadillac of 3- and 5-way blade switches, offering long-term reliability and noiseless operation.
The Agile’s last electronics mod was the jack. Switchcraft is the industry standard and for good reason: They’re proven to handle the sweat and grime of extensive live gigging. Once the jack was wired up, our electronics overhaul was complete. When you’re at this step of your own modding project, you can test that the pickups are properly installed by plugging the guitar into an amp, even without restringing the guitar, and lightly tapping the pickups with a flathead screwdriver. If you don’t hear anything at first, make sure your volume knobs are turned up and that the 3-way switch is on the correct position. If you’ve still got no sound, you’ll have to go back under the hood and find out where a wire might have gotten crossed or inadequately soldered.
Before we restring the Harm and thrill to its new “engines,” though, let's also expand its capabilities by giving it tremolo functionality. While several companies offer ways to add vibrato to an existing instrument, we chose the Duesenberg Les Trem II—and for a few reasons. First off, there’s zero drilling required. Anyone can easily add this hardware to a Tune-o-matic-plus-stoptail arrangement between string changes. Secondly, it offers a smooth, Bigsby-like playing experience without adding as much weight to your guitar. Lastly, it’s not just easier to restring than a Bigsby—you can also adjust the length of the vibrato arm, as well as the tension of the spring bar (for either a stiffer or gushier playing feel).
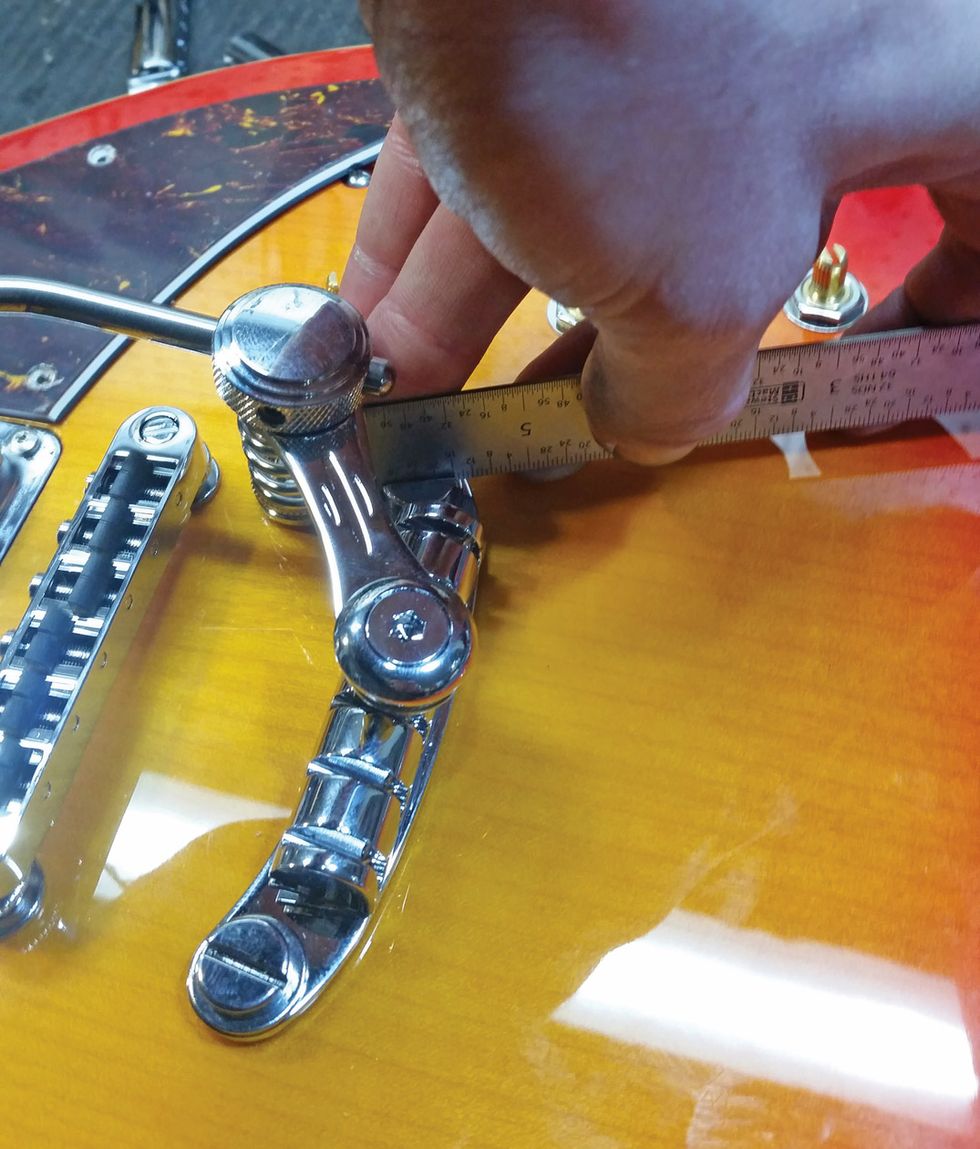
Photo 4 — With the original mounting screws removed, the Duesenberg Les Trem II’s mounting-post holes align perfectly with the anchoring studs embedded in the guitar’s body. Simply place the trem over the studs, then secure the bridge using a tool that fits the slots and doesn’t risk damaging the screws or the anchors.
Because the Agile came equipped with a stopbar tailpiece that slides right off, it was a cinch to remove it and the studs securing it to the bushings embedded in the guitar’s body. The Les Trem II comes with two pairs of mounting studs, one metric and one standard (metric fit the Agile), a combination of spacers that can be used to prevent the trem from touching the body of the guitar (we didn’t need them for the Agile), and the trem itself. To get going, I simply placed the Les Trem over the now-empty bushings and secured it in place by handtightening the new studs. For final tightening, be sure to use something thick that fits the large notch in the top of the screw. I typically use my thick, 6"metal ruler (Photo 4) or sometimes a flattened nickel and vice grips. Why? Using a drill or standard flathead screwdriver can potentially damage the post and/or strip the slot. Once tightened, you’re ready to go!
Okay, on to our final “mods.” The Agile Harm came strung with light-gauge roundwound strings, but we felt a set of heavier flatwounds would instill the guitar with interesting character more in line with the vintage instruments that inspired it. To fit the .011-gauge strings, I had to widen and deepen the nut slots with a set of nut files. In addition, as I mentioned in the section about first impressions of the Agile, the height of the Harm 1’s frets seemed a bit uneven. After a full fret leveling, I was able to set the guitar up beautifully.
Post-Mod Thoughts
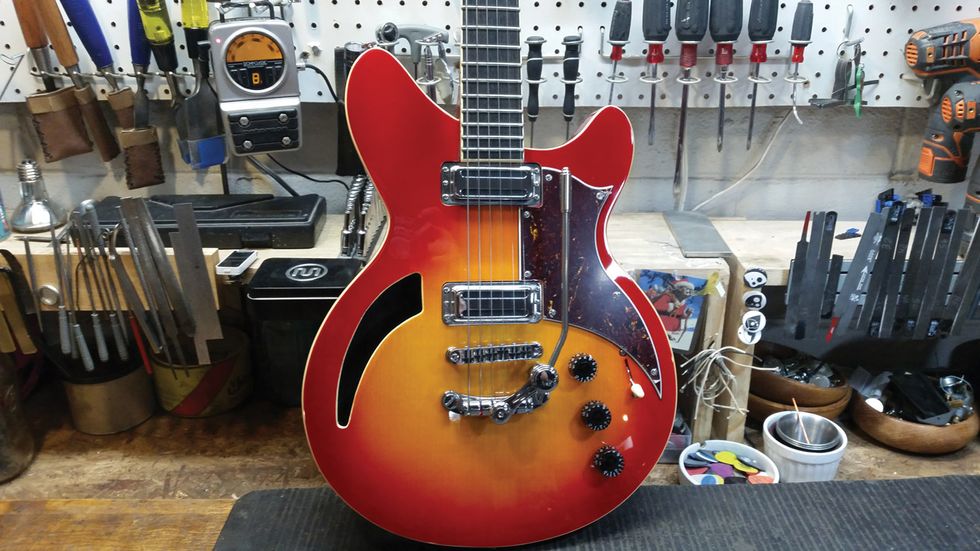
The end result of all our mods to the Agile Harm 1 was dope!The new electronics really give the tone a noticeable sonic upgrade. The bright, handwound pickups balance well with the flatwound strings. And the fret leveling and trem addition gave the guitar playability and feel that it simply wasn’t capable of out of the box. This guitar came out to be really rad.
Watch a before-and-after demo of the Agile Harm 1 Toast FG:
Click here to enter for a chance to win this expertly modded guitar.
ESP
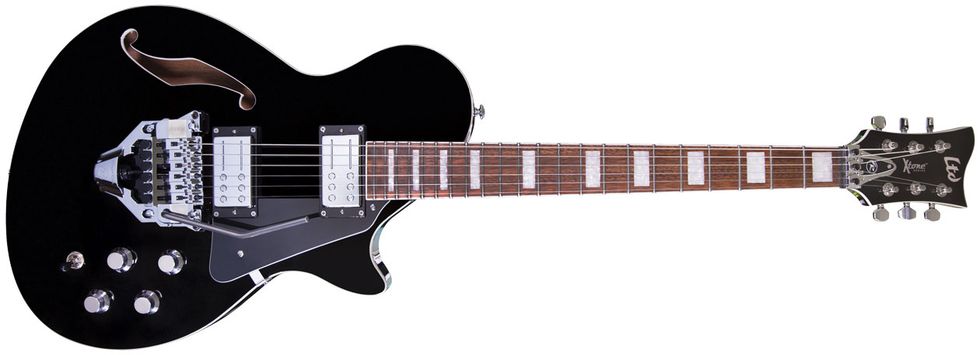
LTD Xtone PS-1
$449 street, espguitars.com
The ESP LTD Xtone PS-1 is a 24 3/4"-scale mahogany semi-hollow design with a maple bolt-on neck topped with a roasted jatoba (aka Brazilian cherry) fretboard. Stylistically, the Xtone brings a great balance of elegance and grit, and it’s a great starting point for a variety of applications. Straight out of the box, it played great and had spot-on fretwork. The tuners were decent, too. And while I generally prefer a bone nut for greater tonal clarity, given that the Xtone’s nut wasn’t damaged or impeding play, I decided to leave it as-is in the interest of keeping this project as wallet-friendly as possible.
As with the Agile, the ESP’s pickups and electronics were the most obvious place to effect a drastic change in the guitar’s sound and dynamics. However, unlike the Agile’s toaster-style pickups—a relatively rare size and type of pickup to encounter on both the mainstream and boutique pickup market—the Xtone came equipped with standard-sized humbuckers. There are tonsof options in that world. That’s a fact that can sometimes feel both like your friend and your enemy, especially if you’re prone to option anxiety or buyer’s remorse. For this project, we went with a pair of Railhammer Hyper Vintage humbuckers, which aim for the classic tones of old PAF pickups, but with more oomph and tautness in the lower three strings.
The Railhammers came with 4-conductor leads, which gave me the option to add coil-splitting capabilities. There are multiple ways to activate a coil-split, but the most common and easiest is to use push-pull pots. Generally, I like to use Bourns push-pulls pots located in the usual tone-knob location, where they’re out of the way and I can adjust volume without fear of accidentally changing sound mid-set. Push-pull pots give you the same basic use of a standard pot with the added functionality of a DPDT (double-pole, double-throw) switch. However, wiring pots for coil splitting is more involved than your standard 2-conductor connection. On the bright side, a quick online search will yield detailed diagrams for a variety of wiring options that all achieve the same result. (For specifics on wiring this and other more-involved mods in this feature, check out our Mod Garagearchives, as well as the resources on SeymourDuncan.com.)
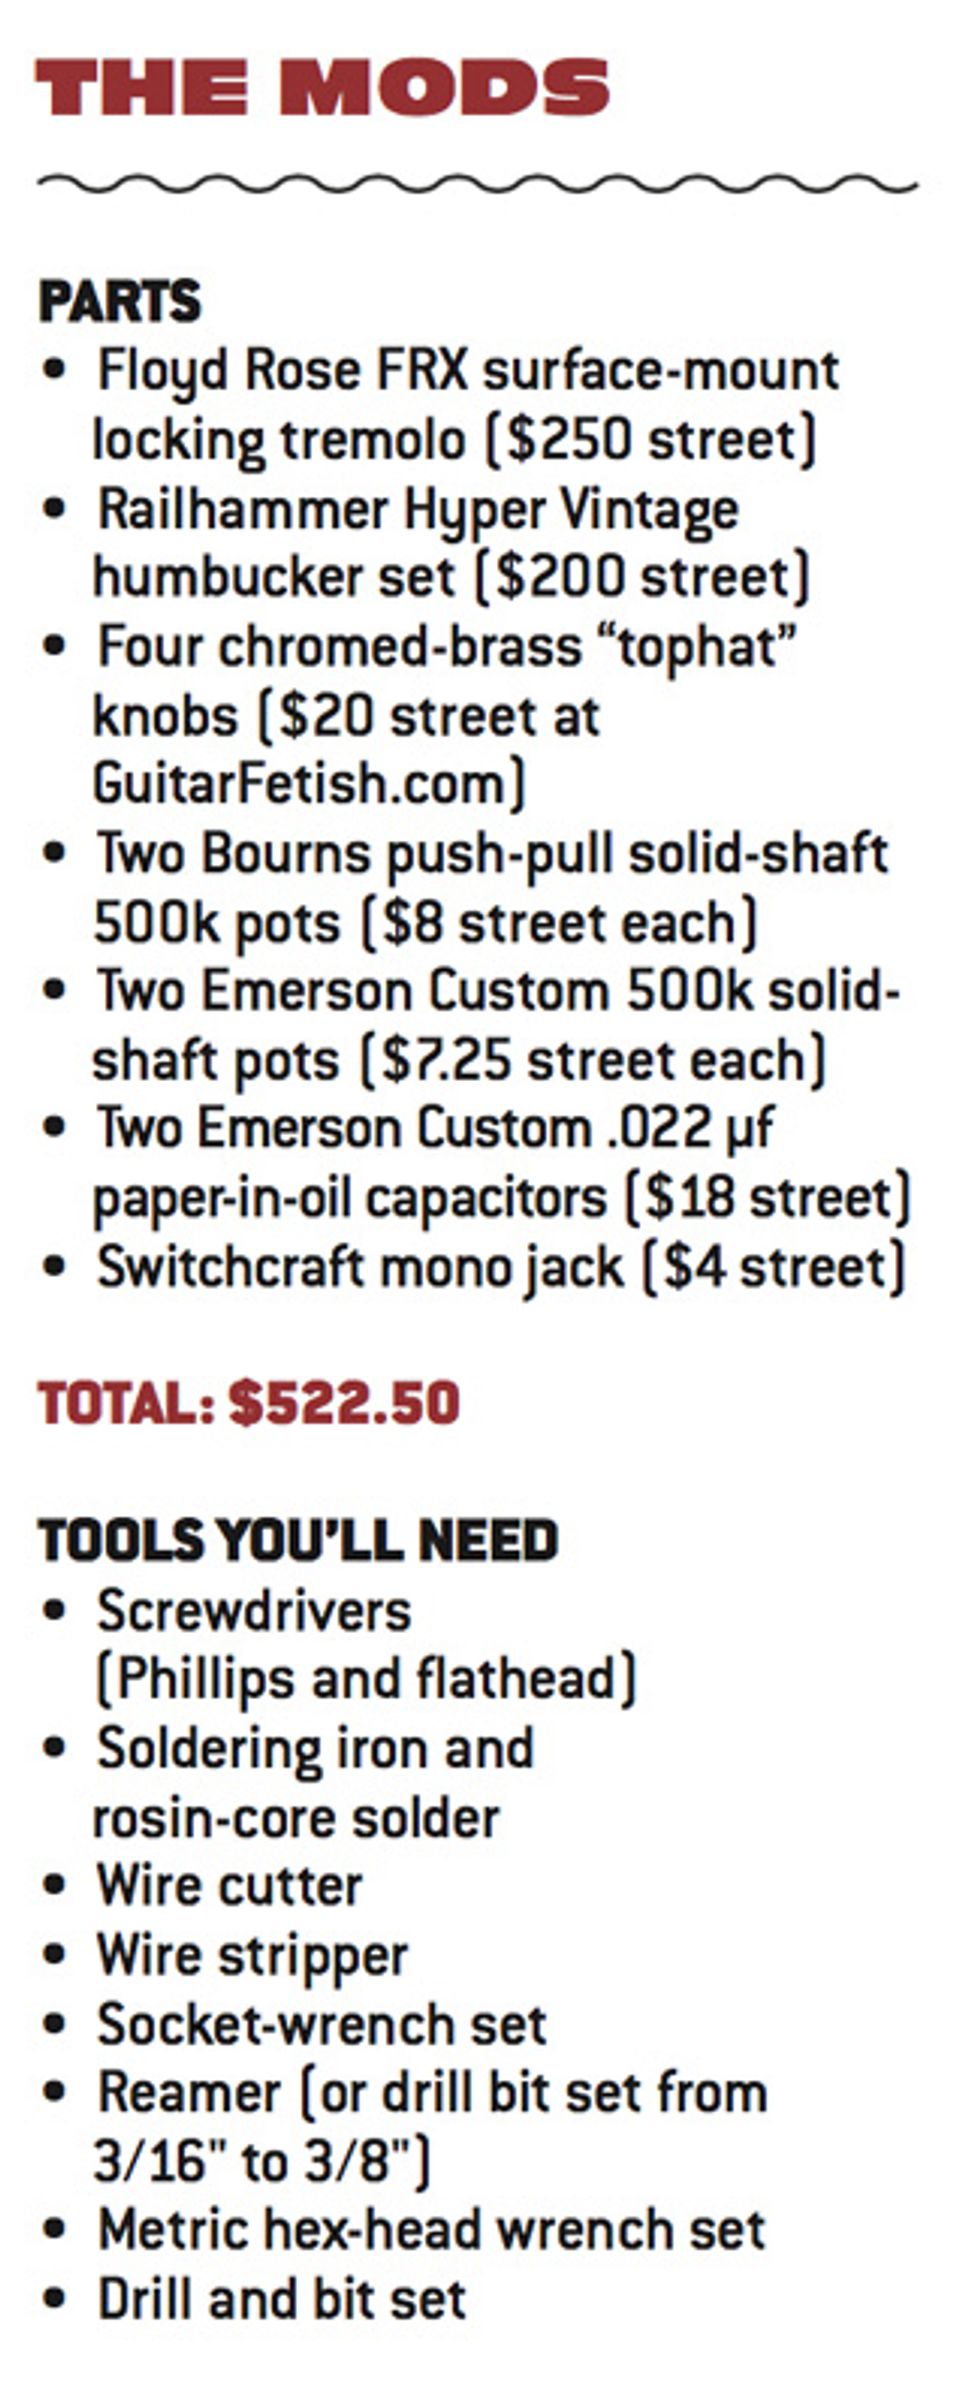
Photo 5 — The Xtone’s modded control cavity now features Emerson Custom 500k volume pots (bottom) and Bourns push-pull tone pots that enable coil-splitting for each pickup.
Like the Agile Harm 1, the Xtone’s original pot-shaft routes weren’t wide enough to accommodate the Bourns and Emerson upgrades, so I enlarged them using the same endpin-jack reamer drill bit. For the volume controls, I used Emerson Custom 500k solid-shaft pots to give the guitar that sweet, reliable sweep. The tone controls feature Emerson paper-in-oil capacitors, but with a lower value than what we used in the Agile, since I didn’t think most players would want to roll off as much treble with the Xtone (Photo 5). I also installed a Switchcraft jack for good measure, while around front I added chromed solid-brass knobs to the new pots, so they’d look as good as they sound, while also having a vibe similar to the new pickups, as well as our next mod.
In the world of locking tremolos, Floyd Rose has long been the industry standard. Whether you favor Van Halen-style dive bombs or Dimebag-esque pulls, few substitutes are on par with it. However, structurally, most Floyd-equipped instruments are more on the Strat end of the spectrum than the more-Les Paul-like guitar we’ve got here. And the Xtone’s semi-hollow construction complicates things even further. It would be tricky, if not impossible, to route it out to accommodate the trem block that extends perpendicularly from the underside of most fulcrum-style bridges—never mind the tremolo-spring assembly we’d need to somehow install in the back of the guitar!
Virtually all fulcrum tremolos—including Leo Fender’s original Stratocaster vibrato, the standard Floyd Rose, and the many similar designs the Floyd has inspired—require these body cavities to accommodate the mechanisms that facilitate the tremolos’ “floating” action. Thankfully, Floyd Rose’s surface-mount FRX model eliminates need for the trem block and the trem-spring cavity, enabling addition of legendary Floyd functionality, with very little permanent modification, to any guitar with a stop tailpiece. That said, while the FRX does greatly simplify the Floydmodprocess, it still requires you to deal with the usual complications and back-and-forth adjustments of getting a locking-nut-and-floating-bridge set up to work perfectly. (For the nitty-gritty details, check out PG’s Guitar Shop 101 article “How to Set Up a Floyd Rose-Style Trem.”)
The first step in installing the Floyd Rose FRX is to remove the guitar’s strings, as well as the stock stop tailpiece and Tune-o-matic bridge. We’ll also remove the threaded bridge-post inserts and the tailpiece studs, but leave the original tailpiece bushings embedded in the body.
The FRX features three main pieces: the locking-nut assembly, the bridge itself, and a base plate to which the bridge attaches. The FRX base plate mounts to the existing tailpiece bushings embedded in the guitar’s body using two new mounting posts (included) that thread into the bushings (Photo 6). Don’t tighten the new posts all the way down, though, because you don’t want the base plate to be flush to the body. (In Floyd Rose’s official installation how-to video, the inventor himself recommends starting out at a height of 5/8"to 3/4".)
Photo 6 — In the foreground you can see that the original Tune-o-matic bridge posts have been removed (left), and the new Floyd Rose mounting posts have been threaded into the original tailpiece bushings (right).
The front of the FRX’s base plate has two screws for adjusting the angle at which the front portion conforms to the top contours (or lack thereof) on a variety of guitars, from carved tops like the Xtone to flatter-topped instruments such as, say, a Gibson SG. Before you screw these front height-adjustment screws down to the body, be sure to place the two small adhesive pads that come with the trem on the guitar between the body and the adjustment screws. This helps protect the guitar’s finish from getting damaged. I ended up adjusting these height screws, as well as the mounting posts that support the rear of the base plate, so that the entire plate was about 1/8"off the body of the guitar. This allowed the compression spring mounted underneath the assembly to function as intended while having full clearance of the body. Once you’ve dialed in the plate height, use a hex wrench to tighten the horizontal hex screws that secure the rear of the base plate to the two rear mounting posts (Photo 7).
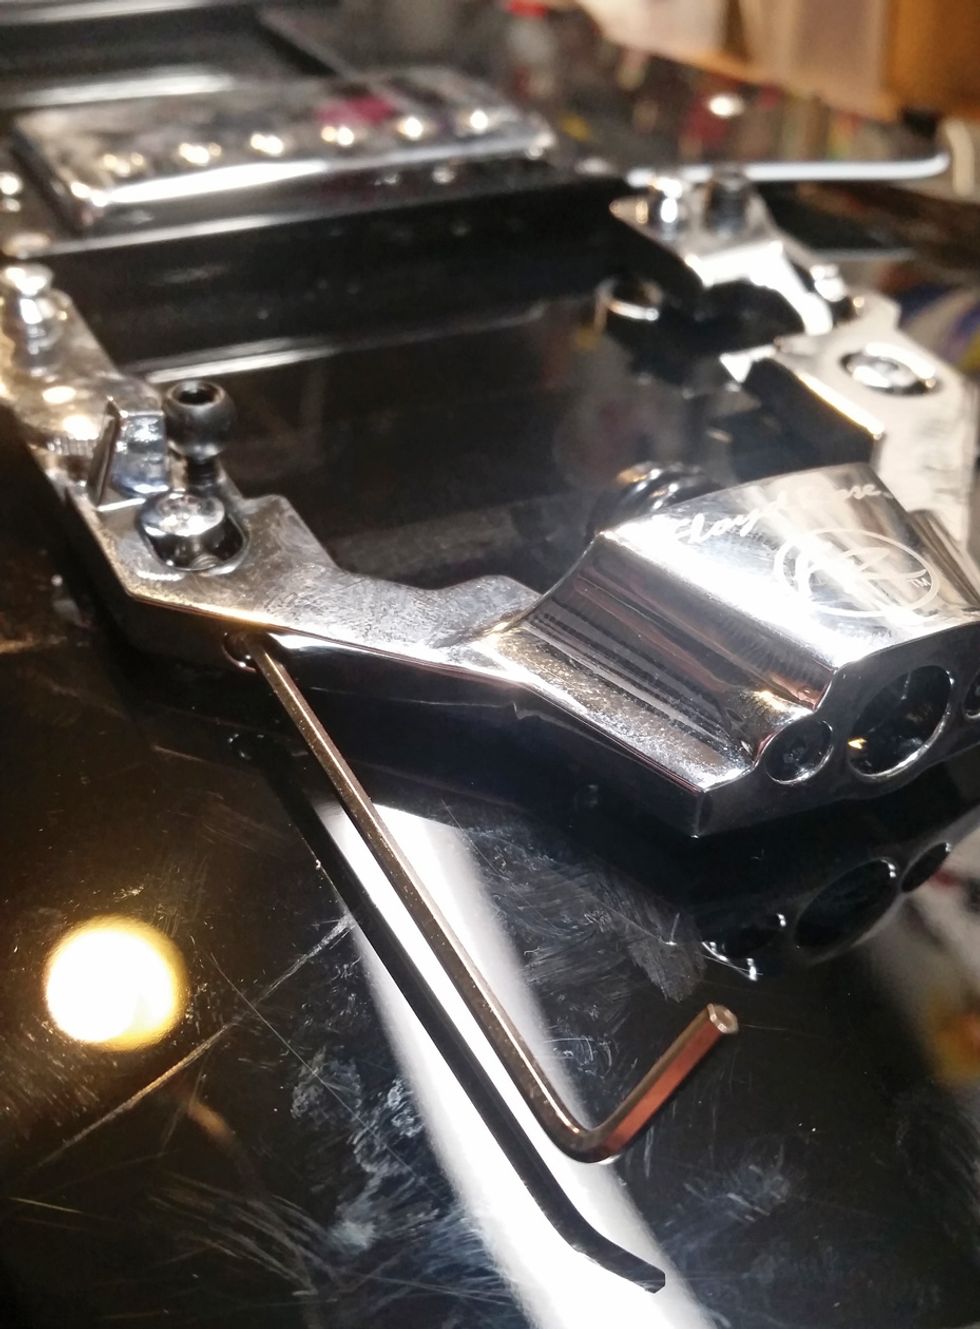
Photo 7 — Once you’ve adjusted the height of the Floyd Rose’s bridge plate, lock it in place by tightening the horizontal hex screws against the two rear posts.
The next part of the tremolo installation is the bridge itself. In order for this “surface-mounted” Floyd to work sans the usual assembly of springs and claws in a rear body cavity, the FRX uses a spring-tension transfer rod that runs underneath the bridge and pushes against a little notch on the underside of the bridge. This rod is threaded through the previously mentioned compression spring on the bottom of the base plate. When placing the bridge onto the baseplate, make sure the tension rod is loose enough for the bridge to sit snugly against the notched pivot posts. Then, tighten the tension rod until it rests in the notch on the underside of the bridge (Photo 8). Note:The bridge will not be held in place until you’ve strung the instrument, so keep this in mind while moving the guitar so that it doesn’t fall out of place and mar your finish.
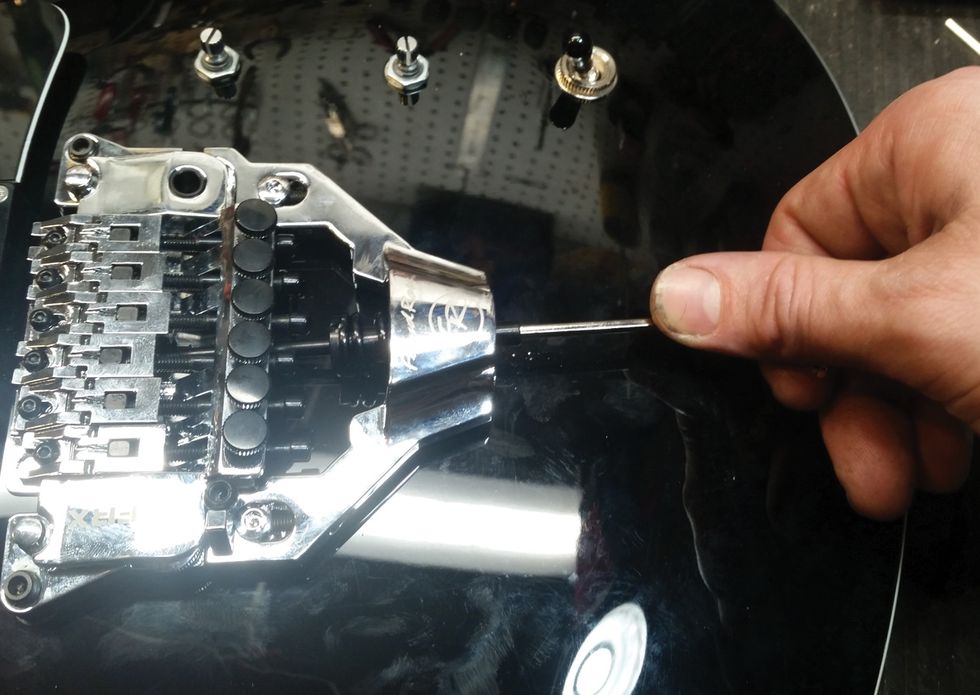
Photo 8 — To attach the bridge to the plate assembly, place the two knife-edge cutouts at the front of the bridge against the pivot points at the front of the plate, then insert the spring-tension transfer rod through the rear of the plate assembly and tighten it until it fits snugly in the notch under the bridge.
Now, holding the bridge safely in place, let’s make our way up to the headstock. This version of the Floyd Rose features a unique twist on the classic locking nut: The locking nut’s base plate also doubles as your new truss-rod cover. It sits behind the existing nut and mounts directly to the headstock with two provided screws. Before we mount the new locking nut, however, it’s important to make sure the FRX nut assembly is at the proper height. To do this, I first removed the existing truss-rod cover and held the locking-nut plate in place behind the ESP’s existing nut. Then I installed a single string in the corresponding locking bridge saddle and tuner. (Hint: The 6th string’s large size makes it easier to see than an unwound 1st string.) As you can see from Photo 9, the Xtone’s headstock angle was so great that using the clamping mechanism to press the string all the way down to the plate’s bottom surface would have almost certainly broken the string—or at the very least pinched the string sharper than the fine tuners could correct after lockdown.
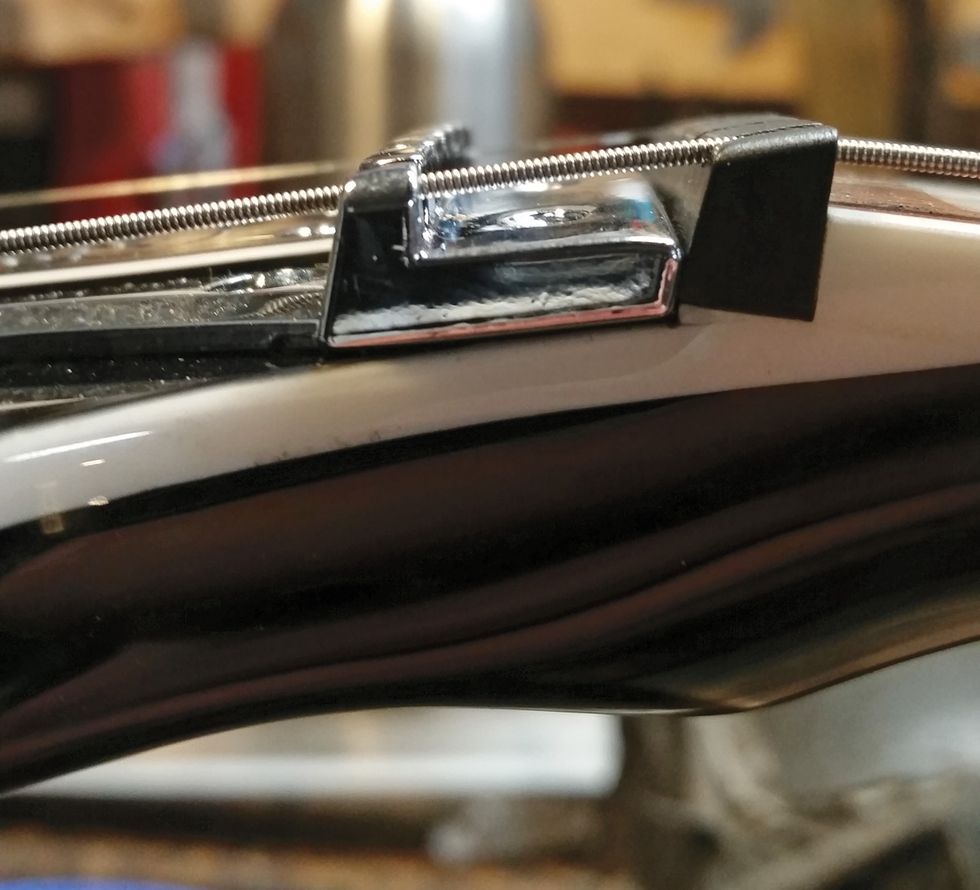
Photo 9 — To see if the locking-nut plate’s surface would match up with the Xtone’s existing nut, I installed a single string. See how far from the bottom plate surface it is?
To remedy this, I measured how much of a height difference there was and determined that a piece of 3-ply pickguard material was just the right thickness for a riser. I cut it to the same shape as the nut plate, and voilà—problem solved! (Photos 10 and 11.)
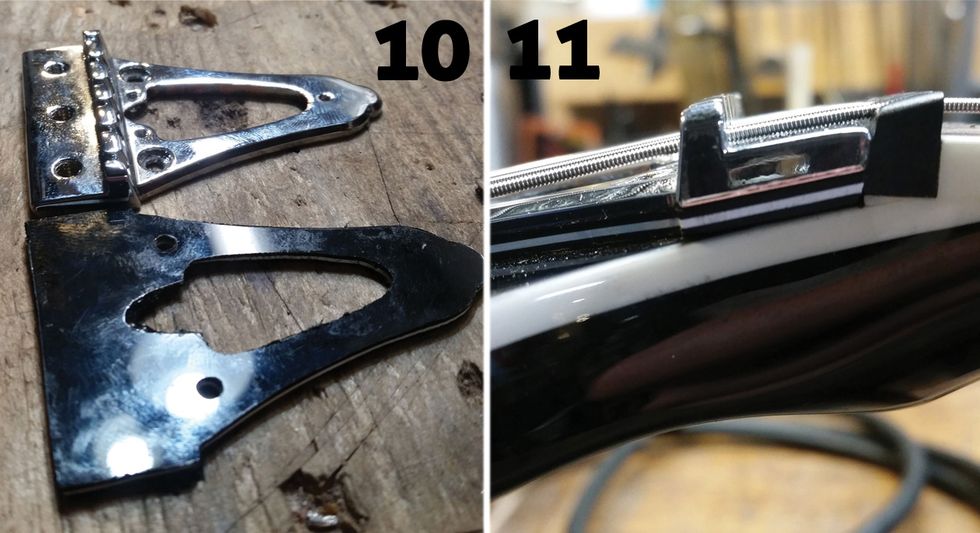
Photos 10 & 11 — To make sure the strings would clamp against the bottom of the locking nut without too much of a break angle, I fashioned a riser out of pickguard material.
Next, I pre-drilled the holes for the locking-nut mounting plate. Before drilling, it’s a good practice to place a piece of tape on the bit to mark the precise depth of the provided mounting screws. This helps avoid accidentally drilling too deep and possibly compromising the structural integrity of this crucial junction. Slowly and carefully drill the holes, using the plate’s screw holes as guides, until the tape on your drill bit is even with the top of the plate. Next, use a handheld screwdriver to slowly and firmly install the mounting screws. Once that was done, the Xtone was ready for stringing up, locking down, and seriously wailing.
Post-Mod Thoughts
All in all, our ESP Xtone PS-1 project was a really cool one, too. Due to its unusual design, I admit I was skeptical about the Floyd Rose FRX’s capabilities at first, but once everything was set up, I was impressed. It holds tuning great and operates exactly as it should. The description was spot on for the pickups, too: warm and chimey PAF-style clarity, with a modern punch that makes this guitar very versatile for any style of play.
Watch a before-and-after demo of the ESP LTD Xtone PS-1:
Click here to enter for a chance to win this expertly modded guitar.
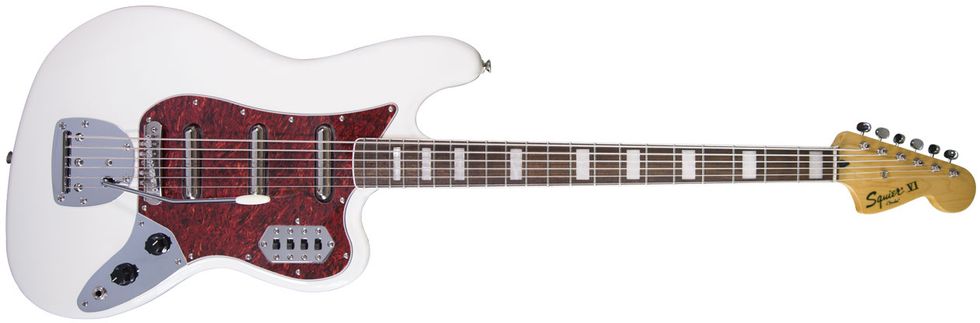
Squier
Vintage Modified Bass VI$449 street, fender.com
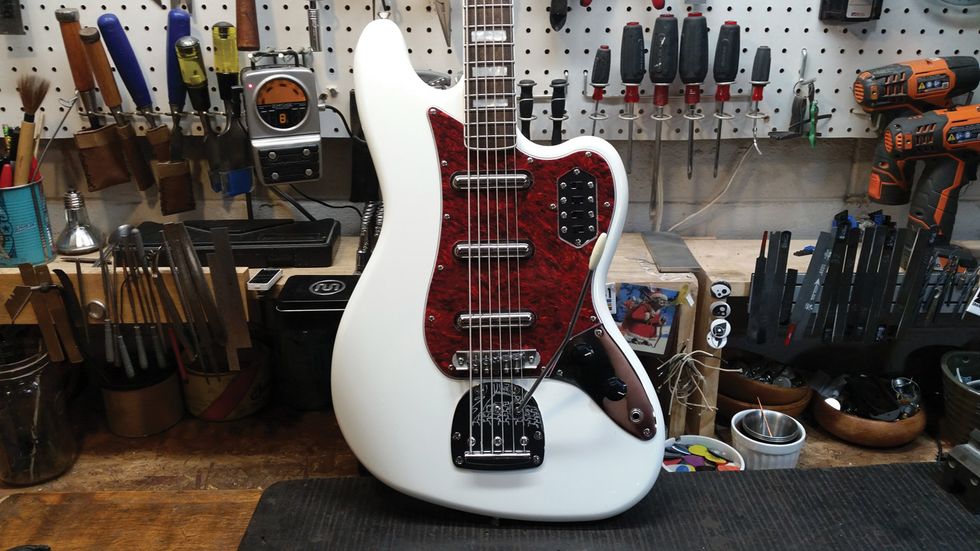
The Squier Vintage Modified Bass VI is a killer, lower-priced recreation of an old personal favorite—the Bass VI that Fender debuted in 1961. Taking the feel of an electric guitar, putting it at a 30"scale, and stringing it up a whole octave down can offer new inspiration that neither a bass nor a guitar alone provides. These things are fun. Out of the box, this one played like you’d expect for this price range: not terrible, but with plenty to be desired, too. The build quality was very good: The nut and tuners were functional, and the bound rosewood fretboard and block inlays don’t just look cool—they’re nice features you typically find on models with a much higher price tag. That said, right off the bat I could tell the VI was going to need more than a standard setup. In addition, the pickups were okay, but nothing to write home about. And, as with all Fender offsets, I knew I had to address the lack of stability in the stock bridge.
Given that the original Bass VI is believed to have been Fender’s response to Danelectro’s 6-string bass from the mid ’50s, we thought the Squier would sound killer with a trio of Seymour Duncan Lipstick Tube pickups with specs similar to those used in the early Danos. Unfortunately, once I removed the original Jaguar-style pickups, the Duncans didn’t quite fit into the VI’s existing cavities. The width was fine, but the routes were too shallow (Photo 12).
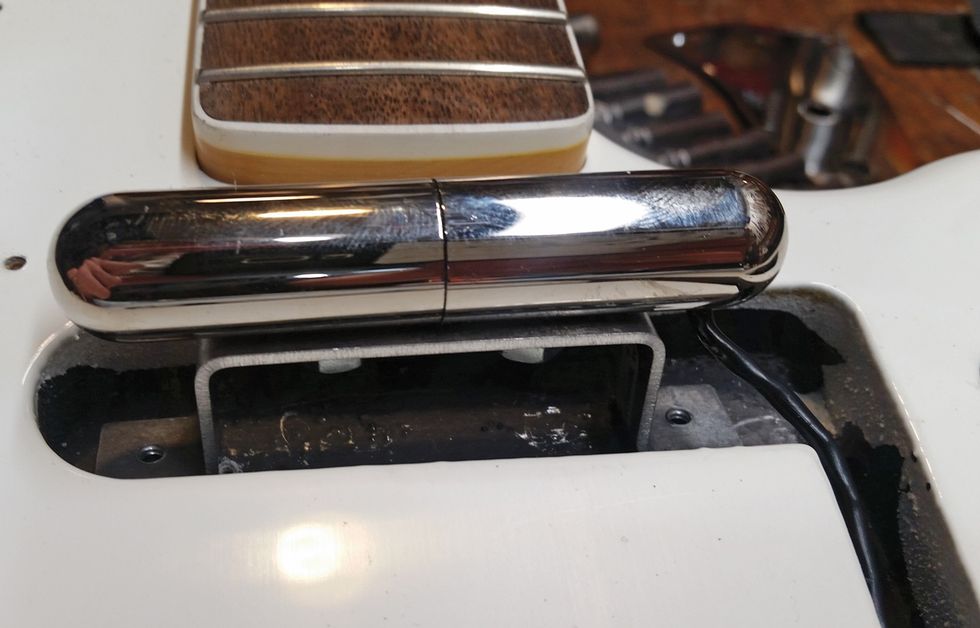
Photo 12 — The new Seymour Duncan “lipstick tube” pickups were taller than the Bass VI’s original pickup routes, so the cavities needed to be deepened.
To remedy this, I removed the neck (to make it easier to work with the body for the coming jobs), measured to find the centerline of the guitar (to make sure the pickups were centered correctly), and used masking tape to mark both the centerline and lines indicating where to center the new holes I needed to drill for the pickups. (Like original Danelectro lipsticks, the new Duncans are installed using screws that go through brackets on the underside of the pickup and on through holes in the back of the guitar.) Then I used a drill press and a 7/8"Forstner bit (again marked with masking tape to ensure I didn’t drill too deep) to achieve the proper cavity depth (Photo 13).
Caution:Before increasing the depth of body routes, be sure to measure the thickness of your guitar to make sure you don’t inadvertently create a weak section that could easily break. A fraction of an inch can ruin your day—and your instrument!
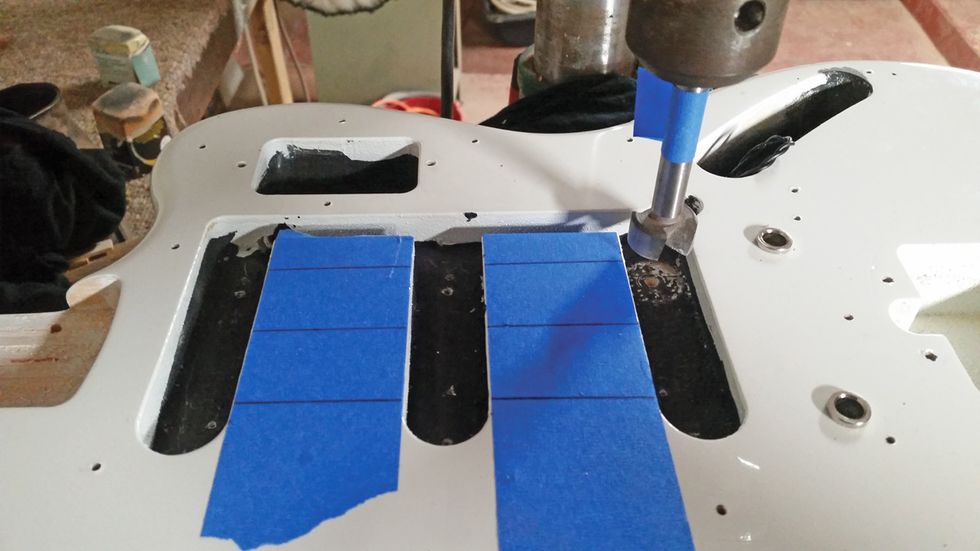
Photo 13 — I used a 7/8" Forstner bit (marked with masking tape to avoid drilling too deep) to increase the depth of all three pickup cavities.
With the cavities at the proper depth, I proceeded to mark the exact location of the pickup mounting holes. Using the previously drawn centerline, I put the pickup in, aligned it with the centerline, and marked the holes for drilling. Using a 1/16"drill bit, I drilled all six mounting holes all the way through the body of the guitar (Photo 14).
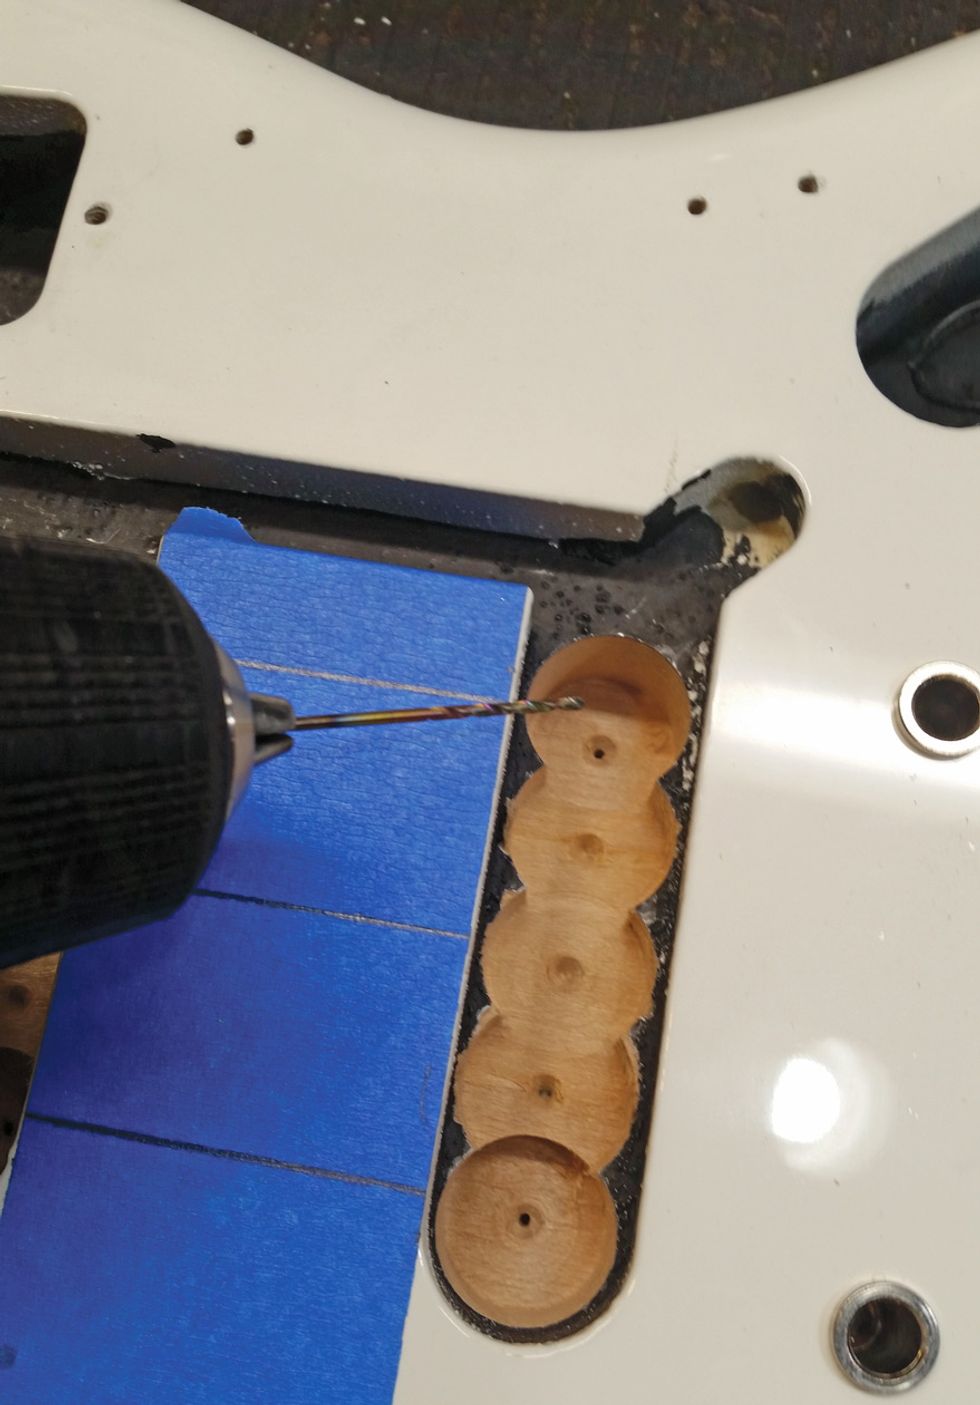
Photo 14 — The pickup routes after being expanded with the Forstner drill bit, as well as drilled out with holes that go all the way through the back of the guitar.
Then I flipped the guitar onto its face in order to widen the screw holes from the back of the guitar with a 1/8"bit—and the drill again set to reverse to avoid cracking the finish. It was then time to mount the pickups. Because the new pickups didn’t come with any springs, I used the original springs from the stock pickups and some foam from the Duncan pickup packaging as a cushion (Photo 15).
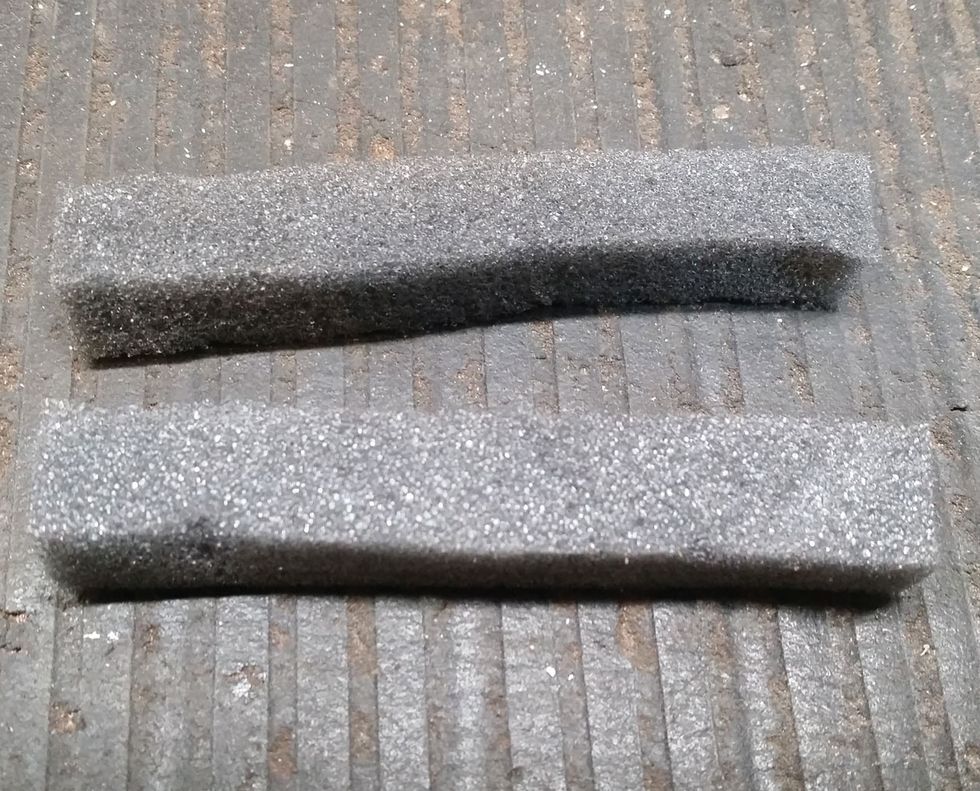
Photo 15 — To prevent potentially vibrations from the pickup housings from possibly becoming audible, I lined the bottom of the cavities with foam pillaged from the new pickups’ packaging.
After installing the pickups, it was on to the electronics! The Bass VI has a panel of four slider switches like those found on a Fender Jaguar. The stock setup is an on-off switch for each pickup, plus a “strangle” bass-cut switch. I opted to turn the bass-cut switch into a phase-reversal switch for the middle pickup, which would then allow the guitar to get those classic out-of-phase tones (Photo 16).
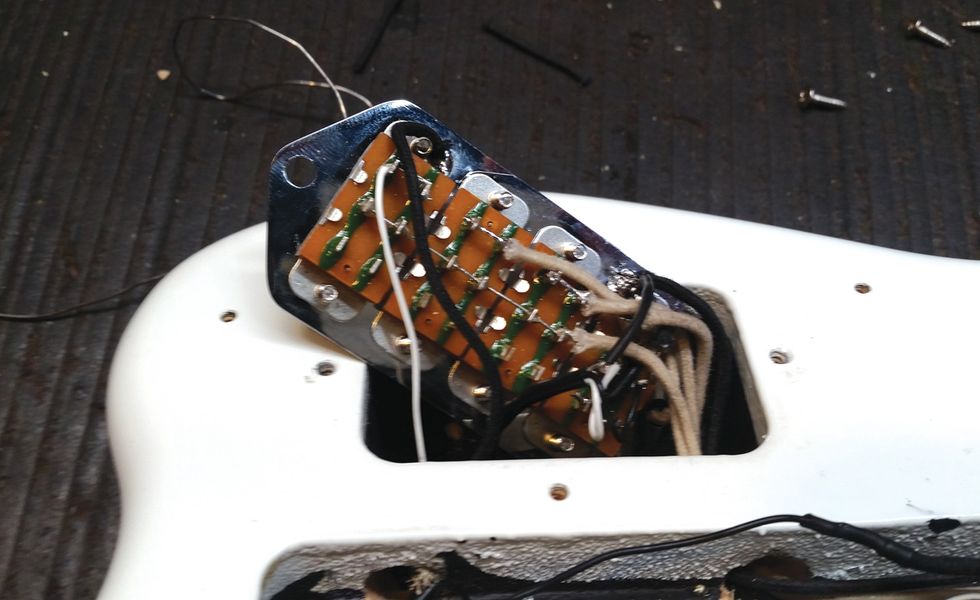
Photo 16 — To expand the Bass VI’s palette of tones in a way I felt better complemented its core voice, I modded the “strangle” bass-cut slider to act as a phase-reversal switch for the middle pickup.
To beef up the somewhat thin sound of the lipstick pickups, I wired series-parallel switches to two push-pull pots (in lieu of the original pots): one for the bridge and middle pickups, and one for the middle and neck pickups (Photo 17). (Again, SeymourDuncan.com and Mod Garageare great resources for specifics on these operations.) This mod greatly multiplied the guitar’s sonic possibilities. I finished it off with the staple Switchcraft mono jack for peace of mind. Even though the electronic mods on this guitar were a little more involved, I knew it would be worth it in the end.
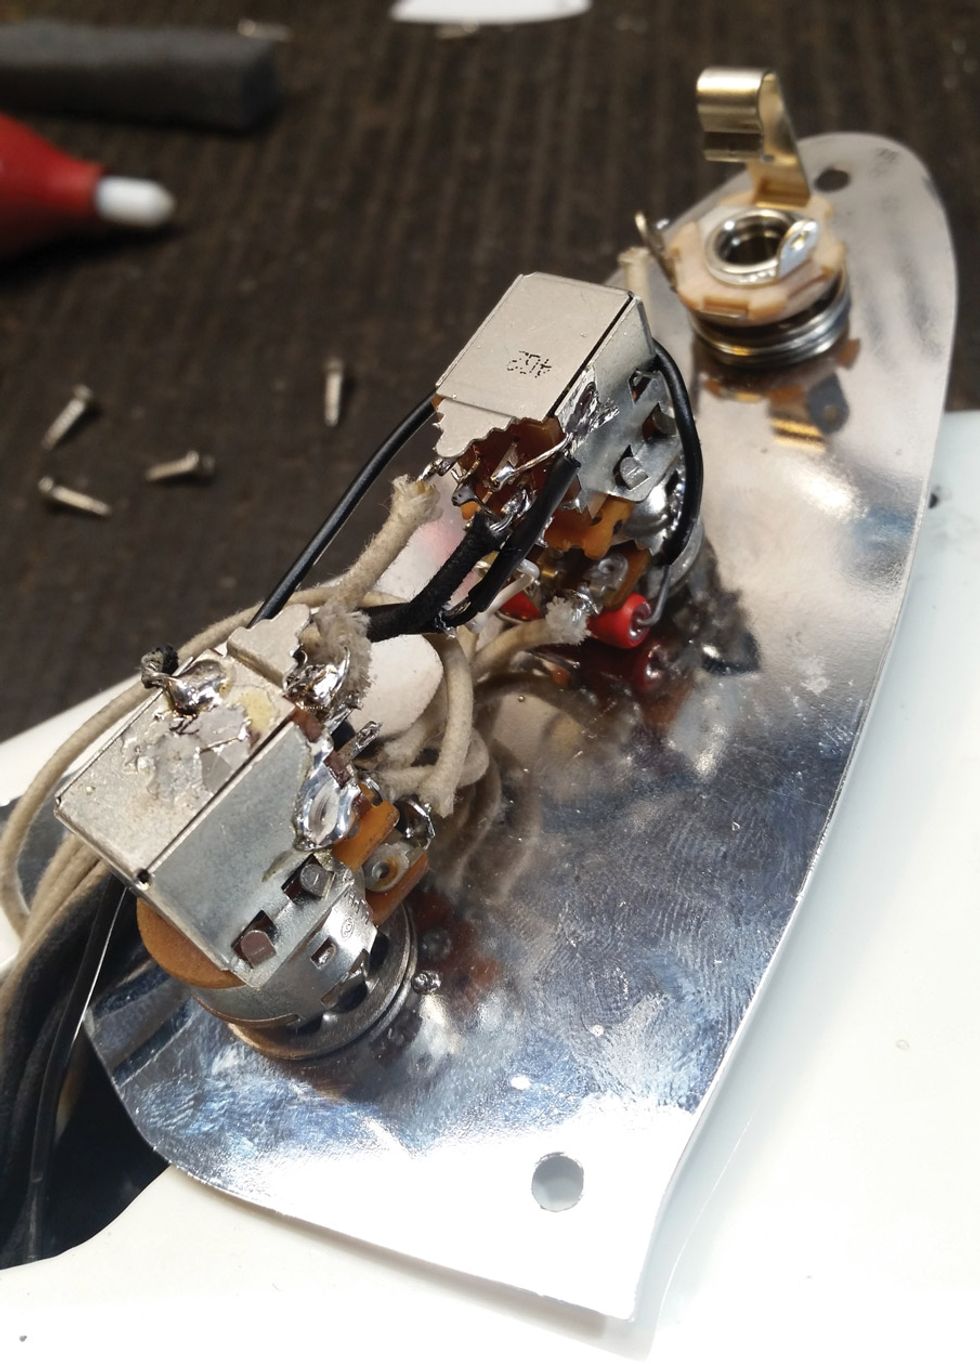
Photo 17 — To broaden the VI’s tonal options even further, I replaced the original volume and tone pots with push-pull units wired up with series-parallel switching.
Okay, let’s move on to hardware. Fender’s traditional “offset”-model bridges (i.e., those on Jaguars, Jazzmasters, and others with similar hardware) are often a sticking point for some players. Some love the classic “rocking” bridge and have no issues with strings popping out of the saddles.
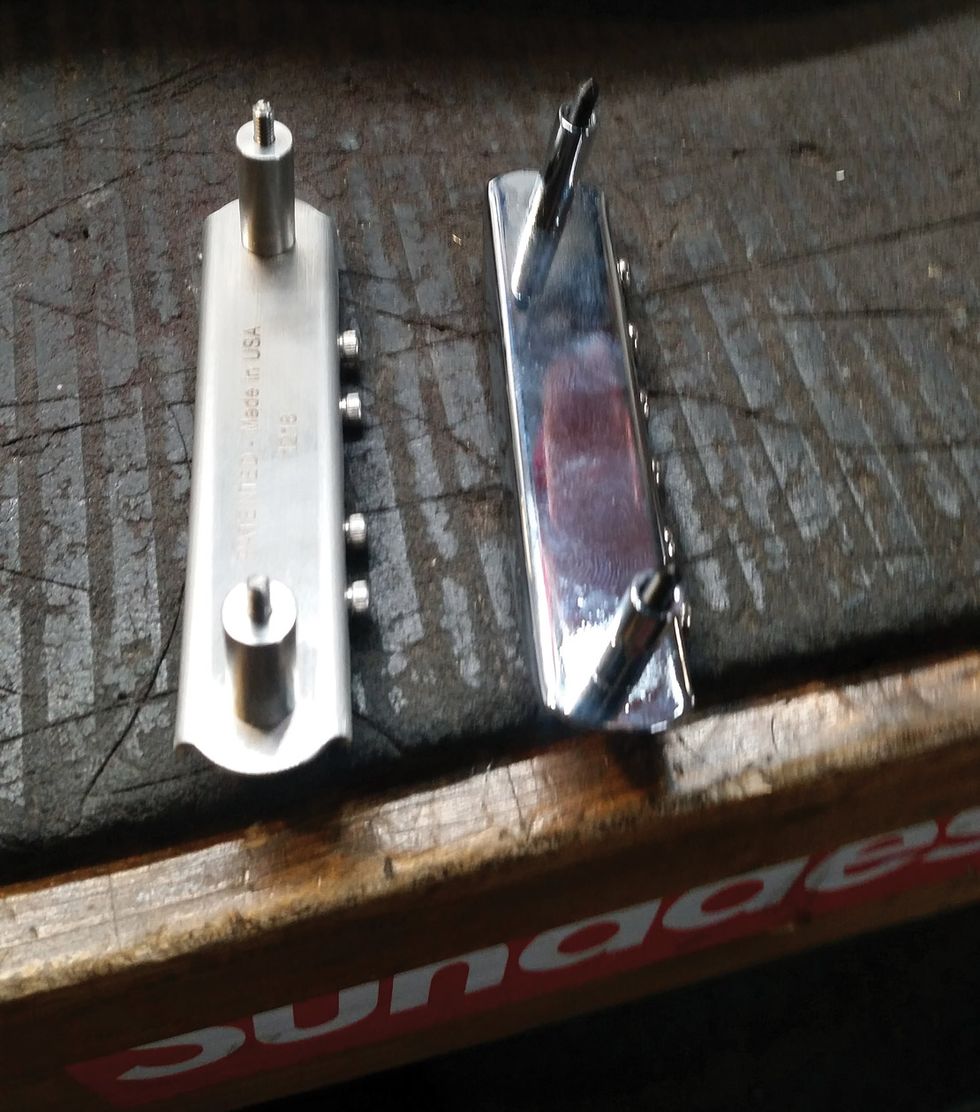
Photo 18 — Among the reasons many players insist on upgrading the stock Fender “offset” bridge (right) to a Mastery (left) are the fact that 1) they are made of thick, high-quality solid brass with chrome plating, and 2) their wider posts eliminate unwanted rocking when installed in the body-mounted thimble receptacles.
Others flat-out insist on an upgrade. Many in the latter crowd consider a Mastery Bridge swap-out the pinnacle of perfection due to the fact that it keeps strings seated in the saddles, and its tight fit keeps intonation stable (Photo 18). This is my favorite upgrade to any offset. With this particular Squier, the standard Mastery M1 drops directly into the existing thimbles on the guitar. Install done. Upgrade achieved.
Post-Mod Thoughts
As mentioned in the intro to this mod, I knew I was in for some solid fretwork as soon as I pulled this guitar out of the box. I've come to expect a few loose “teeth” and a little bit of kick-up past the 12th fret on a lot of guitars in this price range. Once the frets were level, I had no issue getting the intonation perfect with the new Mastery Bridge. Tuning stability while using the vibrato was also noticeably better, as was sustain. The lipstick pickups’ classic, jangly tone was a perfect counterbalance to the low-end frequencies produced by the Bass VI’s long scale and lower tuning. With the addition of the series-parallel and phase switching, it really is incredible how many great tones you can find for all sorts of applications live or in the studio. After all is said and done, I’m truly bummed that this instrument is going back to be given away instead of going into my personal arsenal!
Watch a before-and-after demo of the Squier Vintage Modified Bass VI: