A client wanted her D-12-20 to fret in tune all along the fretboard. Can it be done?
Intonating a flattop’s bridge saddle is tricky, and that’s especially true when it comes to vintage 12-string guitars. Back in the day, it was rare to find an acoustic 12-string with a compensated bridge saddle. In fact for many players, the slightly out-of-tune jangle was a big part of a 12-string’s aural mystique. But times have changed, and as music and recording technology have evolved, most musicians and producers expect a 12-string to play reasonably in tune all along the fretboard.
Intonating a flattop 12-string with a straight bridge saddle involves filing unique break angle and intonation points for each string—an operation that requires skill and patience. Let’s investigate and see exactly what’s involved.
We’ll use a beautiful 1972 Martin D-12-20 as our project guitar. The guitar was in good shape when its owner brought it into the shop, but it didn’t play even remotely in tune and the action was uncomfortably high. Many old 12-strings require a neck reset (an expensive proposition), but I checked the neck angle and it was fine. Fortunately for the guitar’s current owner, the problem was rather simple. Somewhere along the line a previous owner or tech had installed a saddle that was both too high and incorrectly radiused (Photo 1).
My job was twofold: lower the action by reshaping the bridge saddle and then intonate each string. I knew that once I completed these tasks, the D-12-20 would play better than ever and sound more in tune at the higher frets.
Requisite tools. To intonate a 12-string, you need a few specialized luthier tools. These include a string action gauge, radius gauges, and a radius block (the latter must match the fretboard radius). You’ll also need a mechanical pencil, a capo, self-adhesive 80-grit and standard 400-grit sandpaper, and flat, single-cut miniature needle files.
You can estimate where each string should rest on the saddle, but it’s nearly impossible to get it perfect on the first try.
Preliminary check. Before starting this kind of work on a guitar, it’s important to tune to concert pitch and take measurements. These specs provide a baseline to help gauge your progress. You’ll be taking several measurements, so write them down as you go.
First, put a capo on the 1st fret and measure action at the 12th fret with a string action gauge. Take this measurement for both the 1st and 11th strings—the first of the doubled high Es and the low E string. (We’ll assume your 12-string has the standard octave-string configuration, i.e., the octaves in each pair are closer to you than their wound partners. Some electric 12s, notably Rickenbackers, reverse this order.) Measure the distance between the bottom of the string and the top of the 12th fret.
Next measure the relief: With the capo still on the 1st fret, hold the 11th and 12th strings down at the 14th fret and measure the greatest gap between the bottom of the 11th string and the top of the frets. Typically this occurs around the middle of the fretboard, somewhere between the 7th and 9th frets. You can identify this gap by tapping the 11th and 12th strings against the frets while still pressing them down at the 14th fret.
Now remove the capo and check the action at the 1st fret.
Finally, using a strobe tuner, check the intonation for each string. (Naturally, this is tricky on a 12-string because you have to pluck each individual string of the six pairs.) Starting with the 1st string, play the 12th-fret harmonic—make sure it’s in tune—and then fret the same note. If the fretted note is sharp or flat compared to the reference harmonic, write down how many cents it’s off and in which direction. Repeat the process until you’ve documented the intonation at the 12th fret for all 12 strings.
Our 12-string’s preliminary specs. Here’s how the D-12-20 measured up: The action at the 12th fret was 6/64" for the 1st string and 7/64" for the 11th string. Too high to play! The relief was .012"—perfect for my client’s playing style. At the 1st fret, the 1st string was 1/64" and the 11th string was just over 2/64" above the fret. Again, perfect action at the string nut. At this point, I knew my job would simply entail lowering the action at the bridge saddle.
When I checked the intonation with a strobe tuner, and compared the 12th fret harmonics to their corresponding fretted notes, I found most of the fretted notes were from two to six cents sharp, although the G and D pairs were flat by about three cents.
With these measurements in hand, I was ready to get to work.
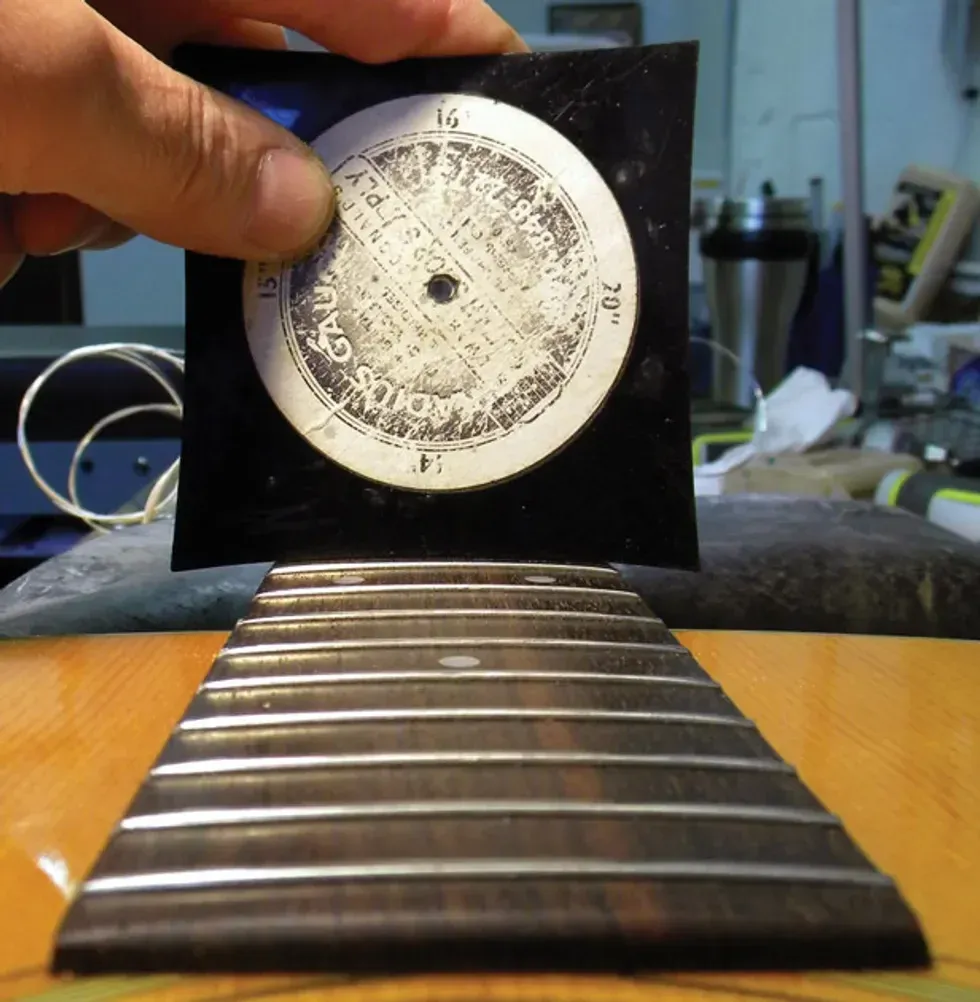
Photo 2
Sanding the bridge saddle. My next step was to check if the saddle’s radius matched the fretboard radius. My radius gauge revealed what I’d suspected—it wasn’t even close. The fretboard had a 14"radius (Photo 2), but the bridge saddle was around 8". This meant the saddle had a much more pronounced arch than the fretboard. I knew if I didn’t reshape the top of the saddle to match the fretboard, the D and G pairs would be radically higher than the other strings.
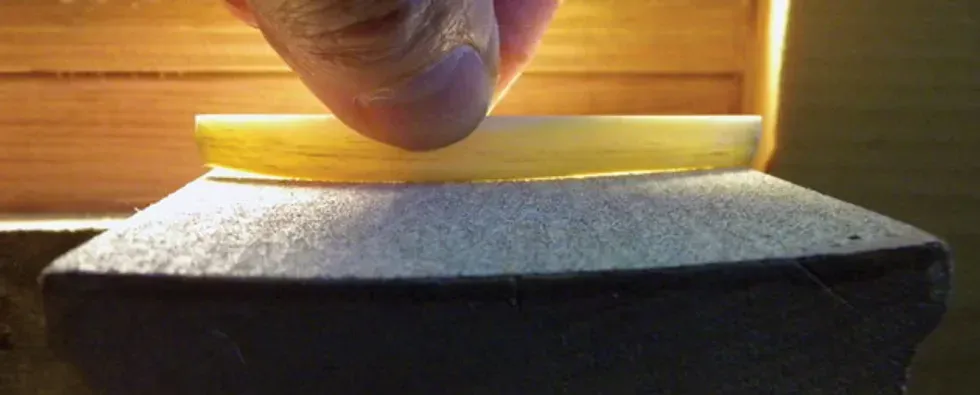
Photo 3
Using a 14" radius block and self-adhesive 80-grit sandpaper, I sanded the top of the saddle until it matched the block’s radius. Here’s the most accurate way to reshape the top of the saddle: Place the radius block in a vise with the radius side up and affix the self-adhesive sandpaper to the block. Now remove the saddle from its bridge slot, turn it upside down, and gently sand its top in the block’s concave area. If you shine light behind the saddle, you’ll be able to see how much material you’re removing from the saddle and make sure its radius matches the block (Photo 3).
Since the action was pretty high on our 12-string, I removed about 1/32" from the top of the saddle at both E string pairs. I removed quite a bit more from the middle of the saddle to flatten out the arch.
Once the saddle is correctly radiused, slip it back into the bridge and grab your mechanical pencil.
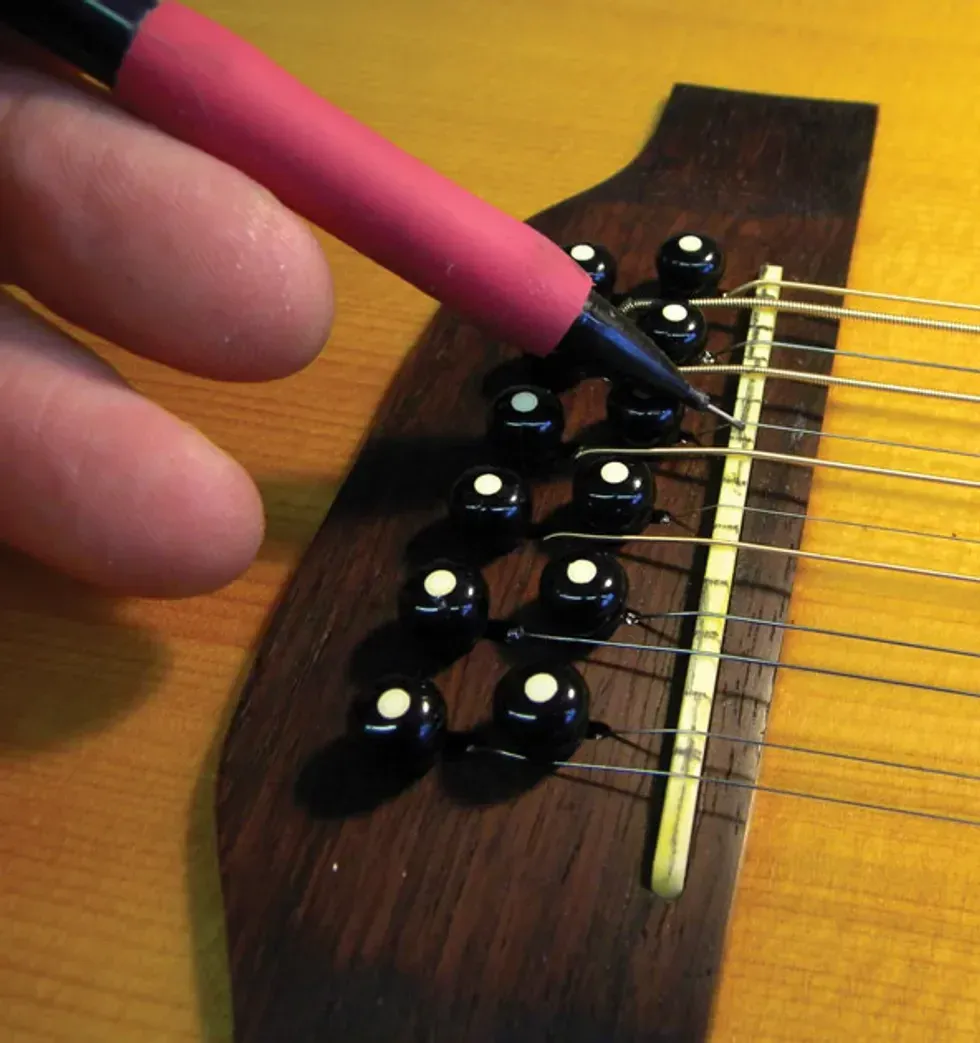
Photo 4
Marking the saddle. Now it’s time to draw guidelines on the saddle crown for both the individual intonation points and the various angles needed to guide the strings as they emerge from the pin holes (Photo 4). But before you start drawing lines, let’s take a moment to discuss where the strings should sit on the top of the saddle. First we’ll deal with the intonation points, then the string angles.
Fair warning: Setting the intonation entails some trial and error. You can estimate where each string should rest on the saddle, but it’s nearly impossible to get it perfect on the first try.
For this task, it’s helpful to mentally divide the 12 strings into three groups:
• The six E, A, D, G, B, and E strings you’d find on a regular flattop. We know the lowest four are wound, and the top two are plain. So far, so good.
• The plain octave strings (E, A, D, G) that pair with the wound E, A, D, and G strings.
• The doubled unison B and high-E strings. Just like their mates, these are plain.
Okay, think about the first group—our standard 6-string. As a general rule, both the low E and B strings intonate best at the rear edge of the saddle (closest to the bridge pins). The G string’s intonation point is typically at the very front of the saddle (closest to the soundhole).
That leaves the high E, D, and A strings to be accounted for. The high E will typically fall between the B (remember, that’s at the rear of the saddle) and the G (at the front of the saddle). The D and A strings usually create a stair-step pattern between the G and low E strings, with the D closer to the G, and A closer to the low E.
The four plain octave strings are a different story. Both the low E’s octave and the G’s octave points will be at the front of the saddle. The octave strings for A and D will be further back toward the bridge pins.
As you’d expect, the unison B and E strings sit at exactly the same point as their siblings.
Now consider how each string travels from the pin hole in the bridge to the top of the saddle—the intonation point. On this Martin, the six primary strings—those that correspond to a standard flattop—are set back toward the rear of the bridge. The six additional strings, the four octaves and two unisons that make a 12-string such a beautiful beast, emerge through the soundboard and bridge right behind the saddle.
On the rear of the saddle, you need to file individual angles (think of them as ramps) that allow each string to reach its intonation point without encountering a sharp edge. Correctly filed angles minimize string breakage and maximize sustain. The angle for the primary strings will be shallower than the six extra strings.
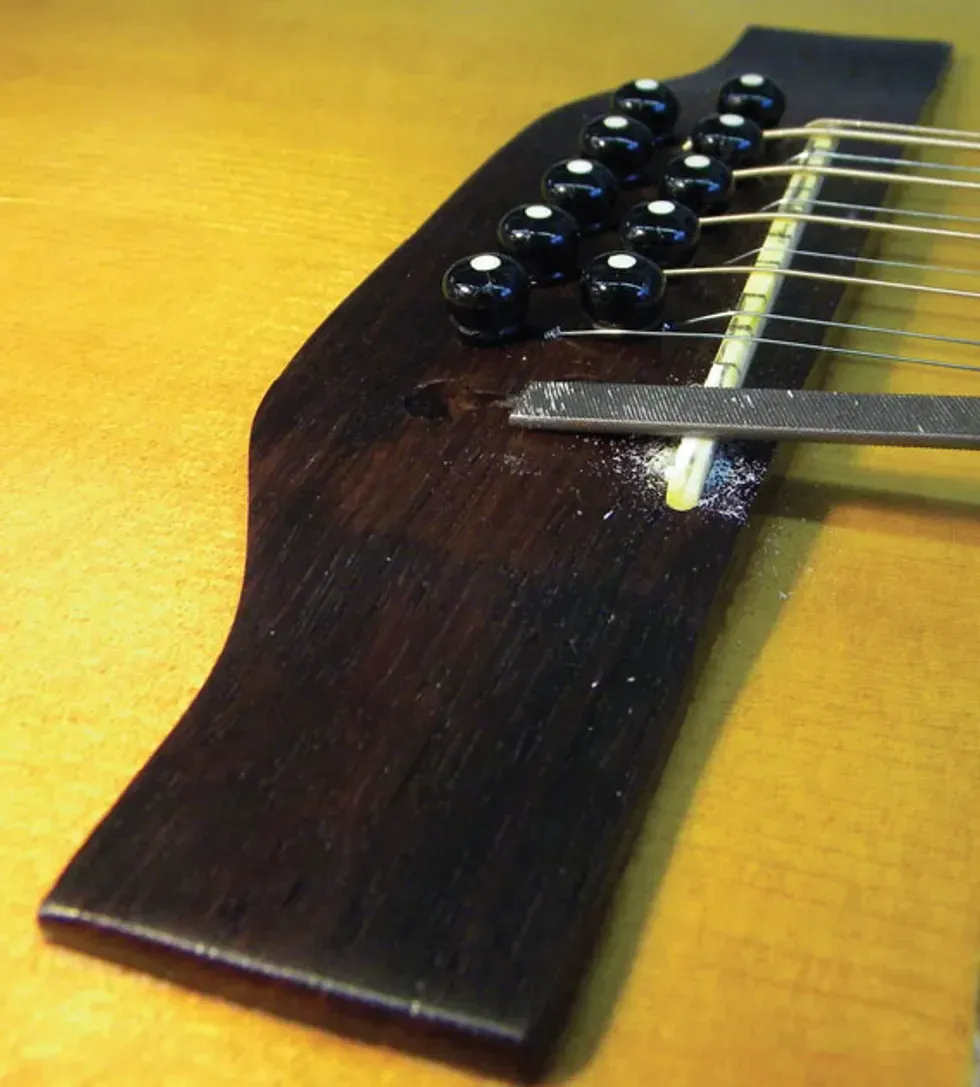
Photo 5
On the rear of the saddle, you need to file individual angles (think of them as ramps) that allow each string to reach its intonation point without encountering a sharp edge. Correctly filed angles minimize string breakage and maximize sustain. The angle for the primary strings will be shallower than the six extra strings.
Filing the saddle. This is where your inner artist gets a chance to shine. Using a miniature flat file, carve each string’s intonation point and rear angle, based on your markings (Photo 5). Go slowly, and to prevent any sitar-like buzzing, be sure each string leaves the saddle from a crisp, defined peak as it heads toward the soundhole.
Checking intonation. As I mentioned earlier, there’s a lot of trial and error involved with intonating a 12-string. Once you’ve done the first pass of filing, put on a fresh set of strings, tune them to pitch, and check the intonation.
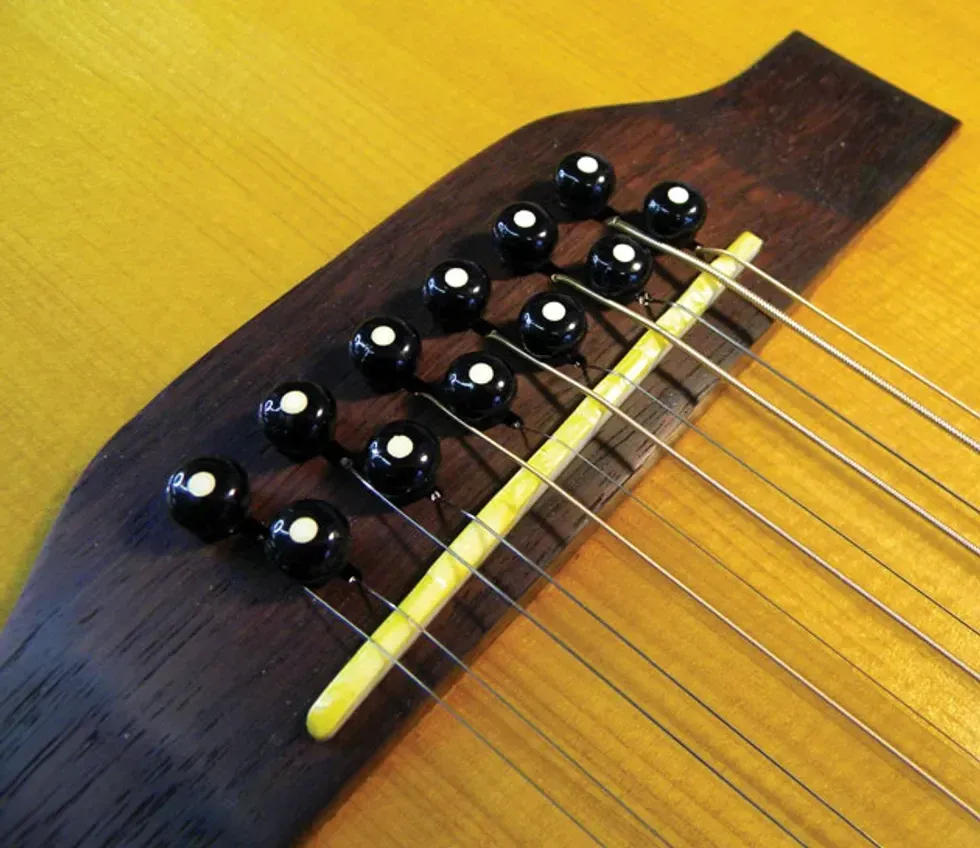
Photo 6
The goal is to have the fretted note at the 12th fret match the corresponding 12-fret harmonic. Use a tuner to keep track of how close the fretted note comes to its reference harmonic. If the string frets sharp, file the intonation point back toward the rear of the saddle. Conversely, if the fretted note is flat, carve the intonation point forward toward the front of the saddle. When you’re done, the saddle should look similar to Photo 6. Don’t be dismayed at how many times you’ll need to slacken and remove the strings, file the saddle, restring, retune, and recheck the intonation.
Wrap it up. When you’ve got the intonation dialed in to your satisfaction, take off the strings one last time, pop out the saddle, and then polish it with 400 grit sandpaper, followed with a polishing cloth. Restring, retune, and you’re good to go.
This process takes a long time to master, but in the end, it’s worth it when your 12-string plays in tune all the way up the neck.
PG contributor Tom Butwin demos seven direct boxes — active and passive — showing off sound samples, features, and real-world advice. Options from Radial, Telefunken, Hosa, Grace Design, and Palmer offer solutions for any input, setting, and budget.
Grace Design m303 Active Truly Isolated Direct Box
The Grace Design m303 is an active, fully isolated DI box, delivering gorgeous audio performance for the stage and studio. Our advanced power supply design provides unbeatable headroom and dynamic range, while the premium Lundahl transformer delivers amazing low-end clarity and high frequency detail. True elegance, built to last.
Rupert Neve Designs RNDI-M Active Transformer Direct Interface
Compact design, giant tone. The RNDI-M brings the stunning tone & clarity of its award-winning counterparts to an even more compact and pedalboard-friendly format, with the exact same custom Rupert Neve Designs transformers and discrete FET input stage as the best-selling RNDI, RNDI-S and RNDI-8.
Telefunken TDA-1 1-channel Active Instrument Direct Box
The TDA-1 phantom powered direct box uses high-quality components and classic circuitry for rich, natural sound. With discrete Class-A FET, a European-made transformer, and a rugged metal enclosure, it delivers low distortion and a broad frequency response. Assembled and tested in Connecticut, USA, for reliable performance and superior sound.
Hosa SideKick Active Direct Box
The Hosa SideKick DIB-445 Active DI delivers clear, strong signals for live and studio use. Ideal for guitars, basses, and keyboards, it minimizes interference over long runs. Features include a pad switch, ground lift, and polarity flip. With a flat frequency response and low noise, it ensures pristine audio.
Radial JDI Jensen-equipped 1-channel Passive Instrument Direct Box
The Radial JDI preserves your instrument’s natural tone with absolute clarity and zero distortion. Its Jensen transformer delivers warm, vintage sound, while its passive design eliminates hum and buzz. With a ruler-flat response (10Hz–40kHz) and no phase shift, the JDI ensures pristine sound in any setup.
Radial J48 1-channel Active 48v Direct Box
The Radial J48 delivers exceptional clarity and dynamic range, making it the go-to active DI for professionals. Its 48V phantom-powered design ensures clean, powerful signal handling without distortion. With high headroom, low noise, and innovative power optimization, the J48 captures your instrument’s true tone—perfect for studio and stage.
Palmer River Series - Ilm
The Palmer ilm, an upgraded version of the legendary Palmer The Junction, delivers studio-quality, consistent guitar tones anywhere. This passive DI box features three analog speaker simulations, ensuring authentic sound reproduction. Its advanced filter switching mimics real guitar speaker behavior, making it perfect for stage, home, or studio recording sessions.
Learn more from these brands!
Delicious, dynamic fuzz tones that touch on classic themes without aping them. Excellent quality. Super-cool and useful octave effect.
Can’t mix and match gain modes.
$349
Great Eastern FX Co. Focus Fuzz Deluxe
Adding octave, drive, and boost functions to an extraordinary fuzz yields a sum greater than its already extraordinary parts.
One should never feel petty for being a musical-instrument aesthete. You can make great music with ugly stuff, but you’re more likely to get in the mood for creation when your tools look cool. Great Eastern FX’s Focus Fuzz Deluxe, an evolution of their très élégantFocus Fuzz, is the sort of kit you might conspicuously keep around a studio space just because it looks classy and at home among design treasures likeRoland Space Echoes, Teletronix LA-2As, andblonde Fender piggyback amps. But beneath the FFD’s warmly glowing Hammerite enclosure dwells a multifaceted fuzz and drive that is, at turns, beastly, composed, and unique. Pretty, it turns out, is merely a bonus.
Forks in the Road
Though the Cambridge, U.K.-built FFD outwardly projects luxuriousness, it derives its “deluxe” status from the addition of boost, overdrive, and octave functions that extend an already complex sound palette. Unfortunately, a significant part of that fuzzy heart is a Soviet-era germanium transistor that is tricky to source and limited the original Focus Fuzz production to just 250 units. For now, the Focus Fuzz Deluxe will remain a rare bird. Great Eastern founder David Greaves estimates that he has enough for 400 FFDs this time out. Hopefully, the same dogged approach to transistor sourcing that yielded this batch will lead to a second release of this gem, and on his behalf we issue this plea: “Transistor hoarders, yield your troves to David Greaves!”
The good news is that the rare components did not go to waste on compromised craft. The FFD’s circuit is executed with precision on through-hole board, with the sizable Soviet transistor in question hovering conspicuously above the works like a cross between a derby hat and B-movie flying saucer. If the guts of the FFD fail to allay doubts that you’re getting what you paid for, the lovingly designed enclosure and robust pots and switches—not to mention the pedal’s considerable heft—should take care of whatever reticence remains.
Hydra in Flight
Just as in the original Focus Fuzz, the fuzz section in the Deluxe deftly walks an ideal path between a germanium Fuzz Face’s weight and presence, a Tone Bender’s lacerating ferocity, and the focus of a Dallas Rangemaster. You don’t have to strain to hear that distillate of elements. But even if you can’t easily imagine that combination, what you will hear is a fuzz that brims with attitude without drowning in saturation. There’s lots of dynamic headroom, you’ll feel the touch responsiveness, and you’ll sense the extra air that makes way for individual string detail and chord overtones. It shines with many different types of guitars and amps, too. I was very surprised at the way it rounded off the sharp edges made by a Telecaster bridge pickup and AC15-style combo while adding mass and spunk. The same amp with a Gibson SG coaxed out the Tony Iommi-meets-Rangemaster side of the fuzz. In any combination, the fuzz control itself, which boosts gain while reducing bias voltage (both in very tasteful measure) enhances the vocabulary of the guitar/amp pairing. That range of color is made greater still by the fuzz’s sensitivity to guitar volume and tone attenuation and touch dynamics. Lively clean tones exist in many shades depending on your guitar volume, as do rich low-gain overdrive sounds.
The drive section is similarly dynamic, and also quite unique thanks to the always versatile focus control, which adds slight amounts of gain as well as high-mid presence. At advanced focus levels, the drive takes on a fuzzy edge with hints of Fender tweed breakup and more Black Sabbath/Rangemaster snarl. It’s delicious stuff with Fender single-coils and PAFs, and, just as with the fuzz, it’s easily rendered thick and clean with a reduction in guitar volume or picking intensity. The boost, meanwhile, often feels just as lively and responsive—just less filthy—lending sparkle and mass to otherwise thin and timid combo amp sounds.
Among this wealth of treats, the octave function is a star. It works with the fuzz, drive, or boost. But unlike a lot of octave-up effects, you needn’t approach it with caution. Though it adds plenty of the buzzing, fractured, and ringing overtones that make octave effects so wild and distinct, it doesn’t strip mine low end from the signal. The extra balance makes it feel more musical under the fingers and even makes many chords sound full and detailed—a trick few octave effects can manage. With the fuzz, the results are concise, burly, and articulate single notes that lend themselves to lyrical, melodic leads and power chords. In drive-plus-octave mode, there are many hues of exploding practice-amp trash to explore. The boost and the octave may be my favorite little gem among the FFD’s many jewels, though. Adding the octave to boosted signals with a generous heap of focus input yields funky, eccentric electric-sitar tones that pack a punch and are charged with character in their fleeting, flowering state.
The Verdict
It’s hard to imagine adding extra footswitches to the Focus Fuzz Deluxe without sacrificing its basic elegance and proportions, and without elevating its already considerable price. Certainly, there would be real utility in the ability to mix and match all three excellent gain modes. On the other hand, the output level differences between fuzz, drive, and boost are pretty uniform, meaning quick switches on the fly will shift texture and attitude dramatically without delivering an ear-frying 30 dB boost. And though it’s hard not be tantalized by sounds that might have been, from combining the fuzz and/or boost and drive circuits, the myriad tones that can be sourced by blending any one of them with the superbly executed octave effect and the varied, rangeful focus and output controls will keep any curious tone spelunker busy for ages. For most of them, I would venture, real treasure awaits.
Why is Tommy’s take on “Day Tripper” so hard? And what song would Adam Miller never play with him? Plus, we get Adam’s list of favorite Tommy Emmanuel records.
We call guitarist Adam Miller in the middle of the night in Newcastle, Australia, to find out what it’s like to play with Certified Guitar Player, Tommy Emmanuel. Miller tells us just how famous Tommy is in Australia, and what it was like hearing him play from a formative age. Eventually, Adam got to open for Emmanuel, and they’ve since shared the stage, so we get the firsthand scoop: Why is Tommy’s take on “Day Tripper” so hard? And what song would Miller never play with him? Plus, we get Adam’s list of favorite Tommy Emmanuel records.
Adam’s newly released trio album, Timing, is out now.
Plus, we’re talking about new recordings from Billy Strings and Bryan Sutton, as well as Brooklyn Mediterranean surf party band Habbina Habbina.
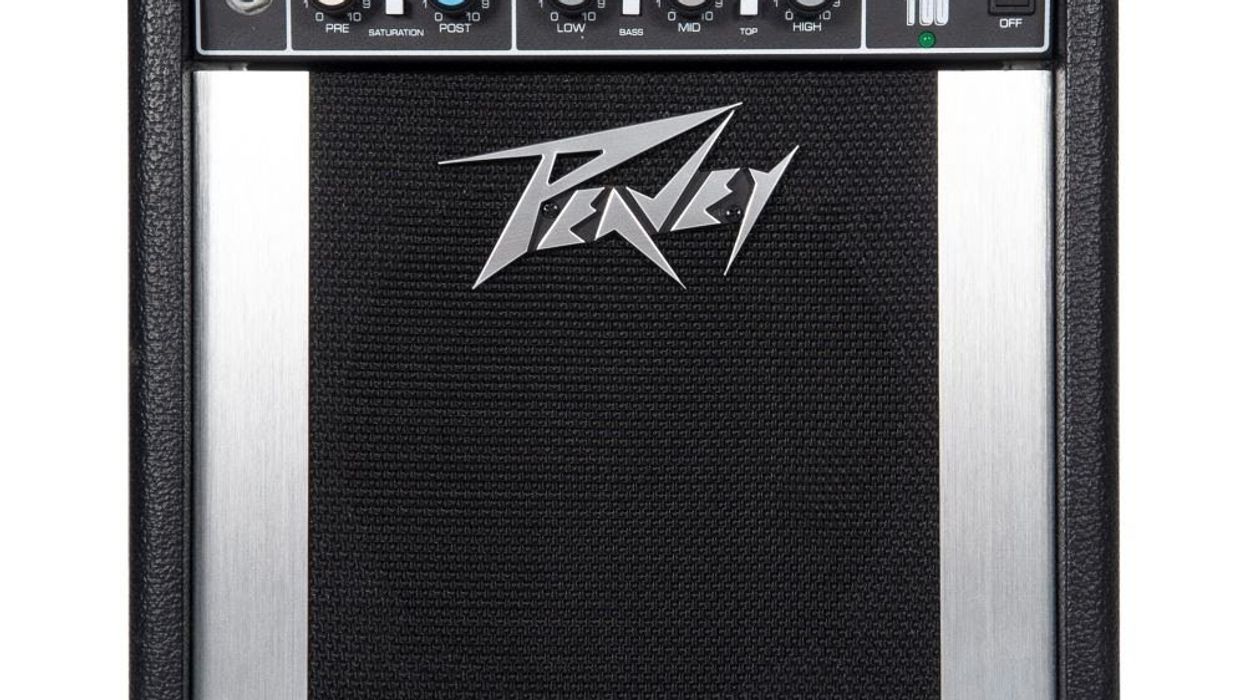
Peavey Electronics announces the Decade preamp pedal. The internet and social media have been abounding with chatter about the current recording secret of the modern-day guitar gods – the Peavey Decade practice amp.
The discontinued amp has reached unimaginable demands on the secondary markets. So much so that small pedal builders have made attempts to capitalize and duplicate the proprietary designs themselves. Tone chasers can now rejoice as the Decade preamp pedal now brings those highly sought after tones back to market in a small, compact footprint.
Guitar players will find a single input, single output preamp pedal straight forward and easy to navigate. Faithful to the original Decade circuitry (circa 1980), the control layout will be identical to the original amplifier. The GAIN section features PRE and POST controls. PREGAIN sets the gain of the input circuitry. POST GAIN sets the gain before the out. Built off the legendary Peavey Saturation patent, the new, switchable SATURATION allows tube-like sustain and overload at all volume levels, suitable for bedrooms, rehearsals, stadiums and apparently, those very expensive recording studios. The traditional BASS, MID, and HIGH equalization controls provide the tone shaping enhancements any guitar should require. Upgraded pedal features include an internal 24v supply from the standard 9v supply/battery and worldwide EMC/FCC compliance approval.
To learn more, visit online at www.Peavey.com
Street $199.99 USD