
There are three major issues to consider when thinking about powering your pedalboard: voltage, current, and isolation.
With so many cool and interesting pedals readily available to the modern musician, you will inevitably come to the point where you need to build a pedalboard (especially if youāre a gear junkie like me). Youāll need to decide which kind of board to buy or build, which pedals will actually make it on your board, the optimum order of the effects, cable lengths, and whether or not you will buy pre-made cabling or wire your own. But probably the single most critical decision youāll make is how to power all of the pedals on your new board. There are three major issues to consider when thinking about powering your pedalboard: voltage, current, and isolation.
Luckily for us, the early popularity of Boss pedals helped to establish an unofficial standard when it comes to the voltage level and DC (direct current) jack used in powering pedals. The simple fact that most pedals could be powered by a 9V battery was the logical starting point that led to the inclusion of 9V DC power inputs. These DC inputs were useful when players didnāt want to hassle with batteries, and instead wanted to be able to power their pedals from standard AC wall outlets. Boss chose to use a 2.1mm DC power input jack with a center negative polarity and because of this, the majority of pedals on the market today also use this āstandard.ā Take a look at the labeling next to the input on your pedals and chances are it will say 9V DC, center negative (an icon symbolizing a jack with a negative sign pointing to the center symbolizes this).
Of course, not all pedals are powered with 9V, so make sure to take note if there is one in your collection with special voltage requirements. Some devices out there even use 9V AC (alternating current) power. Be very careful not to accidentally plug an AC power source into a pedal designed to be powered with DC. Chances are that if a pedal needs 18V or 24V DC, the manufacturer will have supplied a special power adapter anyway. Be sure not to hook your pedal up to a higher voltage source than it calls forāno one likes ending their pedalboard project with a puff of smoke!
Current is the next thing you will need to think about. The current that a given effect consumes is not likely listed on the pedal itself. For that you will need to look in the manual. Assuming theyāre analog devices, a distortion, overdrive, fuzz, compressor, or wah will in almost all cases have a very low current requirement (less than 20 mA or so). This is because these classic analog effects use only a handful of transistors and op-amps with low power requirements.
A digital effect, on the other hand, will contain a microprocessor or DSP, probably some memory, logic chips, A/D and D/A converters, as well as supporting analog components. In this case, you will literally be powering millions of miniaturized transistors inside of these digital chips, so the pedal will be a bit hungrier for power. Digital and DSP-based pedals typically consume more than 150 or 200 mA, and modern power supply manufacturers have taken this into consideration.
The thing to remember about current is that there is no danger in having more than you need available. But if your power supply canāt keep up with demand, your pedal may not even turn on. Worse yet, it could shut down in the middle of a gig. Think of current like horsepower in a car. If you have a 450-horsepower muscle car, you are not using all of that power when backing out of your garage, but itās there waiting for you when you step on the gas.
Voltage and current are critical in getting all of your pedals to work properly, but thereās one more thing that is crucial in making a low-noise rig: isolated power. Whenever you string together a number of different effects, their electronics can interact in both good and very bad ways.
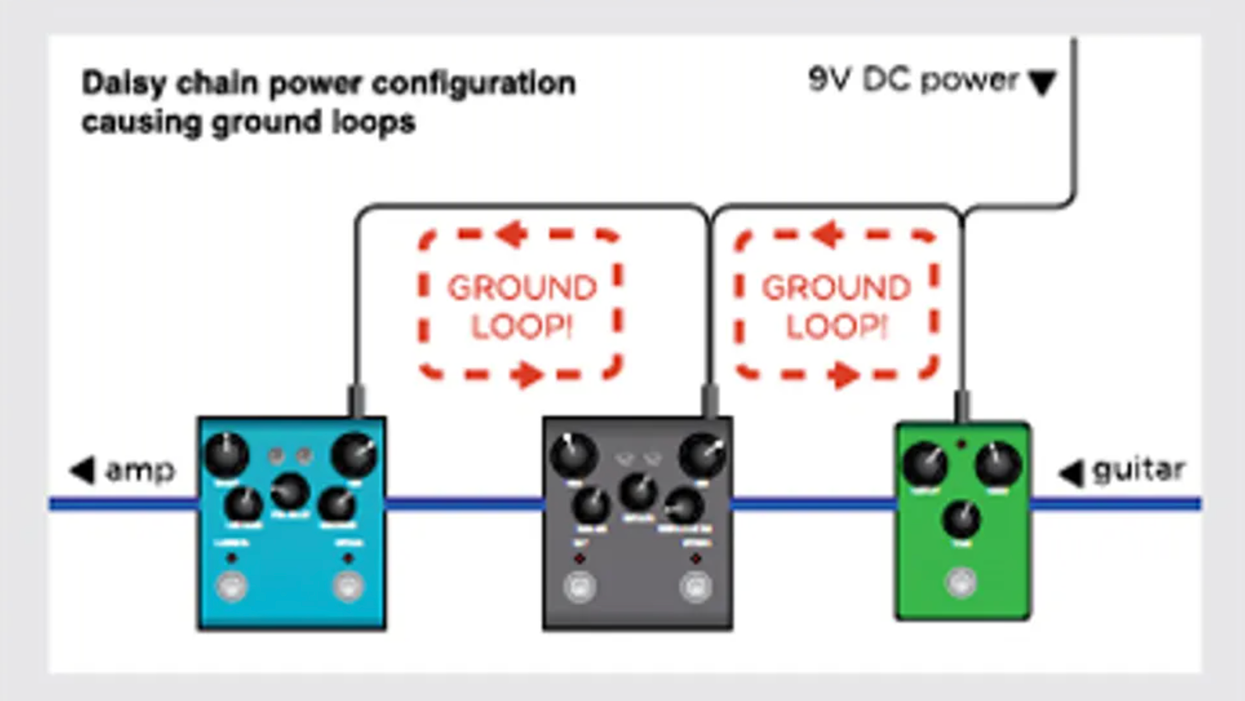
The most common noise problem I regularly encounter when helping players troubleshoot their pedalboard is ground loops. Ground loops are commonly caused when using a daisy-chain power cable to power multiple pedals. This creates a ground loop between every pedal in the daisy chain!
Why should we avoid ground loops? One reason is that they allow stray magnetic fields to introduce hum into your signal path. Another is that noise currents are able to flow into your audio instead of cleanly back into the power supply. If the only type of effect you use is distortion, you may not have heard the ill effects. But, if you have modulation and delay pedals, the likelihood of ground loops wreaking havoc on your signal is high.
To solve this, power supply manufacturers have created multiple-output isolated power supplies. The Voodoo Lab Iso-5 is an example of a cost-effective, multiple-output isolated power supply. An isolated supply works by using a transformer (or multiple transformers) to keep every power outlet completely electrically isolated. This prevents your guitar signal ground from connecting to multiple pedals at the power supply.
Ideally, you want your ground and guitar signal to have a single path to your amp. Otherwise, hum and other nastiness will creep its way into your tone. Multiple-output supplies, when designed correctly, also supply regulated power that is cleaner than a standard wall wart. That said, if you have a bunch of wall warts lying around anyway, having them all connected to a power strip under your board is not a bad solution at all. This will also provide isolation if each wall wart is only plugged into a single pedal.
This may be a lot to think about, but if you do a bit of research up front, youāll save a lot of frustration down the line. Watch those voltage levels, make sure you have enough current available, and use an isolated power source for each effect. Happy shredding!
[Updated 12/6/21]
- DIY Pedalboard Build - Premier Guitar āŗ
- Got Noise Issues? It Could Be Your Pedalboard's Power Supply ... āŗ
- Tools for the Task: Pedalboard Power - Premier Guitar āŗ
- DIY: How to Make a 9V Power Supply Out of a Drill Battery - Premier Guitar | The best guitar and bass reviews, videos, and interviews on the web. āŗ
- DIY: How to Make a 9V Power Supply Out of a Drill Battery - Premier Guitar āŗ
This wonky Zim-Gar was one of many guitars sold by importer Gar-Zim Musical Instruments, operated by Larry Zimmerman and his wife.
The 1960s were strange days indeed for import guitars, like this cleaver-friendly Zim-Gar electric.
Recently I started sharing my work office with a true gem of a guy ⦠one of the nicest fellas Iāve ever come across. If youāve been following my column here, you might remember my other work mate Dylan, who is always telling me about new, fad-type things (like hot Honey guitars) and trying to convince me to use AI more. (What can I say, heās a millennial.) But Steve, on the other hand, is about 10 years my senior and is a native New YorkerāBrooklyn actually, from the Canarsie neighborhood. Steve is a retired teacher and spent many years teaching in the Brownsville area of Brooklyn, and man, he has some amazing stories.
Mostly we talk about music and sports (heās exiled here among us Philadelphia sports fans) and heās just endlessly interesting to me. He has a huge appetite and can eat a whole pizza. When he talks, he sounds like one of the Ramones and he still has an apartment in Rockaway Beach. We both love Seinfeld and, like George Costanza, Steve knows where all the great bathrooms are across New York City. Since heās been added to my circle (and is such a mensch), I decided I should work him into a column.
So hereās the connection: Back in the day there were many American importers, dealers, and wholesalers. A lot of them were based in New York, Chicago, and Los Angeles, but I only know of one guitar importer located in Brooklyn: Gar-Zim Musical Instruments. The company was run by Larry Zimmerman and his wife, and the couple had some success importing and selling Japanese guitars and drums. I used to see early Teisco imports with the Zim-Gar badge, which was the brand name of Gar-Zim. Iāve also seen Kawai guitars with the Zim-Gar label, but the Zimmermanās seemed to sell cheaper and cheaper gear as the ā60s wore on, including the piece you see here.
āThis build reminds me of the cutting boards I used to make in wood shop back in my high school days.ā
The model name and factory origin of this guitar is a mystery to me, but this build reminds me of the cutting boards I used to make in wood shop back in my high school days. The guitar is just flat across the top and back, with absolutely no contouring or shaping. Its offset body is plywood with a thin veneer on the top and back. From a distance this guitar actually looks kind of nice, but up close you can see a rather crude and clunky instrument that offers little flexibility and playability. The non-adjustable bridge is off center, as is the tremolo. It was really hard to get this guitar playing well, but in the end it was worth it, because the pickups were the saving grace. Another example of gold-foils, these units sound strong and raw. The electronics consist of an on/off switch for each pickup and a volume and tone knob. The tuners are okay, and the headstock design is reminiscent of the Kay ādragon snoutā shape of the mid to late ā60s, which is where I would place the birthdate of this one, probably circa 1966. Everything is just so goofy about this buildāeven the upper strap button is located on the back of the neck. It reminds me of that era when simple wood factories that were making furniture were tasked with building electric guitars, and they simply didnāt know what they were doing. So, you get oddities like this one.
Gar-Zim continued to sell guitars and other musical instruments through the 1970s and possibly into the ā80s. I once even saw a guitar with the label Lim-Gar, which is totally puzzling. I think there shouldāve been a Stee-Gar designation for my new buddy Steve-o! Yes, good readers, with guitars and me, there are always just a few degrees of separation.
Dive into the ART Tube MP/C with PG contributor Tom Butwin. Experience how this classic tube-driven preamp and compressor can add warmth and clarity to your sound. From studio recordings to re-amping and live stage applications, this time-tested design packs a ton of features for an affordable price.
Art Tube Mp Project Series Tube Microphone/Instrument Preamp
Designed in Rochester NY and originally released in 1995, the Tube MP is celebrating its 30th anniversary in 2025.
The Tube MP/C is the most fully-featured member of the Tube MP family, designed for recording guitarists and bassists. It is a tube mic preamp and instrument DI with advanced features including an optical compressor/limiter and switchable line/instrument output levels for use as a re-amping device.
The Oceans Abyss expands on Electro-Harmonixās highly acclaimed reverb technology to deliver a truly immersive effects workstation. The pedal is centered around dual reverb engines that are independently programmable with full-stereo algorithms including Hall, Spring, Shimmer and more. Place these reverbs into a customizable signal path with additional FX blocks like Delay, Chorus, Tremolo, or Bit Crusher for a completely unique soundscape building experience.
Electro-Harmonix has paved the way for powerful, accessible reverbs since the release of the original Holy Grail and now weāve pushed the envelope deeper with the fully-equipped Oceans Abyss. Featuring a customizable signal path with up to 8 effects blocks, the Oceans Abyss can be configured as individual reverb, modulation, EQ, delay, bit crusher, saturation or volume effects, or as countless combinations for incredibly creative effect shaping. From a simple Spring reverb to a lush stereo field featuring stereo hall and shimmer reverbs, chorus, delay, overdrive, and tremolo, you can go from surf to shoegaze instantly, without breaking a sweat.
Deep parameter editing is accessible via the high-visibility OLED display with multiple graphical views and easy-to-read designs. Expression/CV control over nearly every parameter gives artful control of your effects and dynamics. Fully-stereo I/O plus an FX Loop allows for use with any instrument, recording set up, or live rig. 128 programmable presets via onboard footswitching or MIDI ensure perfect recall in all performance situations. MIDI IN/OUT ports with MIDI IN support of PC, CC, and Tempo Clock expand the already immense talents of the Oceans Abyss. Connect with UBS-C to Windows or Mac for effects editing, preset management, and more with the free EHXport⢠app (coming soon).
- Two Stereo Reverbs available at once, each fully pannable in the stereo field
- 10 reverb types to choose from: Room, Hall, Spring, Plate, Reverse, Dynamic, Auto-Infinite, Shimmer, Polyphonic, Resonant
- Additional FX blocks: Delay (Digital, Analog and Tape emulations), Tremolo, Chorus, Flanger, Phaser, Graphic EQ, Saturation, Bit Crusher, External FX Loop, Volume
- Create custom signal path routing with up to 8 effects blocks. Two blocks may be re-verb, the rest may be any of the additional FX blocks.
- Infinite reverb sustain with the press of a footswitch
- Stereo Audio I/O
- Stereo FX Loop routing on TRS Jacks
- Dual action footswitches allow for momentary or latching use
- Easily enable or disable tails
- 128 fully customizable presets
- All controls can be saved to presets
- Dive deep into global and preset settings to set up Oceans Abyss for your specific needs
- Illuminated slide pots and buttons
- High-visibility OLED graphical display
- Multiple graphical views: Signal Path, Performance, Settings, Physical, Explorer
- Easy-to-navigate menu system
- Ergonomic NavCoder knob allows rotary and directional navigation through menus
- EXPRESSION / CV input to control nearly any parameter in any FX block
- Footswitch input allows for adding up to three external footswitches, each assigna-ble to a number of functions
- MIDI In and Out. MIDI IN supports PC, CC (over nearly every available parameter), and Tempo Clock
- USB-C port to connect to Windows or Mac and interface with EHXport⢠app (coming soon)
- 96kHz / 24-bit sample rate conversion
- Supplied with 9.6VDC / 500mA power supply
Our columnistās silver-panel Fender Bandmaster.
How this longstanding, classic tube amp design evolved from its introduction in 1953.
I have a silver-panel Bandmaster Reverb that I donāt think Iāve talked about enough in this column. Itās one of the most versatile and flexible amps I own, so I use it for everything. Itās portable, has tube-driven reverb and tremolo, and has a full set of EQ knobs including the critical bright switch, which we discussed the importance of earlier this year (āHow to āTrebleshootā a Vintage Fender Amp,ā March 2025). The amp is not only pedal-friendly; the flexible 4-ohm output impedance will handle almost all speaker configurations and sound any way youād like. Letās take a deeper look at the Fender Bandmaster amp and walk through its development through the years.
The first Bandmaster was introduced in 1953 as a wide-panel tweed amp with Fenderās 5C7 circuit. This rare combo was loaded with a single 15" Jensen P15N and powered by dual 6L6GC tubes in push-pull configuration to produce a modest 25 watts. The 6L6GCs were cathode biased and along with the 5U4GB rectifier tube contributed to a forgiving sag, early breakup, and a midrange-y voice.
Fender made several changes when they launched that ampās successor in 1955, the more widely known 5E7 narrow-panel Bandmaster, a well-proven amp that has come back as a reissue model. It was still a dual-channel ampāinstrument and microphoneābut the newer 5E7 model had a fixed bias and a negative feedback loop, providing a louder, firmer, and cleaner tone. Most importantly, the single 15" speaker was replaced by three 10" speakers, making it very similar to the narrow-panel tweed Bassman, the granddaddy of all Marshall amps. This Bandmaster had three speakers instead of the Bassmanās four, and it delivered 25ā30 watts instead of 40. It offered early breakup with a midrange-y, big and full tone.
For those not acquainted with tweed amps, the volume and EQ knobs behave differently than on silver- and black-panel Fender amps. The volume pot can act like a distortion control, while the EQ knobs control the volume, and many players Iāve talked to have not really unlocked this secret. This works because, in these circuits, the volume pot sits right before the preamp tube, which allows it to push the tube into full distortion. Since the EQ pots are located right after and are capable of reducing the volume, youāre able to distort the preamp at low volume settings.
āThings became more standardized in 1964 with the arrival of the black-panel AB763 Bandmaster, an amp I have worked on a lot and appreciate for its robustness, simplicity, and versatility.ā
In 1960, a short-lived and rare Bandmaster dressed in brown tolex and a black faceplate appeared with the 5G7 circuit. From here on, all Bandmasters had the modern top-mounted chassis. With this circuit, the Bandmaster started to both look and sound more like a black-panel amp. It kept the 3x10" speakers but got a diode rectifier and bigger transformers resulting in a 45-watt output. Tremolo was introduced for the first time, and both channels were now intended for guitar.
The following year, a blonde 6G7 Bandmaster followed as a smaller amp head paired with a 1x12 extension cabinet. It had the timeless early blonde looks with cream tolex, brown faceplate, oxblood grill cloth, large Fender logo, and white knobs. But halfway into the blonde era, towards 1964, things turned strange and rather confusing. There were suddenly two 12" speakers, black knobs, a wheat-colored grill cloth, a more slim black-panel-style Fender logo, a black faceplate, and all in various combinations close to the transition into ā64.
Things became more standardized in 1964 with the arrival of the black-panel AB763 Bandmaster, an amp I have worked on a lot and appreciate for its robustness, simplicity, and versatility. It offers a pure, clean, scooped black-panel tone thatās somewhere between a Vibrolux Reverb and Pro Reverb, which share the medium-sized 125A6A output transformer and dual 6L6GC tubes. With its medium/high power and flexible 4-ohm output impedance, it can drive all kinds of speaker cabinetsāas long as you stay between 2 and 8 ohms, you are safe.
For a short time in 1967ā68, there was a transitional Bandmaster with aluminum trim and black-panel innards before the all-new silver-panel Bandmaster Reverb replaced it in 1968. The small-head cabinet had grown in size and, unfortunately, weight to accommodate the reverb tank. The amp got a 5U4GB rectifier tube along with a few general silver-panel changes to the circuit. Several silver-panel models existed with minor differences until a 70-watt beast version came along in 1977 with master volume.
To my own 1968 Bandmaster Reverb, I have done a few adjustments. First, I made a custom baffle to hold two 8" speakers. I installed a pair of WGS G8C speakers that fit perfectly on the baffle board without colliding with the reverb tank or transformers. Sometimes, I use only one of the 8" speakers for bedroom volume levels. Second, I reversed the bias circuitry to standard AB763 specs, making it easier to adjust bias correctly on both power tubes. If you are into sparkling clean and funky Strat sounds, you would love this little 2x8" combo.