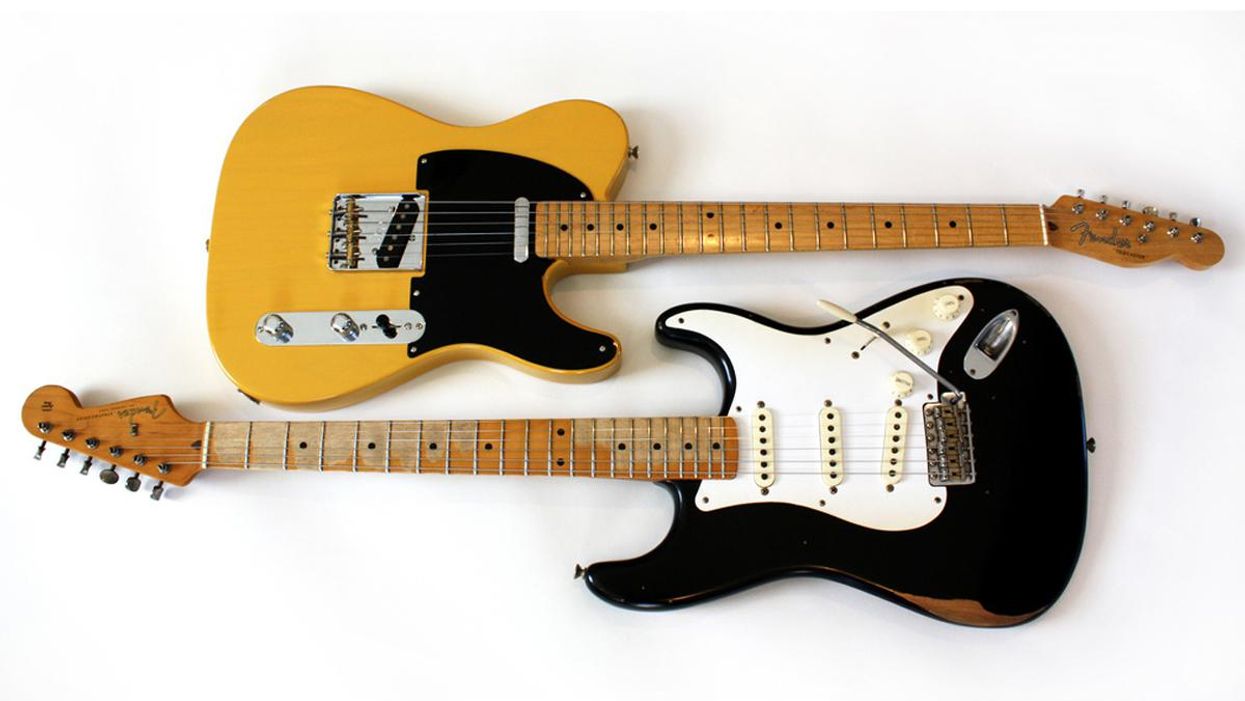
Adjusting pickup height sounds simple, but pickups that aren’t adjusted properly can cause problems.
Guitars with two or three pickups offer lots of sonic variety, but they also introduce a particular problem that single-pickup instruments—such as Fender Esquires and some Les Paul Juniors—don't have. When you switch pickups on a multi-pickup guitar, you can experience volume differences between one position and another. This can be rather annoying when you're in the studio or playing a gig. Just as frustrating is when your treble strings sound weak, but the bass strings are ridiculously loud. In both cases, the fix can be as simple as adjusting your pickups.
Guitarists often overlook this tweak, either after a setup or replacing pickups. Adjusting pickup height sounds simple, but pickups that aren't adjusted properly can cause problems, which I'll describe in detail below. Fortunately, all these problems are correctable.
To show you how to adjust pickups yourself, we'll look at two guitars—a Stratocaster and a Telecaster. Both of these project guitars sport single-coil pickups and both are terribly out of adjustment.
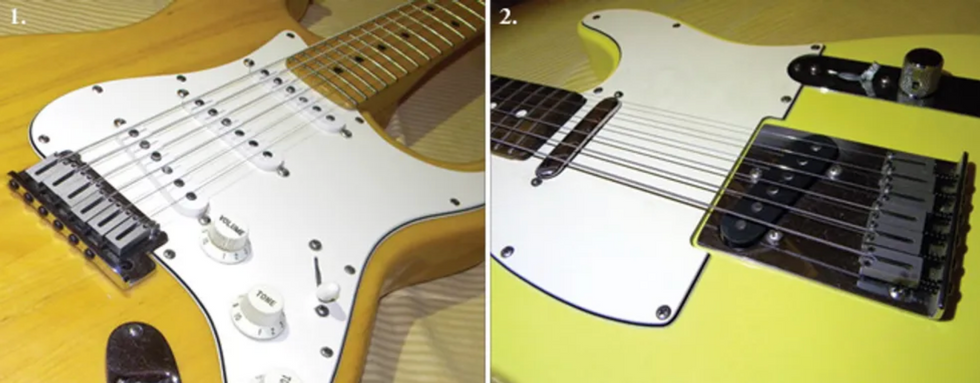
1. This Strat needs the height of its three single-coil pickups adjusted for optimum sound. 2. Our project Tele's two single-coils also need to be adjusted for proper height.
Step 1: Gather your tools and prepare your workspace.
You only need two tools for this project, but it's important to use the correct ones. Here's what I use when adjusting pickups:
- 6" precision machinist ruler
- Phillips head screwdriver
Step 2: Measure current pickup height.
First tune the guitar to pitch and then start taking its current measurements. These baseline measurements are very important because you need to know where the pickups are now in relation to where they should be.
Here's how to measure a pickup's height:
- Press the 1st string onto the last fret and hold it down.
- Using the 6" machinist ruler, measure the distance from the top of the pole piece to the bottom of the 1st string. Write down the measurement.
- Repeat this process with the 6th string, again holding it against the last fret and writing down the measurement.
- Now repeat the process with the remaining pickup(s).
- At this point you'll have measurements for both the treble and bass sides of each pickup.
How did our project guitars measure up?
The Strat's bridge pickup was 6/64" on the treble side and 8/64" on the bass side. The middle pickup measured 8/64" on both treble and bass sides, and the neck pickup measured 2/64" and 4/64", respectively, for the treble and bass sides. As we'll see in a moment, these distances are way off. The project Tele was also out of whack, with its bridge pickup measuring 4/64" and 2/64" (treble and bass) and neck measuring 2/64" and 4/64".
Not only were the heights of these pickups all over the map, the Tele's neck pickup was loose and wobbly. That's a tell-tale sign that the rubber compression tubing (which acts like a spring) over the pickup screws had either shrunk or was too short to begin with. To correct it, I had to remove the strings and pickguard, and then separate the pickup from the guard. After installing new tubing, I was able to adjust the pickup without it bobbing inside the guitar.
When you finish recording the baseline measurements on both the treble and bass side of each pickup, you're ready to adjust them to their ideal specs.
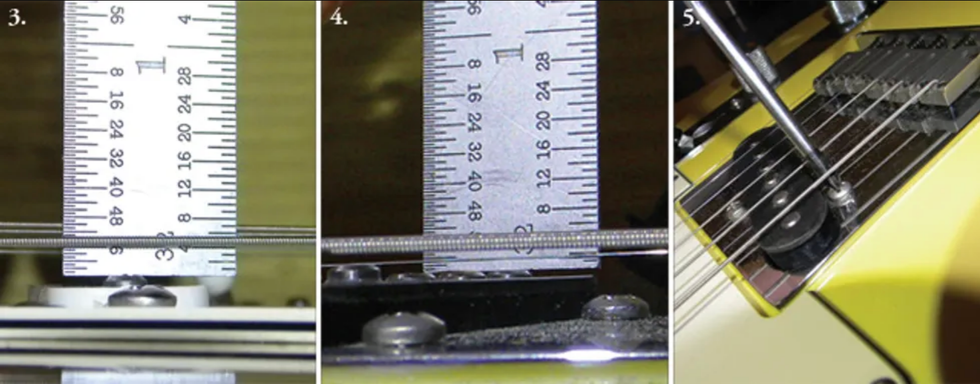
3. Using a machinist ruler to measure the distance between the top of the pole piece and the bottom of the 6th string on our project Stratocaster's bridge pickup. This pickup is too low. 4. The bridge pickup is set too high on our project Telecaster. 5. Adjusting a Telecaster bridge pickup. In addition to setting its overall height, the three adjustment screws let you control the pickup's fore and aft tilt. For maximum sustain and power, make sure the top of the bridge pickup's pole pieces sit parallel to the strings.
Step 3: Correct the pickup height.
There's a lot of debate about what constitutes "correct" pickup height, but conceptually the goal is simple: Set the pickup height to give your guitar optimum volume, clarity, sustain, and treble-to-bass balance.
Setting the pickups too high doesn't further this cause. In fact, when Fender-style single-coil pickups are too close to the strings, the pole pieces—which are cylindrical magnets—will pull the strings out of tune, causing intonation problems and reducing sustain. If the pole pieces are high enough, they can actually collide with the strings, especially when you play open chords. When a pickup is too close to the strings, its output signal can be too hot and overload the preamp stage in your amplifier.
Yet when the pickups are set too far away from the strings, the result is a weak signal. This will cause the guitar to sound thinner and brighter than normal.
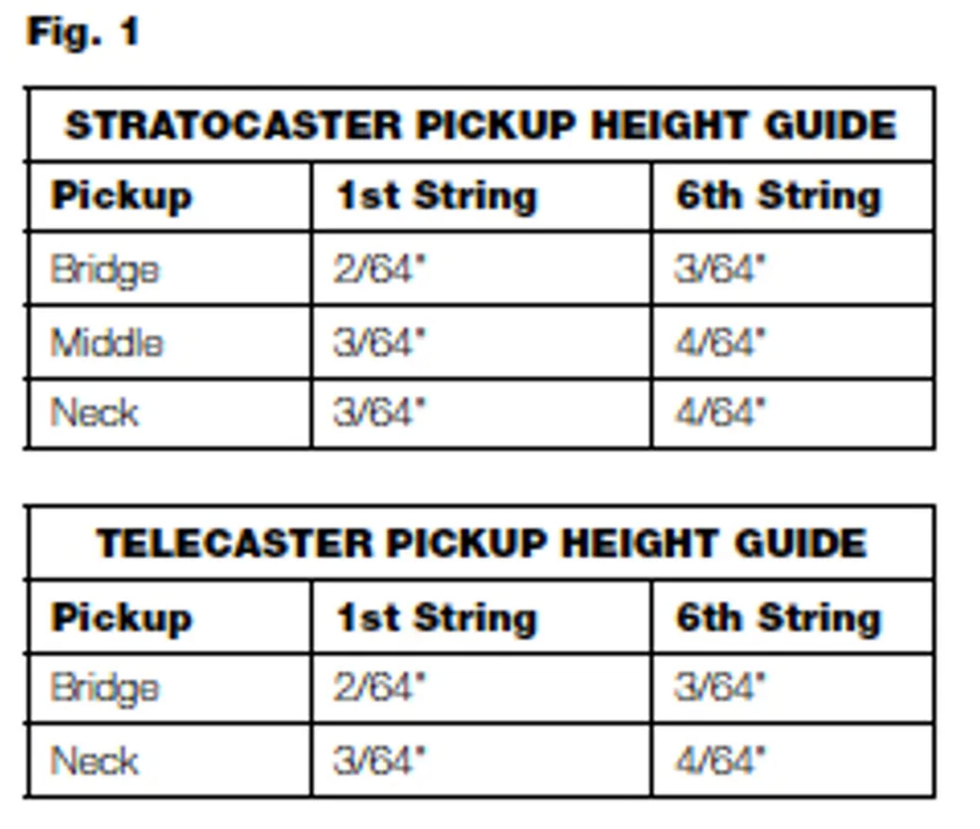
Furthermore, when the pickups aren't balanced correctly from the 1st to the 6th string, the result is uneven volume as you move from the treble to the bass strings. Fortunately, we can prevent all these problems. The tables in Fig. 1 show the measurements I use for each pickup on a Strat and Tele.
Using a Phillips head screwdriver, raise or lower the pickup by turning the adjustment screws located on either side of the pickup. (Some single-coils use slot-head screws, in which case you'll need a straight screwdriver.) Make small adjustments and go slowly. After each adjustment, again hold down the 1st and 6th strings at the last fret and take new measurements. Repeat this process for each pickup until it matches the corresponding specs in the tables.
Tip: Running out of screw length before you're done adjusting the pickups is one of the "little surprises" that can occur when altering pickup height. If this happens, remove the pickguard and replace the screws with longer ones.
Step 4: Testing—1, 2.
After you adjust the pickups to spec, it's time for the final test, which is to plug into your amp and play. So you can hear the full range of your pickups, don't stand too close to your amp. Instead, move back a good 10 feet or more.
Be sure to test the pickups with the guitar's volume wide open. Listen carefully to the balance between bass and treble strings, and switch between all the positions on your pickup selector. The goal is to hear equal volume from each pickup, even though the tone will change dramatically from pickup to pickup.
These measurements are a base point to start from, though I wouldn't recommend adjusting the pickups any higher. If the pickups sound unbalanced after you've set them to these specs, lower the louder pickup to reduce its output instead of raising the quieter one. A quarter turn can make an audible difference, so listen carefully, and be patient.
Wrap.
By following this relatively simple procedure, you'll probably discover that the dynamics, sustain, clarity, and stringto- string balance will have improved on your Strat or Tele. Next month, we'll tackle another DIY project, so stay tuned.
[Updated 8/27/21]
- Mod Garage: Before You Swap Out Those Tele Pickups … - Premier ... ›
- Mod Garage: The Infamous Telecaster Neck Pickup - Premier Guitar ›
- Adjusting Stratocaster Pickup Height, Pt. 2 - Premier Guitar ›
- Guitar Shop 101: How to Shim a Bolt-On Neck - Premier Guitar ›
- 10 of the Best Telecaster Pickups - Premier Guitar ›
Stompboxtober Day 23 is here! Today’s prize is a pedal from J. Rockett Audio. Enter now and come back for more daily prizes!
J. Rockett Audio Designs PXO Phil X Signature Overdrive Pedal
The PXO was created as a live or studio tool. When we sent Phil the overdrive sample he found that it saved him in backline situations and provided him a drive that plays well with others.
The PXO is an overdrive/boost where you can select pre or post giving you variety in how you want to boost, EQ and overdrive. We have provided standard controls on the overdrive side such as Volume/Gain/Overdrive and EQ but on the boost side you have a separate Tilt EQ that allows you to EQ with simplicity. You can experiment by cascading in a pre or post situation and experiment from there. The PXO has a lush, thick feel to the bottom end and a smooth top end that begs you to dig into the note.
Your 100 Guitarists hosts are too young to have experienced SRV live. We’ve spent decades with the records, live bootlegs, and videos, but we’ll never know quite how it felt to be in the room with SRV’s guitar sound.
Stevie Ray Vaughan was a force of nature. With his “Number One” Strat, he drove a veritable trove of amps—including vintage Fenders, a rotating Vibratone cab, and a Dumble—to create one of the most compelling tones of all, capable of buttery warmth, percussive pick articulation, and cathartic, screaming excess. As he drew upon an endless well of deeply informed blues guitar vocabulary, his creativity on the instrument seemingly knew no bounds.
Your 100 Guitarists hosts are too young to have experienced SRV live. We’ve spent decades with the records, live bootlegs, and videos, but we’ll never know quite how it felt to be in the room with SRV’s guitar sound. So, we’d like to spend some time imagining: How did it feel when it hit you? How did he command his band, Double Trouble? The audience?
SRV was mythical. His heavy-gauge strings tore up his fingers and made a generation of blues guitarists work a lot harder. And his wall of amps seems finely curated to push as much air in all directions as possible. How far did he take it? Was he fine-tuning his amps to extreme degrees? Or could he get his sound out of anything he plugged into?
This episode is sponsored by Divided by 13.
Learn more: https://dividedby13.com
By now, we’re all familiar with the many options out there for amp modeling. Mic modelers are another reliable asset to digital recording tech, and can rapidly grow your inventory with just a few clicks.
As guitarists, we’re very aware of amp-modeling and profiling technologies, such as the Line 6 Helix, Fractal Axe-Fx, Neural DSP Quad Cortex, and Kemper Profiler. While our bases are covered for these (with modelers available for every “holy grail” amp under the sun), we are still missing another vital area of the recording process—microphones—for the acoustic instruments and vocals we might want to capture.
What if we could record them using holy-grail-modeled microphones? This month, let’s evaluate microphone modeling to help you make better-sounding recordings. Tighten up, the Dojo is now open.
The Sincerest Form of Flattery
Microphone modeling is an intriguing advancement in recording technology, offering great flexibility and possibilities for musicians, producers, and engineers. Makers like Slate Digital, Antelope, and Antares make many offerings, from hardware to software.
Universal Audio’s Sphere DLX ($1299 Street), LX ($799), and their six new Standard Mic series have impeccably modeled classic mics, and when coupled with their classic mic pre and compressor plugins, you can enjoy the same highly coveted mic chains appreciated the world over.
How It Works
The technology behind microphone-modeling systems relies heavily on convolution and impulse response techniques. These techniques involve capturing the unique sonic fingerprint of a microphone by recording its response to a wide range of frequencies and sound pressure levels. The immediate benefit is that this means you can grow your mic locker exponentially and gain access to a wide range of legendary microphone tones and textures all from a single mic! Most modeling microphones are usually either small- or large-diaphragm, multi-pattern, condenser microphones that are capable of capturing a wide frequency range and dynamic response. By adding other modeling mics, you can record in stereo or surround, and/or record multiple instruments at a fraction of the cost of owning multiples of the modeled mics themselves.
A Wealth of Options
One significant advantage of mic-modeling systems is their ability to offer a vast array of microphone options within a single session instead of having the time-consuming duty of swapping them out to achieve different sounds. With a modeling system, you can switch between different mic models instantly and audition various mics to find the perfect tone for the recording.
“The same vintage microphone can sound different on different days depending on temperature, humidity, and the voltage from the wall.”
Another lovely bonus is that microphone-modeling systems also offer the ability to swap microphone characteristics after the recording has been made! Want to swap your AKG C12 for a Neumann U 47 long after the recording session is over? No problem! This is especially useful when the initial microphone choice may not have been ideal or when the production requires a different tonal character than originally intended.
Weighing the Pros and Cons
Some audio purists argue digital emulation can’t truly replicate the sound of a physical microphone, especially when it comes to vintage models that have unique characteristics developed over decades of use. The subtleties of these microphones and their aging components shape the way they interact with different preamps and compressors.
After making over a hundred records at Blackbird over the last eight years, I’ve grown quite familiar with a good portion of our 1,800-plus vintage mics, like Telefunken 251s, AKG C12s, Neumann U 47s and KM 84s, Shure SM7s and SM57s, RCA 44s and 77s, and Royer R-121s. These are the very same mic models that most modeling mics are trying to capture. But experience has taught me that not all microphones sound identical even if they are the same make and model (and year). Also, the same vintage microphone can sound different on different days depending on temperature, humidity, and the voltage from the wall (that’s why Blackbird has its own regulated power and all the studios strive for consistent temperature and humidity year-round).
For home studios and smaller production environments, microphone-modeling systems can be a game changer. You’ll get a wide range of high-end microphone sounds without the need for a large microphone collection, and the ability to change microphone models after the fact gives budding producers and engineers greater confidence and flexibility in their work.
In reality, most users find that the convenience, cost savings, and versatility offered by modeling systems far outweigh any potential shortcomings. Finally, keep in mind that even though the mic “profile” you choose (U 47, U 67, SM7, etc.) will be consistent day in and day out, the modeling mic itself is also still a mic and will require you to be mindful of these same issues I mentioned above in order for your mic “profile” to be as accurate as possible.
Until next time, namaste.
With simple controls, models from the award-winning HX family, and the option for battery power, this compact unit is designed to be perfect for Metal guitarists seeking versatile tone options.
Simple controls make it easy to use, while models derived from the award-winning HX family of processors ensure exceptional hard-driving sound quality and authentic feel.
This new unit gives players seven amps, seven cabs, and 17 distortion, modulation, reverb, and delay effects—including a looper—and it may be powered by three AA batteries (included) or an optional 9-volt power supply.
Guitarists can also download the free POD Express Edit app for their computers or mobile devices to quickly and easily access a world of deeper tone editing, preset management, and global settings.
“For a wide variety of Metal guitarists, the POD Express Black is a great all-in-one modeler that gives them a unique selection of high-gain tones, plus essential effects,” says Rick Gagliano, Line 6 Director of Product Management. “It’s compact, fun and easy to use, affordable, and—most importantly—it features tones derived from the Helix family of products.”
Additional features include stereo outputs, tap tempo, a tuner, a noise gate, a headphone output, and a USB-C audio interface with re-amping capabilities. Add an optional expression pedal for volume control, or up to two footswitches to select presets or turn effects on and off.
The POD Express family, which also includes the previously released POD Express Guitar and POD Express Bass, represents the latest evolution of a line that began in 1998 with the groundbreaking red "kidney-bean" POD—the portable processor that pioneered the amp modeling revolution.
POD Express Black is $179.99
For more information, please visit line6.com.