A client wanted her D-12-20 to fret in tune all along the fretboard. Can it be done?
Intonating a flattop’s bridge saddle is tricky, and that’s especially true when it comes to vintage 12-string guitars. Back in the day, it was rare to find an acoustic 12-string with a compensated bridge saddle. In fact for many players, the slightly out-of-tune jangle was a big part of a 12-string’s aural mystique. But times have changed, and as music and recording technology have evolved, most musicians and producers expect a 12-string to play reasonably in tune all along the fretboard.
Intonating a flattop 12-string with a straight bridge saddle involves filing unique break angle and intonation points for each string—an operation that requires skill and patience. Let’s investigate and see exactly what’s involved.
We’ll use a beautiful 1972 Martin D-12-20 as our project guitar. The guitar was in good shape when its owner brought it into the shop, but it didn’t play even remotely in tune and the action was uncomfortably high. Many old 12-strings require a neck reset (an expensive proposition), but I checked the neck angle and it was fine. Fortunately for the guitar’s current owner, the problem was rather simple. Somewhere along the line a previous owner or tech had installed a saddle that was both too high and incorrectly radiused (Photo 1).
My job was twofold: lower the action by reshaping the bridge saddle and then intonate each string. I knew that once I completed these tasks, the D-12-20 would play better than ever and sound more in tune at the higher frets.
Requisite tools. To intonate a 12-string, you need a few specialized luthier tools. These include a string action gauge, radius gauges, and a radius block (the latter must match the fretboard radius). You’ll also need a mechanical pencil, a capo, self-adhesive 80-grit and standard 400-grit sandpaper, and flat, single-cut miniature needle files.
You can estimate where each string should rest on the saddle, but it’s nearly impossible to get it perfect on the first try.
Preliminary check. Before starting this kind of work on a guitar, it’s important to tune to concert pitch and take measurements. These specs provide a baseline to help gauge your progress. You’ll be taking several measurements, so write them down as you go.
First, put a capo on the 1st fret and measure action at the 12th fret with a string action gauge. Take this measurement for both the 1st and 11th strings—the first of the doubled high Es and the low E string. (We’ll assume your 12-string has the standard octave-string configuration, i.e., the octaves in each pair are closer to you than their wound partners. Some electric 12s, notably Rickenbackers, reverse this order.) Measure the distance between the bottom of the string and the top of the 12th fret.
Next measure the relief: With the capo still on the 1st fret, hold the 11th and 12th strings down at the 14th fret and measure the greatest gap between the bottom of the 11th string and the top of the frets. Typically this occurs around the middle of the fretboard, somewhere between the 7th and 9th frets. You can identify this gap by tapping the 11th and 12th strings against the frets while still pressing them down at the 14th fret.
Now remove the capo and check the action at the 1st fret.
Finally, using a strobe tuner, check the intonation for each string. (Naturally, this is tricky on a 12-string because you have to pluck each individual string of the six pairs.) Starting with the 1st string, play the 12th-fret harmonic—make sure it’s in tune—and then fret the same note. If the fretted note is sharp or flat compared to the reference harmonic, write down how many cents it’s off and in which direction. Repeat the process until you’ve documented the intonation at the 12th fret for all 12 strings.
Our 12-string’s preliminary specs. Here’s how the D-12-20 measured up: The action at the 12th fret was 6/64" for the 1st string and 7/64" for the 11th string. Too high to play! The relief was .012"—perfect for my client’s playing style. At the 1st fret, the 1st string was 1/64" and the 11th string was just over 2/64" above the fret. Again, perfect action at the string nut. At this point, I knew my job would simply entail lowering the action at the bridge saddle.
When I checked the intonation with a strobe tuner, and compared the 12th fret harmonics to their corresponding fretted notes, I found most of the fretted notes were from two to six cents sharp, although the G and D pairs were flat by about three cents.
With these measurements in hand, I was ready to get to work.
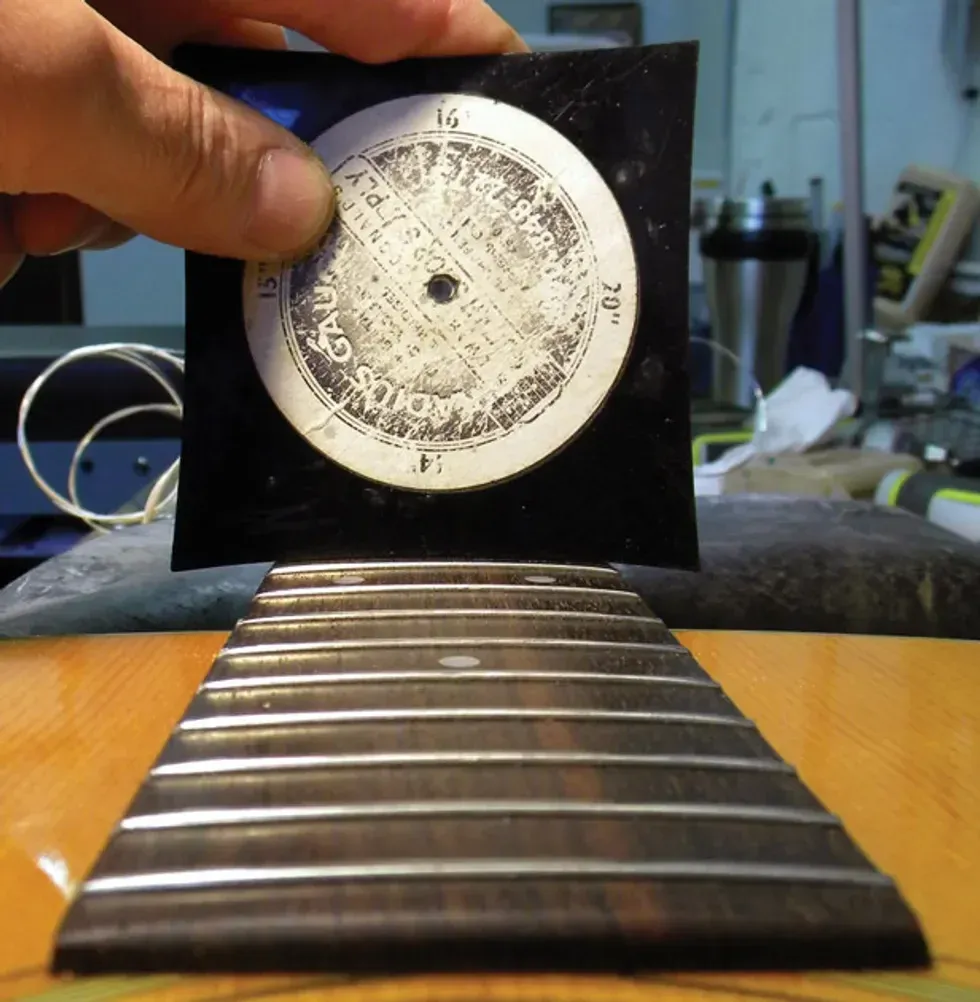
Photo 2
Sanding the bridge saddle. My next step was to check if the saddle’s radius matched the fretboard radius. My radius gauge revealed what I’d suspected—it wasn’t even close. The fretboard had a 14"radius (Photo 2), but the bridge saddle was around 8". This meant the saddle had a much more pronounced arch than the fretboard. I knew if I didn’t reshape the top of the saddle to match the fretboard, the D and G pairs would be radically higher than the other strings.
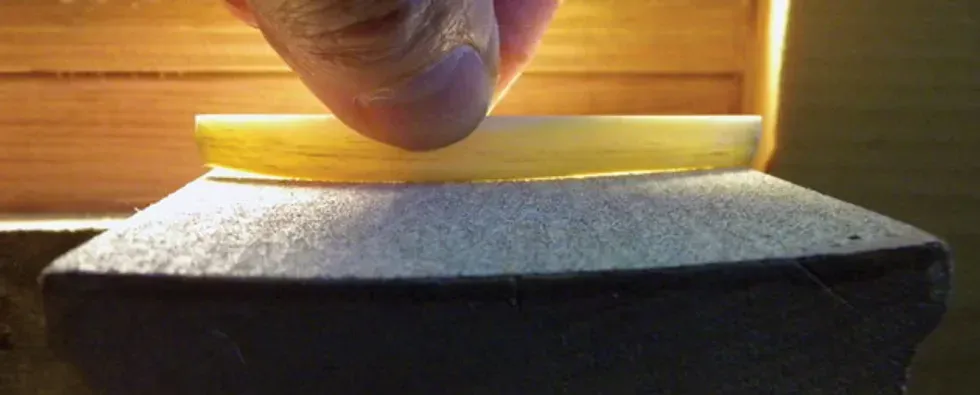
Photo 3
Using a 14" radius block and self-adhesive 80-grit sandpaper, I sanded the top of the saddle until it matched the block’s radius. Here’s the most accurate way to reshape the top of the saddle: Place the radius block in a vise with the radius side up and affix the self-adhesive sandpaper to the block. Now remove the saddle from its bridge slot, turn it upside down, and gently sand its top in the block’s concave area. If you shine light behind the saddle, you’ll be able to see how much material you’re removing from the saddle and make sure its radius matches the block (Photo 3).
Since the action was pretty high on our 12-string, I removed about 1/32" from the top of the saddle at both E string pairs. I removed quite a bit more from the middle of the saddle to flatten out the arch.
Once the saddle is correctly radiused, slip it back into the bridge and grab your mechanical pencil.
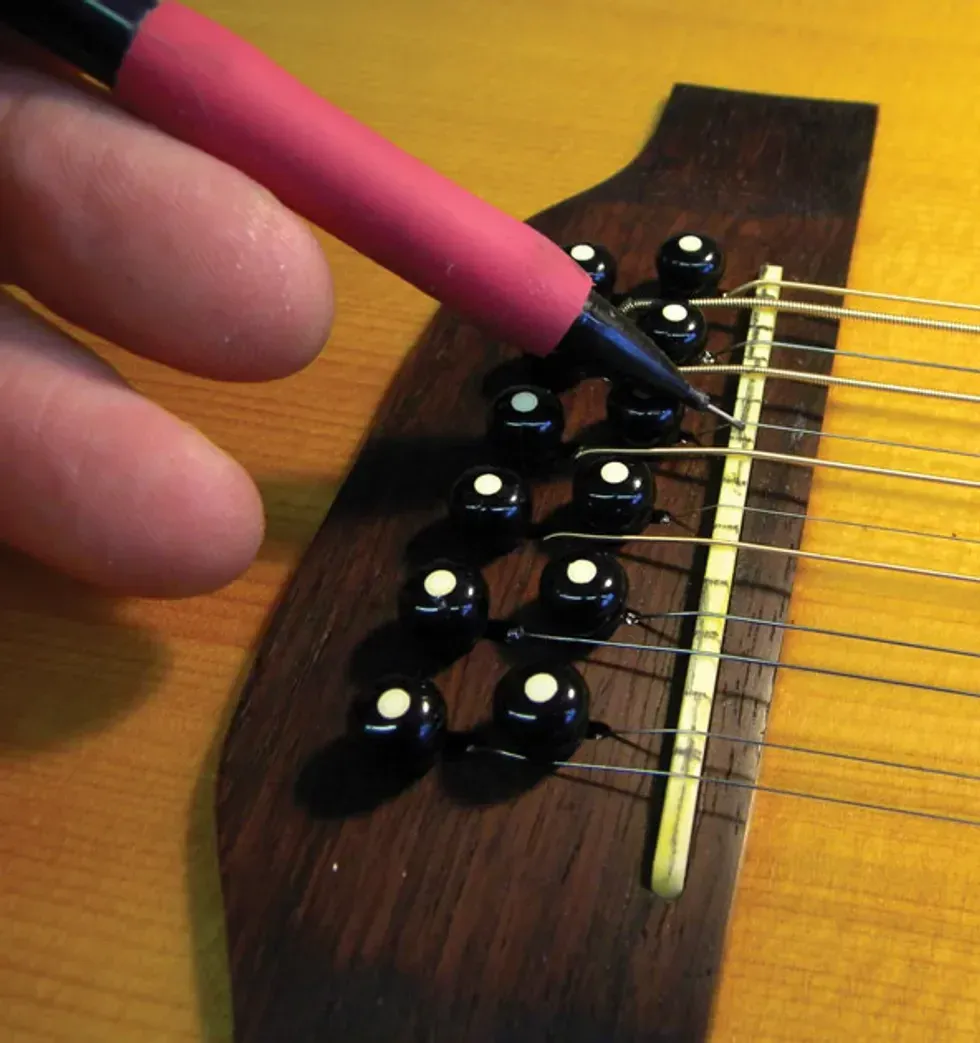
Photo 4
Marking the saddle. Now it’s time to draw guidelines on the saddle crown for both the individual intonation points and the various angles needed to guide the strings as they emerge from the pin holes (Photo 4). But before you start drawing lines, let’s take a moment to discuss where the strings should sit on the top of the saddle. First we’ll deal with the intonation points, then the string angles.
Fair warning: Setting the intonation entails some trial and error. You can estimate where each string should rest on the saddle, but it’s nearly impossible to get it perfect on the first try.
For this task, it’s helpful to mentally divide the 12 strings into three groups:
• The six E, A, D, G, B, and E strings you’d find on a regular flattop. We know the lowest four are wound, and the top two are plain. So far, so good.
• The plain octave strings (E, A, D, G) that pair with the wound E, A, D, and G strings.
• The doubled unison B and high-E strings. Just like their mates, these are plain.
Okay, think about the first group—our standard 6-string. As a general rule, both the low E and B strings intonate best at the rear edge of the saddle (closest to the bridge pins). The G string’s intonation point is typically at the very front of the saddle (closest to the soundhole).
That leaves the high E, D, and A strings to be accounted for. The high E will typically fall between the B (remember, that’s at the rear of the saddle) and the G (at the front of the saddle). The D and A strings usually create a stair-step pattern between the G and low E strings, with the D closer to the G, and A closer to the low E.
The four plain octave strings are a different story. Both the low E’s octave and the G’s octave points will be at the front of the saddle. The octave strings for A and D will be further back toward the bridge pins.
As you’d expect, the unison B and E strings sit at exactly the same point as their siblings.
Now consider how each string travels from the pin hole in the bridge to the top of the saddle—the intonation point. On this Martin, the six primary strings—those that correspond to a standard flattop—are set back toward the rear of the bridge. The six additional strings, the four octaves and two unisons that make a 12-string such a beautiful beast, emerge through the soundboard and bridge right behind the saddle.
On the rear of the saddle, you need to file individual angles (think of them as ramps) that allow each string to reach its intonation point without encountering a sharp edge. Correctly filed angles minimize string breakage and maximize sustain. The angle for the primary strings will be shallower than the six extra strings.
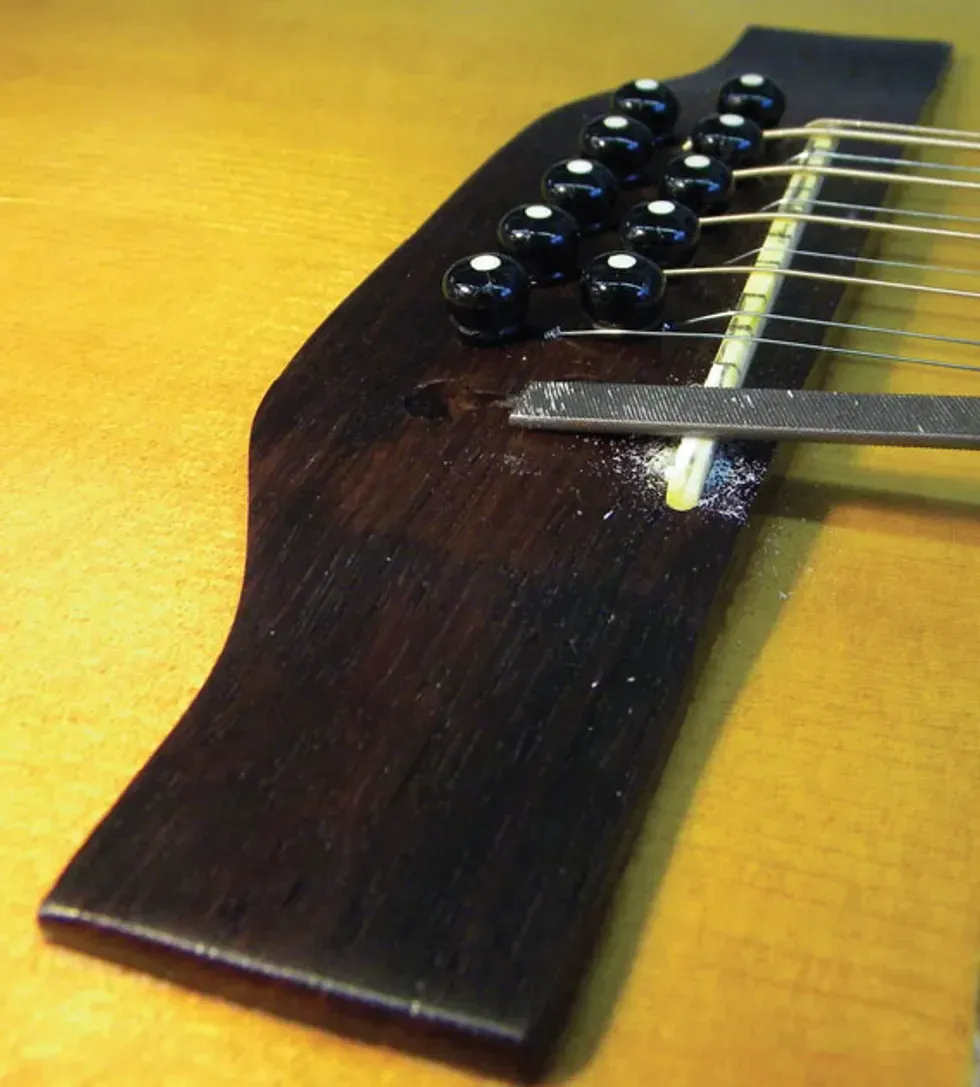
Photo 5
On the rear of the saddle, you need to file individual angles (think of them as ramps) that allow each string to reach its intonation point without encountering a sharp edge. Correctly filed angles minimize string breakage and maximize sustain. The angle for the primary strings will be shallower than the six extra strings.
Filing the saddle. This is where your inner artist gets a chance to shine. Using a miniature flat file, carve each string’s intonation point and rear angle, based on your markings (Photo 5). Go slowly, and to prevent any sitar-like buzzing, be sure each string leaves the saddle from a crisp, defined peak as it heads toward the soundhole.
Checking intonation. As I mentioned earlier, there’s a lot of trial and error involved with intonating a 12-string. Once you’ve done the first pass of filing, put on a fresh set of strings, tune them to pitch, and check the intonation.
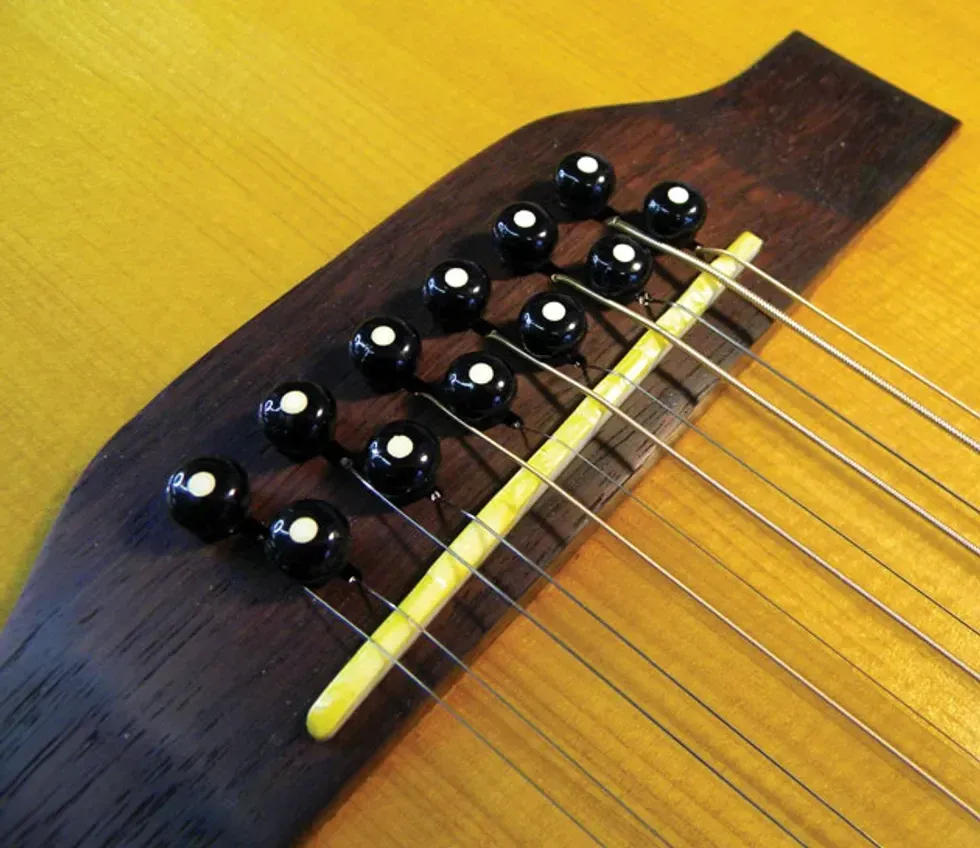
Photo 6
The goal is to have the fretted note at the 12th fret match the corresponding 12-fret harmonic. Use a tuner to keep track of how close the fretted note comes to its reference harmonic. If the string frets sharp, file the intonation point back toward the rear of the saddle. Conversely, if the fretted note is flat, carve the intonation point forward toward the front of the saddle. When you’re done, the saddle should look similar to Photo 6. Don’t be dismayed at how many times you’ll need to slacken and remove the strings, file the saddle, restring, retune, and recheck the intonation.
Wrap it up. When you’ve got the intonation dialed in to your satisfaction, take off the strings one last time, pop out the saddle, and then polish it with 400 grit sandpaper, followed with a polishing cloth. Restring, retune, and you’re good to go.
This process takes a long time to master, but in the end, it’s worth it when your 12-string plays in tune all the way up the neck.
Here’s how 21 killer players from the past year of Rig Rundowns—including Justin Chancellor, Zakk Wylde, MonoNeon, Carmen Vandenberg, Sturgill Simpson, Jason Isbell, and Grace Bowers—use stomps to take their sounds outside the box.
TOOL'S JUSTIN CHANCELLOR
Justin Chancellor’s Pedalboard
If you ever catch yourself playing air guitar to Tool, you’re probably mimicking Justin Chancellor’s parts. “Schism,” “The Pot,” “Forty Six & 2,” “H.,” “Fear Inoculum,” “Descending,” “The Grudge,” and plenty of others feature his buoyant bass riffs.
What stomps does he run his Wal, StingRay, and Fender basses through? Glad you asked. His setup is either a bass player’s dream or nightmare, but for someone as adventurous as Chancellor, this is where the party starts.
You’ll notice many of his pedals are available at your favorite guitar store, including six Boss boxes, an Ernie Ball Volume Pedal, and MXR Micro Amp. Crucial foot-operated pedals are in blue: the Dunlop JCT95 Justin Chancellor Cry Baby Wah with a Tone Bender-style fuzz circuit (far left) and DigiTech Bass Whammy (middle). He really likes using the Tech 21 SansAmp GT2 for distortion and feedback when the Whammy is engaged or he’s playing up the neck. Covering delays are three pedals—he has the pink Providence DLY-4 Chrono Delay programmed to match drummer Danny Carey’s BPMs in “Pneuma,” which slightly increase during the song from 113 ms to 115 ms. The Boss DD-3s are set for different speeds with the one labeled “Faster” handling “The Grudge” and the other one doing more steady repeats. There’s a pair of vintage Guyatone pedals—the Guyatone VT-X Vintage Tremolo Pedal (Flip Series) and Guyatone BR2 Bottom Wah Rocker (a gift from guitarist Adam Jones). The Gamechanger Audio Plus pedal is used to freeze moments and allow Justin to grab onto feedback or play over something. The Boss GEB-7 Bass Equalizer and Pro Co Turbo RAT help reinforce his resounding, beefy backbone of bass tone, while the MXR Micro Amp helps goose his grimy rumbles. The Boss LS-2 Line Selector is a one-kick escape hatch out of the complicated signal chain for parts of “Schism.” The Wal and Music Man stay in check with the TU-3S tuner, a pair of Voodoo Lab Pedal Power 2 Pluses help bring things to life, and everything is wired up with EBS patch cables.
STURGILL SIMPSON AND LAUR JOAMETS
Sturgill Simpson’s Pedalboard
Alt-country veteran Sturgill Simpson packed light for his latest run. His board bears just a Peterson Stomp Classic tuner running into a Fulltone True-Path ABY-ST, which splits his signal to his two Magnatone Panoramic Stereo amps. “I wouldn’t use a tuner if I didn’t have to,” he chuckles. The LILY P4D beside the splitter lets him control his mic signal to cut interference from onstage noise.
Laur Joamets’ Pedalboard
For his main board, Laur Joamets packs a little heavier than his boss. The platform, made by West Coast Pedal Board, carries a Peterson StroboStomp, Greer Amps Arbuckle Trem, sRossFX fuzz/overdrive, MXR Booster, T-Rex Replica, sRossFX germanium octave pedal, TC Electronic Viscous Vibe, Dunlop EP103 Echoplex, and Source Audio True Spring Reverb. An MXR Tap lets him tap in delay tempos. He has a second pedalboard, as well, for his Stage One steel guitar. It goes into a Peterson StroboStomp HD, then on to a Greer Black Tiger and Goodrich Sound Company volume pedal, before hitting his Magnatone Varsity Reverb and a custom-built Fender brown-panel Deluxe clone he calls “the Charmer.”
PANTERA’S ZAKK WYLDE AND REX BROWN
Zakk Wylde’s Pedalboard
When Pantera’s bassist Rex Brown and singer Phil Anselmo decided to fire the band up again, the choice of fellow road dog Zakk Wylde on guitar seemed perfect. Here’s what Wylde had on the floor and in the racks for the band’s February date at Nashville’s Bridgestone Arena.
His signature arsenal of effects seen here includes a MXR Wylde Audio Overdrive, MXR Wylde Audio Phase, Wylde Audio Cry Baby wah, and a Dunlop ZW357 Zakk Wylde Signature Rotovibe. The lone box that isn’t branded Wylde is a standard fare MXR Carbon Copy. Offstage, his rack is home to a MXR Smart Gate and MXR Wylde Audio Chorus that’s always on. Both are powered by a Voodoo Lab Pedal Power 3 Plus. Another drawer holds a Radial BigShot I/O True-bypass Instrument Selector, Lehle Little Dual II Amp Switcher, and a Radial BigShot EFX Effects Loop Switcher.
Rex Brown’s Pedalboard
This tour was the first time Rex Brown used a switching system. His stage board sported a Dunlop JCT95 Justin Chancellor Cry Baby Wah, a 2000s Morley Pro Series II Bass Wah, Origin Effects DCX Bass Tone Shaper & Drive, a MXR M287 Sub Octave Bass Fuzz, and a Peterson StroboStomp HD. The brain of everything in the rack and onstage is the RJM Mastermind GT. And to help “move mountains,” Rex has a Moog Taurus III.
MSSV’S MIKE BAGGETTA AND MIKE WATT
Mike Baggetta’s Pedalboard
Mike Baggetta has some core pedals in MSSV, his indie supergroup with legendary bassist Mike Watt and drummer Stephen Hodges. His arsenal includes a Creepy Fingers Hold Tight fuzz, an Electro-Harmonix Ring Thing, a Wilson Effects Freaker Wah V2, an EHX Deluxe Memory Man, and a Red Panda Tensor. The signal flows from his Benson amp into the Tensor, which he uses for glitch sounds, harmonizing, and overdub mode, among other feats. His Memory Man adds space—the final frontier.
Mike Watt’s Pedalboard
Mike Watt puts his signature Reverend Wattplower bass into a Broughton Audio high-pass filter, an EarthQuaker Devices The Warden optical compressor, and a Sushi Box Effects Finally tube DI that functions as a preamp. There’s also a TC Electronic PolyTune.
MONONEON
MonoNeon’s Pedalboard
The Memphis-born avant-funk bassist keeps it simple on the road with a signature 5-string, a tried-and-true Ampeg stack, and just four stomps. Almost all of his stomps have been zhuzhed up in his eye-popping palette. He’d used a pitch shifting DigiTech Whammy for a while, but after working with Paisley Park royalty, the pedal became a bigger part of his playing. “When I started playing with Prince, he put the Whammy on my pedalboard,” Thomas explains. “After he passed, I realized how special that moment was.” MonoNeon also uses a Fairfield Circuitry Randy’s Revenge, a Fart Pedal (in case the Fairfield ring mod isn’t weird enough, we guess), and a JAM Pedals Red Muck covers fuzz and dirt needs. A CIOKS SOL powers the whole affair.
GRACE BOWERS
Grace Bowers’ Pedalboard
Grace Bowers is one of the freshest new guitar stars to emerge in the past year. She has the essential fixin’s for her classic rock tones: a Dunlop Crybaby Wah, Grindstone Audio Solutions Night Shade Drive, EarthQuaker Devices Tone Job, MXR Phase 90, MXR Phase 95, and Boss DD-2. Bowers powers them with a Voodoo Labs Pedal Power ISO-5.
GREEN DAY’S JASON WHITE
Photo by Raph Pour-Hashemi
Jason White’s Pedalboard
Long-time touring member Jason White’s stable is dominated by his Gibson Les Pauls and ES-335s. A Shure wireless system sends his signal to a rack set-up with an ISP noise gate, just in case White’s P-90s are picking up a lot of noise. From there, it hits a Dunlop Cry Baby and DVP1XL, then a MIDI-controllable RJM Effect Gizmo, which handles White’s effects: an MXR Reverb and Poly Blue Octave, Strymon TimeLine and Mobius, API Select TranZformer GTR, and a Custom Audio Electronics 3+SE Guitar Preamp, which gets engaged for clean tones and small combo sounds. A Lehle Dual SGoS Switcher and Fishman Aura DI Preamp handle changes with the piezo-equipped guitars. A Strymon Zuma provides the juice.
BONES UK’S CARMEN VANDENBERG
Carmen Vandenberg’s Pedalboard
Carmen Vandenberg covers a lot of ground with her Bones UK guitar sounds, and she’s got a carefully curated collection of stomps to span the territory. Her guitar first hits an Ernie Ball Cry Baby before running through the rest of the pedals: a Boss TU-3, Fulltone OCD, Supro Drive, Pigtronix Octava, EHX Micro POG, Supro Chorus, Blackstar Dept. 10 Boost, EarthQuaker Devices Dispatch Master, MXR Carbon Copy Deluxe, Catalinbread Belle Epoch, and Boss NS-2. A Live Wire Solutions ABY manages the signals on their way to her signature Blackstar CV30s.
BLACK PUMAS’ ADRIAN QUESADA, BRENDAN BOND, AND ERIC BURTON
Adrian Quesada’s Pedalboards
Adrian Quesada loves tremolo and reverb, and uses a Strymon Flint for both. His other main stomp is the Electro-Harmonix Holy Grail that provides a healthy dose of spring reverb. Also along for the tour: a Line 6 Echo Park, a Catalinbread Echorec, a Boss GE-7 Equalizer, a Catalinbread Belle Epoch, and an EarthQuaker Devices. The Fulltone Clyde Wah Deluxe has stepped in for a different filter sweeper. There’s also a JAM Pedals Ripple two-stage phaser, and a TC Electronic PolyTune2 Noir keeps his guitars in check. That’s all on board one.
His second board includes a JHS 3 Series Delay, a JHS Crayon, and an Electro-Harmonix Nano POG. Utility boxes on here—Strymon Ojai, JHS Mini A/B, and TC Electronic PolyTune—handle switching, tuning, and power.Brendan Bond’s Pedalboard
Three pedals get the job done for Mr. Bond: an Acme Audio Motown D.I. WB-3 passive D.I., a JHS Colour Box, and a Boss TU-3 Chromatic Tuner.
Eric Burton’s Pedalboard
Frontman and guitarist Eric Burton is the band’s lone wireless member. To accommodate his onstage prowling, tech Bryan Wilkinson uses a Radial JDI passive direct box that takes in the XLR from the audio subsnake wireless rackmount and routes it into the first pedal: a Boss TU-3 Chromatic Tuner. From there, Burton only has a couple pedals—a DigiTech Mosaic to mimic a 12-string for “OCT 33” and a JHS Colour Box for any required heat. A Strymon Ojai turns everything on.
JASON ISBELL AND SADLER VADEN
Jason Isbell’s Pedalboards
Jason Isbell could open a huge gear shop just by clearing off his boards and racks. First off, he has a complex wet/dry/wet setup that is parsed out via a RJM Mastermind, with two Magnatone Twilight Stereo combos carrying the all-wet effects. There’s also a Radial JX44v2, which serves as the core signal manager. Above it, on the rack, is an Echo Fix Chorus Echo EF-X3R. Moving up the rack, one drawer includes an Ibanez DML10 Modulation Delay II, EarthQuaker Devices Tentacle, and a trio of stereo-field-only effects: a Boss MD-500, Strymon Volante, and Hologram Electronics Microcosm. Another level up, you’ll find a Chase Bliss Preamp Mk II, Chase Bliss Tonal Recall Delay, Chase Bliss Dark World Reverb, Chase Bliss Condor EQ/Filter, Chase Bliss Gravitas Tremolo, Chase Bliss CXM-1978 Reverb (stereo-field only), Keeley 30ms Automatic Double Tracker, gold Klon Centaur, Analog Man Sun Lion Fuzz/Treble Booster, Analog Man King of Tone with 4-jack mod, Keeley 4-knob CompROSSor, Pete Cornish OC-1 Optical Compressor, EHX Micro POG, Analog Man ARDX20 Delay, and a trio of Fishman Aura Spectrum DIs.
Sadler Vaden’s Pedalboard
Isbell’s 6-string sparring partner Sadler Vaden’s pedalboard chain starts with a Dunlop Clyde McCoy Wah, then a Lehle volume pedal, which feeds the Gig Rig. He uses a Line 6 M5 with a Dunlop expression pedal for a lot of modulation effects. Other pedals include a Crowther Prunes & Custard, Nordvang No.1, an Analog Man Dual Analog Delay, Comp, and King of Tone, a Strymon BlueSky, and a Greer Lightspeed. Every effect is isolated into the Gig Rig. The board has four outputs, two for each side of his 3rd Power British Dream, one for a Marshall plexi, and one that goes to an aux line and splits to a Vox Pacemaker. The auxiliary line is as a backup in case Sadler’s amps go down. It consists of a Strymon Iridium into a Seymour Duncan Power Stage that goes to FOH. And finally, his acoustic pedalboard sports a Shure wireless running into an ART Tube MP/C preamp into a L.R. Baggs Venue DI, with a Radial Engineering Bigshot selector.
MICHAEL LEMMO
Michael Lemmo’s Pedalboard
Rising star player Michael Lemmo relies on his stomps for tone sculpting, but he doesn’t need much to get the job done. His signal hits a Korg tuner, followed by an Xotic EP Booster, Bearfoot FX Honey Bee OD, Red Panda Context, Boss DD-7, and TC Electronic Ditto. They’re all juiced by a Truetone 1 Spot Pro CS7.
HELMET’S PAGE HAMILTON
Page Hamilton’s Pedalboard
Page Hamilton used to travel with a full Bradshaw rig with rack gear, but he’s reduced things to a pair of Eventide H9 units and a handful of Boss boxes—a PS-5 Super Shifter, a MT-2W Metal Zone Waza Craft, a TS-2 Turbo Distortion, a NS-2 Noise Suppressor, and a FB-2 Feedbacker/Booster. A couple of Peterson Stomp Classic tuners keep his ESP Horizons ready, and a Boss ES-5 Effects Switching System organizes all his sounds and settings.
BARONESS’ JOHN BAIZLEY, GINA GLEASON, AND NICK JOST
John Baizley’s Pedalboard
The Baroness frontman’s board is packed with staged dirt boxes and tasteful mod stomps, all held in check with a GigRig G2, Peterson StroboStomp, and Ernie Ball Volume Pedal. The crown drive jewels are a heavily modded EHX Big Muff and Crowther Double Hot Cake, but a Beetronics FX Overhive and Pro Co RAT add sizzle, too. A Boss DD-3, DM-2W, and TR-2, EarthQuaker Devices Dispatch Master and Tentacle, MXR Phase 90 and Dyna Comp, and EHX Deluxe Memory Man handle the rest, while a DigiTech Whammy lurks for its moment to blast off.
Gina Gleason’s Pedalboard
Gleason’s favorite drive these days is the EQD Zoar. Piling on top of that are a MXR Super Badass Distortion, MXR Timmy, modded EHX Big Muff, and a touchy Philly Fuzz Infidel prototype; an Xotic SP Compressor and UAFX 1176 Studio Compressor tighten things up when needed. Three time machines—the Strymon TimeLine, EQD Space Spiral, and Boss DD-3—handle delay, and a Walrus Slo dishes out reverb. The MXR EVH Phase 90 adds some color along with another DigiTech Whammy. The Ernie Ball Volume Pedal, Peterson StroboStomp, and GigRig G2 finish the line-up.
Nick Jost’s Pedalboard
The bassist’s board is powered by an MXR Iso-Brick, with an Ernie Ball Volume Pedal and Boss TU-3 pulling utility duties before an Xotic Bass BB Preamp, Boss ODB-3, DOD FX69B Grunge, MXR Stereo Chorus, and Tech 21 SansAmp Bass Driver DI.
WOLFMOTHER’S ANDREW STOCKDALE
Andrew Stockdale’s Pedalboard
When we walked into Nashville’s Eastside Bowl for this Rig Rundown with Wolfmother’s alpha canine, Andrew Stockdale, it sounded like he was playing his SG through a Marshall stack at head-ripping volume. Nope! Stockdale was blasting skulls apart with a Line 6 HX Stomp doing the heavy tonal lifting. The rest of his board’s layout is a Snark floor tuner, an EHX Micro Synth (a Wolfmother staple), an Xotic AC Booster, an EHX Micro POG, a Dunlop Cry Baby 535Q Multi-Wah, a Boss TR-2 tremolo, a CIOKS DC5 power supply, and Shure GLXDC+ wireless.
FEARLESS FLYERS' CORY WONG AND MARK LETTIERI
Cory Wong’s Pedalboard
Through a Shure GLXD16 wireless system, Cory Wong flows his guitar into his Neural DSP Quad Cortex, which runs a beta version of his Archetype: Cory Wong plugin, based off of a melding of a Dumble and a Fender Twin. The signal hits an onboard envelope filter and rarely used pitch shifter, then exits out the effects loop into a Wampler Cory Wong Compressor, Jackson Audio The Optimist, and a Hotone Wong Press. The signal goes back into the Quad Cortex, where there’s a preset phaser, stereo tape delay, and modulated reverb, plus a freeze effect. Two XLR outs run to front of house, while two run to Wong’s Mission Engineering Gemini 2 stereo cabinet.
Mark Lettieri’s Pedalboard
Mark Lettieri’s signal first hits a Keeley Monterey Custom Shop Edition, followed by an MXR Deep Phase, J. Rockett HRM, J. Rockett Melody OD (Lettieri’s signature), Pigtronix Octava, and a Dunlop DVP4, all powered by a Strymon Ojai. A TC Electronic TonePrint Plethora X5 pedalboard handles coordination and switching between the devices.
SLASH’S BLUES BALL BAND
Slash’s Pedalboard
“I haven’t had a pedalboard in front of my feet since the ’80s,” Slash told us. But with the Blues Ball tour, he kept it simple, stomping his own boxes. His chain includes a Peterson StroboStomp, Dunlop Cry Baby, MXR CAE Boost/Line Driver, Ibanez TS9 Tube Screamer, MXR EVH90, BBE Soul Vibe Rotary Simulator, Boss DD-3 Digital Delay, and MXR Uni-Vibe, with everything powered by a Voodoo Lab Pedal Power 2 Plus. All pedals are taped down with their settings dialed in. When his signal leaves the board, it hits a Whirlwind Selector A/B box, where it splits off between his amps and his Talk Box rig.
Tash Neal’s Pedalboard
Tash Neal keeps a modest pedalboard at his feet: a D’Addario Chromatic Pedal Tuner, Dunlop Cry Baby, XTS Custom Pedals Precision Multi-Drive, EHX Green Russian Big Muff, and a Fender Waylon Jennings Phaser, powered by a T-Rex Fuel Tank.
RANCID’S MATT FREEMAN
Matt Freeman’s Pedalboard
Bassist Matt Freeman’s signal goes wireless into one of his Avalon U5 Class A Active Instrument DI and Preamps, and then through a Way Huge Pork Loin Overdrive, set to give his Bassman a good push.
CHRISTONE “KINGFISH” INGRAM
Kingfish’s Pedalboard
Kingfish’s signal starts with a Shure Wireless BLX4, which hits a Boss TU-3w Chromatic Tuner. From there, the route is a Dunlop Cry Baby Mini Wah, a Marshall ShredMaster, and a Boss DD-3 Delay. The pedals live on a Pedaltrain Nano board and were assembled by Barry O’Neal at XAct Tone Solutions.
DIXIE DREGS’ STEVE MORSE
Steve Morse’s Pedalboard
Steve plays through a pair of 3-channel Engl Steve Morse signature 100-watt amps—one wet, one dry—but his pedal chain is relatively simple: a Keeley Compressor, two Ernie Ball volume pedals, two TC Flashbacks, a TC Electronic Polytune, and a foot controller for his Engls.
Watch the official video documenting the sold-out event at House of Blues in Anaheim. Join Paul Reed Smith and special guests as they toast to quality and excellence in guitar craftsmanship.
PRS Guitars today released the official video documenting the full night of performances at their 40th Anniversary celebration, held January 24th in conjunction with the 2025 NAMM (The National Association of Music Merchants) Show. The sold-out, private event took place at House of Blues in Anaheim, California and featured performances by PRS artists Randy Bowland, Curt Chambers, David Grissom, Jon Jourdan, Howard Leese, Mark Lettieri Group, Herman Li, John Mayer, Orianthi, Tim Pierce, Noah Robertson, Shantaia, Philip Sayce, and Dany Villarreal, along with Paul Reed Smith and his Eightlock band.
“What a night! Big thanks to everyone who came out to support us: retailers, distributors, vendors, content creators, industry friends, and especially the artists. I loved every second. We are so pleased to share the whole night now on this video,” said Paul Reed Smith, Founder & Managing General Partner of PRS Guitars. “I couldn’t be more proud to still be here 40 years later.”
With nearly 1,400 of the who’s who in the musical instrument industry in attendance, the night ended with a thoughtful toast from PRS Signature Artist John Mayer, who reflected on 40 years of PRS Guitars and the quality that sets the brand apart. “The guitars are great. You can’t last 40 years if the guitars aren’t great,” said Mayer. “Many of you started hearing about PRS the same way I did, which is you would talk about PRS and someone would say ‘They’re too nice.’ What’s too nice for a guitar? What, you want that special vibe that only tuning every song can give you on stage? You want that grit just like your heroes … bad intonation? The product is incredible.”
Be sure to locate your sample library where it can be quickly referenced on your DAW.
Improve your recordings using your own samples. Bryan Clark, house producer at Nashville’s Blackbird Studio, tells you how to take the final steps in building your own sample library.
Mastering the sample import process in your chosen DAW can significantly enhance your creativity and streamline your workflow. With a clear understanding of the tools and techniques available, you will be better equipped to bring your musical ideas to life and make your productions stand out.
This month, we finish up a three-part series on creating your own sample libraries. In this final installment, I’m going to give you the basic ways to import your samples into various popular DAWs. Each one has its unique workflow and user interface, but the fundamental process remains very similar. This Dojo guide will cover how to import samples into Ableton Live, LUNA, Logic Pro, Pro Tools, and Studio One.
Ableton Live
Steps to Import Samples
Drag and Drop: Simply locate the sample file in your computer’s file explorer, then drag and drop it directly into an audio track in the session or arrangement view.
Browser Window: Use Ableton’s built-in browser (on the left-hand side). Navigate to the sample’s location on your hard drive, then drag it into the workspace.
Create a Simpler or Sampler Instrument: Drag the sample into a MIDI track with Simpler or Sampler loaded. This allows you to trigger the sample using MIDI notes.
Tips: Use the warp feature for time-stretching and syncing samples to your project’s tempo.
Organize your samples into collections using the “Add Folder” option in the browser.
LUNA
Steps to Import Samples
Drag and Drop: Drag the sample from your file explorer directly into the timeline. Then hold the CTRL key down, click on the end of the loop, and drag it to the length it needs to be.
Browser/Workspace: Use the media browser to navigate to your sample’s location on your hard drive. Drag it into an audio track in your session.
Audio Track Import: Right-click on an empty area in the timeline or a track and select “Import Audio” to locate and add your sample.
Tips: Use LUNA’s built-in varispeed capabilities to match your sample to the session’s tempo.Logic Pro
Steps to Import Samples
Drag and Drop: Drag the sample from the Finder directly into an audio track in the workspace.
File Browser: Use the file browser (accessible via the media sidebar or “F” key) to locate and drag samples into the timeline.
Quick Sampler: Drag your sample onto a MIDI track with the Quick Sampler plugin loaded. This lets you play the sample chromatically.
Tips: Use Logic’s flex time feature to sync samples to your project’s tempo. Organize samples into Logic’s library for quick access.Pro Tools
Steps to Import Samples
Import Audio Dialog: Go to File > Import > Audio; then locate your sample and click “Convert” or “Add” to bring it into the session.
Drag and Drop: Drag the sample directly from your file explorer into an audio track.
Workspace Browser: Use the workspace (accessible via Window > New Workspace) to locate your sample. Drag it into your session.
Tips: Use the elastic audio feature for tempo matching and pitch adjustments.
Place your samples into playlists for efficient access during editing.
Studio One
Steps to Import Samples
Drag and Drop: Drag your sample directly from your file explorer into the timeline or browser.
Browser: Open Studio One’s browser (on the right-hand side), navigate to the folder containing your sample, and drag it into your project.
Sampler Track: Drag the sample onto a MIDI track, and use the Sample One sampler for additional manipulation.
Tips: Enable the “Stretch Audio Files to Song Tempo” option in the browser for automatic tempo synchronization. Create sample folders within Studio One’s browser for quick access.General Best Practices
Regardless of the DAW you use, it is important to maintain a smooth and efficient workflow. Organize your sample library with clear folder names and categories to make locating files easy (see last month’s installment for detailed strategies). Where possible, learn DAW-specific shortcuts for importing and editing samples to save time. Always check if your DAW offers a feature to sync the sample’s tempo to your project to ensure seamless integration. Finally, regularly back up your sample collection to avoid losing important audio files and preserve your creative assets! Seriously. Do it now.
Next month, we’re off to “console” land and I’ll be investigating console emulations (hype or not?), summing bus processors, and more to give you a more “studio” sound. Until then, blessings and namaste.
Stretching the boundaries of reverb’s realm through dynamic and pitch control.
Nice core reverb sounds. Invites cool compositional and arrangement directions. High quality.
If you lack patience, it will be hard to unlock its coolest secrets.
$329
Gamechanger Audio Auto Reverb
gamechangeraudio.com
When the first Moog synthesizer appeared, it freaked out a lot of musicians—not least for the way it blurred the divisions between instruments and their roles. Was it percussion? A keyboard? A reed instrument? Many effects makers build from this philosophical foundation. The Latvian company Gamechanger often seems to revel in it—an attitude that’s manifest in the company’s Auto Series pedals, which includes the Auto Reverb.
There’s no reason you can’t use the Auto Reverb in a very straightforward fashion. The plate, spring, and hall settings are all very nice digital representations of their analog inspirations—and I’d be perfectly happy playing an instrumental surf set with the spring mode, for instance. But because you can control the parameters like the reverb’s level, decay, tone, and the filter with changes in pitch and dynamics, the Auto Reverb can function in highly orchestral ways, transforming itself from subtle to outlandish as a musical piece shifts in intensity or rises from low to high keys toward a blurred, hyper-spacious climax. While these attributes make the Auto Reverb a great fit for prepared guitar and conceptual pieces—and invites many themes and compositional ideas within those forms—it can just as easily be configured to create an especially dynamic and dramatic pop song arrangement on stage or in the studio that might otherwise be relegated to automations within a DAW. It’s fun to use, if not always intuitive. But knowing its ways can expand your musical options significantly.