
Need to play an acoustic gig on the go? These 10 combos will get you through nearly anything.
Acoustic amplification can be a tricky dragon to tame. With so many sonic forces potentially working against you, it’s important to have a rock-solid amp that can deal with feedback, volume issues, and even handle more than one instrument.
Fishman Loudbox Artist BT
With an impressive 120 watts on tap, this dual-channel combo offers both instrument and mic inputs, aux input, XLR output, built-in modulation and reverb, plus Bluetooth connectivity.
$659 street
Fender Acoustasonic 40
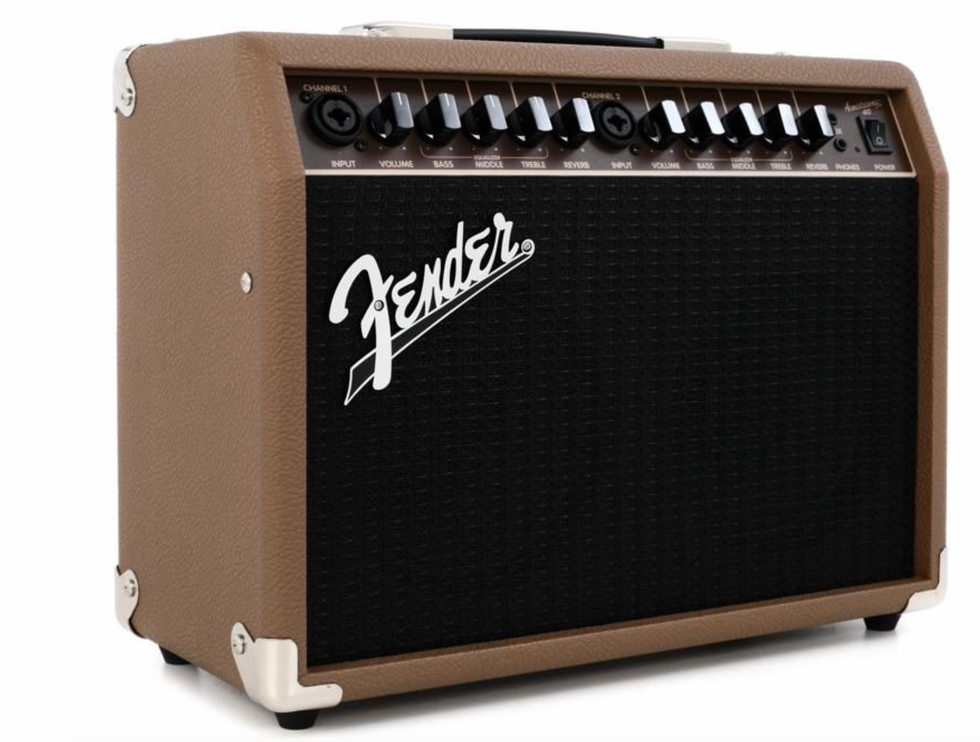
At only a hair over 16 pounds, this grab-and-go combo packs 40 watts into a rather small package. It has two channels with combination input jacks, independent 3-band EQ controls, digital reverb, and an XLR output that you can either use to record or feed FOH.
$199 street
Boss Acoustic Singer Pro
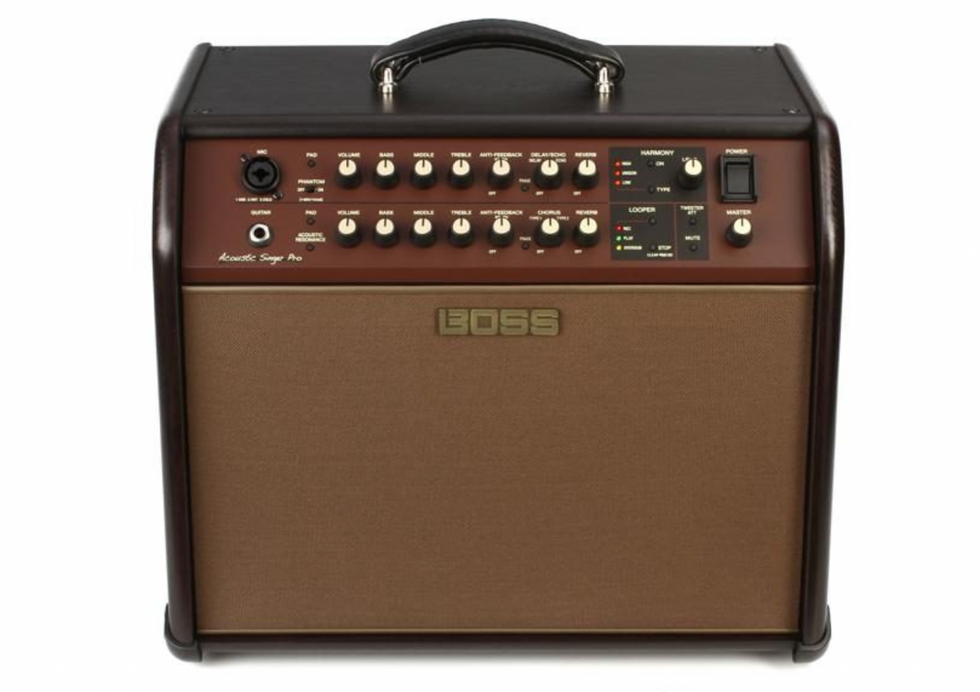
This portable gigging machine is specifically aimed at guitarists who want to add a new dimension to their vocals. Included is an automatic harmony setting that builds harmonies that correspond to your guitar chords in real time .
$789 street
TC-Helicon Harmony V100
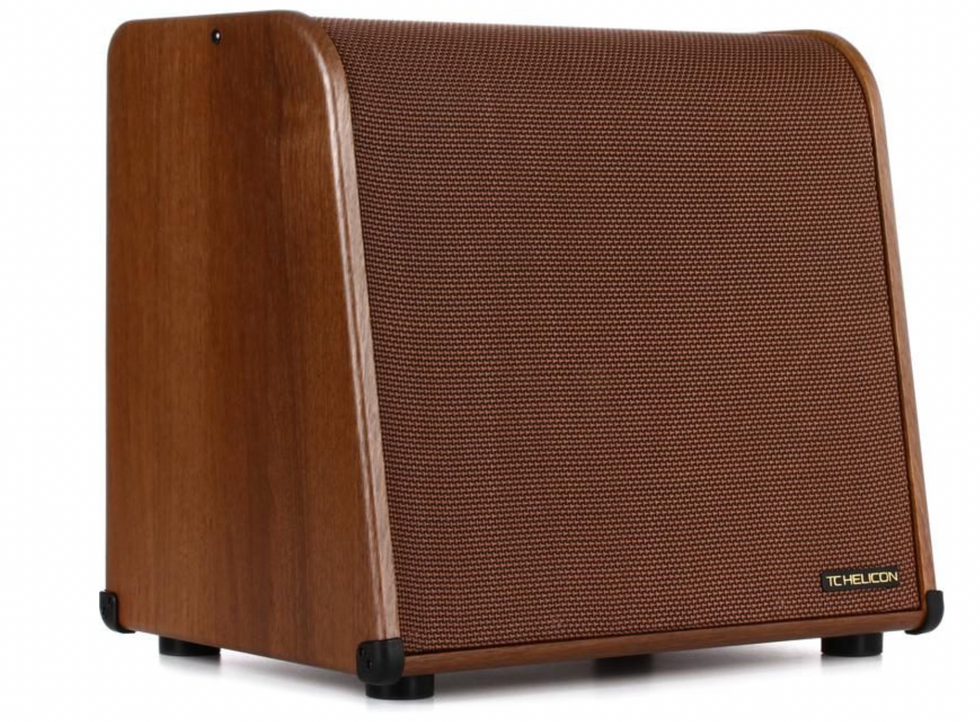
Built around a single 10" Tannoy speaker, this 100-watt combo offers independent channels for guitar and vocals, modulation, and effects such as pitch correction and harmony. Another bonus is the TC’s BodyRez control, which adds resonance to acoustic signals.
$639 street
Blackstar Acoustic:Core 30
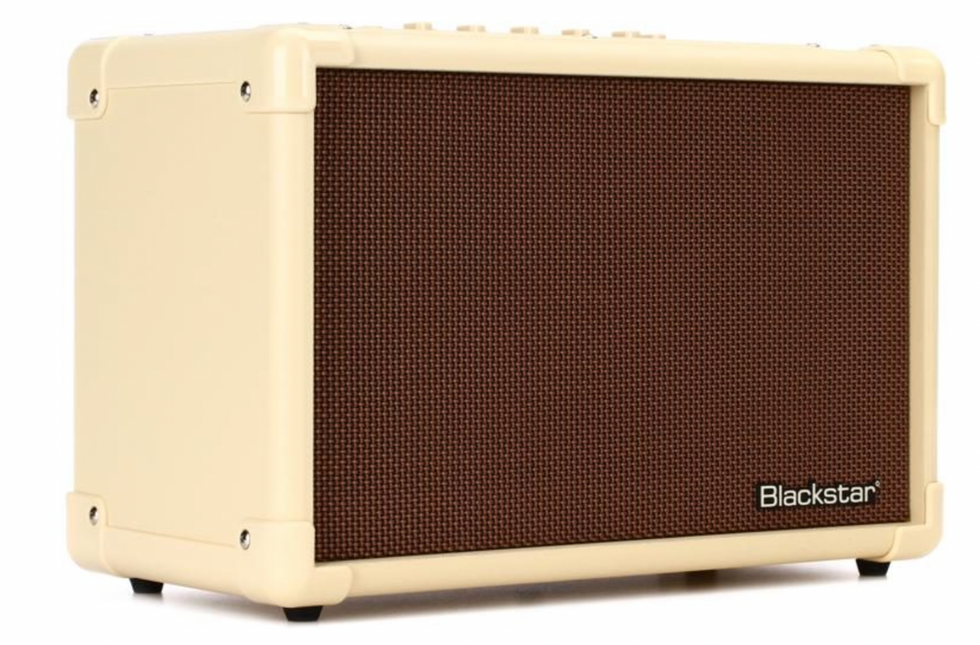
A 2x5" amp that is also an audio interface? Not only does this uber-portable combo offer options tailored for the recording guitarist, it also has independent vocal and guitar channels, built-in reverb and chorus, plus switchable EQ shapes.
$179 street
Hughes & Kettner ERA 2
Designed in collaboration with amp guru Michael Eisenmann, this combo—which includes two 8" custom woofers and a 1" dome tweeter—offers a whopping 400 watts along with three different types of reverb plus chorus, flanger, delay, and phantom power for the vocal mic.
$1,219 street
Orange Crush Acoustic 30
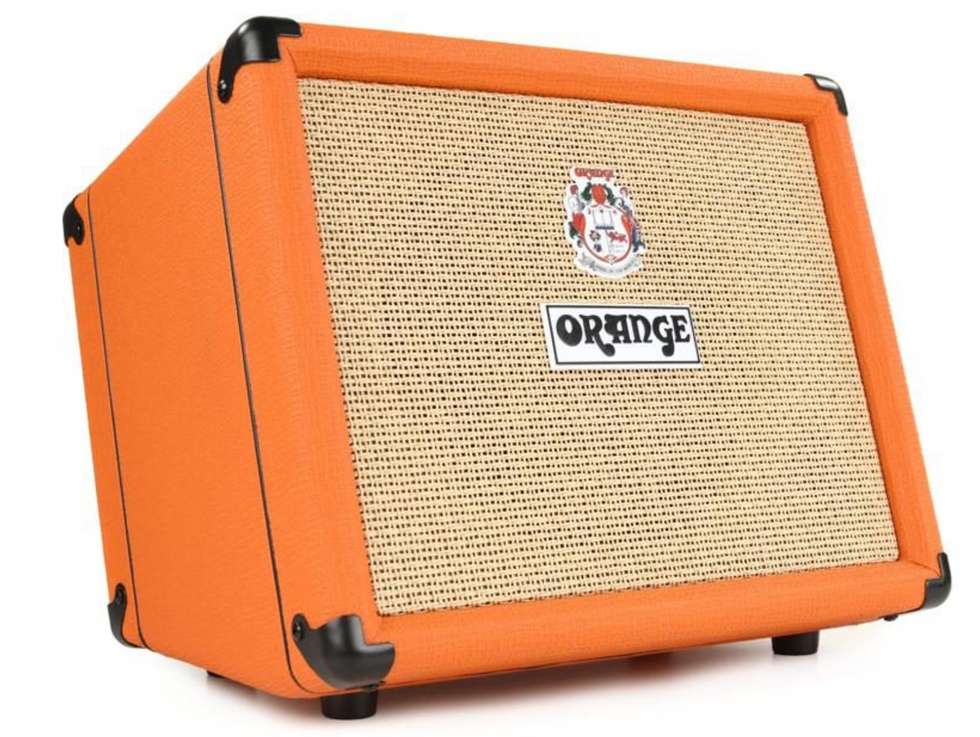
Usually, boxes of this color and shape are found crushing eardrums, but this 30-watt, 8" combo can not only run on batteries, it packs a ton of features in a rather small chassis. Features include dedicated mic and guitar channels, plus dedicated XLR and 1/4" outputs, and an effects loop.
$399 street
Vox VX50AG
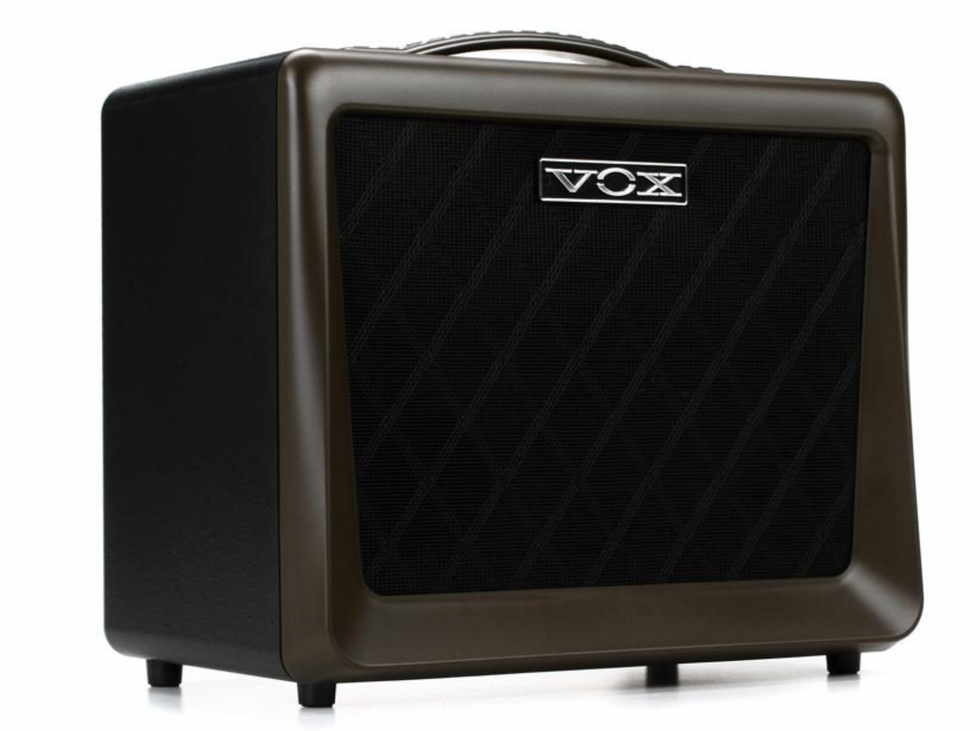
Combining a full 50 watts with the company’s Nutube tech, this svelte combo can handle coffeeshop gigs and late-night practice sessions with ease. Each channel features independent EQ controls, digital reverb, and phase/phantom power options.
$299 street
Roland AC-33
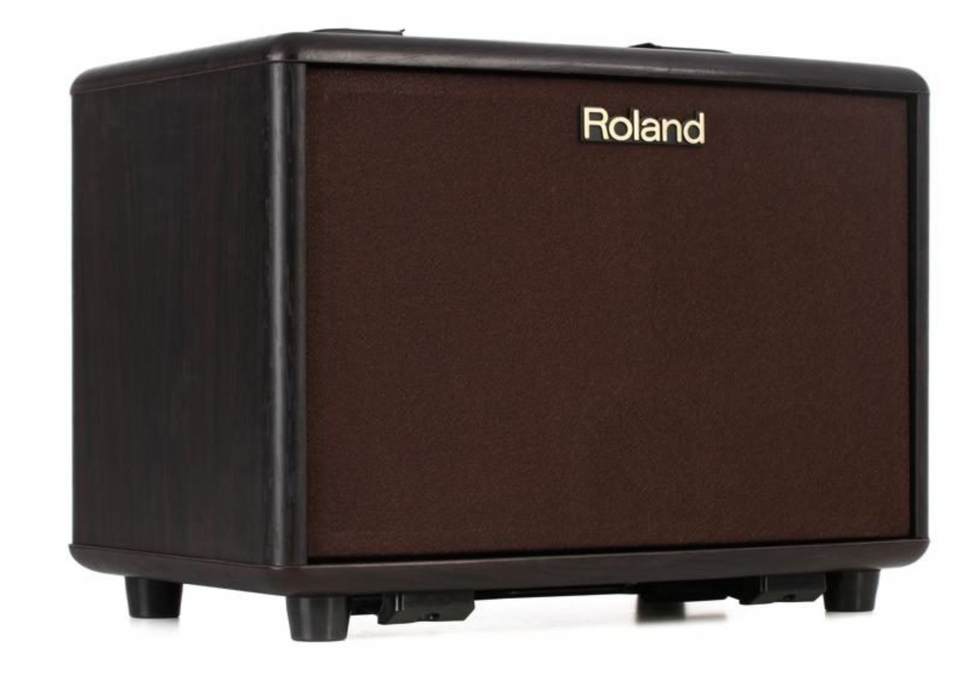
A fully featured, gig-ready combo that can handle nearly any one-person show, this box includes feedback controls, a looper, and Roland’s famous chorus effects. It also has a line out, aux inputs, and the ability to run on batteries.
$599 street
Rivera Sedona Lite
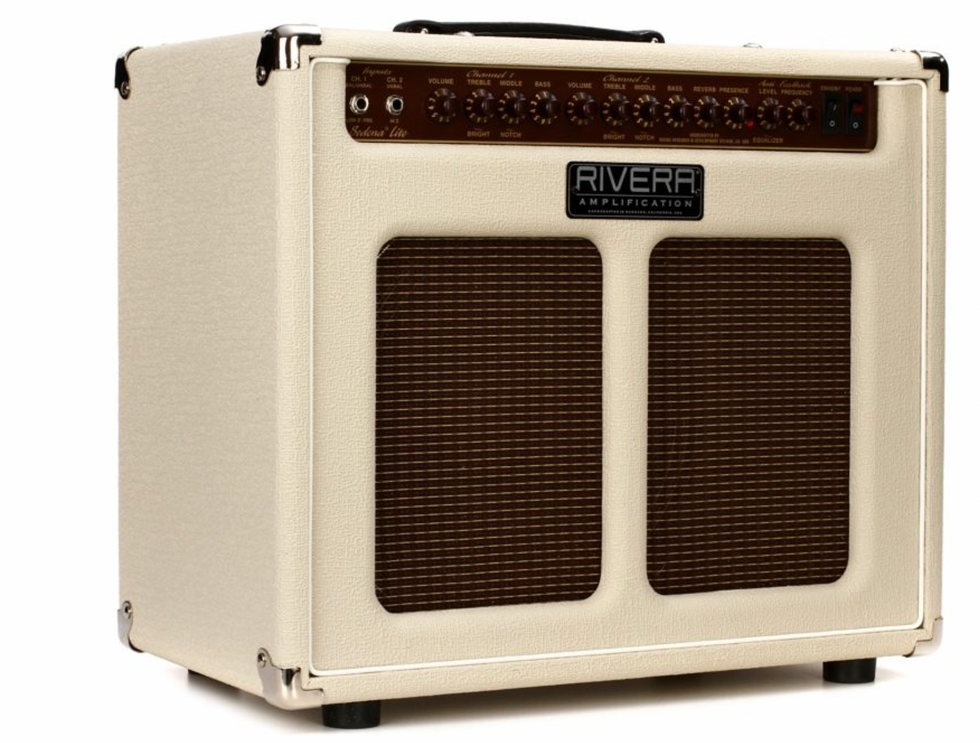
This high-end acoustic combo is an incredible tool if you want to go the hybrid route and need a single amp for both electric and acoustic. It also includes a six-spring Accutronics reverb, an anti-feedback equalizer, plus a customized input for Expression System-equipped Taylor guitars.
$2,249 street
- Top 10 Acoustic Guitars: Rig Rundown Best-Ofs ›
- Acoustic Guitars and Fender Amps ›
- 10 Acoustic Amps You Should Unplug Into ›
There's a lot of musical gold inside the scales.
Intermediate
Intermediate
• Develop a deeper improvisational vocabulary.
• Combine pentatonic scales to create new colors.
• Understand the beauty of diatonic harmony.Improvising over one chord for long stretches of time can be a musician's best friend or worst nightmare. With no harmonic variation, we are left to generate interest through our lines, phrasing, and creativity. When I started learning to improvise, a minor 7 chord and a Dorian mode were the only sounds that I wanted to hear at the time. I found it tremendously helpful to have the harmony stay in one spot while I mined for new ideas to play. Playing over a static chord was crucial in developing my sense of time and phrasing.
The following is the first improvisational device I ever came across. I want to say I got it from a Frank Gambale book. The idea is that there are three minor pentatonic scales "hiding" in any given major scale. If we're in the key of C (C–D–E–F–G–A–B) we can pluck out the D, E, and A minor pentatonic scales. If we frame them over a Dm7 chord, they give us different five-note combinations of the D Dorian mode. In short, we are building minor pentatonic scales off the 2, 3, and 6 of the C major scale.
Viewing this through the lens of D minor (a sibling of C major and the tonal center for this lesson), D minor pentatonic gives us the 1–b3–4–5–b7, E minor pentatonic gives us 2–4–5–6–1, and A minor pentatonic gives us 5–b7–1–2–4. This means you can use your favorite pentatonic licks in three different locations and there are three different sounds we can tap into from the same structure.
If you smashed all of them together, you would get the D Dorian scale (D–E–F–G–A–B–C) with notes in common between the D, E, and A minor pentatonic scales. Ex. 1 uses all three scales, so you can hear the different colors each one creates over the chord.
Ex. 1
Ex. 2 is how I improvise with them, usually weaving in and out using different positional shapes.
Ex. 2
The next idea is one I stole from a guitarist who often came into a music store I worked at. On the surface, it's very easy: Just take two triads (in our example it will be Dm and C) and ping-pong between them. The D minor triad (D–F–A) gives us 1–b3–5, which is very much rooted in the chord, and the C major triad (C–E–G) gives us the b7–9–4, which is much floatier. Also, if you smash these two triads together, you get 1–2–b3–4–5–b7, which is a minor pentatonic scale with an added 2 (or 9). Eric Johnson uses this sound all the time. Ex. 3 is the lick I stole years ago.
Ex. 3
Ex. 4 is how I would improvise with this concept. Many different fingerings work with these, so experiment until you find a layout that's comfortable for your own playing.
Ex. 4
If two triads work, why not seven? This next approach will take all the triads in the key of C (C–Dm–Em–F–G–Am–Bdim) and use them over a Dm7 chord (Ex. 5). Each triad highlights different three-note combinations from the Dorian scale, and all of them sound different. Triads are clear structures that sound strong to our ears, and they can generate nice linear interest when played over one chord. Once again, all of this is 100% inside the scale. Ex. 5 is how each triad sounds over the track, and Ex. 6 is my attempt to improvise with them.
Ex. 5
Ex. 6
If we could find all these possibilities with triads, it's logical to make the structure a little bigger and take a similar approach with 7 chords, or in this case, arpeggios. Naturally, all the diatonic chords will work, but I'll limit this next idea to just Dm7, Fmaj7, Am7, and Cmaj7. I love this approach because as you move further away from the Dm7 shape, each new structure takes out a chord tone and replaces it with an extension. I notice that I usually come up with different lines when I'm thinking about different chord shapes, and this approach is a decent way to facilitate that. Ex. 7 is a good way to get these under your fingers. Just ascend one shape, shift into the next shape on the highest string, then descend and shift to the next on the lowest string.
Ex. 7
Ex. 8 is my improvisation using all four shapes and sounds, but I lean pretty heavily on the Am7.
Ex. 8
This last concept has kept me busy on the fretboard for the last five years or so. Check it out: You can take any idea that works over Dm7 and move the other diatonic chords. The result is six variations of your original lick. In Ex. 9 I play a line that is 4–1–b3–5 over Dm7 and then walk it through the other chords in the key. These notes are still in the key of C, but it sounds drastically different from playing a scale.
Ex. 9
In Ex. 10, I try to think about the shapes from the previous example, but I break up the note order in a random but fun way. The ending line is random but felt good, so I left it in.
Ex. 10
While all these concepts have been presented over a minor chord, you can just as easily apply them to any chord quality, and they work just as well in harmonic or melodic minor. Rewarding sounds are available right inside the harmony, and I am still discovering new ideas through these concepts after many years.
Though the above ideas won't necessarily be appropriate for every style or situation, they will work in quite a few. Developing any approach to the point that it becomes a natural extension of your playing takes considerable work and patience, so just enjoy the process, experiment, and let your ear guide you to the sounds you like. Even over just one chord, there is always something new to find.
Fifteen watts that sits in a unique tone space and offers modern signal routing options.
A distinct alternative to the most popular 1x10 combos. Muscular and thick for a 1x10 at many settings. Pairs easily with single-coils and humbuckers. Cool looks.
Tone stack could be more rangeful.
$999
Supro Montauk
supro.com
When you imagine an ideal creative space, what do you see? A loft? A barn? A cabin far from distraction? Reveling in such visions is inspiration and a beautiful escape. Reality for most of us, though, is different. We’re lucky to have a corner in the kitchen or a converted closet to make music in. Still, there’s a romance and sense of possibility in these modest spaces, and the 15-watt, 1x10, all-tubeSupro Montauk is an amplifier well suited to this kind of place. It enlivens cramped corners with its classy, colorful appearance. It’s compact. It’s also potent enough to sound and respond like a bigger amp in a small room.
The Montauk works in tight quarters for reasons other than size, though—with three pre-power-section outputs that can route dry signal, all-wet signal from the amp’s spring reverb, or a mixture of both to a DAW or power amplifier.
Different Stripes and Spacious Places
Vintage Supro amps are modestly lovely things. The China-made Montauk doesn’t adhere toold Supro style motifs in the strictest sense. Its white skunk stripe is more commonly seen on black Supro combos from the late 1950s, while the blue “rhino hide” vinyl evokes Supros from the following decade. But the Montauk’s handsome looks make a cramped corner look a lot less dour. It looks pretty cool on a stage, too, but the Montauk attribute most likely to please performing guitarists is the small size (17.75" x 16.5" x 7.5") and light weight (29 pounds), which, if you tote your guitar in a gig bag and keep your other stuff to a minimum, facilitates magical one-trip load ins.
Keen-eyed Supro-spotters noting the Montauk’s weight and dimensions might spy the similarities to another 1x10 Supro combo,the Amulet. A casual comparison of the two amps might suggest that the Montauk is, more-or-less, an Amulet without tremolo and power scaling. They share the same tube complement, including a relatively uncommon 1x6L6 power section. But while the Montauk lacks the Amulet’s tremolo, the Montauk’s spring reverb features level and dwell controls rather than the Amulet’s single reverb-level knob.
“High reverb levels and low dwell settings evoke a small, reflective room with metallic overtones from the spring sprinkled on top—leaving ghostly ambience in the wake of strong, defined transient tones.”
If you use reverb a lot and in varying levels of intensity, you’ll appreciate the extra flexibility. High reverb levels and low dwell settings evoke a small, reflective room with metallic overtones from the spring sprinkled on top—leaving ghostly ambience in the wake of strong, defined transient tones. There are many shades of this subtle texture to explore, and it’s a great sound and solution for those who find the spring reverbs in Fender amps (which feature no dwell control) an all-or-nothing proposition. For those who like to get deep in the pipeline, though, the dwell offers room to roam. Mixing high level and dwell settings blunts the amp’s touch sensitivity a bit, and at 15 watts you trade headroom for natural compression, compounding the fogginess of these aggressive settings. A Twin Reverb it ain’t. But there is texture aplenty to play with.
A Long, Wide Strand
Admirably, the Montauk speaks in many voices when paired with a guitar alone. The EQ sits most naturally and alive with treble and bass in the noon-to-2-o’clock region, and a slight midrange lean adds welcome punch. Even the amp’s trebliest realms afford you a lot of expressive headroom if you have enough range and sensitivity in your guitar volume and tone pots. Interactions between the gain and master output controls yield scads of different tone color, too. Generally, I preferred high gain settings, which add a firecracker edge to maximum guitar volume settings and preserve touch and pick response at attenuated guitar volume and tone levels.
If working with the Montauk in this fashion feels natural, you’ll need very few pedals. But it’s a good fit for many effects. A Fuzz Face sounded nasty without collapsing into spitty junk, and the Klon-ish Electro-Harmonix Soul Food added muscle and character in its clean-boost guise and at grittier gain levels. There’s plenty of headroom for exploring nuance and complexity in delays and modulations. It also pairs happily with a wide range of guitars and pickups: Every time I thought a Telecaster was a perfect fit, I’d plug in an SG with PAFs and drift away in Mick Taylor/Stones bliss.
The Verdict
Because the gain, master, tone, and reverb controls are fairly interactive, it took me a minute to suss out the Montauk’s best and sweetest tones. But by the time I was through with this review, I found many sweet spots that fill the spaces between Vox and Fender templates. There’s also raunch in abundance when you turn it up. It’s tempting to view the Montauk as a competitor to the Fender Princeton and Vox AC15. At a thousand bucks, it’s $400 dollars less than the Mexico-made Princeton ’68 Custom and $170 more than the AC15, also made in China. In purely tone terms, though, it represents a real alternative to those stalwarts. I’d be more than happy to see one in a backline, provided I wasn’t trying to rise above a Geezer Butler/Bill Ward rhythm section. And with its capacity for routing to other amps and recording consoles in many intriguing configurations, it succeeds in being a genuinely interesting combination of vintage style and sound and home-studio utility—all without adding a single digital or solid-state component to the mix.
Watch the official video documenting the sold-out event at House of Blues in Anaheim. Join Paul Reed Smith and special guests as they toast to quality and excellence in guitar craftsmanship.
PRS Guitars today released the official video documenting the full night of performances at their 40th Anniversary celebration, held January 24th in conjunction with the 2025 NAMM (The National Association of Music Merchants) Show. The sold-out, private event took place at House of Blues in Anaheim, California and featured performances by PRS artists Randy Bowland, Curt Chambers, David Grissom, Jon Jourdan, Howard Leese, Mark Lettieri Group, Herman Li, John Mayer, Orianthi, Tim Pierce, Noah Robertson, Shantaia, Philip Sayce, and Dany Villarreal, along with Paul Reed Smith and his Eightlock band.
“What a night! Big thanks to everyone who came out to support us: retailers, distributors, vendors, content creators, industry friends, and especially the artists. I loved every second. We are so pleased to share the whole night now on this video,” said Paul Reed Smith, Founder & Managing General Partner of PRS Guitars. “I couldn’t be more proud to still be here 40 years later.”
With nearly 1,400 of the who’s who in the musical instrument industry in attendance, the night ended with a thoughtful toast from PRS Signature Artist John Mayer, who reflected on 40 years of PRS Guitars and the quality that sets the brand apart. “The guitars are great. You can’t last 40 years if the guitars aren’t great,” said Mayer. “Many of you started hearing about PRS the same way I did, which is you would talk about PRS and someone would say ‘They’re too nice.’ What’s too nice for a guitar? What, you want that special vibe that only tuning every song can give you on stage? You want that grit just like your heroes … bad intonation? The product is incredible.”
Be sure to locate your sample library where it can be quickly referenced on your DAW.
Improve your recordings using your own samples. Bryan Clark, house producer at Nashville’s Blackbird Studio, tells you how to take the final steps in building your own sample library.
Mastering the sample import process in your chosen DAW can significantly enhance your creativity and streamline your workflow. With a clear understanding of the tools and techniques available, you will be better equipped to bring your musical ideas to life and make your productions stand out.
This month, we finish up a three-part series on creating your own sample libraries. In this final installment, I’m going to give you the basic ways to import your samples into various popular DAWs. Each one has its unique workflow and user interface, but the fundamental process remains very similar. This Dojo guide will cover how to import samples into Ableton Live, LUNA, Logic Pro, Pro Tools, and Studio One.
Ableton Live
Steps to Import Samples
Drag and Drop: Simply locate the sample file in your computer’s file explorer, then drag and drop it directly into an audio track in the session or arrangement view.
Browser Window: Use Ableton’s built-in browser (on the left-hand side). Navigate to the sample’s location on your hard drive, then drag it into the workspace.
Create a Simpler or Sampler Instrument: Drag the sample into a MIDI track with Simpler or Sampler loaded. This allows you to trigger the sample using MIDI notes.
Tips: Use the warp feature for time-stretching and syncing samples to your project’s tempo.
Organize your samples into collections using the “Add Folder” option in the browser.
LUNA
Steps to Import Samples
Drag and Drop: Drag the sample from your file explorer directly into the timeline. Then hold the CTRL key down, click on the end of the loop, and drag it to the length it needs to be.
Browser/Workspace: Use the media browser to navigate to your sample’s location on your hard drive. Drag it into an audio track in your session.
Audio Track Import: Right-click on an empty area in the timeline or a track and select “Import Audio” to locate and add your sample.
Tips: Use LUNA’s built-in varispeed capabilities to match your sample to the session’s tempo.Logic Pro
Steps to Import Samples
Drag and Drop: Drag the sample from the Finder directly into an audio track in the workspace.
File Browser: Use the file browser (accessible via the media sidebar or “F” key) to locate and drag samples into the timeline.
Quick Sampler: Drag your sample onto a MIDI track with the Quick Sampler plugin loaded. This lets you play the sample chromatically.
Tips: Use Logic’s flex time feature to sync samples to your project’s tempo. Organize samples into Logic’s library for quick access.Pro Tools
Steps to Import Samples
Import Audio Dialog: Go to File > Import > Audio; then locate your sample and click “Convert” or “Add” to bring it into the session.
Drag and Drop: Drag the sample directly from your file explorer into an audio track.
Workspace Browser: Use the workspace (accessible via Window > New Workspace) to locate your sample. Drag it into your session.
Tips: Use the elastic audio feature for tempo matching and pitch adjustments.
Place your samples into playlists for efficient access during editing.
Studio One
Steps to Import Samples
Drag and Drop: Drag your sample directly from your file explorer into the timeline or browser.
Browser: Open Studio One’s browser (on the right-hand side), navigate to the folder containing your sample, and drag it into your project.
Sampler Track: Drag the sample onto a MIDI track, and use the Sample One sampler for additional manipulation.
Tips: Enable the “Stretch Audio Files to Song Tempo” option in the browser for automatic tempo synchronization. Create sample folders within Studio One’s browser for quick access.General Best Practices
Regardless of the DAW you use, it is important to maintain a smooth and efficient workflow. Organize your sample library with clear folder names and categories to make locating files easy (see last month’s installment for detailed strategies). Where possible, learn DAW-specific shortcuts for importing and editing samples to save time. Always check if your DAW offers a feature to sync the sample’s tempo to your project to ensure seamless integration. Finally, regularly back up your sample collection to avoid losing important audio files and preserve your creative assets! Seriously. Do it now.
Next month, we’re off to “console” land and I’ll be investigating console emulations (hype or not?), summing bus processors, and more to give you a more “studio” sound. Until then, blessings and namaste.