Sometimes a guitar’s bolt-on neck needs a shim. Find out why and learn how to shim a neck the right way.
Recently a client brought an older Fender Telecaster into the shop for a setup. The action was really high, but the saddles had run out of adjustment and couldn't drop any lower. After careful inspection, I determined that the neck needed a shim to fix the problem. Fortunately, shimming a bolt-on neck isn't too hard. In fact, if you're handy with basic tools you can do this yourself, but you need to understand the process and know what mistakes to avoid. Let's investigate.
Understanding Neck Angle.
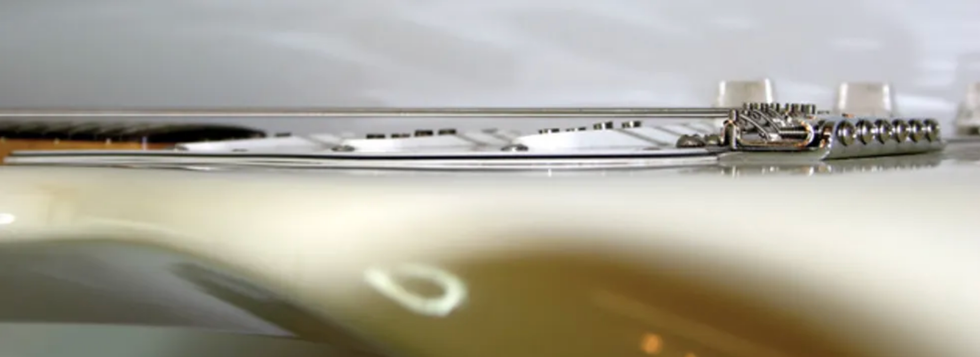
Fig. 1. This neck angle is too low, so even dropping the saddles flush to the bridge plate won't bring the strings close enough to the fretboard to play comfortably.
Our journey begins with neck angle, which is the pitch of the neck relative to the guitar's body and bridge. When the neck angle is set correctly, an electric guitar's saddles can be raised or lowered to create comfortable playing action and optimum tone and sustain.
But when the neck angle is too low (Fig. 1), the saddles can't be moved down enough to bring the strings close to the frets. The guitar is hard to play and the intonation suffers. Conversely, when the neck angle is too high (Fig. 2), you can't raise the strings enough to prevent fretting out or buzzing—even when the saddles are adjusted to their maximum height.
Fig. 2. This neck angle is too high. The guitar is unplayable even with the saddles raised to their maximum height.
In this column, we'll learn how to fix a neck angle that's too low. Typically, this problem can be resolved using a shim (Fig. 3).
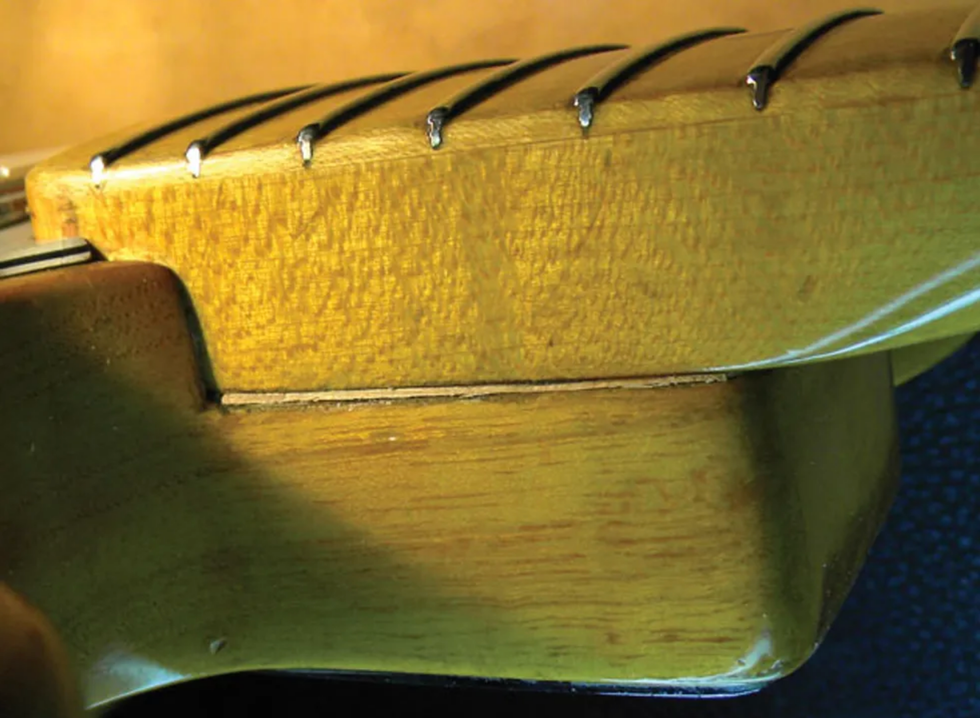
Fig. 3. A full-pocket neck shim can correct a neck angle that's too low.
What causes a neck angle that's too low? Most players don't realize that an electric guitar can compress over time. As an instrument ages, constant string tension can cause the body to become slightly concave, and this changes the neck angle. This doesn't occur with every guitar, but it is common.
Many experts say that the angle for a bolt-on neck should be between zero and five degrees. From my experience, this is correct in most cases. But what I find even more important is how you adjust the neck to its optimal angle. When this is done properly, your guitar will play and sound at its best. When the neck angle is adjusted improperly, it can ruin a perfectly good neck.
If your guitar plays well and the saddles offer enough adjustment range for you to set the action correctly, you don't need to change anything. However, if the angle is too low and you can't move the saddles down any further, the neck needs a shim.
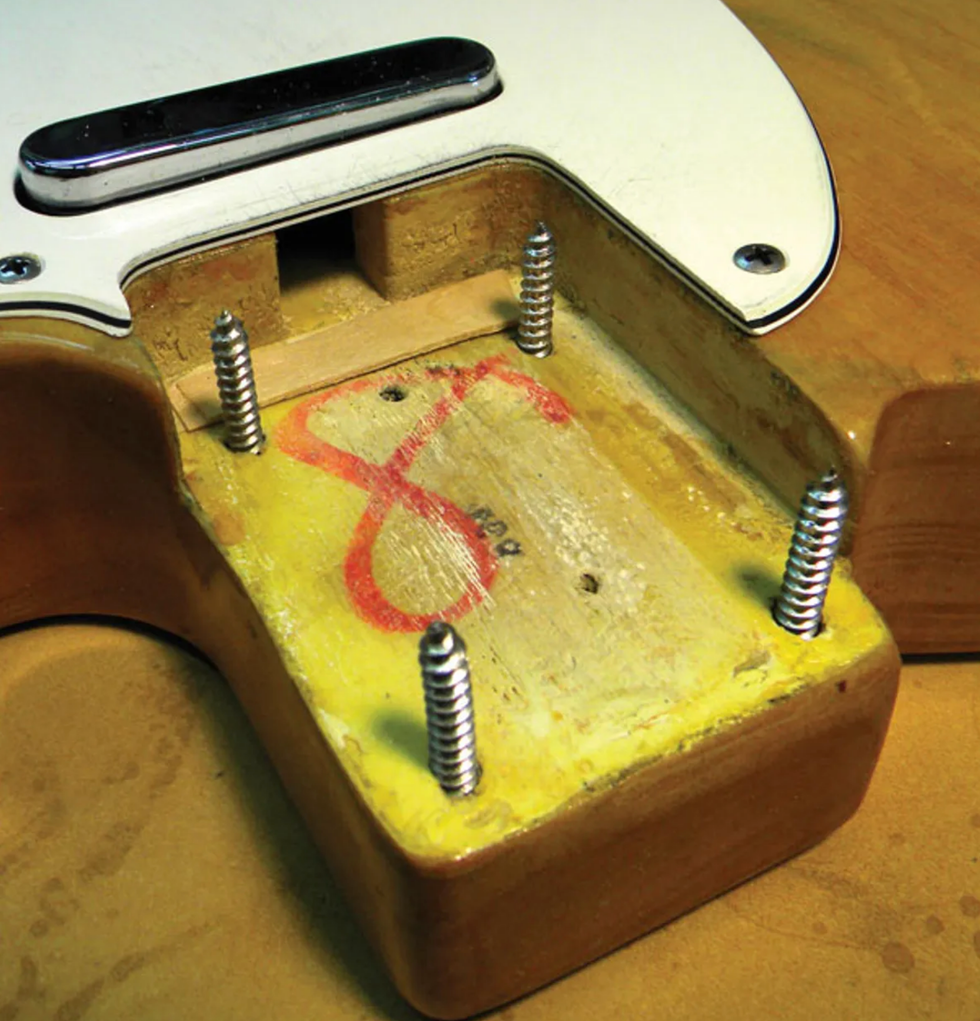
Fig. 4. A shim made from a Popsicle stick or scraps of wood leaves a gap between the neck pocket and neck. Eventually, pressure from the neck screws will warp the neck as it tries to fill the void.
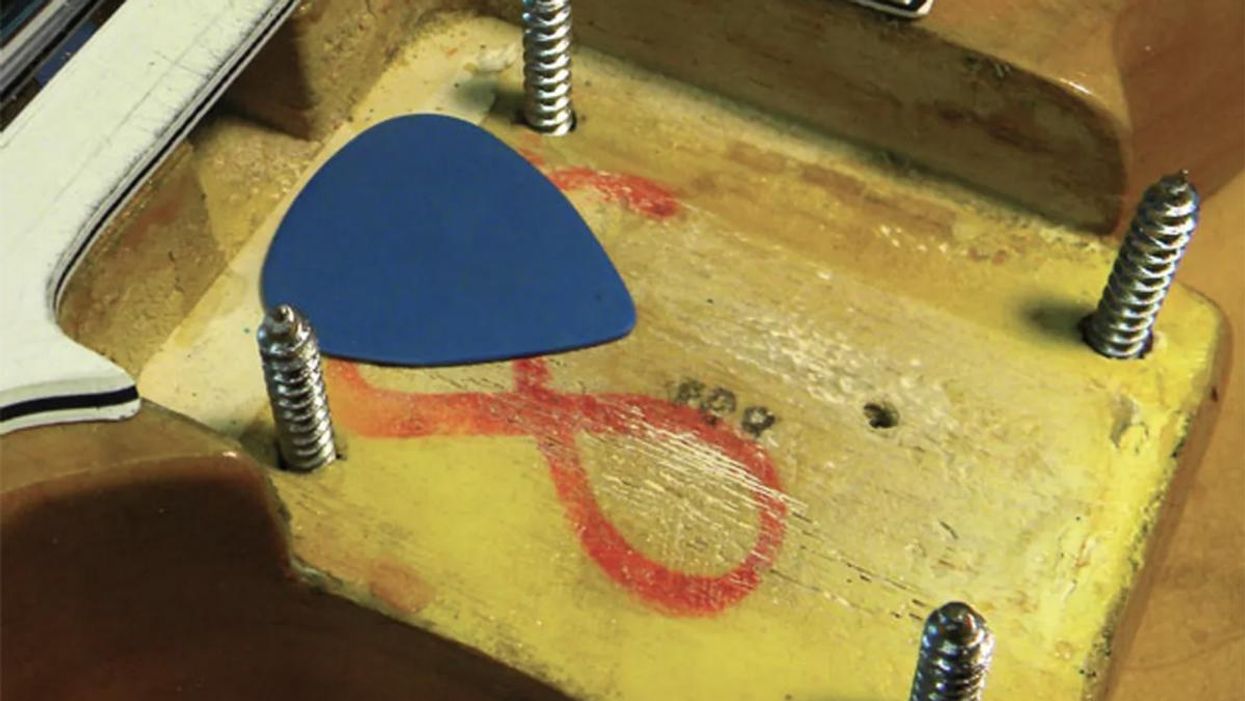
Shimming dos and don'ts. I've seen just about every type of material used to shim a neck, including a matchbook cover, metal washers, a broken Popsicle stick, wood scraps (Fig. 4), and a guitar pick (Fig. 5).
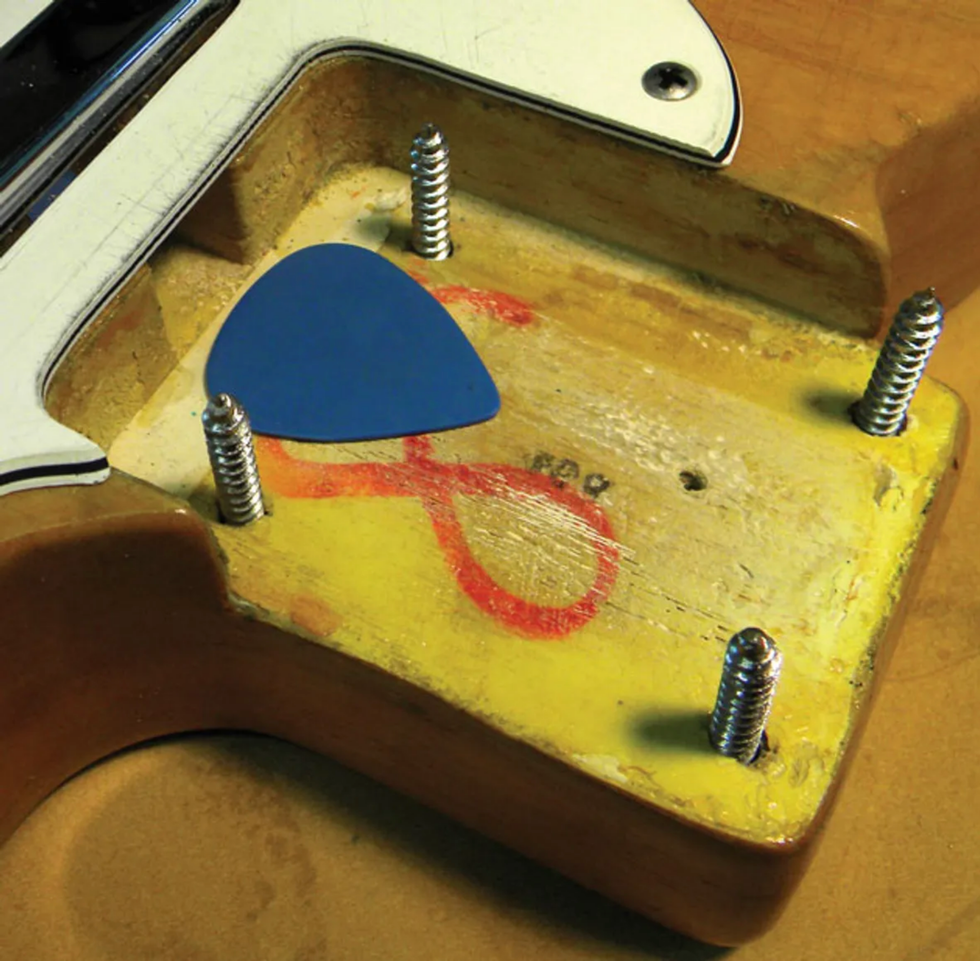
Fig. 5. Another no-no: Using a guitar pick as a shim.
For starters, don't use paper or plastic, and above all, only use a "full-pocket" shim. Here's why a full-pocket shim is essential: When someone uses, say, a matchbook cover or guitar pick, it leaves a gap between the body and neck. Over time, the screws holding the neck force it to fill that void. As a result, the neck warps and the end of the fretboard looks like a ski jump. Next thing you know, the fretboard has to be sanded to remove the warp and then refretted. If you're lucky, the neck will have a thick enough fretboard to allow resurfacing. If not, the neck is a total loss. Either way, it's going to cost you hundreds of dollars.
To avoid these problems, use a full-pocket shim that fits inside the entire neck pocket and is shaped like a thin wedge, with the slightly taller end facing the bridge This raises the end of the fretboard just a bit, which is what you want when correcting a neck angle that's too low.
What You'll Need.
The best material for a shim is a thin piece of maple veneer. Most bolt-on necks are made of maple, so it makes sense to make a shim from the same material. The wood can be easily shaped to fit the neck pocket and angled to the proper degree. I typically start with a piece of maple about .060" thick.
The project requires a small hobby saw, 80-grit self-adhesive sandpaper attached to a flat plastic or wood sanding block, a belt sander, a hole punch, a pencil, and some superglue.
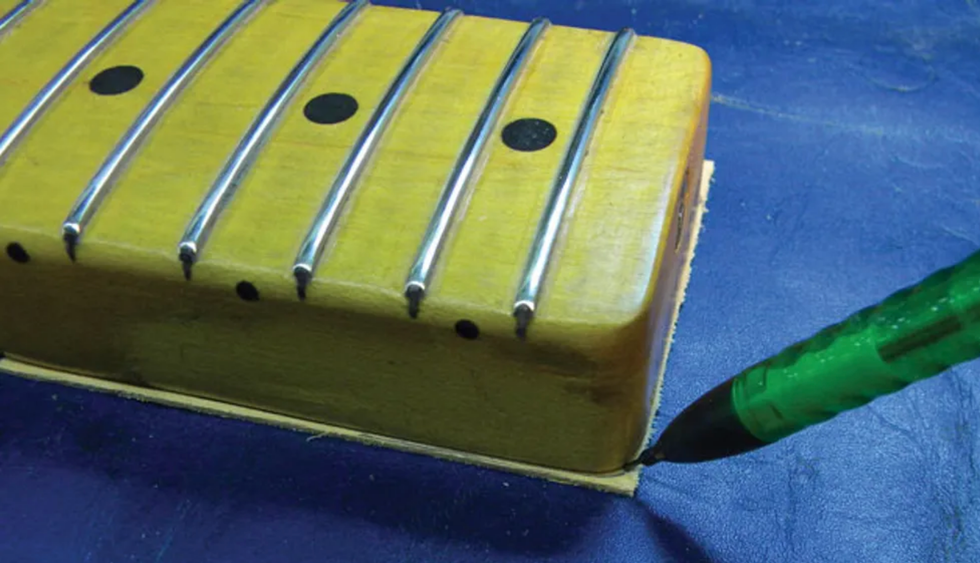
Fig. 6. Tracing the neck heel contours onto a full-pocket maple shim.
Crafting a Shim.
Use a hobby saw to cut out a rectangular piece of wood that's slightly wider and a bit longer than the neck pocket. Begin by tracing the neck heel onto your rectangular piece of maple (Fig. 6). Next, using the 80-grit sandpaper or a belt sander, trim the wood along the neck-heel line. Frequently check your progress to assure a close fit (Fig. 7).
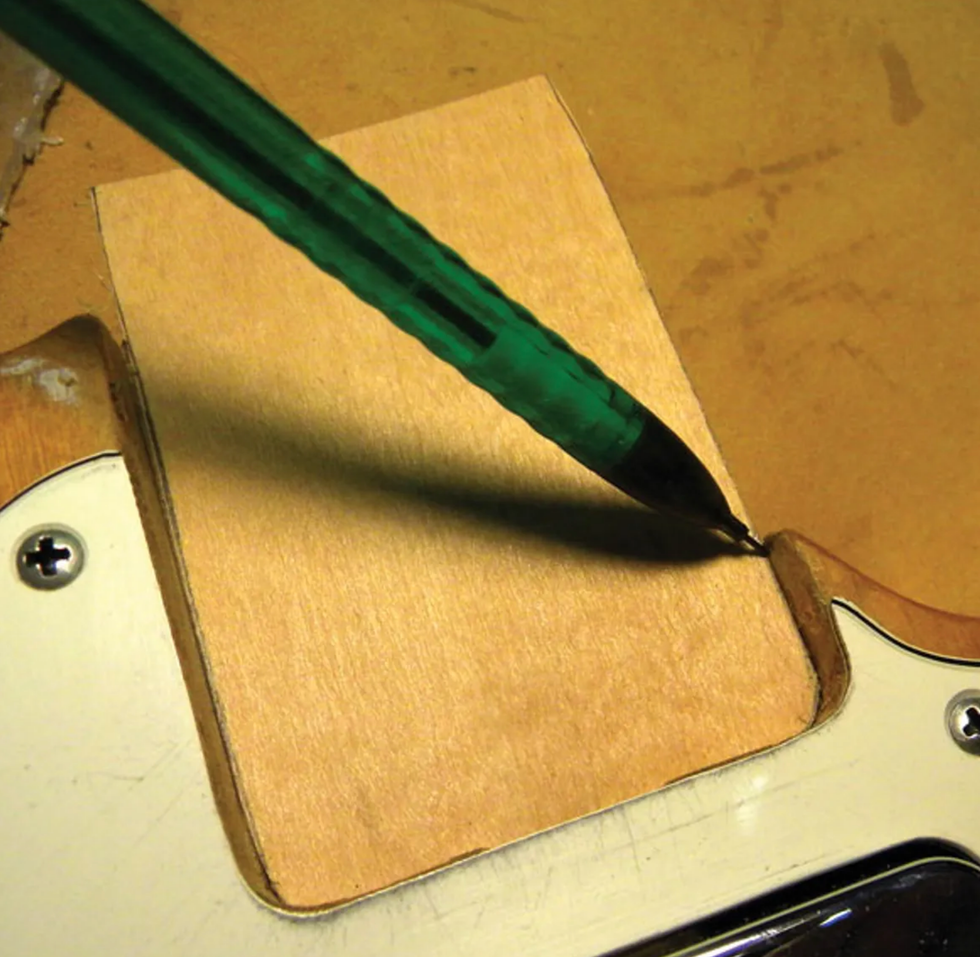
Fig. 7. Checking how the shim fits into the neck pocket.
When you've shaped the shim so it sits securely inside the neck pocket, trim off any excess length. Using the rear edge of the neck pocket as a ruler, mark the trim line on the shim, remove the extra wood with the hobby saw, and then sand the edge smooth.
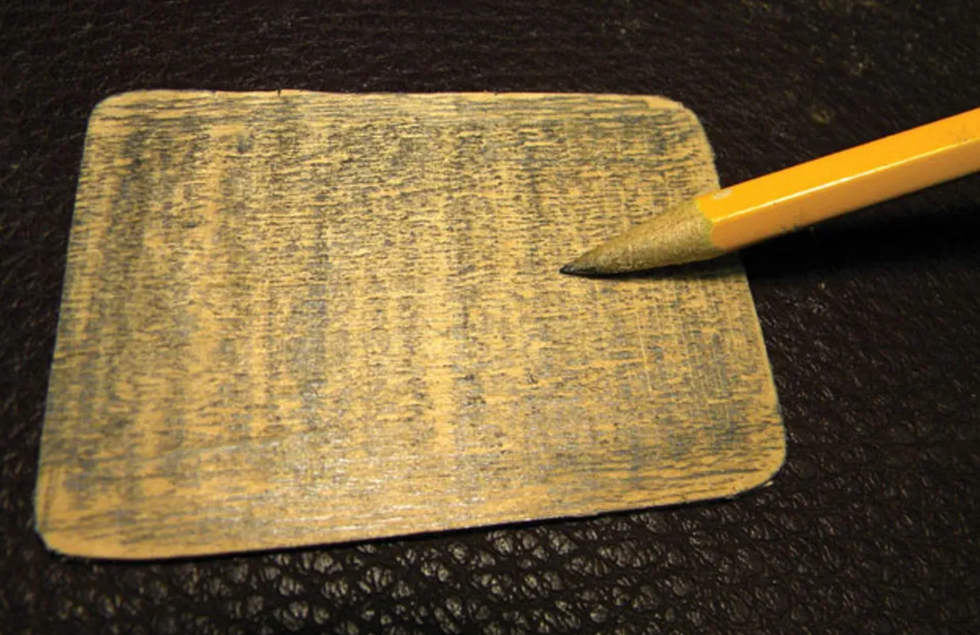
Fig. 8. Using a pencil to mark the bottom of the shim before sanding it into a subtle wedge.
Once the shim fits the neck pocket, the next step is to shade its entire bottom with a pencil (Fig. 8). This will help you know where to sand and how much material to remove.
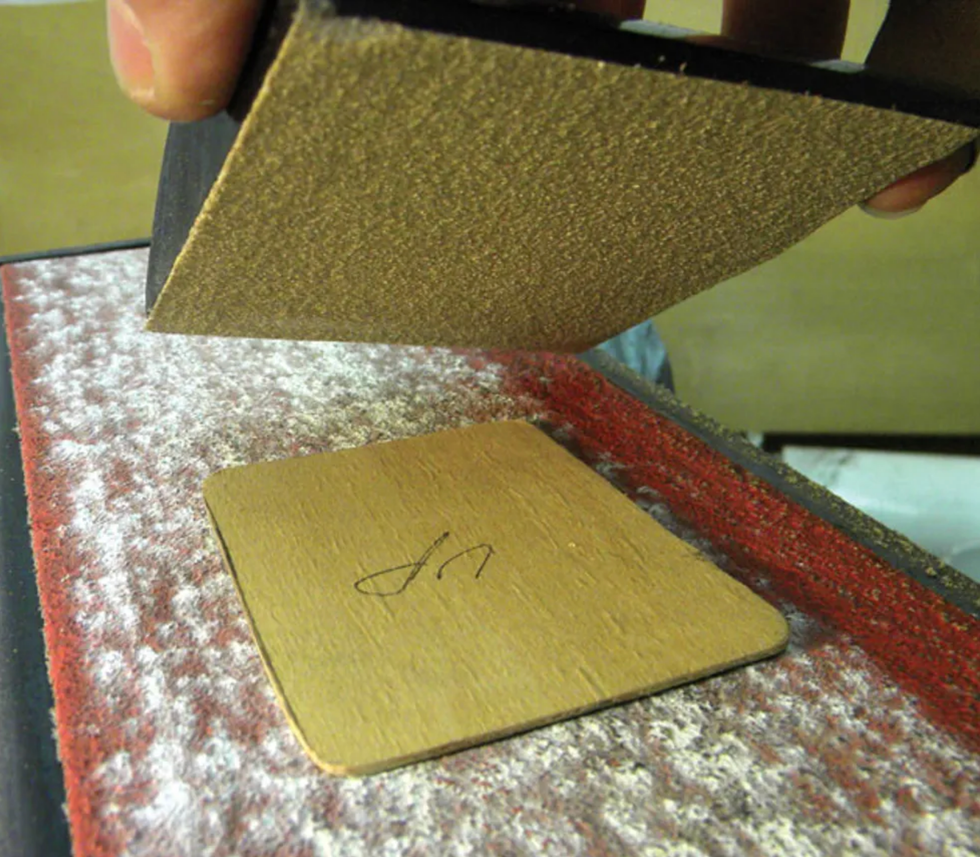
Fig. 9. Getting ready to sand the shim to its proper thickness and angle.
Next, place the shim on the belt sander—make sure it's turned off—with the shaded side face down. Lay your sanding block on top of the shim with the 80-grit paper against the wood (Fig. 9).
Holding the block, turn on the belt sander while keeping pressure on the block. Apply more pressure to the end of the shim that will face the headstock. This will create the subtle wedge shape you need to correct a neck angle that's too low.
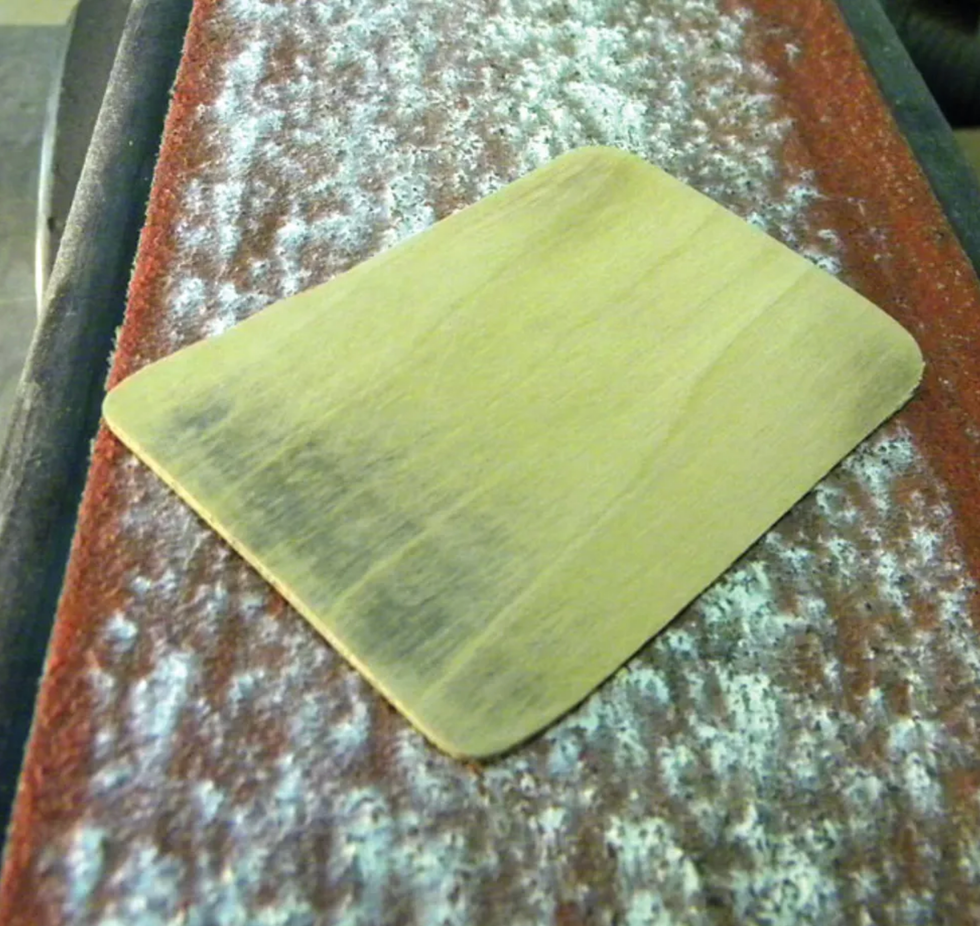
Fig. 10. Checking the bottom of the shim to confirm that the end facing the headstock is sanded a bit thinner than the end facing the bridge. The pencil marks tell the story.
Frequently check the bottom of the shim to make sure it's getting sanded evenly from side to side, but developing a slight front-to-back angle (Fig. 10). This is where the pencil marks come in handy.
Don't sand away too much wood—you'll have a chance to check your shim depth and angle in a few minutes when you string up for the first time. If need be, you can return to the sander to remove a little more wood from the bottom of the shim. By working incrementally, you won't have to start from scratch again.
Once you've sanded the shim into a subtle wedge and smoothed the top, it's time to punch holes to accommodate the four neck screws. Place the shim into the neck pocket with the shaded side down. Be sure it's oriented so the thicker end of the wedge faces the bridge. Insert the neck bolts and gently turn them until they each make a shallow impression in the shim.
Remove the shim and place a few drops of superglue around each screw-tip impression to reinforce the wood where you'll be punching holes for the neck screws.
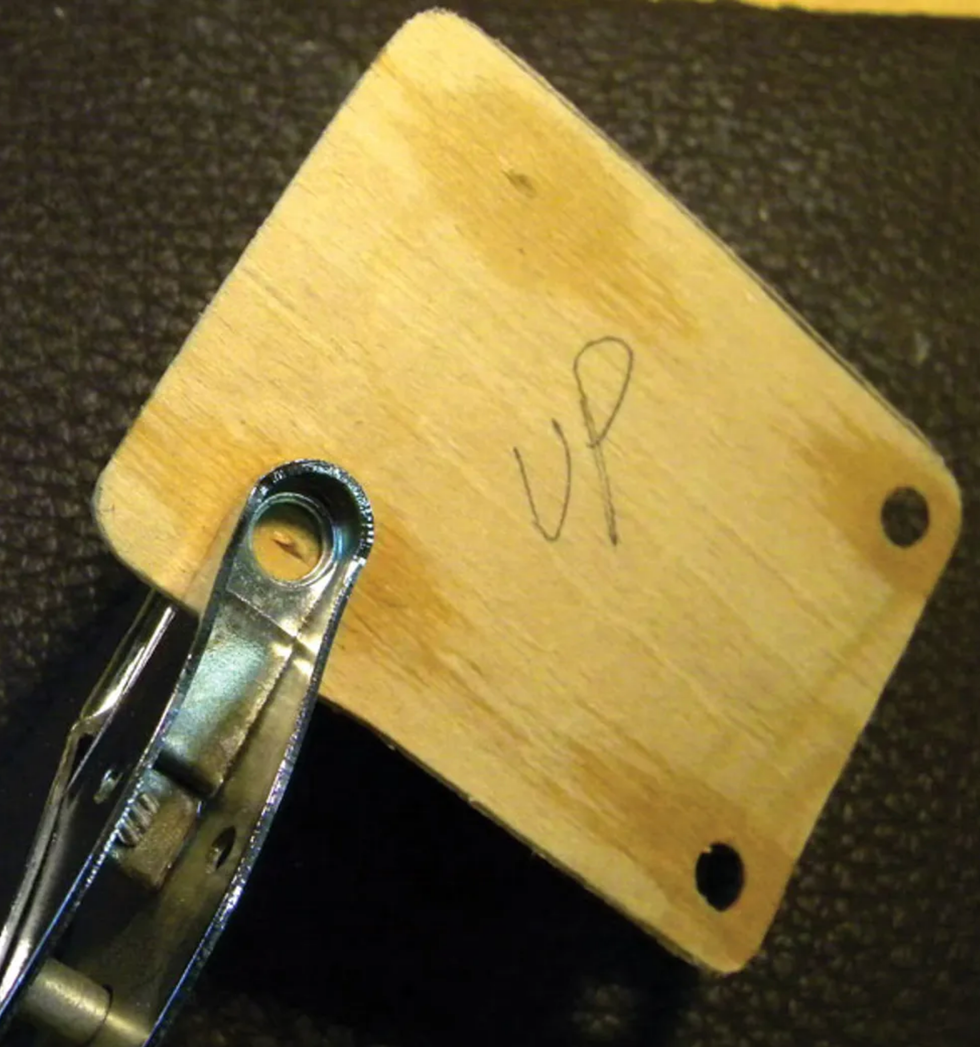
Fig. 11. Punching holes for the neck screws after reinforcing the screw-tip impressions with superglue.
Using the screw impressions to center your punch tool, make four holes in the shim. Work slowly and carefully to avoid cracking the shim as you punch holes in it (Fig. 11).
Following the same orientation described above, reinsert the shim into the neck pocket. Bolt the neck onto the body, string up, and tune the guitar to pitch. From there, measure the action and test playability.
Remember: The problem you're correcting is a low neck angle that prevented you from adjusting the saddles down far enough to create comfortable action. The shim is working properly if you can use the saddle screws to set the action the way you like it. The saddle screws should offer sufficient adjustment range to lower or raise the action.
If the action is too low with the shim in place—even with the saddles raised—you need to remove the shim and sand it thinner. It may take several attempts to achieve the correct thickness and angle. Carving a shim takes time and patience, but the reward is well worth the effort.
Tilt-Screw Syndrome
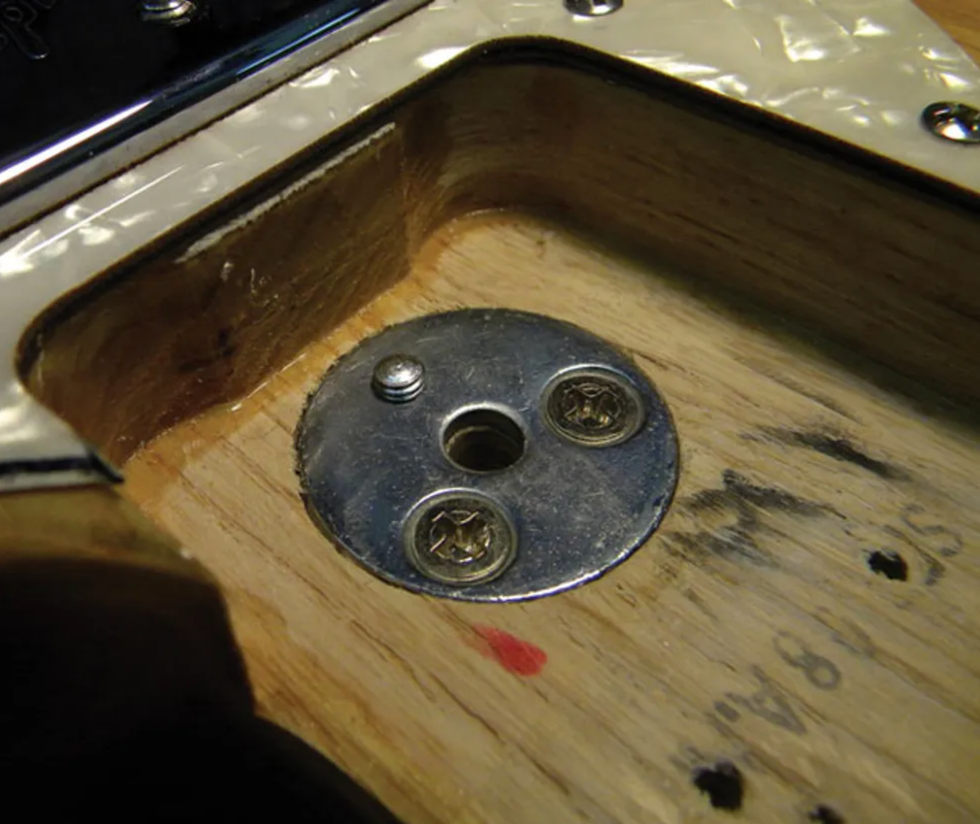
Fig. 12. The micro-tilt neck adjustment system uses an Allen screw to press against a metal disc embedded in the neck heel.
Some electric guitars have a "micro-tilt" assembly in the neck pocket (Fig. 12). By inserting a hex wrench through a hole in the neck plate, you can push an Allen screw against a metal disc embedded in the neck heel and adjust the neck angle without using a shim. This invention, in my opinion, is a great way to force the end of the neck to warp or bow. If your guitar has micro-tilt hardware, I'd remove the Allen adjustment screw from the body and simply bolt the neck flat against the pocket. If the neck angle is too low, use a full-pocket shim to correct the problem.
[Updated 9/1/21]
- DIY: How to Set Up a Fender Stratocaster - Premier Guitar ›
- How to Balance Pickups on Strats and Teles - Premier Guitar ›
- How to Get the Most Out of Your Delay Pedal - Premier Guitar ›
- Time for a Neck Adjustment? - Premier Guitar | The best guitar and bass reviews, videos, and interviews on the web. ›
- Time for a Neck Adjustment? - Premier Guitar ›
- DIY: How to Refinish Your Axe - Premier Guitar ›
- Tone Tips: A Crash Course on Buffers - Premier Guitar ›
- Guitar Shop 101: “Decking” a Stratocaster Trem - Premier Guitar ›
- Reader Guitar of the Month: T-Style Chickadee - Premier Guitar ›
- Time for a Neck Adjustment? - Premier Guitar ›
- The Inexpensive, Everyday Tools That Live on My Workbench - Premier Guitar ›
The series features three distinct models—The Bell,The Dread, and The Parlor—each built to deliver rich, resonant acoustic sound with effortless amplification.
Constructed with solid Sitka spruce tops and solid mahogany back & sides, the Festival Series offers warm, balanced tone with incredible sustain. A Fishman pickup system, paired with hidden volume and tone control knobs inside the sound hole, ensures seamless stage and studio performance.
Grover 16:1 ratio tuners provide superior tuning stability, while D’Addario strings enhance clarity and playability. Each guitar comes with a heavy-padded gig bag, making it a perfect choice for gigging musicians and traveling artists.
Key Features of the Festival Series Guitars:
- Solid Sitka Spruce Top – Provides bright, articulate tone with impressive projection
- Solid Mahogany Back & Sides – Adds warmth and depth for a well-balanced sound
- Fishman Pickup System – Delivers natural, high-fidelity amplified tone
- Hidden Volume & Tone Control Knobs – Discreetly placed inside the sound hole for clean aesthetics
- Grover Tuners (16:1 Ratio) – Ensures precise tuning stability
- D’Addario Strings – Premium strings for enhanced sustain and playability
- Heavy-Padded Gig Bag Included – Provides protection and convenience for musicians on the go
Kirk Hammett has partnered with Gibson Publishing to release The Collection: Kirk Hammett, a premium hardcover coffee-table photo book where Kirk tells the stories behind his rare and collectible instruments.
“I am thrilled to announce the launch of The Collection: Kirk Hammett. I’ve worked diligently on this curated collection of vintage and modern guitars for the book. I feel the book captures the rich history and artistry behind each of these unique and rare instruments. Every picture tells a story and thanks to Ross Halfin and his exceptional photography, every picture in this book is worth a million words! This book could not be possible without the help of Gibson, so I’d like to thank them for making my passion for Greeny, and guitars a reality. I hope all of you enjoy this journey as much as I did.”
“It’s exciting the time has come to release The Collection: Kirk Hammett by Gibson,” adds Cesar Gueikian, President and CEO of Gibson. “We have been working on this project with Kirk for years now, and I had the opportunity to work closely with Kirk on the composition of the collection for the book. It was a thrill to put this together and it took a village to get it done! I hope everyone appreciates the work that went into this book and enjoys every story behind the guitars.”
The Collection: Kirk Hammett, Custom Edition is limited to just 300 numbered copies signed by KIRK HAMMETT and comes in a huge 19 x 14.5” (490 x 370mm) presentation box featuring custom artwork and an outstanding case candy package. In addition to the large-format 17 x 12” (432 x 310mm) hardcover version of the book with a stunning lenticular cover, the boxset includes a frameable 16 x 11.6” (407 x 295mm) art print of a Ross Halfin portrait of KIRK HAMMETT signed by both Halfin and the Metallica guitarist. Other case candy includes an Axe Heaven miniature replica of Hammett’s 1979 Gibson Flying V with case and stand, an exclusive pick tin complete with six Dunlop® Kirk Hammett signature Jazz III guitar picks, and a Gibson Publishing Certificate of Authenticity.
Explore The Collection: Kirk Hammett book HERE.
The collection includes Cobalt strings with a Paradigm Core, Tim Henson Signature Classical Strings, and the Tim Henson Signature FretWrap by Gruv Gear.
Engineered for maximum output, clarity, and durability, these strings feature:
- Cobalt with a Paradigm Core (not RPS) for added durability
- Nano-treated for maximum lifespan and corrosion resistance
- Gauges 9.5, 12, 16, 26, 36, 46 (Turbo Slinky set)
- Available individually or as part of the Tim Henson Signature Bundle
Tim Henson Signature Classical Strings
Crafted for dynamic, percussive tonality, these strings pair fluorocarbon trebles with silver-plated copper basses to deliver exceptional response and clarity.
- Gauges: 24, 27, 33, 30, 36, 42
- Available individually or as part of the Tim Henson Signature Bundle
Tim Henson Signature FretWrap by Gruv Gear
An essential string-dampening tool, the Tim Henson Signature FretWrap is designed for cleaner playing by eliminating unwanted overtones and sympathetic vibrations.
- Features Tim Henson’s custom ‘Cherub Logo’ design
- Size Small, fits 4-string basses, 6-string electric/acoustic guitars, and ukuleles
- Ideal for live performance and studio recording
- Ernie Ball collaboration with Gruv Gear
- Available individually or as part of the Tim Henson Signature Bundle
The Ernie Ball Tim Henson Accessory Bundle Kit
For players who want the complete Tim Henson experience, the Ernie Ball Tim HensonSignature Bundle Kit includes:
- Tim Henson Signature Electric Strings (9.5-46)
- Tim Henson Signature Classical Strings (Medium Tension)
- Tim Henson Signature FretWrap by Gruv Gear (Small)
- Tim Henson Signature Cable (Exclusive 10ft white dual-conductor cable, only available in the bundle)
The Tim Henson Signature String & Accessory Collection is available starting today, March 19, 2025, at authorized Ernie Ball dealers worldwide.
For more information, please visit ernieball.com.
Ernie Ball: Tim Henson Signature Electric Guitar Strings - YouTube
Enjoy the videos and music you love, upload original content, and share it all with friends, family, and the world on YouTube.Teamwork makes the dream work for the Charleston, South Carolina, twosome, who trade off multi-instrumental duties throughout their sets.
Michael Trent and Cary Ann Hearst have been making music as Shovels & Rope since 2008. The husband-and-wife duo from South Carolina specialize in rootsy, bluesy rock, Americana, and alt-country, but they don’t confine themselves to traditional two-piece arrangements. They switch off on vocal, guitar, percussion, and synth duty throughout their shows, orchestrating a full-band ruckus with all available limbs.
Their seventh full-length, Something Is Working Up Above My Head, released in September last year, and while touring in support of it, they stopped at Nashville’s Brooklyn Bowl in late February. PG’s John Bohlinger caught up with Trent before the gig to see what tools he and Hearst use to maintain their musical juggling act.
Brought to you by D’Addario.Black Bird
Trent’s not a guitar snob: Generally speaking, he plays whatever he can get his hands on. While playing Eddie Vedder’s Ohana Fest, someone loaned him this Gretsch Black Falcon, and he fell in love with it. He likes its size compared to the broader White Falcon. It’s also the band’s only electric, so if it goes down, it’s back to acoustic. Hearst takes turns on it, too.
Trent loads the heaviest strings he can onto it, which is a set of .013s. It lives in standard tuning.
Ol' Faithful
As Trent explains, he and Hearst have done some DIY decorating on this beautiful Gibson J-45—it’s adorned with sweat droplets, stains, and fingernail dust. It runs direct to the venue’s front-of-house system with an LR Baggs pickup. This one is strung with Martin heavy or medium gauge strings; lighter ones are too prone to snapping under Trent’s heavy picking hand (which holds a Dunlop Max-Grip .88 mm pick). And it rolls around in an Enki tour case.
On Call
These second-stringers—a Loar archtop and an LR Baggs-equipped Recording King—are on hand in case of broken strings or other malfunctions.
Need for Tweed
Trent doesn’t trust amps with too many knobs, so this tweed Fender Blues Junior does the trick. It can get fairly loud, so there’s a Universal Audio OX Amp Top Box on hand to tame it for some stages.
Shovels & Rope's Pedalboard
Because Trent and Hearst trade off bass, guitar, keys, and percussion duties, all four of their limbs are active through the set. Whoever is on guitars works this board, with an MXR Blue Box, Electro-Harmonix Nano Big Muff, EarthQuaker Devices Hummingbird, and Boss OC-5, plus a pair of Walrus Canvas Tuners for the electric and acoustic. Utility boxes on the board include a Walrus Canvas Passive Re-Amp, Radial J48, Livewire ABY1, and a Mesa Stowaway input buffer.
A Roland PK-5 MIDI controller, operated by foot, sits on the lower edge of the board. It controls the board for “Thing 2,” one of two MicroKORG synths onstage.
Thing 1 and Thing 2
There’s no one backstage helping Hearst and Trent cook up all their racket; they handle every sound themselves, manually. During the first few sets of a tour, you’re liable to see some headaches, like forgetting to switch synth patches during a song, but eventually they hit a rhythm.
Affectionately given Seuss-ian nicknames, this pair of microKORGs handles bass notes through the set, among other things, via the foot-controlled PK5. “Thing 1” is set up at the drum station, and runs through a board with an EHX Nano Big Muff, EHX Bass9, EHX Nano Holy Grail, and a Radial Pro DI. A Walrus Aetos keeps them all powered up.
The board for “Thing 2,” beside the guitar amps, includes an EHX Mel9 and Bass9 powered by a Truetone 1 SPOT Pro, plus a Radial ProD2.