
Image 1 — How to Get the Most out of Hum-Sing-Hum Wiring
This circuit lets you get HSH and SSS-like tones from a single guitar.
Hello and welcome back to Mod Garage. Today we'll talk about HSH wiring in general and how to get the best out of it. In general, an HSH configuration means that you have three pickups on your guitar: a bridge humbucker, a middle single-coil, and a neck humbucker. This configuration was very popular in the so-called “super-strat" era, but is still used today, even if you don't see it as often. Almost every manufacturer has at least one or more HSH models in its portfolio, from Ibanez to Suhr, Charvel, Fender, and PRS to Framus, just to name a few. So, I think it's worth taking a closer look at this special configuration, its possibilities, and its downsides.
The original HSH concept is clear and easy: combining humbucker and single-coil pickups on a guitar to enhance your tonal palette by implementing two different basic sounds. You have the power of the two humbucker pickups plus the clearness and chime of a single-coil pickup, so the possibilities to combine these three pickups is virtually unlimited. For example, you can put a really hot modern humbucker at the bridge position for fat, loud, and overdriven lead playing. A PAF-style neck humbucker will take you instantly to blues land, while an S-style middle single-coil will give you an additional archetypal sound we all love.
It came into fashion to split humbucker pickups to receive a single-coil type sound from them, usually by shutting one coil down to ground, which makes things even more complex in an HSH configuration. Playing the three pickups on their own is trouble free and the purest shape of the basic HSH concept. The problems start when you want to combine the pickups to get even more sounds out of your guitar. Usually the humbucker is way louder than your single-coil pickup, upstaging its tone when playing together. With the humbuckers in split-mode, balanced volume together with the single-coil pickup is usually not a major problem but phasing often is. You will have to take care not to end up in an out-of-phase dilemma, if it's not intended. With two splittable humbuckers, the number of possible combinations is almost slaying: You can combine all individual coils (five in total) in parallel or in series, you can have all of these combinations in phase or out of phase, you can operate the two humbuckers in normal humbucker mode (both coils in series), or in a hum-free single-coil sounding mode (both coils in parallel), or in real single-coil mode (one coil shut down to ground). You see, it's easy to get lost with all these possibilities.
Not everything that's technically doable sounds great or is useable in a musical context, so it's time to think about the combinations you really need and want from such a configuration. Almost every company came up with their own solution and combinations. What I want to show you is a wiring with two stages to get the most desirable sounds out of an HSH guitar. It's basically the combination of the standard HSH switching with auto-split wiring when combining the humbuckers with the middle single-coil on the first stage, and a normal S-style single-coil wiring by splitting the humbuckers into single-coils on the second stage. This is like having an HSH and SSS guitar in one package.
Not everything that's technically doable sounds great or is useable in a musical context, so it's time to think about the combinations you really need and want from such a configuration.
We've talked about auto-split several times before, but this means that a humbucker is automatically split into a single-coil when it's combined with a single-coil pickup, usually in an HSS or HSH configuration. With this wiring you will receive the following combinations:
Stage 1 (HSH auto-split mode):
- Bridge humbucker alone
- Bridge humbucker inside coil in parallel with the middle single-coil
- Middle single-coil alone
- Neck humbucker inside coil in parallel with the middle single-coil
- Neck humbucker alone
Stage 2 (SSS operating mode):
- Bridge humbucker inside coil
- Bridge humbucker inside coil in parallel with the middle single-coil
- Middle single-coil alone
- Neck humbucker inside coil in parallel with the middle single-coil
- Neck humbucker inside coil
If you want to squeeze more sounds out of this, you can add phase switches, series/parallel switches, humbucker multi-sound switches, etc. Keep in mind that most humbucker pickups in split mode don't sound like a real single-coil pickup—only sort of ... but, in most cases and especially in a band context, this is all you need. For me, this is the most practical HSH wiring when you don't need series and out-of-phase switching. But as mentioned, all this can be added to the circuit.
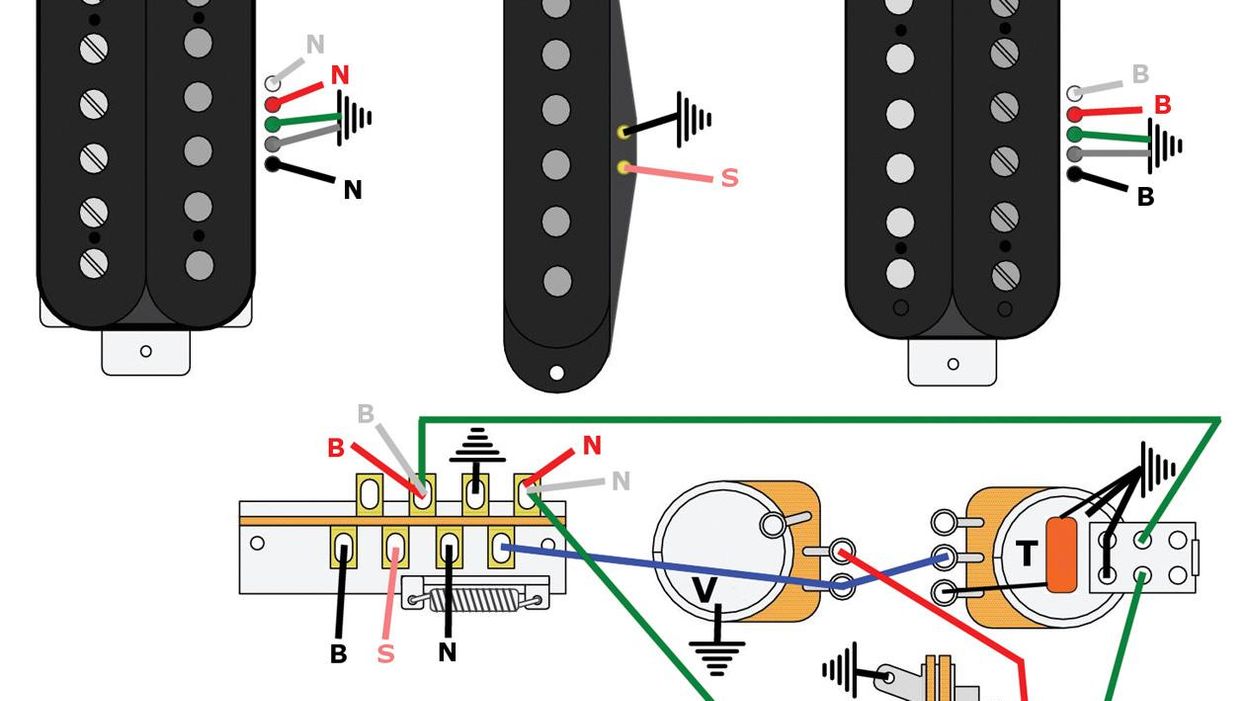
So here we go. The good news for this wiring, as seen in Image 1, is that you can leave your stock 5-way pickup selector switch (with the standard two switching stages). All you additionally need is a DPDT switch to change between the two operating modes. This can be an additional mini toggle switch or a push-pull or push-push pot. Both humbuckers need to have a 4-conductor wiring, so you have access to both coils. This wiring will not work with humbuckers sporting the traditional 2-conductor wiring. I show the version with a standard push-pull pot and, as usual, with the Seymour Duncan color code. If you use pickups from a different company, you need to transfer this color code, but you already know where and how to do this. For clarity, I left out all ground connections (there are many of them in this wiring), using the standard ground symbol instead. Simply solder these wires to the back of one of the pots and do the same with the string-grounding wire in your guitar.
That's it! Next month we return to our DIY relic series, taking care of the plastic tuner buttons, so stay tuned.
Until then, keep on modding!
[Updated 7/26/21]
- Exploring Fender's 5-Way Super Switch - Premier Guitar ›
- Mod Garage: The Original Eddie Van Halen Wiring - Premier Guitar ›
- Mod Garage: Strat-PRS Crossover Wiring - Premier Guitar ›
- Mod Garage: The Original Eddie Van Halen Wiring - Premier Guitar ›
- Mod Garage: Four Ways to Configure a 4-Conductor Humbucker - Premier Guitar ›
- Mod Garage: Strat-PRS Crossover Wiring - Premier Guitar ›
- Mod Garage: The HSS Auto-Split Mod, Pro Version - Premier Guitar ›
- Epiphone Al Caiola and Its 5-Switch Tone Expressor System - Premier Guitar ›
PG contributor Tom Butwin takes us through three exceptional solidbody electric guitars: the versatile Gibson Les Paul Studio, the uniquely styled Zemaitis SCW22, and the dynamic PRS CE 24. Each brings a distinct flavor—find out which one matches your style!
Gibson Les Paul Modern Studio Electric Guitar - Worn White
Les Paul Stu Mod, Worn WhitePRS SE CE 24 Standard Satin Electric Guitar - Vintage Cherry Satin
SE CE24, Vint Cherry SatOriginally introduced in 1975 as part of the Schaffer-Vega Diversity System (SVDS) wireless system, this mini boost pedal originated from a 1/4” headphone jack intended for monitoring purposes.
"The SVDS Boost is a recreation of one of the first full-frequency boosts ever used on stage."
Originally introduced in 1975 as part of the Schaffer-Vega Diversity System (SVDS) wireless system, this mini boost pedal originated from a 1/4” headphone jack intended for monitoring purposes. However, guitarists and bassists soon discovered an unexpected benefit: by connecting their instruments to the headphone output, they could boost their signal by up to 30dB.
Legendary guitarists like Angus Young, David Gilmour, Eddie Van Halen, Carlos Santana, and more utilized this technique. The SVDS Boost is a faithful reproduction of this iconic boost, which may very well be the first full-frequency boost ever heard on stage.
The Sound
Unlike typical clean boosts, the SVDS Boost adds vintage coloration and harmonics that instantly transport you to the golden era of rock. The unique "Goalpost" EQ design enhances the extreme ends of the frequency spectrum, while maintaining the integrity of your mid-range. With up to 30dB of boost, the SVDS unlocks new tonal possibilities, delivering rich harmonics, singing sustain, and even controlled feedback.
Pedal
Placement The SVDS Boost truly shines when placed after other overdrive, distortion, or fuzz pedals, adding dynamic response and restoring low-end fidelity that can often be lost with mid-boost pedals. Its ability to enhance your existing gear is unparalleled, making your guitar, amp, and pedals sound better than ever.
Build
Quality Precision-built using high-quality components, the SVDS Boost is designed to withstand the rigors of professional touring. Its robust construction ensures years of reliable performance, whether in the studio or on the road.
Availability
The SVDS Boost is now available at solodallas.com and authorized SoloDallas dealers worldwide.
Price: $129 USD.
Behind every great guitarist is probably a great tech.
The life of a tech is where art, craft, science, and sorcery collide. My story isn’t so different from thousands of others in the performing arts world. It began at an extremely young age, in what they now call middle school. As much as I wanted to play music, draw, paint, and photograph, I was also drawn to the technical side of the creative pursuits.
Luckily, schools at the time offered classes in photography and art right along with printing, drafting, woodworking, stage crew, and auto repair. I never thought of them as disparate—even then I knew they were all interconnected. There wasn’t a master plan—there was only a path.
Along the way, I met others who shared a passion for music and mechanics. One of the first was a ham-radio fanatic who also loved music. He was referred by a classmate for electronic repair on my guitar amp, and we soon found we had a lot of common interests. Vince was a high school student by day and a radio-phone operator by night. These were the days before cell phones, a time when car phones were huge radio transceivers stowed in the trunks of wealthy people’s cars. To place a call, the driver had to radio in to an operator who would connect them to a landline. Vince would make the connection and then go back to waiting for the next call. We got to talking about repairing guitar amps, or even the possibility of building one from scratch, and started work on an amplifier within days. While Vince worked on the amp chassis, I constructed a plywood speaker cabinet and stuffed it with 15" Utah speakers. After a few weeks and a dozen trips to the electronics store, we had a functioning, terrible-sounding amplifier. Vince was convinced it had something to do with the plate voltages. “Needs more pressure,” was his cryptic explanation. After that, we lost interest, moved on, and lost touch. But I’d learned enough to be dangerous to myself.
That was the beginning of my long-standing respect for technicians of all sorts. There was Gary, who owned a fledgling amplifier company and rental shop on the West Side of Chicago. His amps were robust and had plenty of clean headroom, which really wasn’t what guitarists were looking for by the end of the 1960s. Still, my long drives to his shop were rewarded with free-flowing lectures about amp design. It was a prototype for a DIY music gear business, which was inspiring.
“Because pros rotate through different tours, their experience and expertise come from an infinitely deeper and wider range of real-world experience than working in a music store or watching YouTube videos.”
Similarly, Bruce Gordon had a repair shop shoehorned into a tiny space off Dempster Street in Evanston, just north of Chicago. Gordon started his repair business while playing in local bands, including one that had a string of regional and national hits. I used to walk past his open door on my way to work in the morning and would often stop to talk to him. He might have been the first pro musician that I had ever met who was also a technician. Once again, I found a person who was willing to share information and tips readily. I worked at a later incarnation of his expanded business where I learned from more seasoned techs who were always comparing notes and helping each other.
Over the decades, I learned to lean on the expertise of pro guitar technicians. As the touring business grew, being a tech became a serious profession, and knowing the techs on the road was a constant source of great information and camaraderie. Because pros rotate through different tours, their experience and expertise come from an infinitely deeper and wider range of real-world experience than working in a music store or watching YouTube videos. When I deal with pro musicians as a guitar builder, it’s often through an introduction made by a tech as much as the other way around. If I find a guitarist to be lacking in the ability to verbalize their ideas, often a great tech is there to sort things out.
So here’s to all those who make the big wheels roll. They learn from each other and pass their lessons along to others freely with no strings attached. Like Jackson Browne sang: “They’re the first to arrive, and the last to leave.” They don’t get the spotlight, but the artists know that without them, there is no show. Without them, I wouldn’t be here today. Thank you to every one of you.
This unusual bass instrument is strung with just two flatwound strings, each with its own fretting surface that’s bent 135 degrees away from one another.
While this forgotten, oddball instrument was designed with multidextrous guitarists in mind, it never quite took off—making it a rare, vintage treasure.
At Fanny’s House of Music, you never know what strange or fascinating relics you might find. Guitorgan? Been there, sold that. A Hawaiian tremoloa fretless zither? We’ve had two.
Recently, the oddest of odd ducks strolled through Fanny’s front door. It looks like a Harmony Wedge lap steel that was thrown in the dryer to shrink a little bit. It has two flatwound bass strings, in reverse order from where you’d expect—the higher string is on the left side if you’re looking at the instrument’s face. Each string has its own fretting surface, bent at a 135-degree angle away from each other, and the frets are labeled with note names. A raised, thin strip of wood separates the strings from each other on the fretboard.
Oh, wait a moment. Did we say “fretboard?” We should have said “footboard.” Allow us to introduce you to the 1970s Mike Miller Foot Bass. That’s right—you play this adorable critter with your feet. The strings are tuned a fifth apart from each other. By setting the instrument on the ground and rocking your foot back and forth over the neck, you get a standard country root-fifth bass line—completely hands-free. Are you a guitar player? All you need is one of these puppies and a drum machine and, poof! You’re a whole band!
Along the “footboard” are markers for note names.
Thank goodness for the internet, which gave me access to the original promotional materials for the Foot Bass. Emblazoned with the all-caps header, “BE YOUR OWN BASS MAN,” its pamphlet extols the virtues of the Foot Bass. Describing it as “practically maintenance free,” it guarantees you’ll “amaze friends and audiences,” and “make extra MONEY.”
A brief meander through the United States Patent and Trademark website revealed the patent, whose filer was equally concerned with finances. “A currently popular form of entertainment is provided by an artist who both sings and accompanies himself on a guitar,” it reads, as if this hasn’t been a popular form of entertainment for a very long time. “The performance of such an artist may be enhanced by adding a bass accompaniment.... However, such an additional bass accompaniment ordinarily requires an extra artist for playing the bass and therefore represents an additional expense.” Sorry, bass players. Clearly, you all do nothing but cost us guitar players money.
“That’s right—you play this adorable critter with your feet.”
Be prepared to dig through your closet when you embark on your Foot Bass journey. If you start with your trusty Doc Martens, you’re in for a disappointing experience. Deep treads make for messy notes and poor contact with the strings. And while barefoot playing allows for more nimble, adventurous basslines, the lack of a rigid surface prevents the “simple and convenient” operation promised by the patent. What you need, as one Fanny’s employee described, are “church shoes”—something with a low profile and a flat sole.
This Mike Miller Foot Bass is from the 1970s, and has a patent for its design.
Even with the right footwear, playing the Foot Bass takes some getting used to. There’s a bit of foam under the pickup cover that mutes the strings when you’re not playing them, but you can still make a remarkable amount of clatter with this thing. It’s a subtle motion that works best, and it certainly takes practice to master it. Add in multiple chords or—be still, my heart—walking up from one chord to the next? Give yourself a couple weeks in the woodshed before you schedule your next show.
If you’re looking for something to watch tonight, there’s a documentary you can find on YouTube called Let Me Be Your Band. It covers the history of one-person bands, starting with blues pioneer Jesse “Lone Cat” Fuller and continuing up to the early 2000s with the careers of Hasil Adkins and Bob Log III, among others. It’s a touching portrayal of ingenuity and spunk, and an ode to owning your weirdness. Not a single person in Let Me Be Your Band had a Foot Bass, though. It’s high time the Foot Bass was celebrated for its cleverness and played by an enterprising solo act. It’s a bit like Cinderella’s glass slipper here at Fanny’s. We can’t wait to see who tries it on for a perfect fit.