Luthier Dave Helmer shows you how to cure buzzy strings, bad intonation, gnarly frets, high action, and other common troubles with off-the-shelf axes.
Guitars are the best. We love them. It’s fun to fall in love with a guitar at a store, buy it, and proudly bring it home. But we’ve all been there … where after a month that new guitar is just not playing as good as it was before. As guitar players, we know what feels good and what feels bad when it comes to playability. Maybe you have setup preferences that you like on all your guitars, or maybe you want to experiment with changes to your setup?
With a few tools, you can perform a handful of tasks that will make your new axe play better and stay in tune. This article is for folks who already know how to tighten loose parts, raise and lower string saddles or bridges, and adjust their truss rods—though I’ll share a tip on how to check it with even more accuracy.
Is that big bulky stock nut uncomfortable on your hand? Let’s trim it down and reshape it. If the action feels high and the neck looks straight, I’ll show you how to lower the action. And haven’t we all swapped out pickups and wondered, “Do they really sound better, or do I think that just because they’re new?” Before you swap your pickups, I’ll share some pickup-height measurements that might make you change your mind.
But wait! There’s more. With everything feeling and playing great, does moving into the upper register start to sound out of tune? Intonation is very easy to check and adjust. When you go to vibrato or hold a note, do the frets feel “sandy”? Are the fret ends rubbing against your hand while you play? Let’s flush and polish those up.
To be clear, we’re not swapping out anything on your new guitar: We’re simply refining the setup. Be sure to go online to see eight videos I made showing various processes covered in this story.
Begin the Beguine
There is an order of operations for best results. Neck relief is the first item to dial in, followed by getting the nut slots cut to the proper depth. After that, setting your string and pickup heights is in order. The final step is setting intonation.
Fret polishing is its own event and can happen anytime between string changes. Getting the frets feeling comfortable and well-polished will take some time and attention. You’ll also need some specialized tools as well as some that can be found in most households. Check the box for my list.
Tools You’ll Need
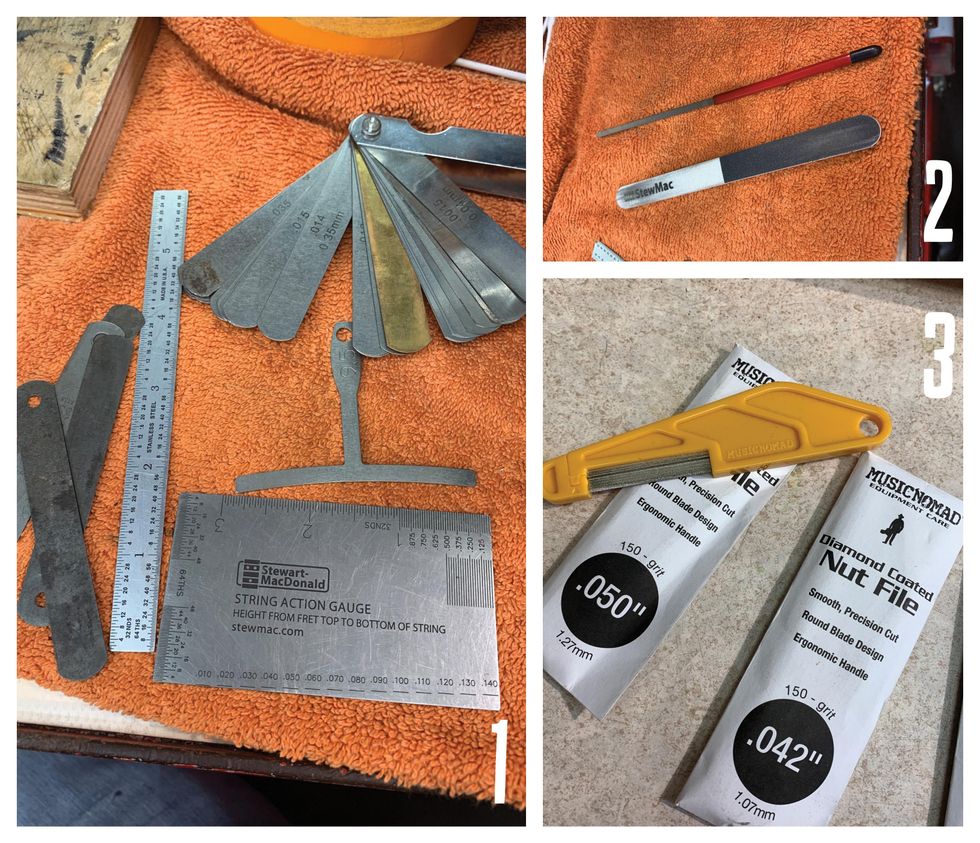
All of the specialized tools in this list are available through online suppliers, including StewMac and Amazon.
- 6" Ruler with measures in 64ths
- String action gauge [Photo 1]
- Miscellaneous screwdrivers
- Allen wrenches
- Radius blocks
- Understring radius gauges (with the radius on the bottom and the top)
- Fret-end dressing file
- Micro-Mesh sticks [Photo 2]
- Tape (low tack)
- Cotton swabs
- Paper towels (blue shop towels preferred)
- Clean cotton rags
- Nut files [Photo 3]
- Stikit sandpaper
- Tri-Flow lubricant
- Capo
- Feeler gauges
- Simichrome polish
Polishing the Frets
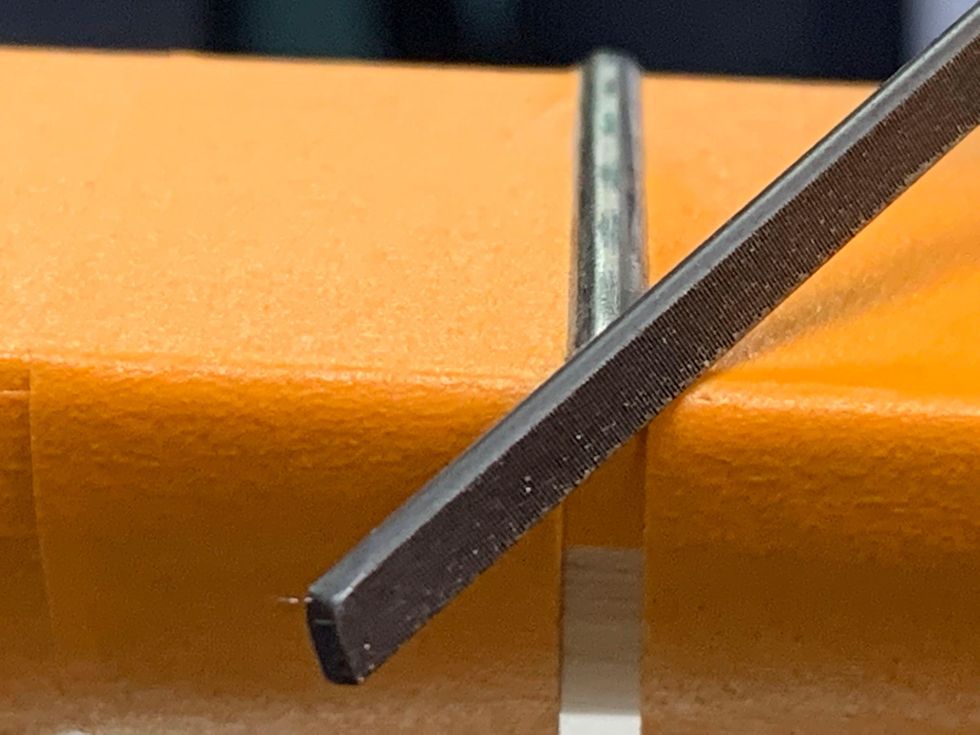
Photo 4
Let’s start with the most Zen of these tasks: fret polishing.
Tape off the fretboard using low-tack tape, exposing only the frets. De-tack each piece of tape on your clothing or maybe a rag—I use my jeans or my sweatshirt. Making it less sticky helps prevent pulling finish off a maple fretboard or the neck. Taping the fretboard also prevents putting any cross-grain scratches into it while you file and polish. You can choose to tape off the entire fretboard or work your way down one fret at a time. Dealer’s choice.
One thing to note about tape, any tape: Even when you de-tack it, you do not want to leave it on overnight. If that happens, rub the tape with your finger, which will break the surface tension. Then carefully pull the tape off from a corner, making sure you’re pulling it off at an angle and not at a straight line with the fretboard edge.
Every fret end has a small burr on the corner from the initial fret job. The fret-end dressing file has a non-marring smooth side for rounding the fret end, and a safe square edge for getting into the corner of the fret end. So, take the fret-end dressing file, use the squared off-side, and file both corners of the fret end [Photo 4].
How to Polish Frets
Here’s how easy it is to polish and smooth frets.
One or two strokes is all you’ll need. Then, using the non-marring side of the file, slightly round off the fret ends.
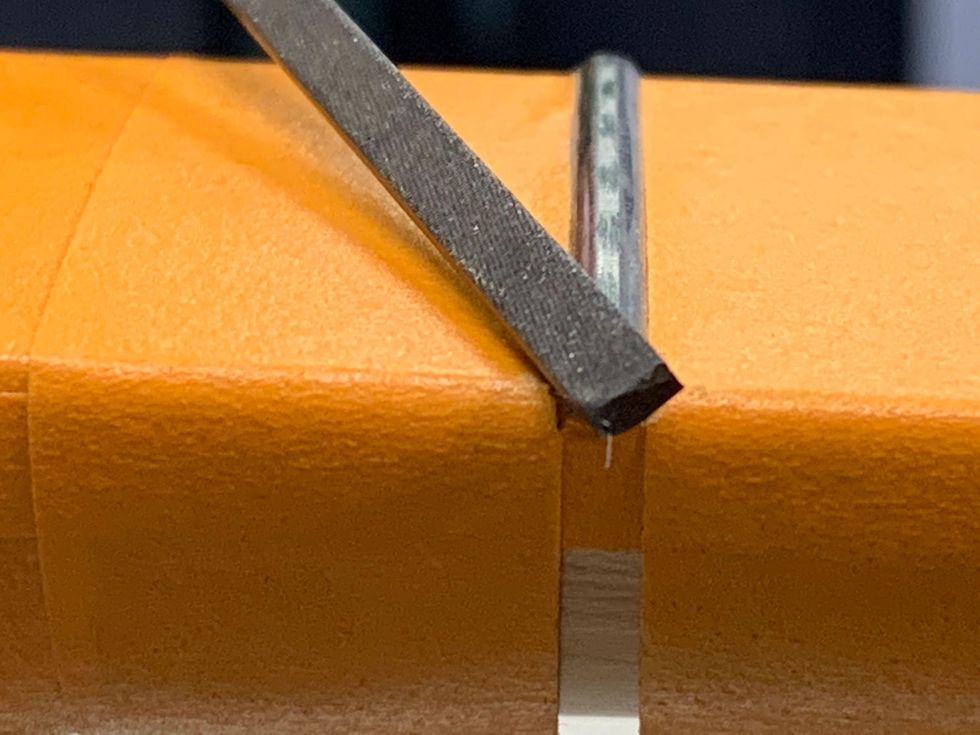
Photo 5
With the file positioned vertically, file downward to make the fret end flush with the edge of the fretboard.
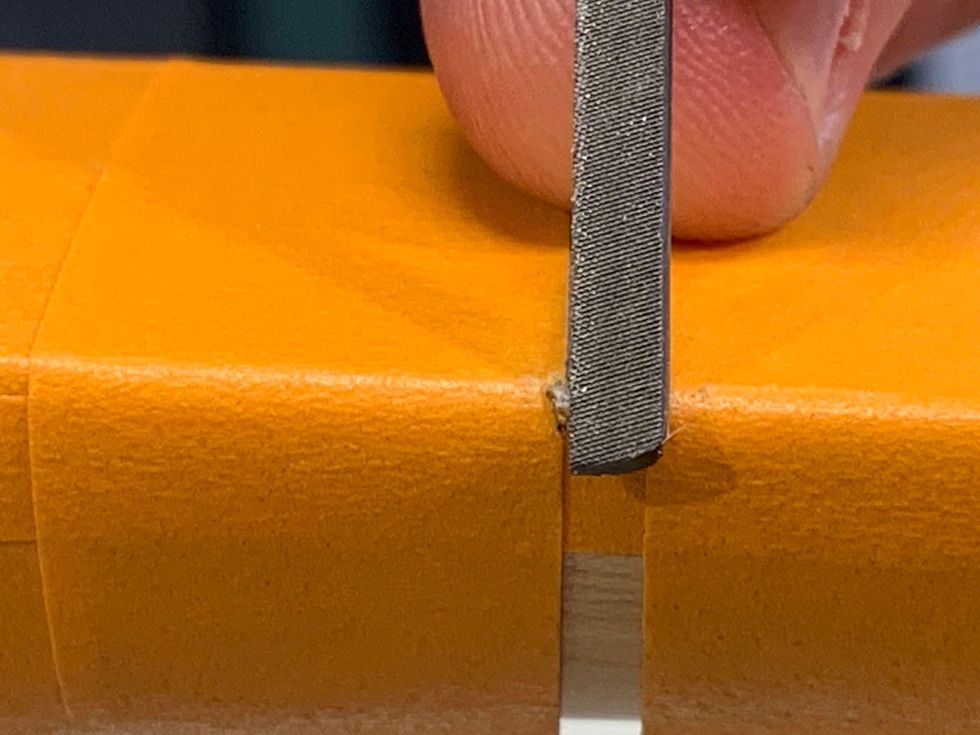
Photo 6
For a nice, rounded-off look, polish the frets using the same rounding motion from the previous step, working through all three grits of the Micro-Mesh stick.
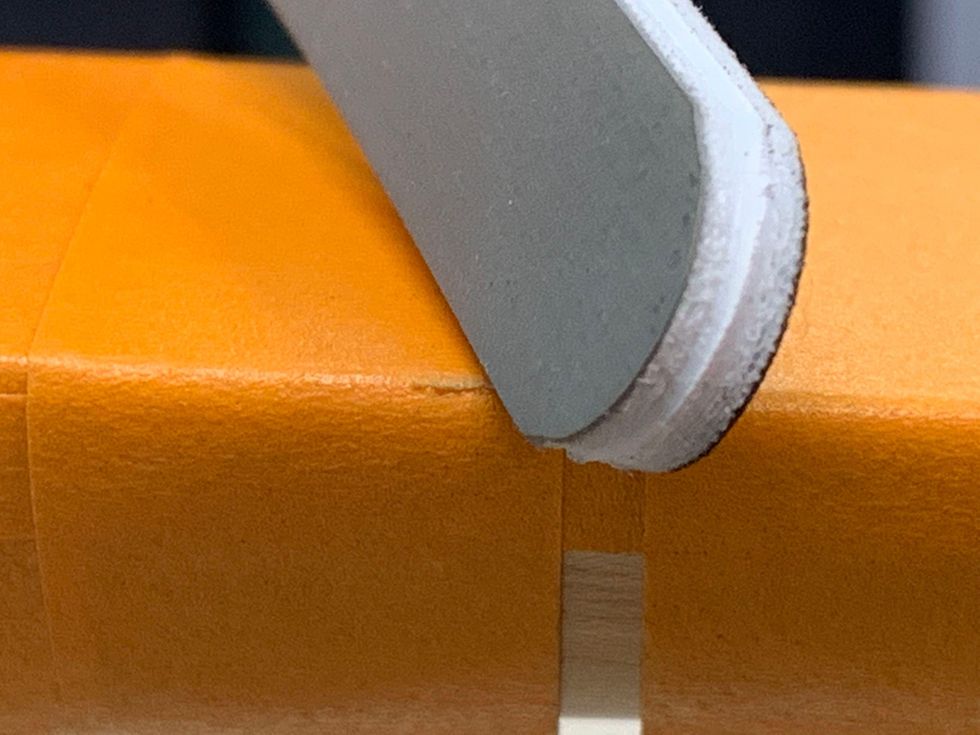
Photo 7
Then, polish both the sides and the top of the frets.
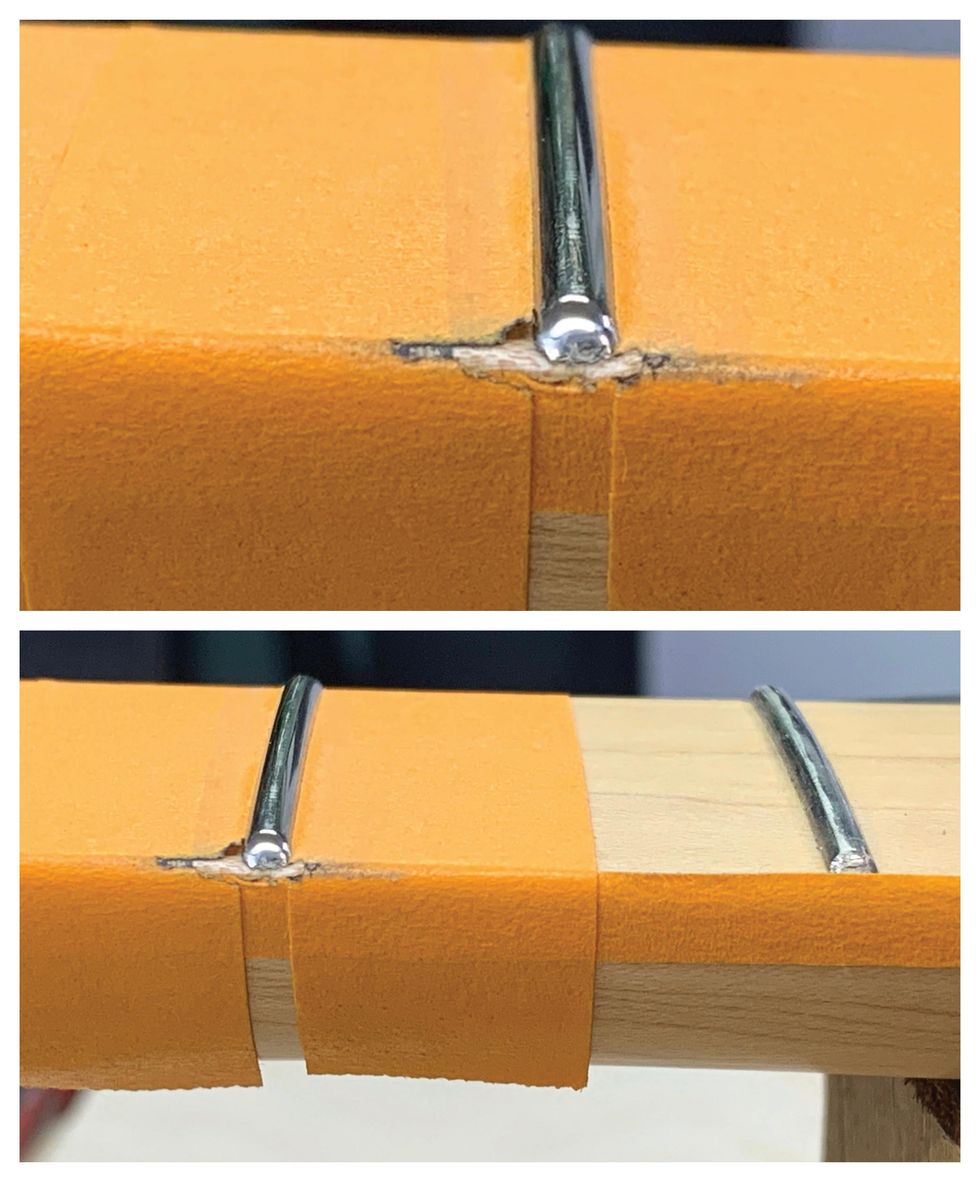
Photos 8 (top) & 9 (bottom)
Using a soft cloth and Simichrome, buff every fret. This will give you a great shine and help prevent oxidation. Now it’s time to remove the tape and condition the fingerboard if it needs it.
Note: Every fret has two fret ends to clean up and polish along with the fret itself. This is a fair amount of handwork. If you’ve never done it, you will get tired and need a break. Take that break. Take multiple breaks. Let the process take however long it requires without rushing. If you’re new, do all the fret polishing over a weekend or a few days. It should be fun, not painful. If it is difficult, call your local luthier and hire them to do it for you.
Adjusting Neck Relief
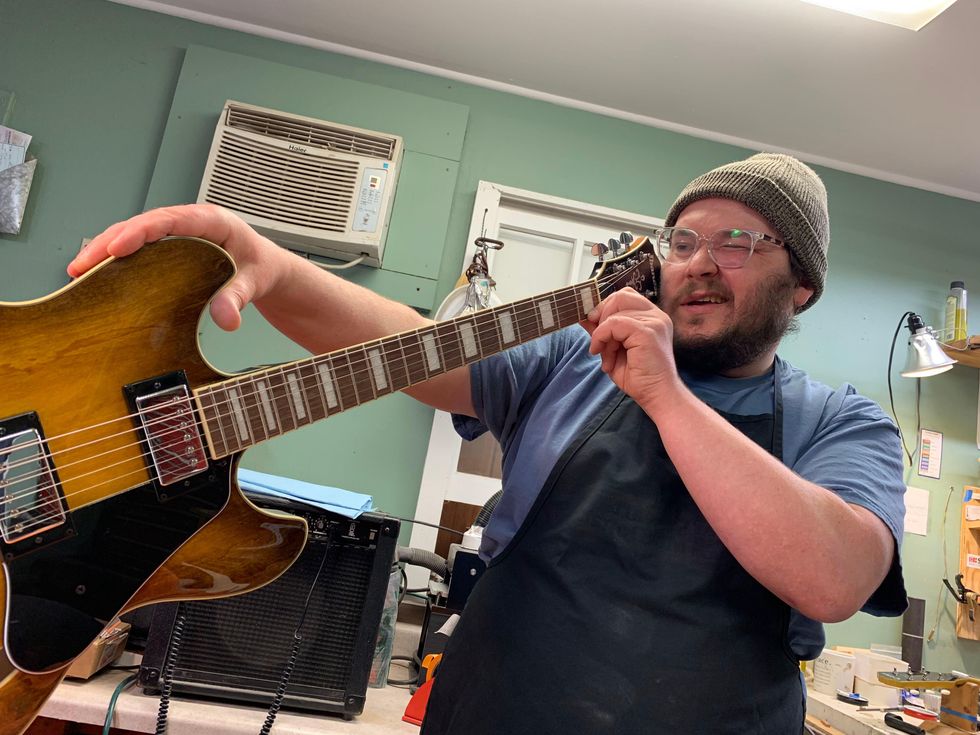
Photo 10
Neck relief refers to the slight amount of concave bowing intentionally created in the neck of a guitar or bass by adjusting the truss rod. For the safety of the guitar, be sure to slack the strings before doing any adjustments to the truss rod. Neither you nor your guitar needs to be tense during this process.
Before whipping out an Allen wrench for the truss rod, start by sight-checking the neck’s straightness. You can sight the neck with the guitar on its back, but I like to put it on edge and look at it that way. It’s easier to see how much curve there is when the guitar is on its side. I feel like gravity plays tricks on my eyes when I sight the neck with the guitar on its back. When I play the guitar, it’s on its side anyway, so looking at it from this vantage point is best.
Tune the guitar to pitch, put a capo on the first fret, and press fret 15 with your left hand.
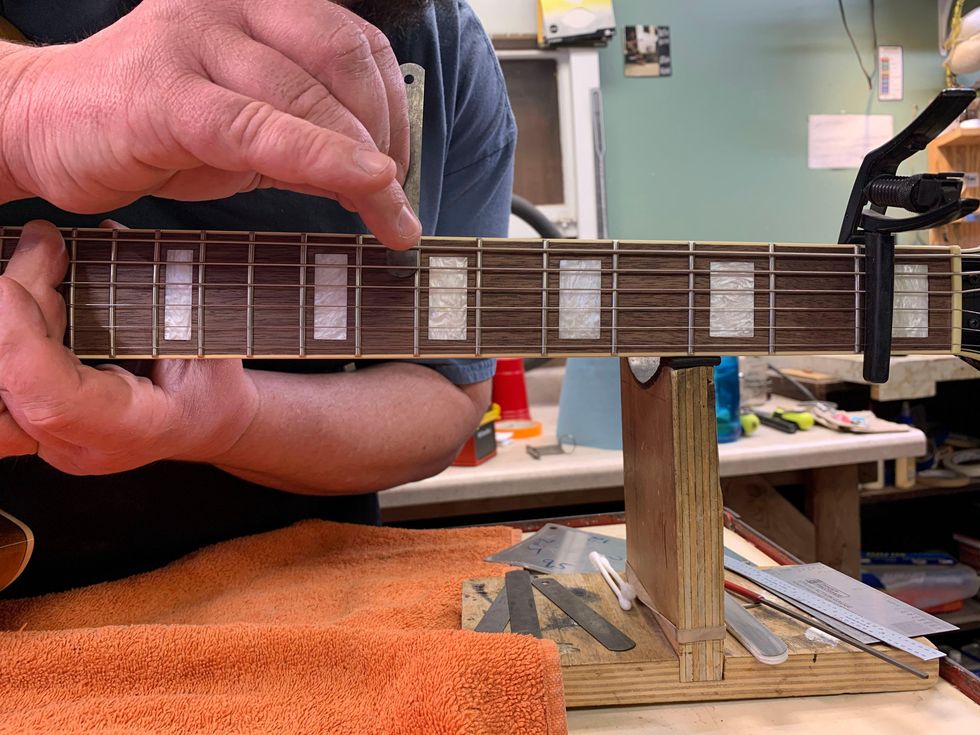
Photo 11
With your right hand, take a feeler gauge and check the gap at frets 7 through 9 (left-handed players, flip your hands around) [Photo 11].
From the top of the fret to the bottom of the string, the gap is usually anywhere from .003" to .012", depending on the feel you are going for. The feeler gauge should fit just between the top of the fret and the bottom of the string. The string shouldn’t move. This will tell you how much “relief” is in the neck. If you find this challenging, keep going—this will take some practice.
When dialing in the relief, I go back and forth between adjusting the truss rod and the string action. Getting the strings low and playing clean on a budget axe can be a challenge. Usually the fretwork isn’t that great, and in the upper register the frets can be unlevel, causing buzzes and clanks. If you need to raise the string action to get the notes to play clean, some fret leveling may be in order. (For more on fret leveling, go online to our article “About Fret Leveling,” from the December 2007 issue.) For good energy transfer, the neck should be as straight as possible. If the neck is straight and the frets are not level, the strings will buzz with low action.
In general, the flatter the radius on the fretboard, the straighter you can get the neck with the truss rod adjustment. On a fretboard with a 12" radius, you should be able to get .005" relief, and on a vintage 7.25" radius board you may need as much as .014" relief. The only way to get better at checking and setting relief is practice.
Refining the Nut
String buzzes, pinging noises when you tune, strings sticking in the slots, and too much string motion in the nut slots are all indicators of trouble. Before getting out the sandpaper and Micro-Mesh sticks, be sure you know if your guitar’s nut is TUSQ or bone. TUSQ is softer, so you should leave TUSQ nut slots a little higher. This leaves room for the TUSQ to wear without causing buzzing on the first fret. With bone, you can cut the slots lower, because it holds up to string wear.
How to Shape Your Guitar's Nut
Watch as Dave Helmer sands down the back half of a nut and creates a smooth finish.
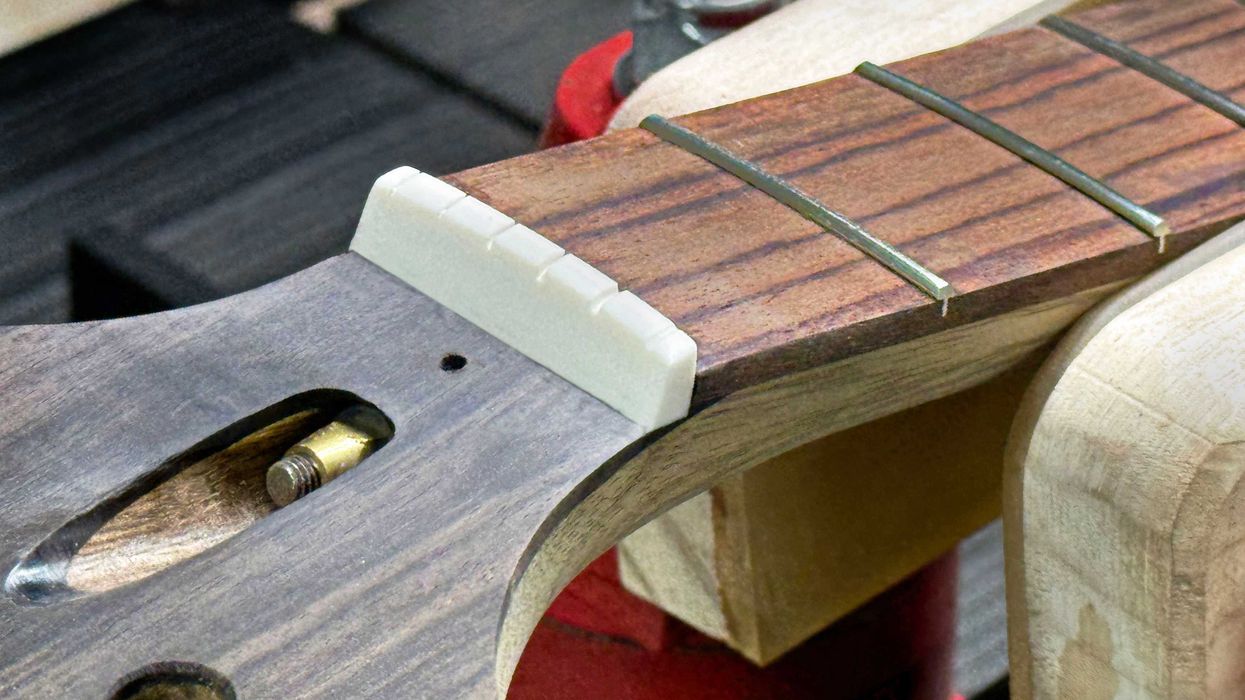
The back side of the nut is usually very bulky and could often stand to lose some material to be more comfortable on your hand. So, let’s start there. Tape off the neck and headstock around the nut using a few layers of tape to protect the headstock face and fretboard. Then, slack the strings and pull them to either side of the nut.
Sand a bevel into the backside—the side closest to the headstock—of the nut using P320 and P400 grit Stikit sandpaper on a flat sanding stick.
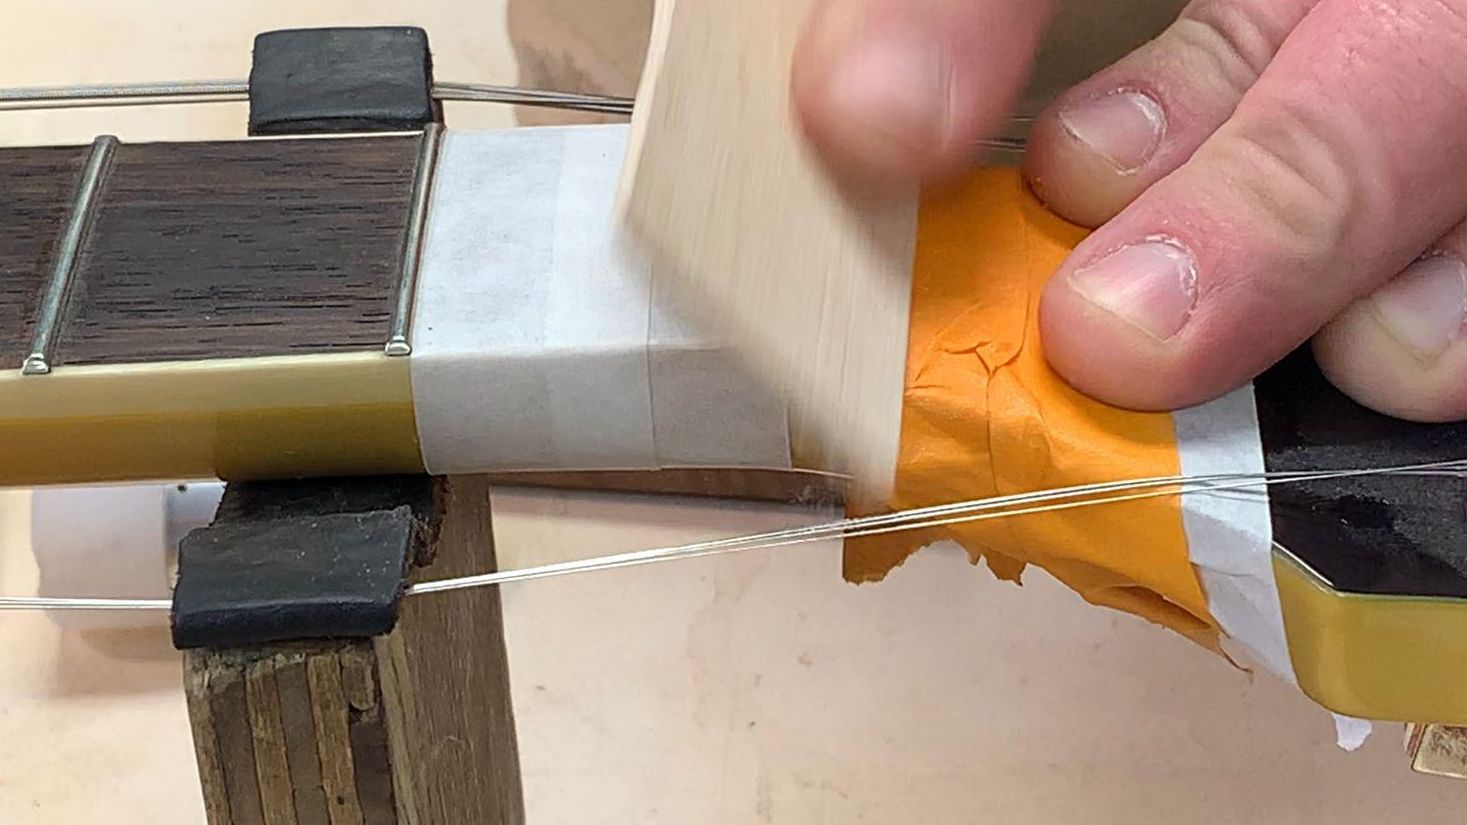
Photo 12
The bevel should start at the back of the nut and come forward about one-third to one-half the thickness of the nut [Photo 12]. Use P320 for most of the sanding and switch to P400 for the last 5 to 10 strokes.
Next, take a fresh Micro-Mesh stick and work through the various grits to buff/round over the bevel you’ve sanded into back of the nut, so it looks and feels good.
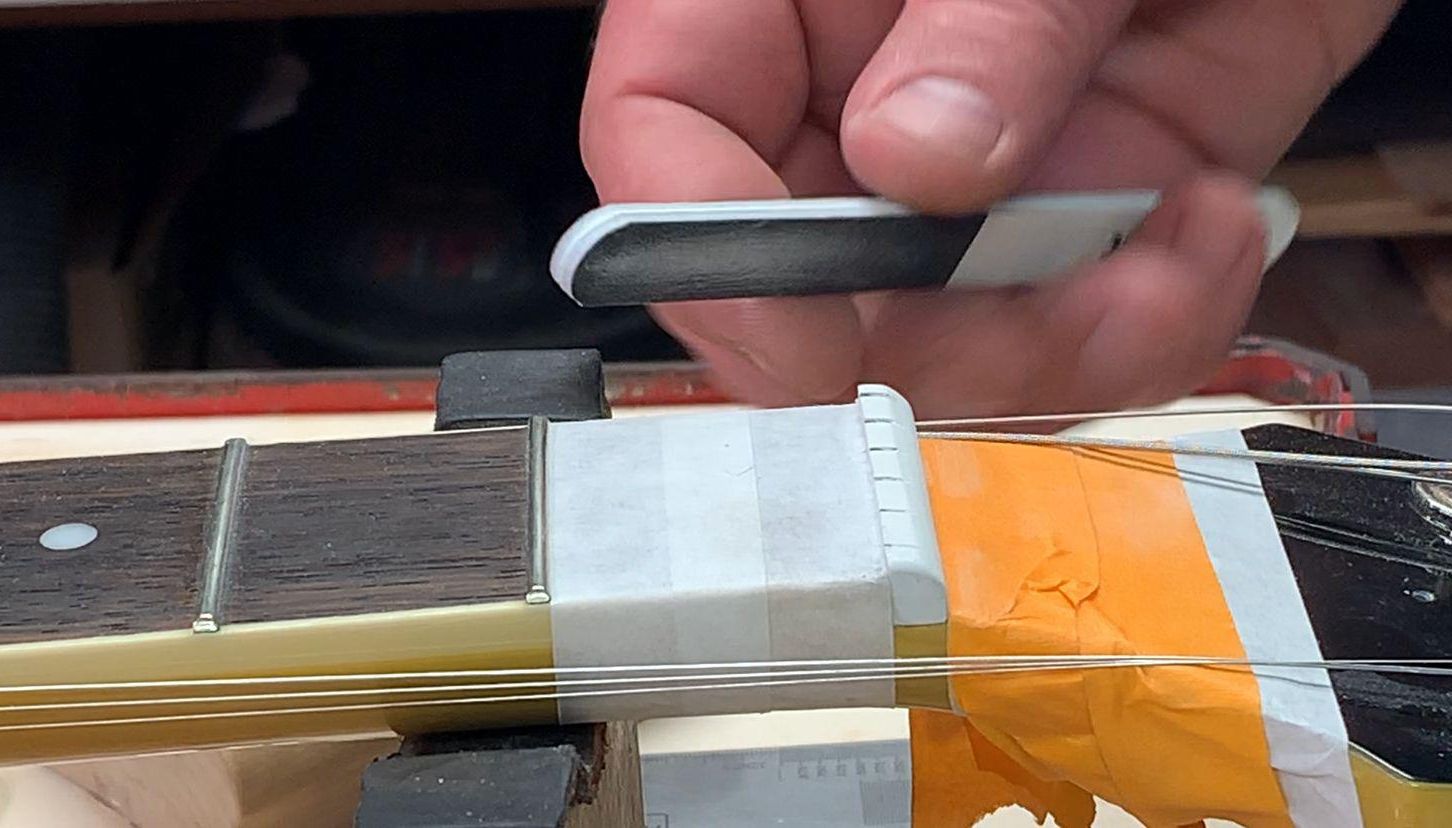
Photo 13
TUSQ nuts are often tall, and the strings sit deep in the slots.
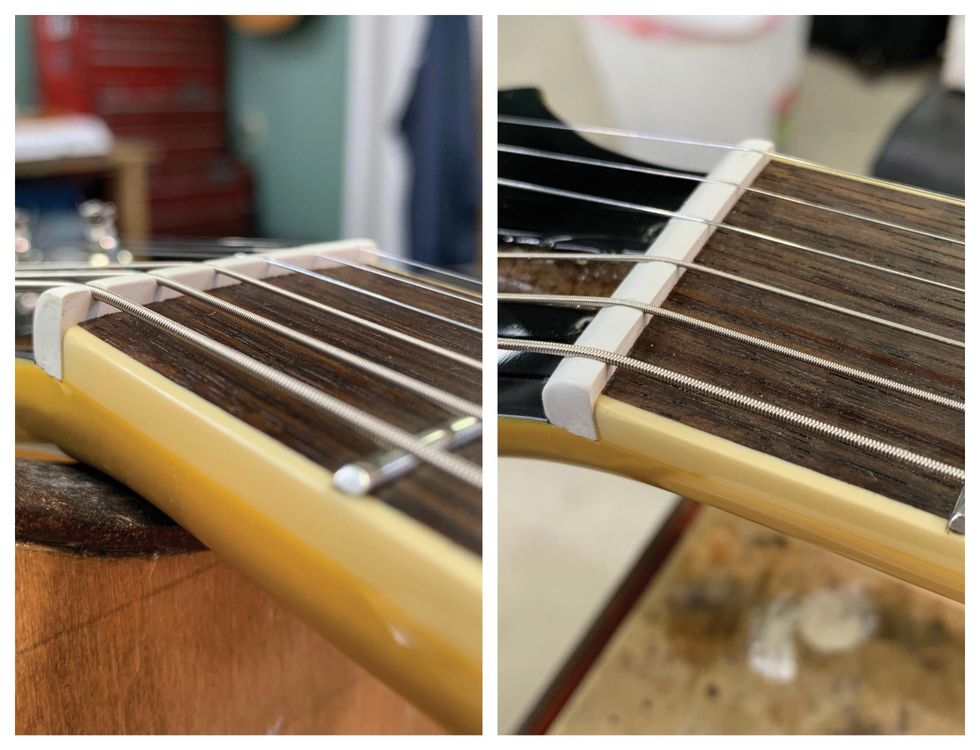
Photos 14 (left) & 15 (right)
Wound strings require 50 percent of the diameter of the string to sit in the nut slot, with the other 50 percent above the top of the nut surface. The plain strings should be flush with the top of the nut. Take a look at the wrong appearance [Photo 14] and the correct look [Photo 15] for properly seated strings.
How to Sand Your Guitar's Nut
Our luthier shows you how to use a radius block and sand down a nut.
Use a radius block that matches the radius of your fretboard.
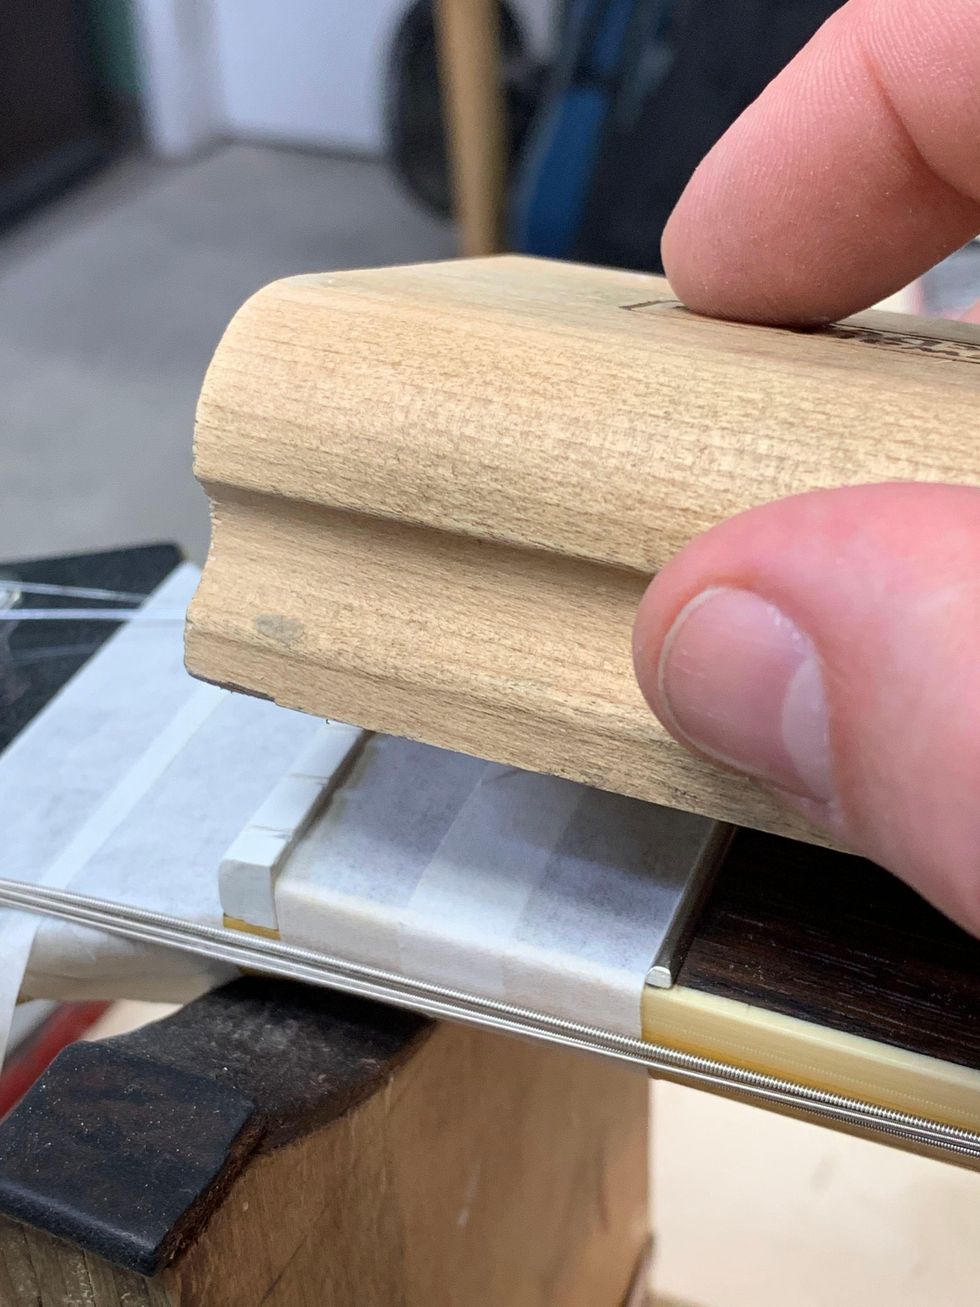
Photo 16
With P320 and P400 grit Stikit sandpapers, use mild pressure to sand down the top of the nut. Sand a bit and check your progress by setting the strings in the slots and putting a little tension on them. Tuning to pitch isn’t necessary. Use the P320 for most of the sanding, and switch to P400 when you are close to the 50/50 height for the wound strings. The radius block sanding will leave a flat, sharp edge on each side of the TUSQ nut [Photo 16]. To round over the sharp edge, use the sanding block and Micro-Mesh stick.
Use the coarse grit of a Micro-Mesh stick to round over and blend the bevel from the back into the top of the nut. Work through the grit gauges until it’s smooth. There is a fine balance between the bevel at the back of the nut and the top radius of the nut. Go back and forth between the two steps to get a nice, finished look and a nut that functions at optimal levels.
… And Refining the Nut Slots
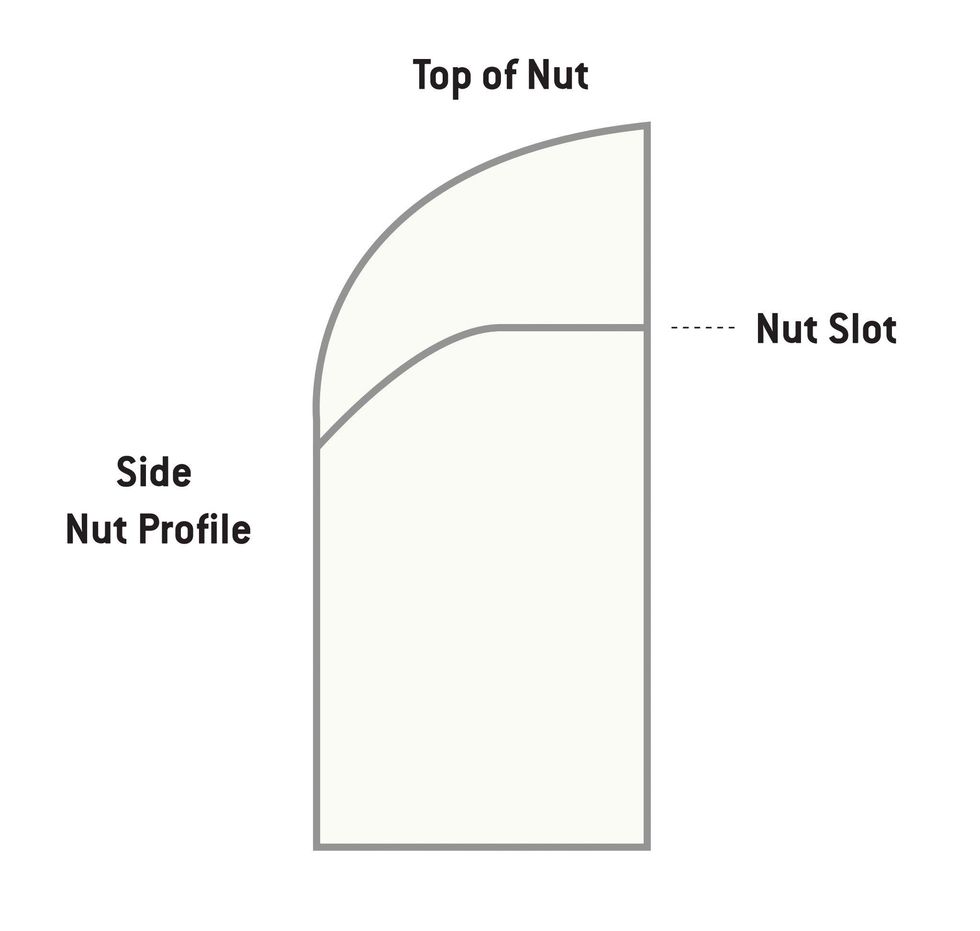
Photo 17
Nut height is the distance from the top of the first fret to the bottom of the string. A good height on the wound strings is about .020", and for the plain strings about .015". Measuring this gap with a feeler gauge can be tricky because of the fretboard radius. Many repair folks do this by eye and feel, based on experience. It takes some practice. A good check: At pitch, fret the third fret and check for a small gap between the string and the top of the first fret.
How to Widen Your Guitar's Nut Slots
A diamond file can make quick work of deepening and widening nut slots.
The bottom of the string should be sitting on the bottom of the front half of the nut slot [Photo 17]. File down each nut slot to its proper depth using the corresponding nut file. There are diamond nut files on the market in multiple sizes to accommodate many string gauges. Make sure to keep your strokes straight. The standard-toothed files have less sizes and usually require rolling them from side to side to get a well-fit string.
Next, using a proper-sized file, round over the bottom back half of the nut slots down, toward the face of the headstock and away from the strings. This will allow the strings to move freely during tuning or bending, while still having support from the front half of the slot.
How to File D and G String Slots on Guitar
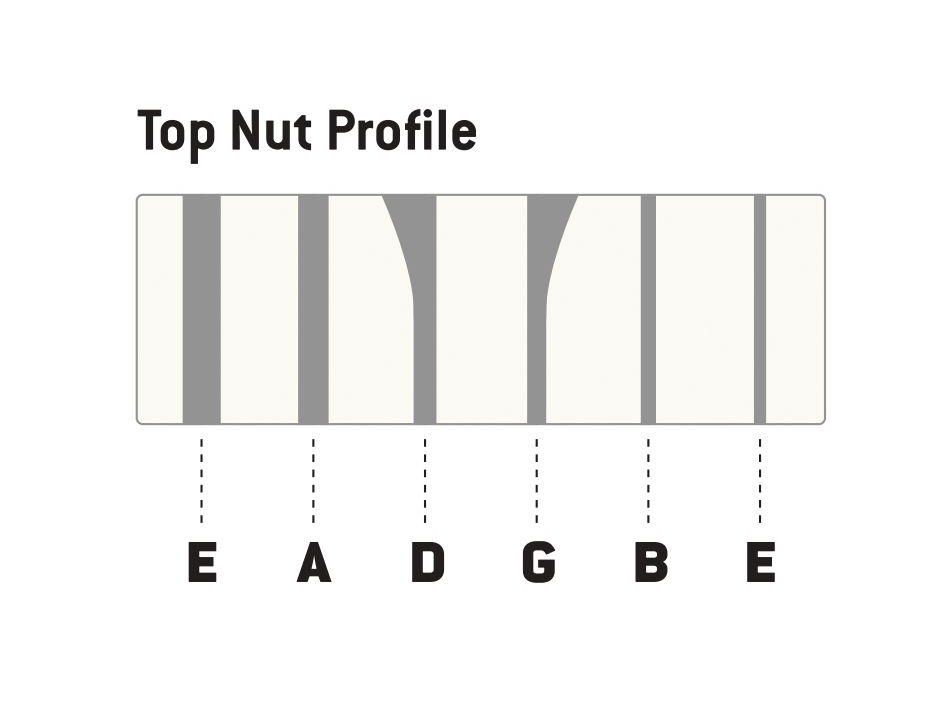
Photo 18
On guitars with 3x3 headstock configurations, the D and G strings need the back half of the slots feathered out away from the center, so the string has a direct path to the tuner post. Using a file that is one size bigger than the string and rolling it side to side on the back of the nut slot will give the string a straight path to the tuner post. Photo 18 is my illustration showing which slots need feathering.
Watch How to File D and G String Slots on Guitar
The D and G nut slots require special attention on 3x3-style headstock configurations.
Additionally, use pencil lead to lubricate the slots. Just get in there with the point of a pencil and mark the slot with its graphite. You might also put a drop of Tri-Flow on the front of the string tree. Tri-Flow will run down the string, so take a cotton swab or cloth to clean up any excess. Tri-Flow has Teflon in it, so you don’t need much.
Adjusting String Action
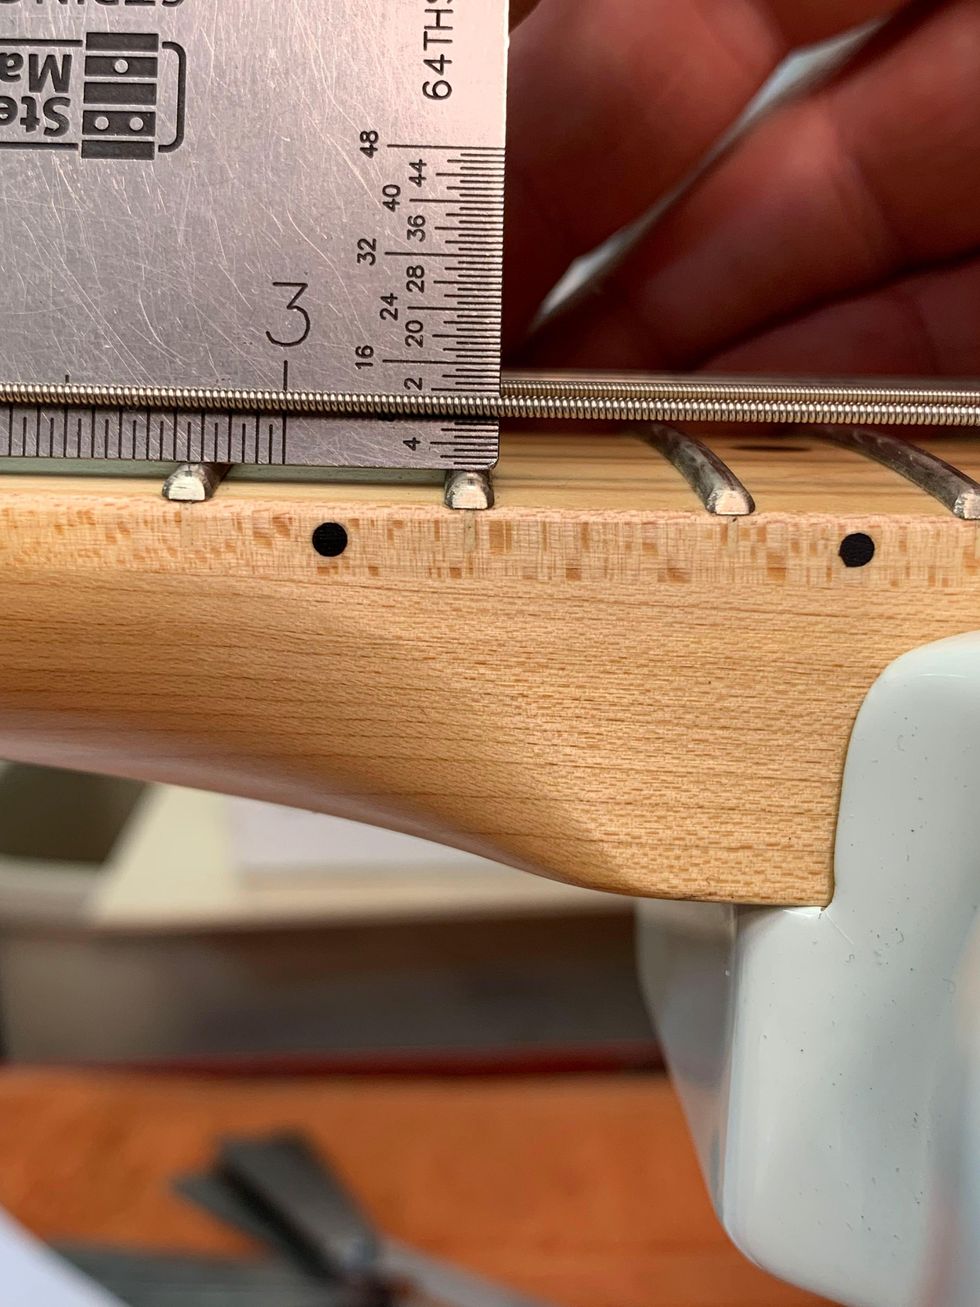
Photo 19
First, find your string height by measuring the string action at the 17th fret on a Fender-style guitar and at the 15th fret on a Gibson-style instrument.On electric guitars, action can range from 3/64" to 3/32", depending on the player’s comfort. My preferences are 1/16" on the treble side and 5/64"on the bass side on both Fender- and Gibson-style guitars measured at the appropriate fret.
How to Adjust Guitar Action
Here’s a look at how our author adjusts the action.
Always loosen the string tension before making action adjustments. This will save wear and tear on the small bridge components. Take either a 6" ruler or a string action gauge and set it on the frets. Measure from the top of the fret to the bottom of the string [Photo 19].
If the action is high, you will lower that string’s saddle or that side of the bridge. If it is low, you will raise it. Make sure the individual saddles are sitting square and upright to the face of the bridge. You do not want them sitting at an angle or leaning over. This will cause buzzing.
The bottom of the strings should match the radius of the fretboard when measured with an understring radius gauge.
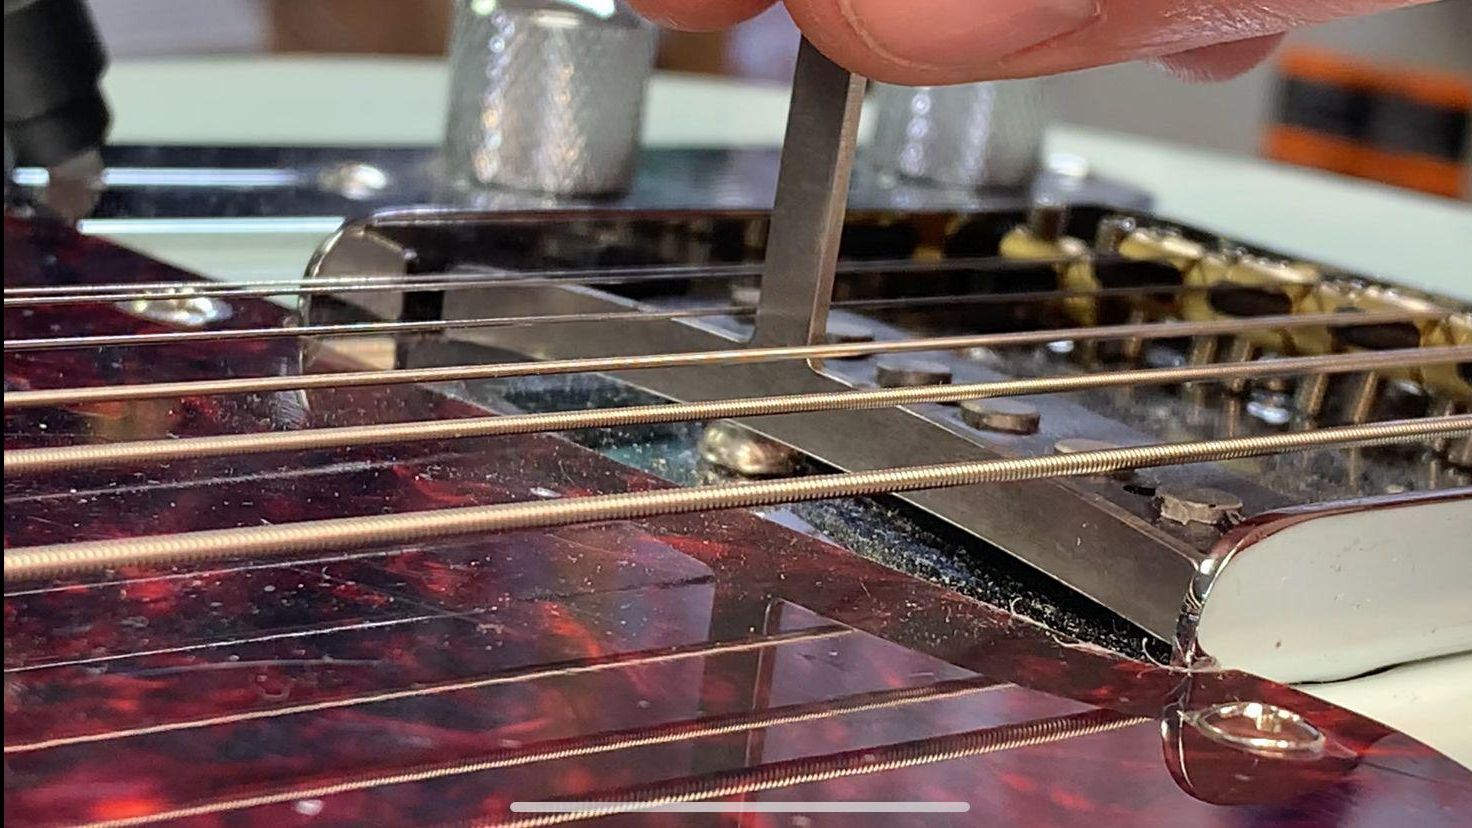
Photo 20
Start your adjustment with the outside strings, working toward the center. On Fender-style guitars, set the two outside strings to the height you want and have the middle four strings a bit higher than that. Bring the gauge up from underneath and just touch the two outside strings. Then, bring the strings down a little at a time until the radius matches.
On a Gibson-style Tune-o-matic, the saddles are not individually adjustable. So, if the radius doesn’t match, the saddles will need to be filed. To do this, I recommend using toothed nut files and a rolling side-to-side motion. Do a little work and check your progress. Remember to slack your strings when adjusting the saddle or bridge up or down.
Changing Pickup Height
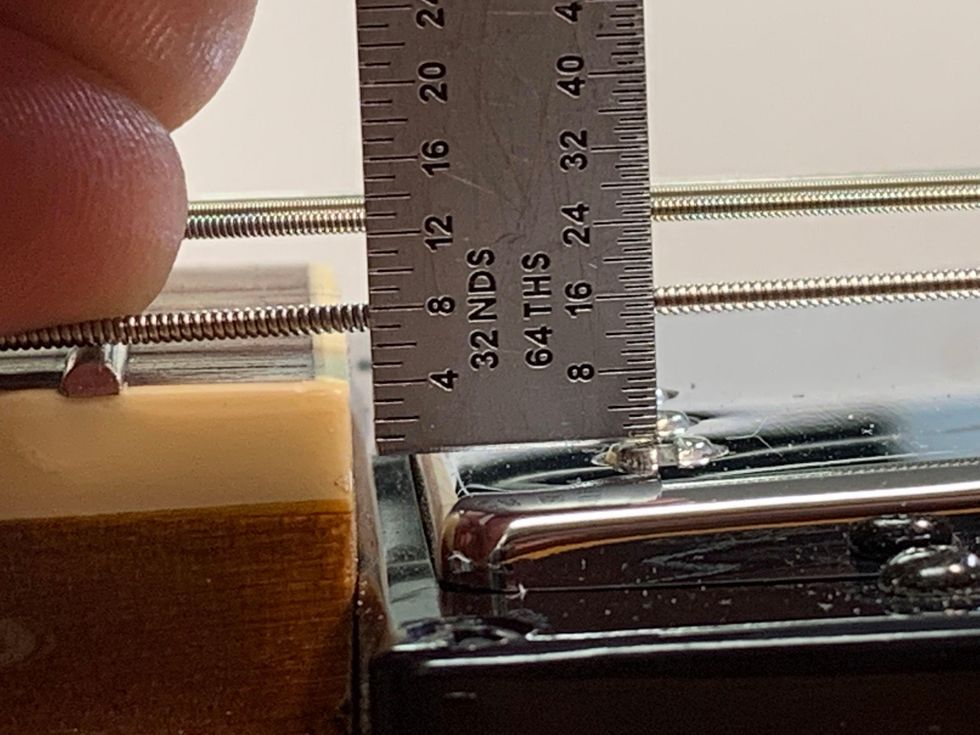
Photo 21
Finally, let’s take a look at pickup-height adjustment. First, to check pickup height, use the two outside strings again. Press the top wound string on the last fret and measure the distance from the top of the pole piece to the bottom of the string [Photo 21]. This distance can range from 3/64" to 1/8". My preferences are 1/16" on the treble side and 5/64" on the bass side.
Adjusting Guitar Pickup Height
Dave Helmer walks you through the process of adjusting the height of your guitar’s pickups.
On most styles of pickups, there are height adjustment screws on either side of the pickup to raise or lower it. The closer the pickup gets to the strings, the more present string frequencies become. If you get too close, the magnetic pull can affect the string’s vibration and you may hear some strange sounds as you go into the upper register.
On Strats, the neck pickup is regularly set too close, and at the 12th fret and above, the low E and A can sound choked, honky, and not clear. Lowering the neck pickup with a screwdriver usually solves this issue.
Setting Intonation
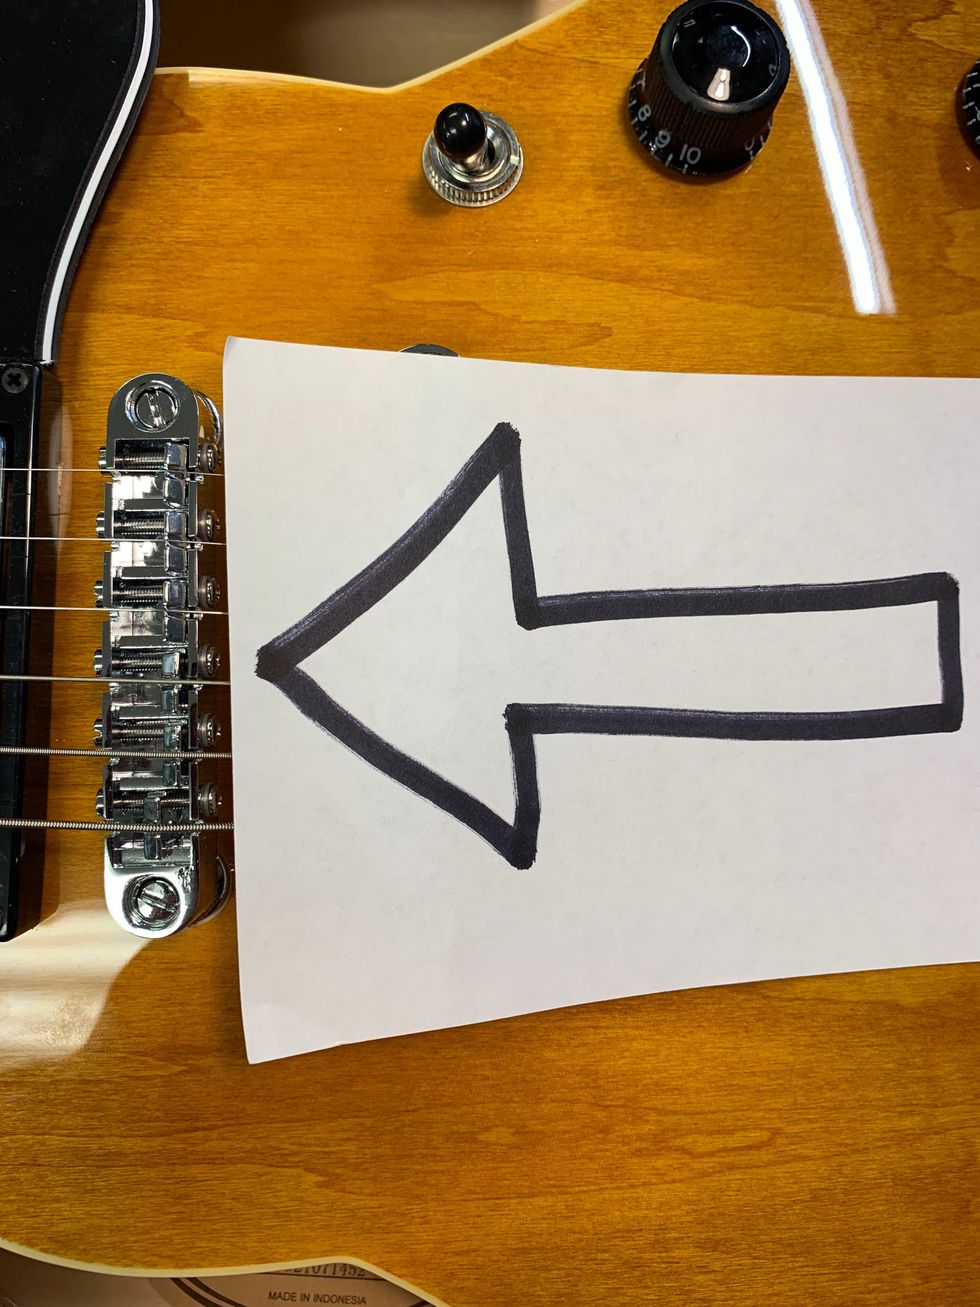
Photo 22
If you can’t get your guitar accurately in tune, you might need to check its intonation. Adjust all saddles as far back as possible so every string will play flat at the 12th fret. You will adjust the saddles forward, gradually making the octave play sharper until it’s in tune with the open string [Photo 22].
Adjust Your Guitar's Intonation
With a tuner and a screwdriver, Dave Helmer shows you how to adjust your guitar’s intonation.
Depending on your vibrato style, experiment with intonating the plain strings slightly flat. Use your ear and do what sounds good. Sometimes, the plain strings can have perfect intonation, but playing with vibrato can make them sound sharp.
To fine-tune intonation, the individual bridge saddles must be adjustable. Once the intonation is set, recheck the string radius using the understring radius gauge and adjust as needed. The radius can change as the saddles come forward during intonation.
Tri-Flow is great for lubricating saddle parts. Put a small drop on the saddle-height adjustment screws and capillary action will suck it in. Adjust the saddle up and down a few times to coat the threads. Clean up any excess with a cotton swab or cloth. Put a drop or two onto a cotton swab and apply the Tri-Flow to the top of each saddle where the string rests. This will help strings move freely during tuning and after any bends or vibrato.
And that’s it! For a relatively small investment in tools and time, you’re now ready to supercharge your new guitar—and maybe your long-treasured axes, too.
- DIY: How to Set Up a Fender Stratocaster - Premier Guitar ›
- 12-String Setup Secrets - Premier Guitar ›
- DIY: How to Set Up and Intonate an Acoustic Guitar - Premier Guitar ›
- Reader Guitar of the Month—Pickups and Finishes - Premier Guitar ›
- DIY Guitar: 7 Cool Reader Mods - Premier Guitar ›
The Brian May Gibson SJ-200 12-string in the hands of the artist himself.
Despite a recent health scare, guitarist Brian May cannot be stopped. With the Queen reissue project, he’s celebrating his legacy, and with his new SJ-200—a limited edition signature Gibson acoustic guitar—he looks to the future.
Long lasting instrumental relationships are something we love to root for. Neil Young and Old Black, Willie Nelson and Trigger—those are inseparable pairings of artist and instrument where, over the course of long careers, those guitars have been shaped, excessively in both cases, by the hands that play them. Eddie Van Halen went steps beyond with Frankenstein, assembling the guitar to his needs from the get-go. But few rock ’n’ roll relationships imbue the kind of warm-and-fuzzy feelings as the story of Brian May and his dad building Red Special, the very instrument that hung around his neck for his rise to superstardom and beyond.
Together, with a legion of Vox AC30s and a few effects, May and his homemade Red Special have created some of the richest, most glorious guitar sounds that have ever been documented. It is with that guitar in his hands that he’s crafted everything from his velveteen guitar orchestras to his frenetic riffs and luxuriant harmonies to his effortlessly lyrical leads, which matched the dramatic melodic motifs of Freddie Mercury in one of the most dynamic lead singer/guitarist pairings in rock music.
Although it has a smaller role in his body of work, overshadowed by such an accomplished, prolific electric guitar C.V., May’s acoustic playing is a major part of the story of his music. His bold opening strums of “Crazy Little Thing Called Love” are some of the most recognizable D-major chords in the classic-rock canon, and his supportive work on “Spread Your Wings” adds lush dimension between Freddie Mercury’s arpeggiated piano chords and his rich electric guitarmonies. The multi-tracked 12-string figure that opens “’39”—his “cosmic folk song”—is among his most recognizable.
It’s a surprise, then, that when I ask May about the acoustic guitars used while recording with Queen, the most notable is his Hallfredh acoustic, a “cheap as hell” guitar from a virtually unknown brand. “My little old acoustic, which I swapped with my dear friend at school,” he reminisces. “The strings were so low on it that everything buzzed like a sitar. I capitalized on that and put pins on it instead of the bridge saddles, and you can hear that stuff on ‘The Night Comes Down’ [from Queen]. I used it all the way through Queen’s recordings, like on ‘Jealousy’ [from Jazz] years later and lots of things.” He also recalls his Ovation 12-string and some others, but the Hallfredh remains in the foreground of his acoustic memories.
The cosmic inlays on the Brian May SJ-200 represent the rock legend’s work in the field of astrophysics, in which he holds a PhD.
In recent years, May has been performing the 1975 ballad and emotional Mercury vehicle “Love of My Life,” which appears on A Night at the Opera, as an acoustic tribute to the late singer. May and his acoustic 12-string sit center stage each night as he leads the crowd through a heartwarming rendition of the song, joined at its climax by a video of Mercury. For that powerful, commanding moment, he’s relied on “a number of guitars we won’t mention, but it just came to the point where I’m thinking, ‘This isn’t sounding as good as I would like it to.’”
At one concert, a Gibson representative who was around piped up and offered to make him a guitar to his specs specifically for this piece. “I was surprised that they would notice me in the first place,” May recalls, “because part of me never grew up.” A surprising take from a rock star of such stature, but he explains, “I’m still a kid who was reading the Gibson catalogs and not able to afford anything, seeing the SGs and the Les Pauls and dreaming of being able to own a Gibson guitar. I now have a couple of the SGs, which I absolutely love, but, of course, I made my own guitar and I now have my own guitar company, so I went a different way. But to me this was a joy that they would offer to make me a guitar, which I could take out onstage.”
After building one for the guitarist, Gibson created a limited edition run of 100 instruments of the new model, called the Brian May SJ-200 12-string. Featuring a AAA Sitka spruce top with a vintage sunburst finish, AAA rosewood back and sides, a 2-piece AAA maple neck with walnut stringer, and a rosewood fretboard, it’s a top-of-the-line acoustic. The most noticeable feature on the SJ-200 is probably the string arrangement, which is flipped—as is most commonly found on Rickenbacker 12-strings—with the lower string above the higher string in each course. May has made that modification on other 12s, because he likes to string the high string first when fingerpicking. “You get an incredibly pure sound that way,” he points out. “‘Love of My Life’ is a good example—if it’s strung the other way, it sounds very different.”
On its pickguard, all seven of the other planets in our solar system are etched. The shaded one, close at hand, is Mercury, a tribute to the Queen singer.
May’s aesthetic customizations draw from his astrophysics work and add a personal sparkle to the large-bodied acoustic. The pickguard features a custom design with the seven other planets in the system, which is to say, not Earth. Mercury sits close at hand, a tribute to the singer. The fretboard and headstock include 8-point star inlays—to give a “more cosmic feeling”—that are made from agoya shell, as are the bridge inlays.
“It became a discussion about art and science, which I love,” May says of the design process. “That’s probably the biggest thread in my life, this path trodden, some people would say, between art and science. But I would say that they’re the same thing. So, I just tread among art and science.”
May’s own Gibson has already appeared in concert during the “Love of My Life” segment of Queen’s show, and occasionally for “’39.” On social media, where May stays active, many fans caught a glimpse of the guitar when he posted a new song for Christmas Eve. “I just wanted to say Merry Christmas, and that’s the way it came out,” he says. “It was incredibly spontaneous. I wanted it to be a gift. I didn’t want it to be, in any way, a way of advertising or making money or anything. It was just a Merry Christmas gift to whoever wants to listen to me.”
“It became a discussion about art and science, which I love,”
While that was one of the first things created with the new Gibson, he has more plans. “I’ve been playing around with it. In fact, we’ve been dropping the D,” he says, hinting at some future plans with guitarist-vocalist Arielle. “I have quite a few songs with the bottom D dropped. I haven’t normally played them acoustic or 12-string, but I’m discovering that some of that sounds really good. It gets such a lovely big clang and a big depth to it.”
Recently, May spent a great deal of time looking back as the band prepped the Queen I box set. The remixed, remastered, and very expanded version of their 1973 debut, Queen—they’ve added the “I” here—which was released last October, encompasses a rebuild of the entire record, plus additional takes, backing tracks, a version recorded specifically for John Peel’s BBC Radio 1 show, and a 1974 live concert recording from London’s Rainbow Theatre.May says of his new Gibson: “To me, this was a joy that they would offer to make me a guitar."
Revisiting this early document over 50 years later, it’s amazing to hear how well-developed the guitarist’s sound already was—full of the propulsive riffs and harmonies that would become part of his signature. May concurs, “You go back into these tracks quite forensically, and I hear myself in the naked tracks and I think, ‘Wow, I didn’t realize that I could do that at that point.’ It must have happened very quickly.”
Reflecting on those formative times, he continues, “I think there’s a period of just exploding, knowing what it is in your head, and striving to make what you play match what’s in your head. But I see it in other people, too. Sometimes, I go back and listen to the first Zeppelin album, and they were pretty young when they made that. But I think, ‘My God, how did they get that far and so quick?’”
“I thought guitars do work as primary orchestral instruments, so that’s what I want to do.”
Before Queen, May had already recorded a two-part guitar solo on the song “Earth,” a late-’60s track recorded with his earlier band, Smile, which also featured future Queen drummer Roger Taylor. While that lead certainly points toward the ambition in May’s later work, its raw untamedness doesn’t quite show evidence of his ultimate precision. But he says he had it in mind from early on. “There weren’t any more tracks to do three parts” when they recorded with Smile, he says, “but I always dreamed of it. It goes back a long, long way to hearing harmonies in other ways from the Everly Brothers, from Buddy Holly and the Crickets, from all sorts of things that we were listening to when we were kids.
“I wanted to make the sound of an orchestra just using guitars, and there’s other little inspirations along the way,” he continues. “Jeff Beck was an inspiration because there’s that wonderful track, ‘Hi Ho Silver Lining,’ which Jeff hated. But there’s one bit where he double-tracks the solo and in just one point it breaks into a two-part harmony, probably by accident. I guess I should have asked him—damn well wish I had. But that sound echoed in my head, and I thought guitars do work as primary orchestral instruments, so that’s what I want to do. I could hear it in my head for a long time before I could make it actually happen.”
Brian May and his Red Special at a recent concert.
Photo by Steve Rose
Though the Queenrecording sessions gave the guitarist his first opportunity to explore the larger harmonized sections that would become part of his signature, many of the sounds on the record left the band dissatisfied. Recorded at Trident Studios in London, the young band could only afford to use the room during downtime. Over the course of four months, they had sessions, usually at night, with in-house producers John Anthony and Roy Thomas Baker, both early supporters. However, the Trident style and sound wasn’t what Queen had in their collective ears, and they’ve remained unhappy with the sonic quality of their debut all these years.
The drums were the band’s primary issue, which Taylor describes as having a “very dry, quite fat, dead sound.” May’s tone is recognizably his own. “Well, I’m a very pushy person,” he laughs. “But nevertheless, it was difficult for me, too. Because of this Trident style of recording, the intention was not to have room sound on it. I kind of pushed, I suppose, to have a mic on the back of the amp as well as the front. That gave me a bit more air. I did feel a little hampered and the change is more subtle on the guitar, but it’s there.
“Jeff Beck was an inspiration because there’s that wonderful track, ‘Hi Ho Silver Lining,’ which Jeff hated. But there’s one bit where he double tracks the solo and in just one point it breaks into a two-part harmony, probably by accident.”
“It’s funny because it changed radically as time went on,” he continues. “And I can remember by the time we got to Sheer Heart Attack, Roy is putting mics all over the room and miking up windows in the booth and whatever to get maximum room sounds. It’s certainly nice to go back and make everything sound the way we pretty much would’ve liked it to sound at the time.”
With Queen I out, a new Queen IIset is in the works, which May calls “a very different kettle of fish.” The drum sounds on their sophomore effort were more in line with the band’s original vision, but the dense layers of overdubs that famously appear on the record came at a cost. “I think it is the biggest step musically and recording-wise that we ever made,” says May. “But there’s a lot of congestion in there. There’s mud because of all this generation-loss stuff [caused by overdubs], and because we liked to saturate the tape, which seemed like a good idea at the time. It made it sound loud. But if you disentangle that and get the bigness in other ways, I think Queen II is going to sound massive.”
The AAA rosewood back and sides of May’s signature acoustic are stunning.
At 77 years old, May certainly seems to keep his schedule packed with music work—not to mention his animal advocacy and scientific endeavors. In May of last year, though, everything came to a halt when the guitarist suffered a stroke. “I couldn’t get a fork from the table to my mouth without it all going all over the place,” he recalls. “It was scary.” Luckily, things began turning around quickly. “After only a few days, it’s amazing what you can get back. By sheer willpower, you just start retraining your muscle.” Not quite a year on when we speak, May estimates he’s regained 95 percent of his abilities, which, he says, “is enough.
“The short answer is, ‘I’m good,’” he assures.
May is in great spirits and appears excited about all his recent projects, finished and in-progress alike. In this time of looking back on his earliest works, I ask him to think about his beginnings, when he would gaze at Gibson catalogs but had to build his own guitar out of necessity, because, as he points out, he “couldn’t afford anything else.”
So, what would young Brian May, stepping into an afterhours session at Trident, making his band’s debut, think about his new limited edition signature model Gibson acoustic? He takes a long pause. “It would have been …” he pauses again, “unthinkable.”
YouTube It
Three new powerful and versatile solid-state heads from the British amp maker provide crunch, headroom, and classic tones in a small package with a same-sized price.
Epic sounds in a small, light, versatile package. Simple control set. Effects loop and footswitchable volume (with independent control) and channels. Dirty channel sparkles and spanks.
Clean channel lacks mid control
$599
Orange Gain Baby 100
orangeamps.com
Playing through a 100-watt head is immensely satisfying, regardless of your style. If you want dirty, and there’s a gain control, you’ve got dirty. If you want clean, the headroom hits the sky. Whether you’re purveying rock ’n’ roll filth, snarling blues, old-school roots, or avant-skronk, it’s all there—especially if you use pedals for low-gain drive and color.
In the case of Orange’s new Baby series entries, these possibilities exist in triplicate: the compact, highly controllable Gain Baby 100, Tour Baby 100, and Dual Baby 100 amps. These grab-and-go solid-state units with strong metal chassis are a mere 6 1/2 pounds, come with a durable shoulder bag for transport, and can be dropped atop a cabinet or into a rack. (These amps measure 12.8" x 3.13" x 7.68".) Each model has two radically different channels, guaranteeing versatility, plus a class A/B power stage for clarity and heavy lifting. They all offer the fat, midrange growl and the fast touch-sensitivity I associate with the classic, Orange sounds of players ranging from Peter Green to Slipknot’s Jim Root, which is perhaps a result of their single-ended JFET preamp stage.
I tested these Babies with a vintage Les Paul, a PRS Silver Sky SE, and a Zuzu custom with coil-splitting, to get a wide variety of tones. I also switched between a 1x12 cabinet with a G 12M Greenback and another with a 50-watt Eminence Red Coat Private Jack. Both cabs were 8 ohms, but the amps can also run 70 watts into 16 ohms. While the Celestion drilled down on nasty, Hendrix- and early ’70s-era voicings, the 50-watter really let the amps breathe in lush harmonic detail.
Each of the triplets has a footswitch option for channel and volume switching, an effects loop, and a balanced XLR out, and can be easily used with a DAW, cab sims, and IR captures. These units can also be switched for 100, 110, and 220 volts AC. Short take: I found a lot to like about these sonic siblings.
Gain Baby 100
While I’m not typically a high-gain player, I took to the Gain Baby 100 immediately, enjoying the edgy tone, responsiveness, sustain, and articulation in its dirty channel. Dirty offers gain, volume, presence, and 3-band EQ, plus the footswitchable volume has its own level control, and it delivers a stinging rock voice where chords hang and bloom. This channel’s real “dirty” secret is a toggle that can be flipped to “tight” mode, which functions like an additional EQ stage that polishes lows and focuses the mids, making them really singing and dimensional.
I initially viewed the clean channel on the Gain Baby and Tour Baby as pedal platforms, with just a volume control and bass and treble, but the clean side’s built-in, single-knob compressor pushes the Gain Baby’s volume and low-end character to the fore, conjuring memories of that ’70s uber-beast, the Sunn Beta Lead (and the Melvins’ King Buzzo). Ultimately, the Gain Baby 100 delivers very distinct and appealing bookends of heavy for just under 600 bucks.
Key: Dirty channel rhythm > dirty channel rhythm with tight switch engaged > dirty channel lead > dirty channel with tight switch lead > clean channel rhythm > clean channel lead
Tour Baby 100
The road-oriented Tour Baby seems the most versatile of the trio. The dirty channel has the same control panel as the dirty side of the Gain Baby, minus the tight switch. And while overall the amp seems to have a bit less gain, it’s still easy to get into Wayne Kramer territory by cranking up the gain control when you want to kick out the jams. Sweet, sustained tones were a snap to achieve by dialing back the guitar’s tone pots, riding the amp’s mid control high, setting treble to about 7 or 8, and dialing in the bass at 3.5 to 4. And, again, like the Gain Baby, the 3-band EQ offers plenty of range. If even more crunch is desired, the presence knob helps dial it in.
The Tour Baby’s clean channel also mimics the Gain Baby’s clean setup, but the compressor doesn’t lean into the low end like it does on the Gain Baby. It does, however, sculpt and define tones in a very appealing way, warming and pushing midrange. While I preferred the dirty channel here, my colleague Tom Butwin fell for the clean side, and his excellent demo video online is well worth watching. For me, this amp’s strength is that it stands on its legs and growls from the dirty side, and provides a characterful pedal platform on the clean side. All three amps, by the way, sound terrific with a reverb pedal, though less so at higher-gain settings.
Dual Baby
For players devoted to traditional British voicings, the Dual Baby may be the most enticing option, providing at least two recognizably classic sounds in one small, efficient package. Channel A is based on the company’s Rockerverb series, minus the reverb, and both A and B channels on the Dual Baby have 3-band EQ. The B side has the same setup and tonal characteristics as the dirty channel of the Tour Baby, sans the footswitchable volume, so you can’t pump up the level for solos with a quick stomp. However, it does have a “tight” toggle, so it’s easy to get into the same spanking, airy terrain as the Gain Baby’s dirty side or play it relatively clean.
But the A channel has another asset: a “tubby” switch, which is new for Orange. With gain pushing toward 7 and presence at about midway, and the treble rolled back, the tubby setting’s low-end boost evokes Black Sabbath—dark and ominous and perfect for sustained power chords. If your tastes run toward nasty, there’s a lot to like with the Dual Baby.
Key:
Channel A rhythm > channel A lead > channel A rhythm tubby > channel A lead tubby >
Channel B rhythm > channel B lead > channel B rhythm tight > channel B lead tight
The Verdict
Orange’s three versatile Babies cover a lot of ground in small, very affordable, well-built packages. Their response and rich-hued sounds–available even at low volumes–never left me pining for tubes, and their 100-watts make them useful for any stage. For travel, studio, or at-home playing, they are well worth investigating. These Babies can unquestionably run with the big boys. PG
The fast-rising, indie-rock outfit shows how they bring their varied four-piece string section to life on tour.
Last year’s Manning Fireworks was a breakout moment for Asheville, North Carolina’s MJ Lenderman, which is both the name of the band and the actual name of singer and guitarist Jake Lenderman, who also plays in the band Wednesday. The record topped plenty of year-end lists and drew favorable comparisons to the likes of Neil Young, Dinosaur Jr., and other stars of the pre- and post-’90s indie-rock boom.
On tour behind the record, the band stopped in at Birmingham, Alabama, joint Saturn on February 1. PG’s Chris Kies met up with Lenderman, guitarist Jon Samuels, pedal-steel player Xandy Chelmis, and bassist Landon George before the show to get the dirt on their dirt.
Brought to you by D’Addario.The SG
Lenderman’s main guitar these days is this 1979 Gibson The “SG,” which he bought in Birmingham while opening for Plains. It’s tuned to D standard, with Ernie Ball Beefy Slinky strings.
Do the Mascis Mash
It’s no surprise that Lenderman digs the Squier J Mascis Signature Jazzmaster. He’s a big Dinosaur Jr. fan and got to sit in with them in Los Angeles to play “In A Jar” in December 2024. From top to bottom, this one is tuned C–G–D–G–G–E for “You’re Every Girl to Me.”
Tele Time
This Fender American Vintage II 1977 Telecaster Deluxe comes out for cleaner needs in the set.
Original Jazz
This is Lenderman’s iconic 2008 Jazzmaster, which he bought back in Asheville.
Hi-Steppin'
Lenderman borrowed a Hiwatt to use at some hometown shows in Asheville and fell in love, so he brings this Custom 50 out on the road now. He’s working his way to a full J Mascis setup, “one cab at a time.”
MJ Lenderman's Board
Lenderman’s clean, easy board has a D’Addario tuner, Death By Audio Interstellar Overdriver Deluxe, a Dunlop wah which he uses as a subtle filter, and TC Electronic Flashback 2.
Loan from Lenderman
Lenderman recorded plenty with this Fender Player Telecaster, but now Samuels puts it to work
Hartzman's Hot Rod
Another loaner, this Hot Rod DeVille combo is on long-term borrow from Wednesday’s Carly Hartzman.
Jon Samuel's Board
Samuels’ board, which is a hybrid of his own pedals and even more borrowed units, carries a Hardwire HT-6 polyphonic tuner, Death By Audio Fuzz War, JHS Double Barrel, Dunlop wah, J. Rockett Archer Clean Boost, Joyo Tremolo, EHX Nano Small Stone, and TC Electronic Flashback 2.
Xandy's ZB
Chelmis, also a member of Wednesday, plays this 10-string ZB Custom, made in the early ’70s with a proprietary pickup. It stays in E9 tuning, and Chelmis makes it sing with a steel he bought from a pawn shop. It runs through a Fender Twin Reverb outfitted with a single 15", and a Goodrich H-120 volume pedal handles swelling duties. From time to time, Chelmis adds in a Guyatone SD2 sustainer for some fuzzy fun.
Precision Vision
George’s go-to is this 2006 Fender Mike Dirnt Precision Bass, strung with Ernie Ball medium-gauge flatwound strings.
Better Beta
George runs through a Sunn Beta Bass head into an Ampeg SVT810E cabinet.
Landon George's Board
On his board, George packs a Korg Pitchblack tuner, Origin Effects Cali76 Compact Bass, Boss DD-7, Darkglass Electronics Alpha Omega, and a Noble Amplifier Company utility box: It’s a tube preamp, DI box, and power supply, all in one.
The solo artist and leader of Asking Alexandria and We Are Harlot finds inspiration in an innovative new guitar that he calls “absolutely game changing.”
“I’m a big fan of old things,” says Danny Worsnop. “From cameras to guitars to microphones to cars, I like the stories they tell and the lives they’ve lived. I think old stuff has more soul.”
Best known as the lead vocalist of rock bands Asking Alexandria and We Are Harlot, British-born Worsnop has also released two solo albums that explore country and blues. He’s currently in the studio working on his third solo release.
With his love of vintage aesthetics and appreciation for instruments that age with character, he’s spent much of his life searching for a guitar that feels like home. “I’m always on the quest to find the perfect thing,” he says.
For years, Taylor’s GS Mini-e Koa Plus has been his go-to songwriting companion. “I don’t need a bunch of things to do the job,” he explains. “This guitar was the first one that did that, and it’s been with me for years. The finish is beat up. It’s got shiny spots from the sweat on my arm. This has been my daily driver and workhorse and life partner since I got it. It’s more than a guitar. It has a life and a personality and a sound. You pick up any other GS Mini-e Koa Plus in the world, it doesn't sound like this one.”
With his love of older things, Worsnop acknowledges the challenges of making a deep connection with an out-of-the-box acoustic. “All the nice, shiny new guitars that anyone has sent me over the years are great—I have fun with them,” he says. “But I've never loved them. I find it hard to love new stuff because it kind of doesn't have a life or personality yet.”
Worsnop’s done his best to infuse them with some of his own personality by tweaking them in different ways–chasing a specific feel and sound that makes a guitar feel more like an extension of himself rather than just another utilitarian tool. But his most recent acoustic arrival was different.
“It’s more than a guitar. It has a life and a personality and a sound.”
Striking Gold
Worsnop recently got his hands on Taylor Guitars’ new Gold Label 814e, designed by Andy Powers, the creative visionary behind many of Taylor’s guitar innovations since 2011. For Taylor’s new Gold Label Collection, Powers drew inspiration from the sound of flattop acoustics from the 1930s and 1940s.
Worsnop was immediately drawn to the Gold Label 814e’s vintage-inspired visual aesthetic—influenced by old banjos and mandolins, early Taylor designs, and Powers’ pre-Taylor archtop guitars. But the true revelation came when he played it.
“When I saw this guitar... I mean, it looks super cool, like an older guitar,” he says. “And the second I picked it up, it was different. It was like, this plays like a guitar that is so old and has stories and songs in it already. I fell in love with it.”
Worsnop says that with other Taylors he has owned, including his GS Mini-e Koa Plus, he would often modify them in some way to give them a more vintage sensibility. But not with the Gold Label.
One of the defining features of the Gold Label 814e is its new Super Auditorium body shape. The non-cutaway body bears a clear family resemblance to Taylor’s popular Grand Auditorium, but the Super Auditorium is slightly longer and wider at the lower bout, with a slightly shallower depth. The new body dimensions, combined with Andy’s version of a long-tenon neck and his new fanned V-Class bracing pattern, are all key ingredients in a new sonic recipe that defines the sound of Taylor’s Gold Label collection. The result is a warm, old-heritage voice that’s unlike anything Taylor has ever produced.
Worsnop says the guitar complements him musically because it supports his dynamic vocals with extraordinary volume and responsiveness to a lighter touch.
“Because I sing loud, having something that’s loud enough, but not so loud that when I do drop down you can’t hear me anymore, is important for me,” he explains.
The Gold Label 814e comes with back and sides of solid Honduran rosewood or solid Hawaiian koa (Worsnop has the Honduran rosewood model) paired with a torrefied Sitka spruce soundboard. Each model is available with a natural or sunburst top.
The Revolutionary Action Control Neck™
One of the standout features of the Gold Label 814e is Taylor’s patented new Action Control Neck™, an innovative neck joint design that allows for quick, easy, and precise neck angle adjustments. It marks another step forward from the patented, micro-adjustable design Bob Taylor introduced back in 1999. Unlike traditional neck resets, this system, like Bob’s, is also glue-less, and in this case enables effortless fine-tuning on the fly without having to remove the neck or even the strings, and without the use of shims. By simply using a 1/4" nut driver (or standard truss rod wrench) on a nut in the neck block (accessible through the soundhole), a player can raise or lower the action to dial in an ideal setup.
“It is a massive deal,” says Worsnop. “When it comes to traveling musicians, it’s absolutely game changing. This allows you to do a micro-adjustment without having to get in the car and drive. When I’m in the studio, I like having that precision to be able to make it just perfect.”
For professional musicians, service techs, and recreational players who want to quickly fine-tune their action, the innovative neck design marks a paradigm shift.
In Studio and Onstage
In his Tennessee home, Worsnop has an upstairs studio where he records most of his music. It’s where he’s tested countless guitars, searching for the right fit. Though his trusty songwriting guitar has been the aforementioned GS Mini-e Koa Plus—perfect for capturing spontaneous new ideas—when it comes to recording, the Gold Label 814e has taken center stage.
“I’m working on the new album right now,” he shares. “If I’m at home and I’m just wandering around downstairs, which is usually where and how writing happens, [the GS Mini] is the guitar I’m walking around with. And then as soon as there’s an idea, I’ll go upstairs, and it’s the Gold Label. Honestly, I don’t play anything else up there now. I put the album recording on hold for this guitar. It’s the only guitar on the album.”
And it won’t just live in the studio. Worsnop plans to bring the Gold Label 814e on tour, making it his primary acoustic guitar for live performances.
Performance Highlight: "Ain't No Use"
In a recently recorded performance of his song “Ain’t No Use”, Worsnop showcases why the Gold Label 814e is such a great fit for him. The song, rich with storytelling and emotional depth, aligns well with the guitar’s vintage aesthetic and warm tonal character. It explores the universal tension between who we are and who we want to be, while emphasizing the transformative power of acceptance despite imperfections. The guitar’s deep, open sound and full-bodied, muscular tone are a perfect complement to Worsnop’s soaring, soulful vocals, amplifying the expressiveness of his performance and highlighting a symbiosis between player and instrument. A video of the performance is featured at the top of this article.
For Worsnop, the Gold Label 814e represents the culmination of years of searching, experimenting and refining his sound. It’s an instrument that feels like it has lived a life, carrying with it the soul and character he always craved in an acoustic.
“I have played music since I was 6 years old, and I’ve spent my entire life looking for my instrument,” he reflects. “At 34, I’ve found it.”